A considerable number of owners of personal plots, having gained experience in cultivating plants, are beginning to think about creating a business for growing and selling vegetables, berries and flowers. Obviously, the possibilities of your own garden are clearly not enough for this - its area is small, and cultivation in the open ground is inextricably linked with many risks that affect the harvested crops, and therefore the stability of earnings. Therefore, to grow cucumbers, tomatoes, strawberries, flowers and other plants, it is advisable to build your own industrial greenhouses.
Industrial greenhouse, inside view
Are you one of these summer residents who has a dream of owning their own agricultural business? Then this material will help you find out how industrial greenhouses work and how they differ from their “smaller brothers.”
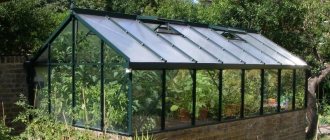
Industrial greenhouses made of polycarbonate
Option 3 heating with gas
The main advantage of gas is that it is more stable in terms of supply, but the final cost of products from the greenhouse can surprise.
Therefore, if heating a greenhouse with gas in winter lasts only a few weeks, then it is not necessary to pull it from a residential building and purchase expensive pipes for this. It will be enough to take a couple of cylinders for this purpose - they will last for a long time. It is only important to remember that excess carbon dioxide can negatively affect the condition of plants, and therefore such a greenhouse must be well ventilated. And to remove combustion waste, it is necessary to use an exhaust device to ensure a constant flow of oxygen into the greenhouse. And so that the lack of oxygen does not lead to the cessation of the combustion process and the release of gas into the air, it is advisable to use heating devices with an automatic protective device - the sensors will immediately operate as soon as the gas supply to the burner stops
And so that the lack of oxygen does not lead to the cessation of the combustion process and the release of gas into the air, it is advisable to use heating devices with an automatic protective device - the sensors will immediately operate as soon as the gas supply to the burner stops.
Small drip irrigation systems for amateur gardeners and gardeners
Tired of greenhouses, beds and greenhouses, gardeners and gardeners are studying drip irrigation:
- create drip irrigation systems with your own hands (for example, instead of droppers for irrigation, medical droppers are used);
- buy boxed versions for greenhouses and greenhouses.
Small systems use
when it is necessary to organize drip irrigation of specific crops in the structure of greenhouses / greenhouses, which changes annually. These are usually manual, gravity-fed annual systems. They are made from low quality materials and are designed for 1 – 2 seasons. They can be purchased inexpensively and installed quickly.
For capital greenhouses of more than 30 m2 or for the industrial production of vegetables (greenhouse complexes from 500 m2), it is irrational to use boxed solutions, and more often it is simply impossible.
For beginning farmers and greenhouses
It is worth paying close attention to the design of long-term professional irrigation systems in order to quickly achieve profitability due to high yields.
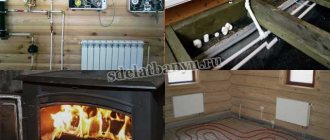
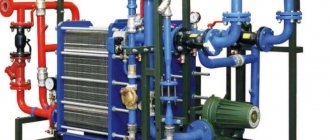
Heating a greenhouse with water heating
When growing a large volume of commercial products, when there is economic benefit, it is advisable to use water heating in the greenhouse.
Water heating in the greenhouse allows the structure to be used all year round, supplemented with sodium lamps to compensate for the short duration of daylight hours.
The hot water boiler is selected based on the area of the greenhouse and the volume of air in the room, and then installed in the vestibule so that flue gases do not enter the greenhouse. Heating pipes are located longitudinally, along walls, under shelving, under the roof, etc.
Heating pipes can pass under a layer of nutrient soil, for example, in pit-type greenhouses. A layer of sand 10 cm thick is poured onto the bottom of the pit, and pipes for hot water are laid on it. They are covered with 10–15 cm of sand on top, and a 25 cm layer of nutritious soil is poured onto the sand.
How to design a drip irrigation system and select equipment
Drip systems can be annual or perennial, automatic or without an automatic control system.
Equipment for designing and creating a drip irrigation system is selected depending on environmental conditions, tasks and budget.
Things to consider:
- geometric dimensions of the site;
- relief;
- type of crop - the algorithm and frequency of watering, the composition of the nutrient mixture are selected for each crop (this is the task of the agronomist);
- planting scheme;
- distance from a water source and the type of this source.
Water treatment
The source of water for a drip irrigation system can be: a well, an open reservoir (pond, irrigation canal, lake), a central water supply or a container with imported water.
The dirtier the source, the more attention needs to be paid to purifying the water from foreign impurities (sand, insect remains, algae), which can clog drip tapes, dosing units and the droppers themselves. The quality of water treatment directly affects the drip lines and the durability of the equipment.
Large farms can afford to install reverse osmosis, which ensures the output water has an ideal composition. But this is expensive equipment. The majority of farms use a filtration system consisting of coarse and fine filters.
Water treatment must be organized in such a way that particles larger than 130 microns do not enter the drip lines.
Drip lines
When creating drip irrigation systems, different drip lines are used for crops growing in open ground and protected ground (in a greenhouse).
For open ground
– integrated drip lines. Droppers (emitters) are installed inside the tube by the manufacturer. The tube can be laid both on the surface of the soil and under it.
For indoor greenhouses
– drip lines with external droppers. Such a line consists of four elements:
- main PE tube with a diameter of 16, 20 or 25 mm (depending on the parameters of the site);
- droppers 2, 3 or 4 l/h (depending on the type of specific crop being grown);
- microtubes that deliver the nutrient solution directly from the droppers to the plant (usually 60 cm long);
- stakes for fixing the end of the microtube directly at the root of the plant.
Two approaches to constructing drip systems
You can assemble both an expensive automated system and its economical version.
Economical option:
drip system without the use of automation, solution unit and using uncompensated droppers. This system is enough for the plants to receive water and produce crops.
An uncompensated drip line will save up to 80%, but it can only be used for growing crops in open ground.
Expensive option:
the mortar unit and automation for controlling the drip irrigation system helps to provide the plants with adjusted nutrition, which allows you to get the maximum yield from a particular crop.
These are two different approaches! Two different systems. An economical option may be better if you use more expensive components and equipment when creating an industrial drip irrigation system.
Expensive and cheap equipment
The difference between expensive and cheap equipment is the service life of the components. Sometimes it differs several times.
You can change components every 2 - 3 years in an expensive system with mortar units and an automation system, get a smaller harvest and spend more on depreciation than when using an economical option, but with high-quality components.
Equipment from Israeli manufacturers (Metzerplas pipes and fittings, Netafim drippers, Lowara pumps, Amiad filters) is in great demand on the world market. The quality and reliability of the products of these companies have been tested over several decades of use in the harsh desert climate of the Middle East.
Variety of metal stove models
The range of stoves for greenhouses is large, but first of all, their thermal power and functionality are taken into account.
The following products are most popular among consumers:
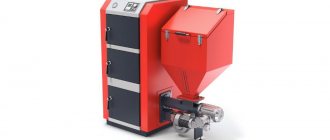
- "Vesuvius mini" This inexpensive and compact potbelly stove has a simple design; it runs on wood. Its productivity allows you to heat a greenhouse whose volume does not exceed 80 cubic meters. The body of the product is made of steel. Its surface can be used as a stove for heating water, humidifying or watering.
- "Cinderella". The small unit is made of heat-resistant steel. It is equipped with side convectors that distribute warm air. A power of 6 kW will be enough to heat a greenhouse with an area of 60 square meters. There is a glass window in the door of the combustion chamber, thanks to which you can observe the process of burning wood. On the upper surface there is a burner for heating water. Wood or garbage is used as fuel.
- "Teplodar Pechurka Plus" It has a power of 5 kW, sufficient to heat 50 “squares” of area. The product is small in size and weight, it is equipped with a casing with convection holes that promote uniform release of thermal energy. There is a burner on the surface, the fuel used is firewood.
- "Normal". The stove's power of 6 kW is enough to heat 60-80 square meters of the greenhouse. The sides of the unit are protected by casings that have convection holes, and therefore they do not warm up to temperatures dangerous for plants. A tightly closing door prevents smoke from entering the room. Thanks to the convenient ash box, it can be collected and used as fertilizer.
- "Klondike NV-100" is a bulerian with a capacity of 6 kW. The unit is capable of heating a room with an area of 60 square meters. The combustion chamber consists of two chambers and operates as a gas generator. The walls of the firebox consist of hollow pipes. In the first chamber, firewood is burned, and in the second, combustion gases are burned. Cold air moves from below, heats up and is discharged through the top of the buleryan. Due to constant air exchange, it does not overheat. It is possible to connect air ducts to pipes. The stove has a long burning mode for 10 hours.
- "Breneran AQUATEN." The stove is equipped with a water circuit and, with a productivity of 6 kW, can heat up to 60 square meters. m. The water jacket of the unit is located along the walls of the firebox. The device operates like a gas generator, and has compact parameters and high efficiency. Works on firewood, wood waste, branches, etc.
Brick ovens in a greenhouse
Stove structures made of brick are usually installed in greenhouses, which are used throughout the year. They have increased heat capacity and therefore can heat even in severe frosts. A stove is selected for a greenhouse so that its performance matches the area.
To build a simple version of the furnace you will need:
- solid ceramic brick – 220 pcs.;
- fireclay brick – 80 pcs.;
- clay solution – 80 l;
- fireclay solution – 30 l;
- concrete for pouring the foundation - 0.25 m3;
- grate;
- doors - blower, combustion and cleaning;
- smoke valve;
- pieces of glass insulation or roofing felt.
The height of the stove to the chimney is 215 centimeters; it can be placed in a greenhouse of standard sizes. The dimensions of the structure being constructed are: horizontally 51x77 centimeters.
The work is carried out step by step:
Step 1 – creating the base. It is constructed from reinforced concrete. The thickness of the foundation should be at least 20–30 centimeters. First, soil is removed from an area of 70x100 centimeters to a depth of 35-40 centimeters. To level the bottom, take coarse sand and cover it with a 20-centimeter layer. Formwork is installed along the perimeter of boards. Rods of 12 mm reinforcement are laid in the form of a lattice in two rows with a cell side of 20 centimeters. The concrete mixture is poured into the finished pit. Allow at least three weeks to dry the foundation, periodically moistening its surface.
Step 2 – laying the firebox and ash pan. The stove is laid out according to the diagram. The first 4 rows are made of red brick using clay mortar. Install the ash pan door, securing it with wire in the masonry. Rows 5 to 12 are made of fireclay bricks using a refractory mixture. A grate is placed in the 5th row, and a firebox door is placed in the 6th, 7th and 8th rows. Rows 9 - 12 form the arch of the combustion chamber.
Step 3. Rows 13 – 15 of fireclay bricks are laid out on refractory mortar. The furnace arch is covered with rows 13 and 14, and a cleaning door is placed in rows 15 and 16. From the 16th row, masonry is made with red brick. Rows 17–21 form smoke channels, and in the 22nd row the first of the smoke dampers is placed.
Step 4. From rows 23 to 27, continue making smoke channels. From the 28th row they begin to narrow the channel, and in the 29th row a second smoke damper is installed. Rows 30 and 31 form the stove vault. Starting from the 32nd row, construct a chimney of the required height from 4 bricks with dressing.
Installation of heating systems
Having decided on the choice of heating system, you can proceed to installation work. Below we will look at how to make heating in a greenhouse.
Water system
There are two ways to make water heating. Let's look at the first one.
As a heater, you can use an old fire extinguisher, the top of which is cut off. At the bottom you need to install an electric heater with a power of 1 kW, for example, from an electric samovar.
Then the electric heater is filled with water, and two water pipes are connected to the fire extinguisher using nuts and rubber seals.
Now let's look at the second method, which requires a 40-liter boiler and a 2 kW electric heater.
The operating principle is as follows: the water, gradually heating up, rises through the pipe into the expansion tank, then passes through a pipeline located along the perimeter of the greenhouse structure at a slope.
The boiler can be a large-diameter pipe, to the end of which the bottom must be welded.
The expansion tank can be made from pipe scraps. Tank volume – no more than 30 liters. In order to connect the boiler and riser, you need to weld couplings on both sides of the tank.
You also need to make a hole in the tank through which water will be added.
The boiler must be grounded, for which a three-core wire of at least 500 V is used. Two wires are intended for the heater phase, one for the boiler.
The key point of water heating is the ability to use solid fuel boilers, which can be located in the greenhouse or in another separate room.
Video:
If boilers are placed separately, a significant portion of the heat coming directly from the boiler is lost.
Such boilers are economical and fireproof; they are often used in industrial greenhouses.
Air system
Organizing air heating for a greenhouse is not difficult.
To do this, you will need a metal pipe with a diameter of 55 cm and a length of 2 m, one end of which is inserted into the greenhouse, and a fire is built under the other.
It is the constant maintenance of the fire that is a big disadvantage.
Due to the fire, the air in the pipe is quickly heated, which penetrates into the structure.
Heating with solar batteries
For this system, you need to make a solar battery, the power of which is calculated in advance.
To do this, you need to dig a hole 13-14 cm deep in the greenhouse and cover it with thermal insulation material, for example, polystyrene or other material with good thermal insulation properties.
Then you need to lay polyethylene for waterproofing, and cover it with wet sand on top. Finally, the hole is filled in on the ground.
Video:
Such a system will provide round-the-clock heating of the greenhouse, but still cannot be the main method of heating due to the small number of sunny days.
Furnace system
To build a stove, the vestibule of the greenhouse must be lined with bricks, and the chimney must be laid along the entire length of the structure. The location of the stove should be 30 cm from the end of the greenhouse.
There is another way to construct a furnace. The calculation for it is as follows: you need a barrel with a volume of at least 3 cubic meters, in which you need to make holes for the chimney and stove. The oven base is then inserted into the hole.
Now you need to remove the chimney from the container and place a 5.5 m high pipe on it outside the greenhouse.
Video:
Then an expansion tank is installed on the barrel, and heating must be made from a profile pipe by welding and the pipes must be laid on the ground in increments of one meter.
If you follow the instructions, there will be no difficulties during installation of the stove.
Thus, you can do any greenhouse heating with your own hands, having projects in front of you to work on. The main thing is to strictly follow the instructions and observe safety precautions.
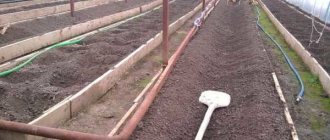
Industrial greenhouses - arrangement and planning of beds
After completing the construction and cladding of an industrial greenhouse, it is necessary to decide what the layout of the beds in it will be. There are three main options.
- Standard narrow beds on soil with gaps for movement of people and, if necessary, vehicles.
Growing strawberries in a greenhouse
Multi-tiered cultivation of strawberries in a greenhouse
Greenhouse based on multi-tiered hydroponics
The choice depends on the specifics of the plants being grown, as well as on the budget for the initial investment in an industrial greenhouse. With the right approach to business and the use of modern agricultural techniques, such a structure will very quickly pay for itself and begin to bring not only fresh and tasty vegetables and berries, but also tangible profits.
Heating winter greenhouses: basic information
- The decision on how to heat a shelter in winter depends directly on the region in which you live.
- The inside of the greenhouse will be much warmer if it is not tinted or mirrored. You also need to ensure that the surface of the greenhouse walls is clean. Thus, visible light passes through transparent surfaces better.
- A vegetable grower who organizes heating of a greenhouse in winter must know that the best heat insulator is air. To arrange the shelter, choose double glazing, which will retain heat. Air mixing (convection) has a bad effect on growing seedlings. There is a constant movement of warm and cold layers. That is why, instead of conventional film for heating a greenhouse in winter, it is better to use cellular polycarbonate.
- The air should not dry out. Otherwise, the plants will begin to wither.
- The air supply should be from top to bottom and slowly. This will allow the heat to remain in the shelter longer.
- The heating design should not be expensive for the budget, but at the same time practical and easy to use. Give preference to one that will be convenient for use by both an experienced farmer and a novice vegetable grower.
Who invented it and why
The Israelis were the first to use drip irrigation in the 60s for growing crops and landscaping the urban environment. Three factors contributed to the creation of the system:
- hot climate;
- water scarcity;
- insufficient amount of microelements in the soil.
It was necessary to create an irrigation system that would ensure an even supply of water to each plant, reduce moisture loss to a minimum and prevent fungi from developing. Fungus and disease are a common problem in crops under rain or spray irrigation systems.
The creator of the drip irrigation system is considered
water resources engineer Simcha Blass (1897 – 1982). He made the first drip devices for water supply, and in 1965 he became one of the founders of NETAFIM, which today supplies irrigation systems around the world.
Israel is the cradle of drip systems, so Israeli drip irrigation systems are valued throughout the world for their outstanding performance and reliable performance in harsh desert conditions.
In Russia and the CIS
Drip irrigation systems are widely used by summer residents, amateur gardeners, farmers and large greenhouse farms. The principle of operation of capital irrigation systems of any size is similar, but building the correct irrigation network for industrial greenhouses is a complex and responsible task even for an experienced specialist.
We rarely use drip systems for landscaping the urban environment.
Winter greenhouse design
In many ways, design requirements depend on the region. In areas with a mild, warm climate, where the temperature in winter rarely drops below zero, a polycarbonate greenhouse does not need to be insulated; it is enough to install temporary heating sources in it and use them as needed. Polycarbonate itself retains heat quite well due to its internal cavities, and while heating up during the day, the greenhouse does not have time to cool down to critical temperatures for plants.
Thermal insulation properties of cellular polycarbonate
End caps for polycarbonate
In areas with temperate and cold climates, the thermal insulation properties of polycarbonate are not enough to maintain a stable positive temperature in the greenhouse, and they have to be equipped with a constant heating source. In addition, to improve the thermal insulation characteristics, it is necessary to make a number of changes to the design of a standard greenhouse.
Heating a greenhouse using a gas burner
Insulation from cold winds
To do this, the greenhouse is located in the direction from north to south, a main wall is installed at its northern end, or, even better, a vestibule made of bricks, blocks or timber. The entrance to the greenhouse is made through the vestibule, and the southern end wall is made solid. The design of the vestibule makes it possible to prevent the greenhouse from blowing out through the cracks in the doors and vents. In addition, it acts as a thermal curtain: when the doors are opened, the plants will not be affected by the flow of cold air.
Insulated greenhouse wall
In the vestibule you can mark out heating equipment - a stove, a boiler. In this case, the chimney is brought out through the north wall, and the polycarbonate will be insulated from the hot chimney pipes and possible sparks. When heating with electricity, an electrical panel is placed in the vestibule. In addition, the vestibule can be used as a storage room.
Foundation and insulation of the blind area
The greenhouse is placed on a strip foundation, concrete or made of blocks, and an insulated blind area is made around it. This will protect the soil inside the greenhouse from freezing.
The blind area is made as follows.
- The turf around the foundation is removed to a width of 50 cm and formwork is made from boards.
- Cover with a leveling layer of sand.
- Insulation is laid - polystyrene.
- Fill the blind area with concrete over a reinforcing mesh or lay paving stones on a layer of sand.
Insulation scheme for the blind area
Soil insulation
Insulating the soil from below allows you to isolate the fertile layer in the greenhouse from the colder underlying layers. At the same time, heating will be more efficient and heating costs will be reduced.
A popular method of soil insulation.
Scheme for insulating beds in a greenhouse
Step 1. At the site of future ridges, make a pit with a depth of at least 60 cm, and pour a 5 cm thick layer of sand on the bottom.
Step 2. Lay the insulation boards, aligning the grooves at the joints.
Step 3. A layer of expanded clay about 10 cm thick is poured on top of the slabs. It acts as drainage and at the same time protects the polystyrene from damage when digging.
Step 4. Fertile soil is laid on top or a warm bed is arranged.
The bottom of the greenhouse is made of blocks
Serially produced models
Large enterprises in all regions of Russia are developing standard designs for conventional and industrial greenhouses. They have created a series of projects and offer the buyer a large selection of products.
REFERENCE: when designing industrial greenhouses, SNiP 2.10.04-85
What types of industrial greenhouses are there? There are several types of professional greenhouses for farmers:
- tunnel;
- multi-tunnel with gallery;
- block multi-span;
- garden centers.
Farm tunnel greenhouses . The series is developed by manufacturing enterprises based on existing building codes and regulations in Russia.
Industrial-scale greenhouses are produced under film and polycarbonate; different types of frames are used in the design. The cross-section of greenhouses can be arched, “Gothic”, “with straight frames” and “straight reinforced walls”. The width of the greenhouse building ranges from 3.5-12 meters .
Farmer Series
Industrial greenhouses "Farmer" are designed in compliance with SNiP 2.10.04-85 , they are intended for the industrial cultivation of vegetables, berries and seedlings. The frame of the farm greenhouse is assembled from a galvanized profile with bolts.
Arc-shaped trusses are tied together by straight beams. The cross-section of greenhouse buildings is semicircular (arched) or pointed (“Gothic”).
Dimensions of industrial greenhouses "Farmer":
The height in various models of the series is 3-4 meters . This allows you to grow both tall and short-growing crops by placing the seedlings on racks.
Greenhouses of this series are mounted on any foundation or on the ground in which racks are dug. The width of the structure ranges from 3.5 to 7.7 meters . The basic kit includes double-leaf gates, which are mounted at the ends of the greenhouse building. At the buyer's request, additional ventilation vents can be installed.
The greenhouses are covered with transparent cellular polycarbonate . The customer can choose the thickness of the polycarbonate - 6 mm (recommended), 8 mm or 10 mm. The polycarbonate is fastened with special “polyclip” fasteners, and the covering material is attached to the end walls with corner brackets. In the Farmer , vegetables can be grown all year round.
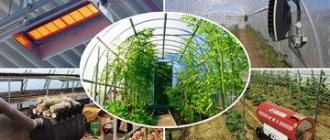
Types of infrared heaters
Infrared heaters of the following types:
- light;
- long wave.
In IR light heaters, the surface heats up to 600 degrees. This equipment is suitable for very large greenhouses. Long-wave devices heat up much less and are better suited for small greenhouses.
Infrared devices can operate from:
- electricity;
- gas;
- liquid fuel.
Infrared heaters for greenhouses are able to heat a greenhouse with an area of 18 square meters. m. When operating on gas, only two cylinders of liquefied gas are consumed during the winter.
The shape of such heating devices is different. They are produced in the form:
- lamps;
- film (tape) panels.
Counting the number of radiators
If calculations are made for greenhouses with a ceiling height of less than 3 meters, the number of heating devices is calculated using a simplified method.
First, determine the area using the formula: S = a x b, where
S – area in sq.m.;
a and b – sides, m.
The thermal power of a greenhouse is determined by the formula: P = Sх120, where
P – thermal power, W.
Next, use the formula for determining the number of sections: n = P : p, where
n – battery sections;
p – thermal power of the section, it is indicated in the data sheet, W.
The calculated number of sections are placed evenly throughout the greenhouse, dividing them into several radiators, and you should choose devices that are minimal in height so that the soil and root zone are better heated.
Pechnoe
In addition to solid fuel boilers, there is another way to use solid fuel in greenhouses - these are various stoves made of metal or brick.
Advantages and disadvantages
Brick is more difficult to heat, but it also loses heat more slowly than steel. This will make it much easier to maintain a stable temperature in the greenhouse. A brick oven does not dry out the air, and its humidity is extremely important for plants. You can compensate for the shortcomings of an iron stove by installing an additional circuit of registers or radiators inside.
Metal heating devices also have a strong side - they are preferable for greenhouses operating in spring and summer:
such structures can be installed for a short time;
- there is no need for a complex foundation;
- the oven takes up relatively little space;
- the cost of the product is less than that of the brick version;
- all work can be completed without turning to professionals.
Selection and installation of the furnace
The chimney system of a metal stove must be installed at an angle of at least 15 degrees. This step increases the heating power. The pipe must be made of metal; it does not need to be insulated, except at the intersection with the roof or wall, since protective boxes are installed there. Before installing stoves, you need to consider their stability - if the stove tips over, the greenhouse may be damaged, and in the worst case, a fire will start.
There are many different designs, but the Vesuvius-mini potbelly stove is deservedly considered one of the best. This is a compact and cheap stove, the design of which is simplified as much as possible. Using a device with a thermal power of 4 kW, you can warm a greenhouse with a total area of up to 25-30 square meters. m. Wood is burned inside the steel body, and water can be heated from above. It is also possible to use Vesuvius-mini as a stove.
“Cinderella” is also a compact device, made of an alloy that is resistant to strong heating. With the help of side convectors, the distribution of hot air is improved, the total thermal power is 6 kW, the heated area can be up to 60 sq. m. m. Control of the stove operation is facilitated by a viewing window in the door; a burner for heating water is installed on top. Firewood or household waste is placed in the oven.
The advantages of the “Normal” system are increased energy production (it warms up greenhouses with dimensions of 60-80 sq. m), as well as special protective covers that prevent the side walls from warming up to dangerous values. The designers took care to securely lock the door to prevent smoke.
In turn, if you choose the Klondike NV-100 stove, you can ensure a long-term supply of heat to the outside - up to 10 hours in a row. And those who want to heat a greenhouse with wood processing waste or cardboard should take a closer look at the Breneran Aquaten design. This is a gas generator furnace with a water circuit.
For your information: of course, no stoves work with waste oil. But heat guns can quite use it.
Whatever the owners choose, it is necessary to prepare a strong foundation, for which they lay sidewalk tiles, bricks, or simply compact the earth. The best place to install stoves is in the middle of the greenhouse, as this makes heating more uniform. If there is a main wall, the back wall of the stove should be leaning against it.
Methods for heating greenhouse areas
Heating is installed in greenhouses for year-round use or for early spring planting of crops and flowers.
The following types are considered the most effective heating methods:
- stove heating with a water-air circuit;
- heating line from an electric, gas or solid fuel boiler;
- use of gas-type heat guns;
- convector or infrared circuits powered from the mains.
Warming up with gas guns is considered effective. The air heats up quickly, fuel consumption is low, the unit itself is compactly located and, if chosen correctly, is absolutely safe to use. If the greenhouse is heated with electric heaters, experts recommend using infrared devices. Infrared rays heat the soil and plants without drying out the air.
Important! Convectors heat the air so that the lower root part of the plant remains cold, and the upper part remains excessively warm. This system is not recommended for permanent use; it is used as a temporary measure to quickly heat the upper part of the greenhouse.
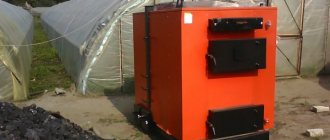
What fuel to heat a greenhouse with and how to choose a boiler
Two options - water and air heating - involve the use of some kind of boiler. But you have to choose, first of all, fuel. There is nothing to talk about here for a long time. Choose the type that is most accessible to you. Both in terms of price and delivery.
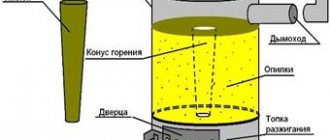
Now about choosing the boiler itself. If you plan to heat with wood, then an ordinary boiler, although relatively cheap, will constantly have to be near the stove: you need to add firewood every 2-3 hours (and this is in the best case with good thermal insulation). It makes more sense to consider purchasing or manufacturing a long-burning boiler. In some options, firewood needs to be added once a day or even less often, but these are very expensive boilers. If the idea interests you, you can make a long-burning stove yourself. For example, “Bubafonya” or one of its variants “Slobozhanka”.
The homemade long-burning wood-burning stove “Bubafonya” is unpretentious in appearance, but the fuel in it burns for a really long time. One such unit can heat a small polycarbonate greenhouse
For those who decide to use a solid fuel convector, we can advise you to take a closer look at “Buleryan” or similar stoves such as “Fire Battery” or “Student”. Don’t even doubt about the “Buler” - the stove is very economical and, with proper placement, will heat the greenhouse quickly and without burning: hot air comes out of the pipes only in the active mode. In operation, the case temperature is around 40 oC, and the air is heated to 45-50 oC. Thanks to its unique design, the stove takes in the coldest air from below, so the greenhouse will be warm, especially in the domed one. Moreover, “Buleryan” can be made with your own hands, but you will need a qualified welder.
These are tanks for diesel fuel. The supply should be substantial, preferably for the whole winter
The luckiest ones are those who have main gas nearby. The connection will, of course, be expensive, but today it is still the cheapest heating. Although, if the price rises at this rate, we will soon look for an alternative.
By the way, about the alternative. The second after gas in terms of cost per kilowatt of heat is pellet heating, or briquette heating. Pellets require a special burner, but briquettes can be placed in a regular solid fuel boiler. At the same time, their combustion duration is longer; a kilogram of fuel releases more heat. There is almost no ash, and what is there is an excellent environmentally friendly fertilizer: from the boiler to the garden bed.
You can make briquettes yourself, using a homemade or purchased press and various combustible waste - from waste paper and sawdust, to hay and seed husks. By the way, the best fuel is obtained from the husk of the sunflower seed. Its heat capacity is greater than that of the best dry firewood, and even some brands of coal.
Pellets and briquettes are an unconventional choice for our country. It is good because you can make briquettes from waste yourself
Don’t discount pellets either, because it’s not for nothing that they are popular in pragmatic and tight-fisted Europe. Automated dedicated pellet boilers are expensive, but there are models that can run on diesel, gas and pellets. The fuel is changed by replacing the burner. Universal units - use whatever you have. In general, combination boilers are an excellent option. They just cost a decent amount.
And another alternative solution is the use of solar energy - solar collectors. This, of course, is an expensive option to install, but quite comparable in cost to water heating and floor heating. But if there are a large number of sunny days a year, you will save a lot on heating costs.
Another alternative way to heat a polycarbonate greenhouse is solar collectors.
An option for heating using electricity is possible. The choice of heating devices here is wide, but the electricity bills will be impressive. Moreover, most likely you will need not a single-phase, but a three-phase connection, and this is a lot of money. Then it’s definitely better to take a closer look at solar heating.
Elements of a drip irrigation system
Drip irrigation systems include:
- Pump for supplying water
(submersible, surface) from wells, open reservoirs and containers. Power from 20 to 350 m3/hour and pressure from 2.5 atm. - Solution unit (mixer)
for preparing a nutrient solution. The most expensive node. - Filters
(sand-gravel and mesh, disk for fine cleaning). Ensure the durability and reliability of the drip irrigation system, protecting drip tapes and droppers from fine sand, insect residues, algae and anything else that can clog drip tapes and droppers. - Tanks for storing water
for irrigation, drainage water, solution with fertilizing. - Drippers for direct supply of water
to the root of the plant. There are two types: compensated and uncompensated. When the pressure in the system drops below a certain level (usually 0.7 bar), a compensated dripper stops the flow of liquid through itself, which allows you to precisely regulate the amount of solution supplied to the roots of the plant. For uncompensated drippers, performance directly depends on the pressure in the system, but it is cheaper. - Drip tapes and dosing units
: tubes, hoses, pipelines. - Accessories and fittings:
bends, pressure regulators, valves, tees, valves, angles, connectors, fasteners.
Heating system
reduces costs
Electric heating in a winter greenhouse
- When heating electrically, it is not advisable to use air heaters, since the heating of the area will be uneven. In this case, it is better to lay the cables in it when laying the foundation, which are used to install heated floors. In this way, it is possible to ensure uniform heating of the entire room and provide additional heating of the soil;
- however, if necessary, especially if there is no other heat source, air heaters can be used, but it is better to install them under shelves with plants. In this way, the seedlings will not be exposed to a direct flow of hot air, and it will be the soil that warms up, albeit slightly.
Convectors
- You can also use convectors; several devices with heating coils will evenly heat the entire greenhouse room;
- This way the soil does not heat up, which is a disadvantage.
Water heating
- when installing water heating, a pipe system is created through which warm water circulates;
- pipes are laid inside the greenhouse along the walls or under the floor, which allows the soil to be heated;
- For this heating system, both metal and plastic pipes are used;
- plastic pipes are preferable because they are more affordable, do not rust and are easier to install;
- the pipes are heated using gas boilers, or can also be done using electricity;
- It is undesirable to use metal pipes to heat the soil, since they are susceptible to damage by corrosion;
- this type of heating ensures uniform heating of both air and soil;
- is not always popular due to the complexity of installing the pipe system and often the high cost of the heating itself;
- Such heating requires constant monitoring.
Considering the fact that energy resources are not cheap, consumers have recently been paying attention to infrared heating. Infrared lamps and heaters are used for greenhouses
Infrared heating of greenhouses
- It is not the air that is heated, but the plants and the soil themselves; heat is transferred from the soil to the entire room;
- if the heater is equipped with a thermostat, it turns off periodically;
- it turns on only to maintain the desired temperature, which significantly saves electricity;
- Infrared heaters and lamps are considered harmless to both people and plants.
One of the most economical ways to heat a greenhouse can be wood heating using a Buleryan stove.
Wood heating
- It is best to place the stove in a kind of hallway in front of the greenhouse, and run chimney pipes throughout the room with exit to the outside on the other side;
- the greenhouse is heated in this way, and carbon monoxide escapes through the chimney;
- however, the downside may be the fact that adding firewood needs to be done on average every 4 hours, which is not very convenient at night;
- There are also wood boilers for heating.
Air heating system
- one of the simplest and most affordable ways to heat a greenhouse;
- with its help, mainly only the air is heated, and the soil remains at the same temperature; this type of heating is best used in combination with others;
- for air heating, you need to lay pipes inside the greenhouse in such a way that its end faces the street, near the outer end of the pipe you need to light a fire so that warm air can flow through the pipes into the greenhouse;
- this type can be considered as an alternative, since it requires regular monitoring and laying of firewood.
It should also be taken into account that for winter greenhouses it is recommended to install a double layer of polycarbonate, glass or film. This also serves as an additional method of insulation.
Installation of metal units
Installation is carried out in stages:
- A solid foundation is built from paving slabs, bricks or well-compacted soil. It is better to place the stove in the center so that the greenhouse heats up evenly. Units with a heating circuit are installed where it is convenient, but observing the fire safety distance specified in the passport.
- The stove is placed on the finished base, check how convenient it is to load fuel and remove ash. When there is a main wall, the unit is mounted to it with its rear wall.
- Chimney pipes of a certain diameter are connected to the smoke pipe using heat-resistant sealant. Install the chimney according to the diagram, avoiding its narrowing.
- If necessary, connect a water or air circuit. Units with a water heat exchanger must not be heated without filling the system with coolant, as this will result in damage.