Here you will learn:
- Advantages of waste furnaces
- Select a drawing
- Assembly sequence
- Starting a potbelly stove
- Work on other types of fuel
Used engine oil is an inexpensive and popular type of fuel. It is used for heating residential and non-residential premises by burning it in factory-made or home-made stoves and boilers. In this review, we will talk about one of these homemade products - this is a small but effective potbelly stove for testing. Characterized by its small dimensions and simple design, it produces a large amount of heat. In conclusion, we will talk about a combined unit that can work on mining and firewood.
Making a simple potbelly stove with your own hands
The basic design of a homemade potbelly stove consists of 4 parts:
- A fuel tank of any shape with a hole in the center, the diameter of which is equal to the corresponding size of the attached pipe. This is where the combustion of the waste begins. The metal for the manufacture of this structural element must have a thickness of at least 3 mm.
- A combustion chamber or injector, which is a vertical cylindrical container with a number of holes, connected through an opening to the tank. As a result of air feeding through the perforated walls of the injector, the fuel entering the chamber burns completely.
- A heat exchanger in the form of a tank located above the combustion chamber. A heated gas mixture enters it. The design can have any size and shape. Ideally, this is a tank with a hollow platform on which food can be heated.
- Pipes for smoke removal, providing effective draft.
To make a potbelly stove yourself, you need to have good welding skills. Welded seams must ensure tightness.
Making a waste tank
An alternative to a welded tank can be an unusable gas cylinder or a canister with thick walls, but in any case, 3 basic requirements are mandatory:
- The design must be at least partially collapsible to allow for periodic cleaning.
- The hole for connecting the injector must be located in the center.
- The hatch for pouring waste should be equipped with an adjusting valve on a bolted connection. With its help, the intensity of combustion is controlled.
The easiest way to make a tank is from large diameter pipes. The bottom and legs are welded to one piece of pipe with a diameter of about 35 cm. In order to close the tank, take a small piece of pipe with a slightly larger diameter, weld a lid to it, then make 2 holes in it - one control hole with a diameter of approximately 60 mm, and the other for the injector.
The height of the side of the 2nd part should be 1/3 of the height of the lower container. The total height of the tank, measured from its bottom to the central hole on the lid, is 10 - 15 cm.
Light the fuel in the tank using paper or cloth soaked in kerosene. They are set on fire and lowered into the container through the control hole. The waste will have to be constantly added to maintain the level of 2/3 of the tank height.
How to make an injector?
The optimal pipe diameter for making an injector is 10 cm, the minimum wall thickness is 0.8 cm. To calculate its height, take the length of the chimney pipe, divide it by 10. Subtract five percent from the result and get the required value. It should be between 36 and 38 cm. This is a condition for normal traction.
The holes made in the walls of the pipe in a checkerboard pattern or simply evenly distributed over the surface have a diameter of 0.9 - 0.95 cm. Indentations of 2 - 2.5 cm and 5.5 - 6 cm are made at the bottom and top of the pipe, respectively.
Basic heat exchanger option
The minimum thickness of the walls of the heat exchange tank is 0.3 cm. It is manufactured using the same technology as the fuel tank. It is better to make the top flat, and the hole for the chimney needs to be moved, then it will be possible, if necessary, to place a frying pan or kettle on the stove.
A partition is made inside the hollow vessel, creating a labyrinth for better heat transfer. Moreover, the thicker this part is, the hotter the surface of the potbelly stove will be. In order to clean the heat exchanger from carbon deposits, a special hatch is made on the side and closed with a lid.
A channel is welded onto the hole intended for the chimney - a pipe with a height of 5 to 10 cm and a diameter of 10 cm.
What is a chimney made of?
In order for the combustion products exiting through the pipe to have the lowest possible temperature, the part of the pipe that is located in the room must be made of steel. Due to this, the smoke transfers its temperature to the walls of the chimney and cools, increasing the residual heat transfer.
An ordinary tin pipe can serve as a continuation of the chimney from the outside, but it will have to be insulated to prevent the accumulation of soot during the cold period. Thermally insulated pipe is the best option, but more expensive. It is not necessary to seal the joints of pipe sections.
The pipes themselves can be of different diameters, but the one with the smaller diameter is connected directly to the furnace. Read on to learn how to make a chimney for a potbelly stove yourself.
Operation and working principle
Do-it-yourself potbelly stove is the most affordable, easy-to-assemble and inexpensive to operate option, which is practically no different from the classic and well-known variation. A stove, for which only used oil will be used, will thereby allow you to save a lot of money, and in order for such a heating unit to start working, the oil must be poured into a special compartment shaped like a pipe. Here it will burn out and be converted into gas, which will pass further into the combustion chamber and mix with the air masses.
The combustion chamber of the gas formed during the combustion process is located in the upper part of the pipe, which such a heating device must be equipped with, and the speed and quality of heating directly depends on the dimensions of the combustion chamber of your potbelly stove. If the chamber is very large, you will need many times more fuel, but the intensity and speed of heating in this case will be at the highest level.
A potbelly stove, with which the garage will be heated intensively, quickly and evenly, allows the oil to initially burn out at fairly low temperatures, which increase significantly at the time of repeated burning, already being gases and mixing with air. The maximum temperature of the exhaust gases in the second chamber can reach about 750-85 degrees, due to which the garage is heated, and additional thermal energy comes from the mounted chimney, the surface of which also warms up well and gives off heat.
A waste oil furnace consists of three main structural components, which you can learn more about below:
- The lowest compartment of the design of a potbelly stove operating on waste oil consists of a round tank into which oil is poured; the optimal dimensions of this element will be a diameter of 3.5-4.5 centimeters. These dimensions are enough for the poured oil to burn intensely and evenly release heat to heat the garage;
- The second structural element of a potbelly stove using waste oil is a tank in which re-burning takes place, not of the oil, but of the resulting gases mixed with oxygen. The dimensions of this element are selected individually and can be equal to the first compartment; in the upper part of the second tank it is necessary to leave a slot, a hole that will go into the chimney;
- The third structural element of a potbelly stove furnace in exhaust is a pipe that connects to the second chamber and has a diameter of only 1.5-2 centimeters, and in order for the exhaust gases to be saturated with oxygen, it is necessary to drill many small holes in such a pipe.
A potbelly stove, the drawing of which was thought out independently or found on a specialized resource, will serve you for many years and will not fail if, at the initial stage, you become familiar with the basic requirements and rules for the operation of such a heating unit. Used oil must be poured into the reservoir to the ½-1/3 mark, but not completely, since during the heating process it will boil and splash, which can lead to its contact with flammable surfaces and fire. Also, after the oil has been used, before using it in a potbelly stove, it is necessary to let it sit well for at least several hours.
It is better to initially make the top of such a design removable so that, if necessary, it is possible to simply clean the internal surface of the heating unit from combustion and decay products deposited on the walls. In order to remove decay products from a narrow chimney, you can use a special brush with a long handle, and also tap, which will allow the accumulated soot to fall away.
Also, in order to extend the service life of the potbelly stove using waste oil, it is necessary to paint it after assembly with a special heat-resistant paint, which in the future will not allow the body to rot, deform, or form rust and corrosion.
Warm brick
A potbelly stove using wood, coal and other types of fuel can significantly increase its efficiency. To do this, it is enough to build a screen of baked clay bricks around it with your own hands. If you look carefully at the drawings of such a mini-building, you will see that the bricks are laid at a short distance from the walls of the stove (about 10-15 cm), and, if desired, around the chimney.
Bricks require a foundation. Do you want the masonry to last a long time? Then fill the base one at a time to form a monolith. It is better to take concrete as the material for the foundation, which should be reinforced with steel reinforcement yourself. It is advisable to place the reinforcement layer at a distance of approximately 5 cm from the surface of the concrete pad.
Ventilation holes are made at the bottom and top of the brickwork, which will ensure air movement (heated masses will go up, cold air flows will come from below). Ventilation also prolongs the life of the metal walls of the potbelly stove, delaying the moment of their burning due to cooling by circulating air.
Bricks laid around the stove accumulate heat and then release it for a long time, warming the air in the room even after the stove goes out. In addition, brickwork additionally protects objects surrounding the stove from fire.
If desired, you can completely lay out the stove from brick. Such a structure is advantageous in that it will last for many years without additional effort on the part of the owner. However, there are also certain disadvantages. The disadvantages of this option include the following:
- the process of laying out such a stove is quite labor-intensive and is suitable only for those people who have experience in masonry with their own hands;
- a brick stove is quite expensive, as it requires the use of fireproof materials, including fireclay bricks and special clay for mortar.
In order to get a small potbelly stove with wood, it is enough to lay out a cone measuring 2 by 2.5 bricks, 9 bricks high. In the combustion chamber, rows 2-4 are laid out of fireclay bricks. An ordinary fired clay brick is suitable for a chimney, into which you must remember to insert a stainless steel sleeve.
Whatever the method of making a miniature stove or potbelly fireplace with your own hands, whether you make them according to a drawing or by eye, the main thing is that at the end you get an effective heating device, and in an expanded configuration also a hob for cooking. Look around for suitable materials (barrels, sheet iron, etc.) and go ahead to your own homemade stove or even a potbelly stove!
How to make a wood splitter with your own hands? How to install a sandwich chimney with your own hands It’s not difficult to build a chimney for a boiler with your own hands Do-it-yourself metal stove How to make a smokehouse yourself at home or in the country
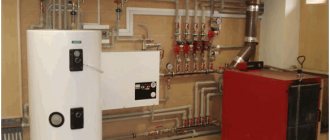
Features of furnaces using waste oil, their advantages and disadvantages
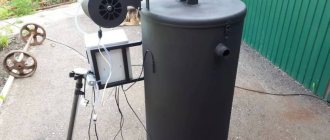
The exhaust furnace is a compact, economical unit
Stoves that use used engine oil as fuel are practically no different from other potbelly stoves in terms of simplicity of design and unpretentiousness in manufacturing materials. As for the method of burning fuel, the processes that occur are associated with the characteristics of the fuel used.
First of all, it should be noted that modern engine oil is a multicomponent substance with a high content of chemical compounds. During use, the lubricating fluid is additionally saturated with decay products of automobile fuel, as a result of which it becomes extremely hazardous to the environment.
Simply burning waste in an open flame is ineffective and unacceptable - it burns poorly, forming acrid smoke, which, in addition to soot, also contains various carcinogenic compounds. A completely different situation occurs with volatile hydrocarbons, into which automobile oil heated to a high temperature breaks down.
Gaseous substances are highly flammable and, when burned, release large amounts of thermal energy.
You can borrow work from friends or buy it at a car service center.
Depending on the method of supplying waste oil to the combustion zone, potbelly stoves are divided into several types:
- with pyrolysis combustion;
- using supercharging and fuel atomization;
- with drip feed.
A potbelly stove should not be perceived as a stove intended exclusively for installation in small technical and utility rooms. Using heating devices equipped with an air collector or a water jacket, it is possible to build complete heating systems for residential buildings.
Scheme of a furnace with drip feed of waste oil
A wide range of homemade liquid fuel stoves, which begins with simple mobile stoves and ends with stationary heat generators, determines their use both in the home and in industry. Today, equipment operating on waste lubricants is heated by:
- residential buildings;
- auto repair shops and garages;
- small production workshops;
- workshops;
- warehouses;
- vegetable stores and greenhouses.
Of course, the ideal option is to install liquid heat generators in auto repair shops. This will not only allow you to heat the premises for free, but also additionally save money on the disposal of drained oil. Nevertheless, such a potbelly stove will also be useful in a small private garage - the cost of working out is much cheaper than other types of fuel.
Like any other homemade heat generator, a waste furnace has its advantages and disadvantages. The advantages of these designs include:
- low cost of fuel. You can drain the waste from your own car, take it from friends, or literally buy it for next to nothing at car service stations;
- high heat transfer, which promotes rapid heating of the room immediately after ignition;
- Efficiency up to 90%;
- autonomy;
- work for a long time when installing large fuel tanks;
- undemanding to manufacturing materials;
- possibility of equipping with a water circuit or an air heat exchanger;
- ease of operation;
- recycling of fuel without the risk of environmental pollution.
If we talk about the disadvantages of units operating during mining, they are inherent in all potbelly stoves. Firstly, this is the low heat capacity of the structure. The temperature in the room will begin to drop immediately after the flame goes out. Secondly, you will need to install a long chimney, which means that you will need to clean it much more often. Thirdly, the hot walls of the diffuser and heat exchanger do not allow installing the device directly in the house - a special extension will be required. It should also be noted that the use of liquid fuel increases the requirements for operational safety - you will need to be extremely careful and attentive.
Preparatory activities
At this stage, materials and tools are selected, as well as a place for installing the oil heat generator is found and arranged.
What is needed to make a stove?
Having decided on the design, you can prepare everything you need. Here is a list of tools you will need later:
- “grinder” or angle grinder (angle grinder);
- circles for angle grinders. You will need several cutting discs and one cleaning disc;
- electric drill;
- two drills Ø6 mm and Ø9 mm;
- diamond cutters Ø60 mm and Ø100 mm;
- welding transformer;
- autogen or plasma cutter.
Of course, working with new materials is much easier and more enjoyable. However, if you have a certain amount of metal accumulated in your backyard or workshop, you can always save money by using suitable blanks. The list of required materials looks like this:
- sheet steel 4 mm thick;
- steel pipe with a diameter of 100 mm and a thickness of 4–5 mm;
- sheet steel 6 mm thick;
- chimney pipe;
- profile metal pipe 40x20 mm.
If the appearance of the equipment you use is important to you, we recommend stocking up on a special heat-resistant primer and paint. A painted potbelly stove will look no worse than industrial designs.
How to choose a place to install a liquid heat generator
The site intended for the installation of a potbelly stove must meet both practicality requirements and safety regulations. In our case, the situation is complicated by several factors. Firstly, when reaching the maximum mode, the walls of the heating device become white-hot, which poses a threat of fire to nearby objects. Secondly, you have to deal with a rather dangerous type of fuel - liquid. Thirdly, the requirements put forward for the installation site apply not only to the potbelly stove itself, but also to the chimney - the temperature of its horizontal section often exceeds 300 °C. Therefore, in order to ensure safe operation of the unit, a number of mandatory requirements will have to be met:
- ensure that the walls of the heating device are at least 0.5 m away from non-combustible surfaces, and 1 m from combustible surfaces. In this case, the latter must be protected by a heat-insulating screen made of heat-resistant material;
- Placing shelves and niches above the potbelly stove is not allowed;
- the stove burns a lot of air, so it is necessary to have supply and exhaust ventilation in the room;
- the unit must be located away from air flows;
- The storage location for used oil must be at a safe distance;
- it must be possible to disconnect the chimney for maintenance.
Most often, a potbelly stove is installed in the corner of the room. Among other things, this installation method allows you to optimize the space of a small room.
Placing a liquid heat generator in a corner will help save space, and a heat-reflecting screen will increase heating efficiency
Having decided on the location, you should prepare a reliable foundation for installing the heat generator. If the floor of the room is a concrete slab, then no additional work will be required. Otherwise, you will have to make a cement-sand screed measuring 1x1 m. To do this, you may have to remove part of the wooden floor if such flooring is located in the place where the heating device is installed.
At the preparatory stage, another essential part of the work is performed - they prepare the blanks for the future unit. Since all its parts are welded from metal 4–6 mm thick, it is extremely difficult to carefully cut out parts with a grinder, especially when it comes to round elements. Therefore, it is better to seek help from the nearest car service center or the nearest enterprise. As a rule, even in small industries there is always a gas cutter, or, even better, a plasma cutter. For little money, an experienced specialist will cut the blanks in full accordance with the drawings. All that remains to be done after this is to carefully sand the edges of the parts on an emery wheel.
If you were unable to use third-party help, do not despair. You can make parts using a grinder, but it will take much more time.
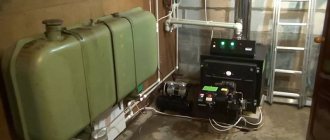
Parts ready for assembly
Potbelly stove plus water circuit
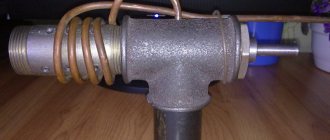
Any home could benefit from having an emergency heat source. Its role can be played by an ordinary, but slightly modernized, potbelly stove. You can improve the stove in two ways - put a water jacket on the burner pipe or wrap its body with a coil of copper tubes.
The coil turns are placed at a distance of about 5 cm from the perforated body of the potbelly stove and connected to the general heating system. A reflective screen is installed around the coil. For its manufacture, sheet aluminum, galvanized steel, and tin are used.
The water jacket is a tank on the upper chamber of the potbelly stove. There should be 2 fittings in its body - one for water supply and the other for drainage. In general, the design resembles a samovar. The volume of the water jacket depends on the length of the heating system and the method of circulation of the coolant.
If a pump is built into the system, the volume of the tank is small, but with natural circulation it has impressive dimensions. To control water parameters, a pressure gauge and thermometer are installed on the tank.
Heat exchanger assembly
I made the stove to heat the garage. I don’t have hot water heaters in my garage, so I decided it would be better to have it immediately heated and circulate the air. If you have water batteries, then you can abandon the air heat exchanger and simply run 4-5 water coils through the upper chamber, connecting them in parallel. In this case, the design must be supplemented with a circulation pump and fan. Such equipment will allow you to heat the entire house with a stove; you just need to allocate a room for installing the stove.
Heat exchanger assembly
Let's go back to my heat exchanger. I installed it between the smoke exhaust pipe and the stove burner - this is where the heat is greatest. I welded an iron plate to the heat exchanger. Thanks to it, the flame will be held better. It will also help distribute the fire inside the stove body.
An air swirler was installed inside the heat exchanger. There are no engineering delights in such a swirler, but it copes with its task one hundred percent. When operating at maximum power, the metal of the case heats up to a scarlet color, and the heated outgoing air even penetrates the glove. You can see the swirler itself in the photo.
I'm making a swirler I'm making a swirler I'm making a swirler I'm making a swirler
Next, I took a duct fan and placed it on one side of the heat exchanger. By the way, you can connect a thermal relay to the fan for automation. This will allow you to set the temperature yourself and save resources. For example, I decided to use a thermal relay from Autonics - I just had it lying around idle. But you can also take some budget model, for example, Vemer KLIMA. I tried it too, it works great.
I supercharged it and this is what happens
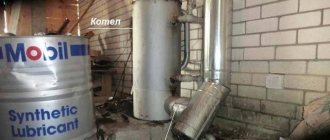
Heat is concentrated in the firebox compartment.
How to convert a wood-burning stove to run on liquid fuel
Often there is no need to make a new heating device, because a simple wood-burning stove is already installed in the room. In order to be able to burn waste in it from time to time, the unit should be slightly altered. In this case, do this:
- a thick-walled metal bowl is attached to the bottom of the fuel chamber - it will serve as an evaporator;
- a hole is made in the side wall through which a nozzle is inserted into the firebox;
- At a short distance from the stove, a container for oil is attached. Its height from the firebox level must be at least 1 m;
- A hose is passed from the nozzle to the waste container, onto which a ball valve is mounted. It will regulate the supply of fuel to the combustion chamber.
You can use a brake disc from a passenger car as an evaporator for a potbelly stove if you first weld the existing holes.
Wood-burning stove converted to run on used motor oil
When starting to ignite, place a rag soaked in kerosene into the bowl. After this, the mining supply is opened and the fill is set on fire. The oil will flow by gravity to the nozzle and drip onto the surface of the metal disk, gradually warming it up to operating temperature. As soon as the bowl warms up to 400–450 °C, the waste droplets will instantly turn into gas, burning and releasing a large amount of heat.
Operating principle of a potbelly stove
The operation of a potbelly stove is based on the phenomenon of pyrolysis. Such a furnace, where the fuel is waste oil, has 2 main compartments: a tank and a combustion chamber, located at different levels. The first is intended for pouring waste and burning it.
In another compartment, located above, combustion products of waste mixed with air are burned. At the first stage, the temperature is relatively moderate, and at the second stage it is much higher - up to 800⁰.
When making such a stove, the main task is to ensure that air flows into both compartments. It enters the first chamber through an opening designed for loading liquid fuel. The hole is equipped with a special damper, through which the volume of air supply is regulated.
Air access to the second tank is provided by holes with a diameter of about 9 mm. The efficiency of a properly assembled potbelly stove reaches 90%. Visually, different potbelly stoves may differ from each other in both shape and size, but the principle of operation is the same.
The power of a potbelly stove is proportional to the volume of the lower tank. The larger it is, the less often you will have to add mining. Sometimes this container is made very massive, holding about 30 liters of used oil.
Main design features
Products using oil are, first of all, attractive because this type of fuel is incredibly accessible and cheap. It accumulates in large quantities in the garage of almost every car owner. Therefore, it is often possible to obtain the required amount of fuel completely free of charge.
A potbelly stove can be purchased or created independently. Most often, people who already have this wood-burning stove want to improve it with their own hands, as a result of which the waste itself will act as fuel, or the joint use of these types of fuel is allowed.
In an oil stove, you can regulate the combustion intensity, for which you use the neck cover located at the bottom of the structure. If there is a need to quickly warm up a cold room, this lid must be opened completely. To maintain the optimal temperature in the room, the lid must be opened a few millimeters.
A product operating in mining requires a specialized chimney, which has quite a lot of requirements. This is due to the fact that its height should be approximately 4 meters, and its diameter cannot be less than 10 cm. It is desirable that the pipe completely lack horizontal parts. To get good draft and prevent condensation from forming on the chimney, you need to insulate it outdoors with your own hands.
Useful tips
A potbelly stove will be easy to use if you listen to the recommendations of experts:
- To check the quality of welded joints, the first ignition is carried out outdoors.
- To ensure tightness, the chimney running inside the garage is made from an all-welded pipe without horizontal sections.
- There should be a box of sand and a fire extinguisher next to the stove.
- The places where the chimney pipe passes through the wall or ceiling are insulated with fireproof material.
- A brick screen lined on 3 sides of the stove will protect against accidental burns and retain heat after the fuel burns out. The distance from it to the walls of the potbelly stove should be 5 - 7 cm.
Despite its simple design, a potbelly stove is considered the most reliable and cheapest way to heat a garage. Even garbage can be burned in such a stove. When choosing, it should be taken into account that horizontal structures last longer than vertical ones.
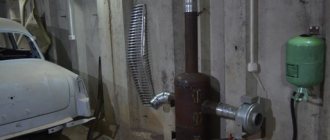
Making a potbelly stove from a gas cylinder
Another design option for a waste furnace is a self-made potbelly stove based on a 50-liter gas cylinder. In addition to this main element, you need to prepare 2 steel pipes with a wall of about 4 mm and a diameter of 10 cm. One of them will remove burning gases, and the second will act as a heat exchanger.
To this should be added a 4 mm steel sheet for the hood above the heat exchanger and the partition separating the evaporator and the combustion chamber. For the evaporation chamber itself, you will need a brake disc from a car with such a diameter that it fits into the cylinder without effort. A piece of 0.5-inch pipe is needed to transport oil to the combustion chamber.
In addition, you should have in stock an equilateral steel angle with a shelf of 50 mm and a length of more than 1 m, a 0.5-inch valve, clamps for sealing - 2 pcs., a hose, any cylinder equipped with a needle valve.
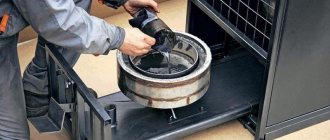
The work of creating a potbelly stove is carried out in a certain order. First, the container is turned upside down and a small hole is drilled in it. A measure such as wetting the drill and the drilling site with oil will prevent sparking.
Empty the container from gas condensate
Drain it carefully away from your home, because... its unpleasant odor lingers for a long time
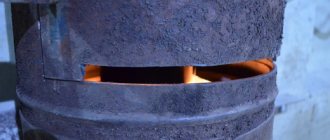
Then the workpiece is filled with water, after which it is drained again, thus removing any remaining gas. Since the mixture is explosive, there should be no open flame nearby.
Cut out 2 rectangles of the same width in the cylinder body, equal to 1/3 of the diameter of the workpiece. The height of the lower rectangle is 20 cm, the second, located 5 cm above the first, is 40 cm. To separate the chambers, a circle with a diameter equal to the internal diameter of the vessel is cut out of a sheet.
In its middle, a hole is made for a pipe with a diameter of 10 cm. This part will separate the combustion chamber from the heat exchanger.
A burner is made from a pipe 20 cm long and 10 cm in diameter. Its lower part is perforated by making holes with a diameter of about 2 cm. The inside is cleaned of burrs, otherwise they will collect soot on themselves, which will significantly narrow the hole later.
Place the previously cut circle on the burner, placing it exactly in the middle, and weld it. The structure is placed inside the stove and a weld is made around the circumference of the cylinder.
Weld the bottom and cover onto the brake disc. This will be the evaporator pan or bowl. To supply fuel, an opening is left in the lid through which air will flow into the stove. The opening is made quite wide, otherwise the draft will decrease and the oil will not get into the bowl.
Weld the pipe onto the top of the lid. A coupling is made from a pipe with a diameter of 10 cm that will connect the bowl to the burner.
Assemble the fuel supply system, for which:
- make a receiving hole in the pan;
- insert a 0.5-inch piece of water pipe into it at an angle of about 40⁰;
- weld the pipe to the furnace body;
- screw an emergency backup valve to the pipe, the role of which is played by an ordinary water tap.
A heat exchanger is made from a pipe with a cross-section of 10 cm. It is cut horizontally into the body of the potbelly stove, and a reflector is mounted at the end. Inflating is achieved by installing a duct fan at the end of the heat exchanger. The air driven through the heat exchanger with its help has a high speed.
An air swirler consisting of triangular teeth connected by welding is placed inside the heat exchanger. A chimney is made from a pipe with a cross-section of 10 cm.
It is welded into a hole located in the upper part of the furnace body and brought out through the wall to the roof of the building.
Next they are making the oil tank. If you have a freon-free cylinder with a working needle valve, then it is quite suitable for this purpose. The vessel and the potbelly stove are connected with a hose connected to the valve. To fill the used oil, a hole is made in the tank body.
To ensure air access to the burner and the evaporator bowl, a groove is selected in the door of the lower compartment. Thrust plates are attached to the upper chamber door opening, which ensures reliable sealing of the combustion chamber. For the same purpose, the door is additionally equipped with a lock.
Now, even if the potbelly stove body is deformed as a result of strong heating, the tightness of the combustion chamber will not be compromised.
All that remains is to weld the legs from the angle pieces to the body and place the stove vertically. In addition to vertical potbelly stoves, horizontal stoves are also made from cylinders. Their structure is similar.
Materials
The exhaust furnaces are made from the following components:
- Cylinder (tanks from fifty liters are suitable);
- Stainless steel pipe 10 centimeters. In total you need about two meters.
- Steel corner.
- Steel sheet for the production of dampers, plugs, pancakes.
- Fuel supply hose.
- Clamps for fixation.
- Half inch tube.
- Half inch valve.