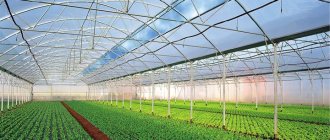
To grow vegetables year-round, heating is required in a greenhouse.
Heating a greenhouse can be done in several different ways. Let's talk about each of them in more detail.
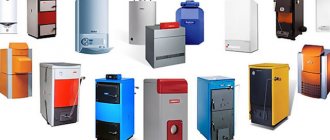
Boilers for heating greenhouses
When choosing a boiler, you should listen to the recommendations:
- electric _ The most accessible and practical are heating elements. Electrode ones are cheaper, but place high demands on the coolant. Induction is unreasonably expensive;
- gas . A model with a closed combustion chamber (air for the firebox is taken from the street) would be preferable. It can be installed in a greenhouse rather than in a vestibule, which eliminates heat loss. Condensing boilers have the highest efficiency. But they only work with low-temperature systems, so you will have to arrange heating according to the “warm floor” scheme (pipes are laid in a “snake” in the ground);
- solid fuel. It is advisable to purchase units that operate for a long time on one load of fuel.
Solid fuel boilers are:
- pyrolysis. Other advantages: high efficiency and clean exhaust;
- top combustion boilers;
- boilers with forced air supply (able to operate in start-stop mode without user intervention);
- pellet boilers. They work on granules pressed from cake or sawdust. They are fed into the firebox automatically by a screw feeder, so the user only needs to fill the hopper from time to time.
Stove for greenhouse
It is not recommended to purchase boilers designed for operation in smoldering mode (Buleryan, etc.), although they also operate on one charge for a relatively long time. Such heaters have extremely low efficiency. And in addition, a large amount of very toxic condensate forms in their chimney.
If it accidentally gets into the soil, it will make the vegetables poisonous. Such boilers can only be used in greenhouses where ornamental plants are grown, not edible ones.
How are plantings organized?
Our user sows green crops in December, and collects the first harvest in late March–early April. At the same time, he usually plants seedlings in the greenhouse, which he grows at home due to the distance from the dacha.
The greenhouse has high beds-boxes. That’s how everything there was earing and bursting with harvest even in November.
Can I use infrared heating?
IR radiation does not pose any danger. Such rays come from any heated body - the sun, stove, heating radiator. The advantage of IR heating is the absence of an intermediary, which is air in other systems: plants receive heat directly.
Heat loss, accordingly, is reduced (in other systems, heat is carried away by air to the ceiling), so IR heating can be considered the most economical.
Common Mistakes
The most important mistake when heating a greenhouse with your own hands is flaws in preliminary planning. It is necessary to think through all the details in advance, calculate the costs of materials and time.
If heating work in a greenhouse is carried out in a hurry, the risk of errors increases. This leads to heat loss, malfunctions and equipment breakdowns.
There is also a risk of making mistakes in calculations and choosing the wrong boiler power for the area you plan to heat. As a result: the inability to achieve the required air temperature in the cold season. Therefore, it is recommended to consult a specialist before carrying out work.
Types of IR heaters
All IR heaters for greenhouses operate on electricity. However, using the same energy carrier, they can have different designs.
Hull
Such devices are also called lamp IR heaters. The emitter is a spiral placed in a quartz tube (protected from dust), fixed in a reflector.
Case IR heater
Cabinet IR heaters are mounted at the top - on the wall or under the ceiling. The minimum distance to plants is 1-1.5 m (depending on power).
Film
Between the two layers of polyester there are tracks of carbon paste. In fact, such devices are not infrared: they heat up to a temperature no higher than +400C (with poor heat dissipation - up to +700C), so they emit even less intense IR radiation than a regular heating radiator.
For comparison: the coil of an IR lamp heater heats up to a temperature of 600C (until a red glow).
A film heater gives off heat by contact, so it is laid in the ground like a heating cable. Using such a heater in a greenhouse is dangerous!
A thin insulating film is easily damaged (the insulation of a heating cable is much thicker), as a result of which, when watering, water can get on conductive elements with subsequent electrical injury to the user.
Tape
These heaters are designed similarly to film heaters, but have a small width, equal to a garden bed. This allows you to save money by placing heating devices only under the plants.
Belt heaters are also installed vertically between rows. In this position, they heat the air like low-temperature radiators of a large area.
Heating the greenhouse with candles. How to heat a small room, tent, greenhouse with one candle?
We all know how much heat it takes to warm a cold house on a winter day. However, modern inventors are constantly coming up with new devices that can significantly save resources and effort. An example of such an invention would be a miniature stove powered by a single candle.
Most likely, such a stove will not be able to heat a large room on a frosty day. Here you will need to organize a full-fledged heating system, for example, think through electric heating schemes. But for heating a tent during a hike or even a greenhouse, the power of this stove will be quite enough.
This amazing device was invented by a Californian named Doyle Doss. It is put on stream and is called “Candle Heater” or in the original “Kandle Heeter”. The heater is quite successfully sold on the American market for $25 apiece. You can do it yourself using the diagram below.
To create such a heater, you will need:
Candle base; Three ceramic flower pots of different diameters; Metal bolt and set of metal washers and nuts; Supports for pots; Candle.
So, the pots need to be placed one inside the other and connected with a metal bolt with washers and nuts threaded onto it as shown in the heater diagram. Place the candle on the stand and secure the finished structure to the supports above the candle. The heater is ready.
Now all the heat from the burning candle will not be wasted, but will serve to heat the room. By heating the metal rod and air in ceramic pots, the candle thus completely transfers its heat to heat the room. In the end, it turns out that there is a lot of it. Probably not enough for a room in a big house. But for a tent, greenhouse, hallway or bathroom - it’s quite enough. An additional bonus will be the absence of soot on the ceiling (it remains in a small pot and can be washed out), as well as the lighting of the room from candle light. A very convenient option during power outages.
Greenhouse heating calculation
The power of the heating system corresponds to heat loss during the coldest period of winter. The amount of heat loss depends on the temperature difference inside and outside the greenhouse, as well as on the thermal conductivity of the enclosing structures - walls and roof.
Formula W = 1.25 * Kt * S * (tin - tout), where:
- W —heat loss power, W;
- 1,25 — coefficient taking into account heat loss from ventilation and blowing;
- Kt - heat transfer coefficient of the enclosing structure, W/sq. m*0С (not to be confused with the thermal conductivity coefficient of the material);
- S —area of the enclosing structure, sq. m;
- Tin - temperature inside the greenhouse, taken equal to +180C;
- Tnar - the lowest temperature of the coldest month, 0C.
Kt values for various designs:
- glass with metal sprockets: 6.4;
- double glazing on metal frames: 3.3;
- polyethylene film: 10;
- polyethylene film with condensation (in greenhouses with high relative humidity): 7.5;
- double film coating with an air gap: 5.8;
- the same with condensate: 4.6;
- concrete plinth 40 cm thick: 2.
There are computer programs and online calculators that perform calculations based on user-entered parameters.
Connection to an existing heating system
Before you do anything, you need to make sure that the boiler can provide the required pressure.
In addition, it makes no sense to connect to an existing system if the greenhouse is located at a distance of more than 10 m from the house.
And since the pipes laid to it must be insulated, it will not cost much. It is also necessary to take into account that the greenhouse needs heating most of all at night. This is when adjustable heating systems can lower the temperature. Here it is important to consider the priority of connection to the greenhouse.
Warm bed in a greenhouse made of polycarbonate, biological method
The biological method of heating beds is made using natural biofuel placed in the subsoil layer. Plant residues, sawdust and manure are used as filler, which is spilled with water for the rotting process. Such beds are the most economical design.
Warm beds running on natural fuel are usually divided according to the type of construction:
- In-depth, when fertile soil is removed, a trench is dug, compost is laid and filled with soil on top so that it is level with the total mass of the earth;
- Raised beds, the top layer of soil is removed from the surface and placed in special wooden boxes, which serve as protection against shedding and washing away of the soil during operation;
- A hilly bed, laid without a box on top of the main platform;
- A combined option, when the lower layers with organic matter are laid at ground level, and the fertile soil layer is fixed with a box.
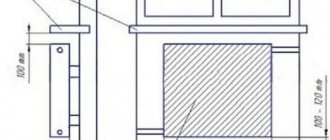
To make a structure for a combined warm ridge, you need to mark out places for future plantings. Then carefully remove the layer of turf, putting the fertile soil aside. Next, you need to dig a trench up to 60 cm deep. To protect against freezing, foam plastic or closed plastic containers are placed at the bottom of the trench. Next begins the first layer of organic matter, consisting of large branches, wooden chocks, and large plant objects.
This layer will play a drainage role. Then a paper backing consisting of waste paper is laid.
After this comes a layer of finer organic matter, food waste, tree leaves, and small grass stems. Next, add ready-made compost, or semi-rotted manure, to begin the rotting process. We install a pre-prepared box into which we will pour fertile soil. Each laid layer must be thoroughly watered. We cover the last layer with fertile soil. Soil enriched with organic matter is perfect for planting tomatoes, pumpkins and cucumbers. The rotting process can warm the earth for 2 months.
Installation
Installation of a cable electric soil heating system in greenhouses consists of the following steps:
Under the greenhouse it is necessary to remove a layer of earth approximately 40 cm deep; Sprinkle the bottom of the hole with a 5-centimeter layer of sand. Sand needs to be spilled and compacted to make the base stronger; We place a reinforced mesh with cells of approximately 10 cm on the sand and lay out the heating cable on it. The cable should be secured to the mesh with plastic ties so as not to damage the outer sheath. The wire is laid out like a snake with a laying step of approximately 12-15 cm; Between the turns of the heating cable we install a temperature sensor, which it is advisable to place in a corrugated tube; Sprinkle the mesh with the cable with a 5-7 cm layer of sand and again spill and compact it; We put a fine-mesh reinforced mesh on top to protect the cable from mechanical damage with a shovel or other objects; We fill the system with a fertile layer of soil on top; Install the thermostat and connect the cable to it
Attention! It is advisable to install an RCD in front of the thermostat to ensure safety precautions against electric shock.
After completing all installation stages, you can safely plant seedlings and connect the plant root heating system in your new greenhouse.
Owners' opinion
If you look at the reviews of owners of warm beds, you can see a truly rosy picture. A larger number of authors argue that growing seedlings in warm beds, and even in greenhouses, only has a better effect on the harvest. Those who use organic warm beds claim that in any climatic conditions the yield increases several times. They note the ease of formation of such beds, the possibility of early planting of seedlings and, accordingly, earlier harvesting. Many also point to the cost-effectiveness and durability of this method. On any site there will always be the ingredients to create this type of beds. And even a woman can build it with her own hands.
Owners of electric heated beds point to the ease of installation if you follow the instructions exactly, and the durability of such a structure. The only downside is that you can’t find such a system in stores everywhere. Some users order installation kits online. Increased productivity, early fruit ripening and full automation of this method are noted if you install a thermostat.
Many gardeners prefer the water method of heating beds. Among the advantages, in addition to high yield and early ripening, is the possibility of self-assembly of this type of heating. Any man is able to install pipes of the required size and diameter, connect a water pump and install a furnace to heat water. In addition, this method, as the authors note, is more economical than electrically heated beds.
DIY water heated floor
As already mentioned, a ground heating system for laying pipes with hot water circulating through them will be most effective if it is located near a house with a local source of hot water. In this case, you can use a household water heating boiler or boiler as a water heater.
If the greenhouse is located at a great distance from a residential building, then you can lay pipes from the house to the greenhouse underground.
To do this, you will have to spend additional effort and resources in order to insulate the pipes that run along the street.
And also install an additional heating device directly for the greenhouse.
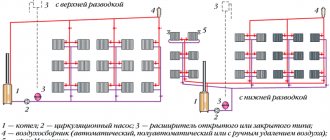
Heating system elements:
- heating boiler or furnace;
- pipes;
- expansion tank;
- chimney;
- circulation pump.
A pump is not necessary to circulate water. In budget options, water heating usually operates due to the difference between the pressure of hot and cold water.
The expansion tank can be either open or closed. It is necessary and can be either purchased or soldered independently.
The type of heating boiler can be different:
- a gas boiler;
- electric heating boiler;
- boiler for solid fuel;
- stove made of brick or metal on coal or wood.
The last option is the most convenient both from the point of view of efficiency and ease of installation. Assembling a small brick stove with your own hands is not difficult, and you can use not only coal and firewood as fuel, but also sawdust and any other wooden and paper household waste.
In accordance with the selected heating source, the chimney pipe is also selected:
- an ordinary brick chimney;
- from a mixture of asbestos and cement;
- metal pipe;
- double-sided “sandwich” pipe.