Siding is one of the most popular facing materials. It is inexpensive, looks beautiful, protects the house from frost, and the walls from moisture. In addition, covering a house with siding and insulation is very simple. If you have minimal construction and repair experience and a set of home tools, you can handle the job yourself. We'll figure out what to do now.
Selection of materials
Before covering a wooden house with siding, it is worth studying basic information about the types of material. The following brief description can be given:
- plastic siding is the cheapest, most practical, but is afraid of mechanical stress;
- metal - strong and durable, but needs protection from rust (does not apply to aluminum);
- wooden - fits perfectly into the properties of a wooden house and will be the best option, but buyers may be put off by the price;
- fiber cement - not so popular, not flammable, durable, but difficult to install and has a large mass.
Next, you need to select the sheathing material. It can be made of wood or light metal profile. Installing metal sheathing is easier on uneven ground. Such a frame will be strong and reliable.
But covering a wooden house with siding on a wooden frame yourself will cost less. You also don’t have to worry about protecting the wall and sheathing at the points of contact with the element, since they are made of material with similar properties. When purchasing and selecting wood for sheathing, it is important to ensure that the wood is:
- without delaminations;
- without deformation;
- without bluish spots or signs of rot.
Before starting work, the wooden sheathing is impregnated with fire retardants and antiseptics. The former increase resistance to fire, and the latter to mold and mildew.
Types and characteristics
The term “siding” refers to ordinary panels intended for cladding the facades of buildings and auxiliary home structures. In addition to their decorative purpose, the panels are often part of a multi-layer wall covering, installed for the purpose of waterproofing, reducing noise entering the premises, and improving the operational characteristics of the building.
At first, siding was made of wood; nowadays, the variety of types of such external cladding is quite large.
Natural wood remains extremely popular to this day. Of course, modern wood panels are significantly different from the boards that were used before.
The wood used for the production of natural siding, as a rule, is coniferous, and certainly goes through a cycle of special preparation, including disinfectant impregnations and heat treatment. This makes the raw material resistant to external influences and increases its resistance to fire and rotting.
Despite the processing of wood, it remains the most environmentally friendly material for the exterior cladding of buildings. No other type of material can compare with it in terms of thermal insulation properties.
Almost all types of modern cladding have a locking part with grooves, allowing the installation of panels with almost no gaps that require sealing.
Metal cladding of houses is not very popular. It is more often used for finishing public buildings, commercial and social buildings, industrial enterprises, offices and other similar buildings.
Most often, galvanized steel is used to produce such panels. The most expensive types are made from aluminum and zinc. The advantages of metal cladding are its reliability (with high-quality anti-corrosion treatment), ease of installation, non-flammability, mechanical strength (however, if the material is inattentively transported or due to a pinpoint impact, it may well become deformed).
Plastic siding is the most popular. More than half of the sales volume of all facade panels comes from this group. Most often, the base substance in them is polyvinyl chloride (PVC), a polymer characterized by excellent performance properties.
Siding installation is so simple and intuitive that anyone, even an inexperienced builder, can handle it.
The best insulation materials
Those home owners who ignore the issue of insulating the external walls of a building are deeply wrong.
No matter how you try, there will certainly remain voids between the wall and the cladding. They will not add heat to the house, but they will collect dampness and create conditions for the appearance of mold, moss, fungi, and insect nests, the proximity of which can be not only unpleasant, but also dangerous.
In addition, damp walls will inevitably collapse. And the dew point will be in the thickness of the wall, which means that temperature fluctuations will contribute to the freezing of the material, rapidly destroying the building. The insulation will move the point outward, into the thickness of the thermal insulation material. Condensed moisture will be discharged outside through the ventilation gap.
Any home should be insulated, even country houses where you live only in the summer. This will ensure the safety of the building and freshness in the house in the heat. After all, thermal insulation protects against heat no worse than against frost.
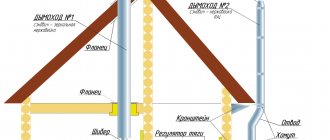
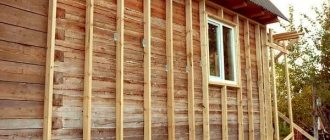
Frame installation
Finishing a wooden house begins with the installation of guides. The vast majority of siding requires the sheathing to be mounted vertically. Its pitch is selected depending on the insulation. The clear distance between the guides should be a couple of centimeters less than the width of the mineral wool. For polystyrene, the distance is selected exactly to match the width.
To make wooden sheathing, bars measuring 40x40 mm or 50x80 mm are most often taken. When using the metal version, you will need a set of special profiles of different sections.
The frame slats are installed in increments of 40 cm, incl. around openings. There should not be any slats at the very bottom
Nails or self-tapping screws are used to attach the frame to a wooden wall. The former must have an anti-corrosion coating made of zinc or aluminum. Before fastening the sheathing with a construction stele, a vapor barrier is installed. To do this, you can use regular plastic film, but it is better to buy a special vapor barrier membrane. The choice of materials in a wooden house should be taken extremely responsibly. It is not recommended to use those that will block the movement of air through the walls. For this reason, membrane is better than film.
When finishing a wooden house with siding, the vapor barrier is attached with an overlap of 10 cm. Before starting work, it is recommended to read the manufacturer’s instructions. Next, the guides are attached at the required increments, starting installation from the corners. Levelness is checked using a building level.
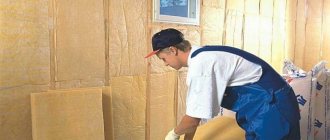
Insulation is placed between the sheathing guides. It is better if it is mineral wool due to its good air permeability. A layer of waterproofing and wind protection needs to be fixed on top of the wool. The best option would be modern vapor diffusion (not to be confused with vapor barrier) windproof membranes.
Distinctive qualities of cladding
Plastic slats can easily withstand high temperatures (up to +50 C) and are fire resistant. They are not afraid of moisture and are not infected by pathogens, are not damaged by moderate mechanical stress, do not attract insects and are environmentally friendly.
Plastic slats are fire-resistant, water-resistant, environmentally friendly, and easy to install.
This decoration on the outside of the house looks attractive and can transform even dilapidated buildings, as it allows you to hide all the imperfections of the facade. Siding is easy to install, but still, its installation requires certain skills. Siding perfectly masks pipes, curved walls and plaster errors.
Modern slats come in a variety of colors, which allow you to show your design skills and create an interesting decorative solution. You can choose drainpipes, storm drains, extensions and various related elements to match the cladding.
When choosing a decorative panel material, you should know that there are several types of it on the construction market:
Securing the starting J-profile
Cladding a house with siding with your own hands at the next stage involves the following procedure:
- Finding the lowest point on the sheathing using a level. It is necessary to measure 50 cm upward from this point and mark this point (for example, with a loosely screwed screw).
- Sequential marking of lines with self-tapping screws along the perimeter of the building.
- Pull the cord at a distance of 50 cm from the bottom along the screws.
- Marking the location of corner profiles on slats. The profile is laid to the corner, its edges are marked.
- Fixing the first starting profile along a rope with a gap of 6 mm from the future border of the corner profile.
- Fastening the remaining starting strips with a gap between adjacent ones equal to 10-12 mm for thermal expansion.
- Checking the level of the starting bars.
Installation of the starting profile
The profile must be mounted perfectly level. If there are deviations at this stage, the entire siding of the wooden house will be distorted.
Corner profiles
Before you attach the siding, you will need to install the corner strips. They can be for external and internal corners. The first ones are mounted in this order:
- Marking the location of the edges of the spotlights.
- Attaching the guide to the corner of the building. There should be a gap of 3 mm between the profile and the soffit (roof). The lower border of the profile is located 6 mm below the border of the starting profile. The plank is secured with self-tapping screws in the upper part.
- Check verticality using a building level or plumb line. Adjust the location if necessary. Fastening the bottom and middle with self-tapping screws. Fasteners do not need to be provided too often.
Installation of a corner profile
If it is necessary to join the profile in height, the joining place is located at the same level in all corners of the building. The joining is done with an overlap. The part with holes for fastening the top panel is cut so that there is a gap of 9 mm between it and the same part of the bottom panel. Instead of a corner profile, when installing siding on a wooden house, you are allowed to use two starter ones.
Step-by-step instructions for installing profiles for internal corners look almost the same. But in this case, other strips are used.
Options for interior corner solutions
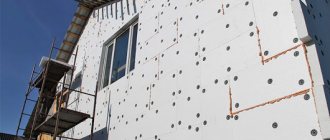
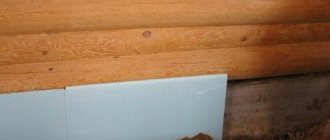
Choosing insulation for the facade
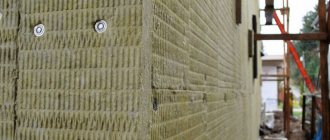
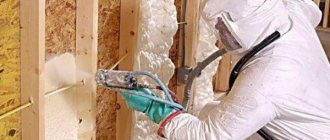
If you want to use foam plastic as an insulation material, then keep in mind that, despite all its advantages, it is not suitable for buildings with curves, and then it is better to give preference to mineral wool or combine these two options.
Scheme for insulating a house with mineral wool
Buy mineral wool that is intended for work outside the building - it is thicker and has a more dense structure. One of the varieties of fibrous roll material is ecowool, which has good thermal and vapor insulation, but its high price is not suitable for everyone.
Opening frames
When securing the siding with your own hands with insulation, you may encounter difficulties at this stage of the work. The fastening in this case depends on how the opening is located relative to the plane of the outer wall: flush or recessed.
Waterproofing is required around windows
In case of flush openings, the façade should be finished in the following order:
- Performing waterproofing of openings.
- Fastening trims or J-type profiles. For each opening you need to use 4 platbands: 2 horizontal and 2 vertical.
- The profiles are connected to each other. A bridge cut is made on each side of the upper profile. They are bent down to divert precipitation into the lower profile. Areas of material on the vertical strips that prevent connection with the upper ones should be removed. The side and top profiles are connected so that the bridges are inside.
- The operations are repeated with the lower casing. But in this case the bridges are cut in the side elements.
Installing profiles around windows
To work with recessed openings, you need to follow the same recommendations as in the previous case. The differences lie in the use of profiles of different shapes.
Savings during work or savings during further operation: we consider the benefits
In order not to indulge in calculations, I will present the facts. Whether it is beneficial for you or not, decide for yourself. Saving energy resources is obvious.
Fact No. 1. Arhangelsk region. Many houses have been built from 150 x 150 timber. The fashion for insulation has not caught on there, so no one is in a hurry to insulate.
In winter, the stoves are heated with wood two to three times a day.
Houses, as a rule, have not one, but two stoves. A lot of fuel is consumed, but people live, although they don’t walk around the house naked.
Fact No. 2. Moscow region. House made of timber with a diameter of 200 mm. Before insulation, in order to maintain the temperature to 11 - 19 C°, they burned with wood 2 times a day.
After insulation (basalt wool 50 mm) in 3 hours, an electric boiler warms up the house on the first floor to 21C°, on the second (attic) - to 26C°.
Frost outside - 20C°.
From the examples it is clear that insulation will halve heating costs. The main thing is to do the casing correctly. There is no need to skimp on quality, and avoid excess layers of the “pie”.
Rockwool - insulation of external walls under siding
Our website presents a number of log house projects, for example: Or you can see all prices for log houses. You can calculate the house or bathhouse you need with maximum accuracy using our log house cost calculator. To order and buy a log house, call:
- Vologda
- Moscow,
Comments
No comments yet.
Installing the first panel
Work should begin on the side of the building that is least noticeable. In this case, there is an opportunity to practice and get better. The first panel is first inserted into the corner profile and into the locking connection of the starting one, snapped into place. A 6 mm gap must be left between the bottom of the lock and the first siding element to compensate for thermal expansion.
Correct fastening of slats
The next step is to fix the first cladding strip to the sheathing. Self-tapping screws are used for this. The siding has elongated holes for fasteners; the self-tapping screw must be placed in the middle of this hole. All fasteners are placed strictly perpendicular to the wall surface. The screws do not tighten too much; this is necessary to prevent deformation and damage due to thermal expansion.
Preparation
- First of all, it is necessary to remove unnecessary parts from the walls that will interfere with the installation of the sheathing;
- Dismantle the trim on doors and windows, remove awnings, lamps, and ebbs. If necessary, you need to remove the window sills, as shown in the photo. You should pay special attention to this so that no unforeseen problems arise during the work;
- The surface of the brick wall needs to be leveled, the old plaster must be removed;
- Fill all the cracks with tow or silicone paste;
- Treat the surface with a moisture protective agent, and then apply a primer.
Installation of remaining panels
Finishing with siding with insulation (or without it) is then performed in two ways:
- overlap extension;
- extension using H-profile.
With the first method, you will need to first shorten the panel locks and fastening frames so that the overlap length is 2.5 cm. Installation of the H-profile is carried out according to the same principle as the corner elements. It is necessary to remember about the gaps of 0.6 cm from the starting strip and 0.3 cm from the soffit.
Every 2-3 rows it is worth checking the horizontal position of the siding using a building level. When passing through openings, a piece of trim falling into a window or door is simply cut off.
What siding to use for cladding
The modern market offers a huge selection of panels in a wide variety of colors and textures. Siding can successfully imitate wood, brick and stone surfaces.
What siding to use for cladding
The standard thickness of the facing panel is 1 mm. Width and length indicators are not subject to standardization and depend on the preferences of a particular manufacturer. The most common cladding panels are about 3-4 m long and about 20-25 cm wide. A large dimensional grid will allow you to choose the panels that will be most convenient to use for cladding your home.
Residential buildings are usually finished using vinyl or any other base siding. When choosing a specific option, all other things being equal, give preference to vinyl panels.
When choosing vinyl siding, be sure to pay attention to the appearance of the elements - the coloring of the panels must be strictly uniform
Expensive siding usually has the same color on both sides. For more budget-friendly materials, the inside is often a little lighter than the outside.
It is not recommended to use panels with a glossy finish. Such material will become very hot in the sun, to the point of deformation. Therefore, the best choice is siding with a matte finish.
Check that all panels are the same thickness. The parameters of their nail holes should also be identical.
Before purchasing a material, check its ductility. To do this, you can bend the thin part of the panel near the nail hole. If the edge breaks, you should refuse to purchase such panels. If the material bends, but remains intact, you can safely use such siding for cladding with insulation.
Completion of finishing
How to properly sheathe a building under a roof? You need to follow this algorithm:
- Measure the distance between the bottom of the finish strip lock and the penultimate siding panel. From this distance, subtract 1-2 mm per indent and obtain the required width of the last panel. The element is marked and the upper part, in which the locking connection is provided, is cut off.
- At the top of the last plank, hooks are made, which are located in increments of 20 cm. To do this, make cuts and bend them outward.
- The prepared strip is inserted into the penultimate panel and snapped into the finishing profile.
To sheathe the pediment, use profiles for internal corners or starting ones. The installation technology is similar to cladding the main part of the wall. In the same way, you need to trim the panels and remember the gaps of 6 and 9 mm. The last, uppermost section of the gable can be secured with a self-tapping screw directly through the panel material. This can only be done here; in other cases, drilling holes is not allowed.
Carrying out work in winter
When performing work at subzero air temperatures, the fragility of the plastic increases. The brought material should not be stored near heating appliances. Vinyl panels should be cut in a heated room. Since the material contracts when cooled, a thermal gap of 6 mm is provided between the ends. Other actions are performed by analogy with the work algorithm described above. If the technology is followed, the siding strips will not warp when the air temperature rises.
Vinyl siding should only be cut indoors.