The most important stage in finishing any room is insulating the floors. Many people underestimate the amount of heat loss through the floor, but properly selected insulation can save up to 30% of energy on heating. Particularly large savings are achieved when using a heated floor system, which simply needs to be insulated from below so that it does not heat the floors or the ground.
Floor insulation thickness
Choosing the type of insulation that is best suited for your room is only half the battle. It is important that the insulation layer is of sufficient thickness, because even the best insulation will not provide sufficient thermal insulation if it is laid in too thin a layer. On the other hand, an excessively thick layer of insulation reduces the height of the ceilings in the room and is an unjustified waste of money.
Thermal conductivity of some insulation materials
It is important to understand that the required thickness of insulation depends on the climatic conditions in your area. It is obvious that when using the same insulation in houses of the same type in Sochi and Norilsk, completely different layer thicknesses will be required. Therefore, you need to take into account that all the recommendations in the article are given for the typical climate of central Russia, where the temperature in winter rarely drops below -25 degrees. If you live in a milder or more severe climate, then the recommendations need to be adjusted up or down.
Let's consider the main types of thermal insulation and the required layer thickness when used in various types of floors.
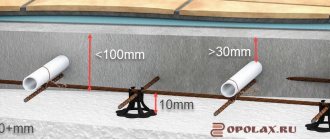
Calculation of insulation thickness for underfloor heating systems
Styrofoam
Usually this word refers to foamed polystyrene and extruded polystyrene (penoplex). In terms of chemical composition and thermal insulation properties, these materials are practically the same, however, penoplex has much greater bending strength and resistance to crumbling than traditional polystyrene foam. For this reason, recently most consumers are abandoning foamed polystyrene (foam) in favor of extruded polystyrene (penoplex).
Styrofoam
The advantage of this type of thermal insulation is its low price, ease of installation and moisture resistance. The disadvantages include the flammability of this material, and when polystyrene burns, a large amount of toxic substances is released.
Polystyrene slabs are produced in thicknesses from 5 mm to 50 mm; a special chamfer is made on the edges of the slabs so that during installation, gaps and, consequently, “cold paths” do not appear at the joints.
Expanded polystyrene
If a layer thickness of more than 50 mm is required, then two or even three layers of polystyrene are laid, with each new layer being laid offset relative to the previous one so that the joints of the slabs of the upper row fall on the centers of the slabs of the lower one.
Screed diagram with foam plastic
When insulating a floor located directly above the ground, the foam layer must be at least 300 mm for a house with a wooden floor, and 200 mm for a house with self-leveling concrete floors. You should lay at least 4 layers of the thickest foam panels, offset from each other.
If there is a cold basement under the floor, then the foam layer can be reduced by 50mm.
To insulate floors between floors of a private house, 150 mm of foam is sufficient for wooden floors and 100 mm for concrete floors.
If you are insulating floors in an apartment building, then for all floors except the first it is enough to lay one layer of foam plastic 50 mm thick. On the ground floor the thickness can be increased to 80-100 mm.
| Index | Polyspen | Polyspen Standard | Polyspen 45 | Control method |
| Density, kg/m3 | 30-38 | 30-38 | 38,1-45 | 5.6 each |
| Bending strength, MPa, not less | 0,4 | 0,4 | 0,4 | 5.8 each |
| Water absorption in 24 hours, % by volume, no more | 0,4 | 0,4 | 0,4 | 5.9 each |
| Thermal conductivity at 25+-5 degrees Celsius, W/m * °C, no more | 0,028 | 0,028 | 0,030 | at 5.10 |
| Toxicity, Hcl 50, g/m3 | T2 moderately hazardous | T2 moderately hazardous | T2 moderately hazardous | at 5.11 |
| Flammability group | G-3 normal-flammable | G-4 highly flammable | G-4 highly flammable | at 5.12 |
| Flammability group | B-2 moderately flammable | B-3 flammable | B-3 flammable | at 5.13 |
| Smoke coefficient | High smoke generating ability | High smoke generating ability | High smoke generating ability | at 5.14 |
| Compressive strength at 10% linear deformation, MPa, not less | 0,2 | 0,2 | 0,3 | 5.7 each |
Calculated thicknesses of Penoplex thermal insulation
Features of laying insulation
The substrate installation scheme depends on the type of materials used. But in any case, it must be placed on the most flat surface possible.
No. 1 - slab laying technology
The substrate, constructed from slabs with a mounting chamfer, is assembled easily - according to the principle of a designer. The slabs are easy to adjust and measure. You can cut the slabs to the appropriate sizes with a regular knife.
The simplicity of laying the substrate is convenient because during installation you can change the configuration of the circuits and the length of the pipelines at any time. To prevent the slabs of material from moving relative to each other during installation and operation, their joints are glued with construction tape.
In order to prevent the formation of heat-conducting bridges, the contour seams between adjacent slabs are taped with foil tape
Sequence of actions when laying insulation boards:
- Foam boards are laid on the cleaned and leveled base, fixing them with special plastic brackets, anchor dowels, or by placing them on an adhesive composition.
- A foil layer is laid on top of the laid and joined slabs.
- The top layer is lined with a reinforcing mesh, onto which the pipes are subsequently mounted.
If the concrete screed of the base floor is poured with significant deviations from the level or has rough cracks and unevenness, or the concrete slabs are laid with irregularities, it is better to build a frame before laying the substrate. To do this, wooden logs are assembled from dry and even timber with a section of 50x50, 50x100 or 100x100 mm.
The logs are placed at an equidistant distance of 60 cm, and pieces of mineral wool or foam boards are laid between them
A distance of 60 cm between the logs is considered the most optimal option, since this “step” does not require the creation of additional sheathing. The main thing is that the logs are located in the same plane and lie strictly level.
Thermal insulation boards must be tightly laid between wooden joists. If there are cracks, they must be filled with foam.
When laying slabs of extruded polystyrene foam, it is necessary to observe some nuances:
Image gallery
Photo from
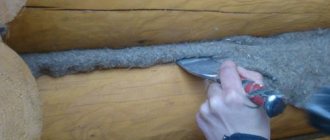
Cutting extruded polystyrene boards
Arrangement based on the principle of brickwork
Installing damper tape around the perimeter of the room
Waterproofing with factory markings for installation
No. 2 - installation of roll materials
The roll material is laid on a carefully leveled base and fixed to the base using tile adhesive or double-sided tape. Cutting strips of the required size is done with ordinary office scissors.
To compensate for the thermal expansion of the screed, it is recommended to place the foil layer slightly overhanging the wall.
The foil material is placed with the metal side up so that the metallized surface best reflects heat
When laying rolled materials, they are guided by the markings of the printed installation markings. It determines the distance between the circuits and facilitates pipe laying. Typically, rolled materials have allowances of foil polymer film at the edges to allow connection of adjacent webs.
When laying sections, pay special attention to expansion joints. To do this, the joints of the laid strips are glued with one-sided construction or metallized tape. If cork is used as a substrate, then before laying it it is necessary to take care of reliable vapor and waterproofing.
No. 3 - mat installation diagram
The stage preceding the laying of mats is the installation of film waterproofing. After laying it around the perimeter of the room, strips of damper tape are glued along the bottom of each wall.
Mats are laid on the prepared base, fastening the slabs together using a locking system. To reliably fasten slabs of small thickness and light weight, use the adhesive method and use plastic harpoon staples.
Some manufacturers, for ease of installation, include edge strips complete with mats, which can be used to conveniently mark areas of exit from the heating zone
An important point: when laying mats, it is not allowed to use metal fasteners, since they can damage the integrity of not only the heat insulator, but also the waterproofing.
The choice of the optimal base option for a thermal insulation substrate depends on your capabilities. Yes, a good substrate will not be cheap. But it will significantly increase the functionality of the equipped water floor system.
Penoizol
This is a liquid version of polystyrene foam, which has the same pros and cons as the solid version. Its advantage is that it can be poured into hard-to-reach places and, after hardening, forms a monolithic coating without seams.
Penoizol
The disadvantages include the fact that you need to think about the method of supplying penoizol for pouring; on high floors this can be a problem. In most cases, penoizol is used during the construction of private houses; when insulating floors in apartment buildings, it is more convenient to use polystyrene foam and penoplex.
The required thickness of the penoizol layer is the same as that of solid foam.
Glass wool and mineral wool
An example of floor insulation with mineral wool
Perhaps this is one of the most budget-friendly options for thermal insulation. In addition to its low price, cotton wool does not burn at all and has good vapor permeability, so it is excellent for insulating wooden floors. This is where the advantages of this material end. The disadvantages include the fact that cotton wool tends to accumulate moisture and this causes rotting and mold growth, the second disadvantage is that over time the wool crumbles if the thermal insulation layer under the floor is not sealed tightly enough, as a result, particles of fibers can pass through the finishing coating become airborne and cause respiratory irritation. Also, wool has very low strength, easily breaks and deforms, which makes it impossible to use it under a concrete screed.
For floor insulation on the ground, rigid mineral wool slabs are recommended
Despite its disadvantages, mineral wool is widely used as insulation, usually in wooden floors.
Most manufacturers produce glass wool and mineral wool in rolls or sheets with a thickness of 50 to 200 mm. Sheets can be laid in several layers with offset joints for better thermal insulation.
Insulation thickness
To use mineral wool on the first floors located above the ground, very good waterproofing is required. Cotton wool instantly absorbs moisture, after which it loses its thermal insulation properties. For this reason, it is better to use foam plastic for thermal insulation of the first floors. If for some reason it is still necessary to use mineral wool, then its layer should be at least 400 mm.
Multilayer laying of insulation
If there is a basement under the floor of the first floor, then a layer of mineral wool 300 mm thick is sufficient.
When insulating wooden floors between floors of a private house, the layer of wool should be at least 200 mm, and in wooden floors of apartment buildings a thickness of 100 mm is sufficient.
| Name | Advantages | Minuses | Thermal conductivity |
| Sawdust | Cheap, environmentally friendly material, lightweight | Flammability, susceptibility to rotting | 0.090-0.180 W/mK |
| Expanded clay | Eco-friendly, durable material, not subject to rotting, non-flammable | Heavy weight, fragility | 0.148 W/mK |
| Styrofoam | Does not rot, is waterproof, lightweight and easy to install | Low vapor permeability, cannot withstand high temperatures, releases toxins when melted | 0.035-0.047 W/mK |
| Mineral wool | Low thermal conductivity, easy to install, environmentally friendly, fireproof | When moistened, it shrinks and loses its insulating properties. | 0.039 W/mK |
List of possible errors
- One of the common and serious mistakes when insulating a floor using penoplex is the missing temperature gap between the screed itself and the surface of the walls. Regardless of the type and cost of the cement or concrete mixture used, the solution may expand during hardening, resulting in its displacement. In this case, a solidly poured monolith may become completely covered with cracks. The consequences will be close to catastrophic, especially if a “warm floor” system is installed - moisture can penetrate inside and damage the heating elements of the structure. The recommendations of professionals are to apply damper tape to the area where the screed meets the walls and columns. You can also leave about 1 centimeter of free space, which, after the screed has completely hardened, is filled with sealant.
- Another common mistake is the use of inappropriate mastics as moisture insulation materials. Most of them contain substances that can destroy the structure of polystyrene foam. In this case, it is safest to use modern films made of membrane material, the joints of which are simply sealed with tape.
- The question often arises about the number of layers required to protect against moisture. Penoplex slabs are often placed on top of roofing felt laid on the ground. The heat insulator manufacturer recommends installing only one vapor barrier layer, which is placed on the surface of the slabs. More powerful protection against moisture is needed only if you plan to install a heated floor. The basic principle is as follows: it is necessary to exclude the penetration of moisture from the outside, leaving the possibility for evaporation of the condensate that has fallen. If Penoplex is covered with waterproofing on both sides, this rule will be violated.
- There are also important notes regarding what kind of floor covering can be used to decorate the foam insulating layer. Often, the strength of the thermal insulation layer is greatly overestimated, and the final finishing is carried out without pouring. Meanwhile, the main purpose of the screed is to uniformly distribute loads and reduce the effects of vibration. Secondary is the protection of the insulation from exposure to ultraviolet radiation and the external environment. A good alternative would be a two-layer installation of plasterboard with a moisture-resistant coating (provided that such work can be carried out in the given room). The absence of any screed is absolutely not allowed.
Ecowool
Ecowool
This material is very similar in characteristics to mineral wool, but is made from cellulose fibers, therefore it is absolutely safe for health. Just like mineral wool, ecowool is afraid of water and is easily deformed. Therefore, in most cases it is used to insulate wooden floors between floors.
Ecowool insulation
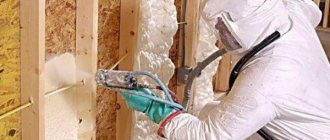
The big advantage of ecowool is that it is installed by spraying under pressure from a special pipe. Thus, the insulation can be “blown out” under the already assembled floor; for this you only need to make several small technological holes.
Spraying ecowool
The required thickness of the ecowool layer corresponds to the thickness of the mineral wool layer, all other things being equal.
Characteristics of basalt and ecowool
The use of lightweight heat-insulating screeds
Providing good thermal conductivity is achieved by using a similar material such as perlite sand in concrete screeds. Lightweight concrete with perlite sand is environmentally friendly, durable, and retains heat remarkably well.
The downside is that the perlite screed must be protected with moisture-repellent compounds. Perlite sand is a very hygroscopic material.
Selecting a heat insulator for a floor is a very complex process. The variety of materials and their characteristics require a careful selection approach. The price issue is also very important. Choose the optimal middle ground between purchasing qualities and cost.
Cork material
The main advantage of natural cork insulation is the extremely high sound insulation of the coating. The high price of the material is compensated by the fact that you simultaneously solve the problem of heat and sound insulation. In addition, cork insulation almost does not burn, is not afraid of moisture, is resistant to rotting and is extremely durable, which allows it to be used as insulation under self-leveling floors.
Cork insulation
Due to its rather beautiful texture, cork insulation is sometimes left even as a finishing coating. In this case, the top layer is covered with a special varnish, which protects it and at the same time emphasizes the design.
Cork insulation is available in rolls and sheets with thicknesses from 3 mm to 200 mm. Sheets of maximum thickness allow you to insulate floors above the ground in just one layer, but at the same time they are very expensive. The cost per square meter of thick cork insulation can reach up to 5,000 rubles. For this reason, cork insulation on the first floors of buildings is rarely used.
Cork thermocork insulation
The thickness of cork insulation on the ground floor of a private house with concrete floors should be at least 100 mm; in floors between floors with concrete floors, a layer of 50 mm is sufficient; if the floors are wooden, then the layer should be increased to 70 mm. In an apartment building, cork insulation is laid in a layer of 10 mm to 30 mm; this is quite enough for effective thermal insulation and complete sound insulation from neighbors below.
Video - Cork insulation
Is thermal insulation necessary for underfloor heating or not?
Thermal insulation in the “pie” of a warm water floor plays a huge role; the correct functioning of the entire heating system depends on it. The screed, poured over the thermal insulation, turns into a large surface that transfers heat.
The main functions that a thermal insulation flooring under a warm water floor should perform:
- distribute heat flows evenly throughout the heated room, this is especially important when laying a water structure, since the configuration of this system consists of straight and curved pipes, so the heat is not distributed evenly;
- prevent the outflow of warm air through the ceilings; it serves as a reflective screen, which also makes it possible to save thermal resources;
- act as sound insulation;
- prevent the entry of moisture and cold from below - when arranging a structure above an unheated room or on the ground;
- prevent the formation of moldy and fungal deposits.
In addition, by using polystyrene foam mats with bosses as insulation under a warm water floor, you significantly simplify the process of installing and fixing pipes.
For your information! If the thermal insulation layer is correctly selected and laid, the floor “pie” turns into a closed thermal device, where thermal radiation is distributed evenly and in the desired direction.
Polystyrene concrete
This is a relatively new material for insulation; it combines the strength of concrete and the lightness of polystyrene. The material has excellent heat and sound insulation properties and at the same time is a durable screed. It is ideal for thermal insulation of large rooms, since it is very easy to pour and level; a team of experienced craftsmen can pour up to 500 m2 of polystyrene concrete per day.
Polystyrene concrete
Due to its low weight, polystyrene concrete does not place a large load on the floors, unlike traditional liquid screed. It does not require waterproofing or additional insulation. You can lay tiles or laminate on a thick backing directly on top of polystyrene concrete. To lay soft coverings such as carpet or linoleum, a thin layer of traditional screed, no more than 30 mm thick, is poured over the insulation.
Polystyrene concrete floors are being poured
For effective thermal insulation of the first floors of private houses, 300 mm of polystyrene concrete above the ground is sufficient; if there is a basement under the floor, then the layer can be reduced to 200 mm. 100 mm of insulation is usually poured into the floors between the floors of private houses; in apartment buildings, a layer of 50 mm is sufficient.
| General characteristics of polystyrene concrete | Values |
| Flammability group | G1 |
| Density | from 150 to 600 kg/m³ |
| Frost resistance | from F35 to F300 |
| Strength characteristics | from M2 to B2.5 |
| Coefficient of thermal conductivity | ranging from 0.055 to 0.145 W/m °C |
| Vapor permeability of polystyrene concrete | 0.05 mg/(m h Pa) |
Insulating the floor with penoplex under the screed, step-by-step process
For insulation under the screed, it is wiser to use Penoplex-F. The letter "F" stands for foundation. It can withstand high compressive loads. They reach up to 27 kilograms per 1 sq. centimeter.
The slabs are laid gradually on a layer of sand. First, one area is sprinkled, and foam boards are laid on it with light pressure and hand movements from side to side to level the sand. Then they move on to the next section until they cover the entire floor.
When laying penoplex on a concrete base, it is first primed. The insulation is applied only after the primer has completely dried. It can be fixed to concrete with glue, putty or foam. In order for the gluing to be high-quality, the concrete surface must be carefully leveled. The joints of the plates are connected to each other with adhesive tape or tape.
When the heat-insulating floor material is completely laid, it is covered with plastic film to protect it from moisture, not forgetting to leave a small 15-centimeter overlap on the walls. This is necessary so that moisture does not get on the insulation from above.
To increase the strength of the base, reinforcement is made; a mesh with cells of 80*80 or 100*100 mm is applied to the film. A layer of sand and cement mortar up to 15 mm thick is evenly laid on top of it. The semi-dry screed is compacted, the masonry mesh is slightly raised and compacted again. To level the surface, beacons are installed in the corners of the room.
To prevent the screed from cracking when it hardens, it is sprayed with water until completely dry. Semi-dry screeds, due to the limited amount of water in them, dry faster, wet ones - 15-20 days. The finished foam screed can be covered with different flooring materials. Waterproofing in the form of a film is laid under laminate, parquet boards, and wooden coverings.
Additional Information! To prevent the screed from cracking as it expands during temperature fluctuations, damper tape is glued to the walls along the inner perimeter.
Staged layers of construction: concrete base, insulation, waterproofing, reinforcing mesh, cement-sand screed, finishing floor covering.
Expanded clay
Expanded clay
Expanded clay is a popular thermal insulation material used in wooden floors and floors with dry screed based on gypsum fiber board. In the latter case, in addition to thermal insulation, it is also a leveling material.
Expanded clay is one of the cheapest materials for thermal insulation; it does not burn, is safe for health and is lightweight. At the same time, it easily absorbs water, which reduces its thermal insulation properties and significantly increases its weight. Therefore, the use of expanded clay requires reliable waterproofing. Another disadvantage of expanded clay is that when working with it, a large amount of dust rises into the air.
Expanded clay as thermal insulation
In terms of thermal insulation properties, expanded clay is inferior to most synthetic materials, so it requires backfilling with a thicker layer, which reduces the height of the ceilings in the room.
Using expanded clay for insulation. The photo shows expanded clay being poured with lean concrete
For effective thermal insulation of the first floors of buildings from the ground, the expanded clay layer must be at least 400 mm when using wooden floors and 300 mm when using concrete floors.
Between the floors of private houses, at least 200 mm of expanded clay should be poured into the floors for wooden floors and 150 mm for concrete floors. In apartment buildings, a layer of expanded clay of 50-80 mm is sufficient.
| Indicators | 10-20 mm | 5-10 mm | 0-5 mm |
| Bulk density, kg/m3 | 280-370 | 300-400 | 500-700 |
| Crushing strength, N/mm2 (MPa) | 1-1,8 | 1,2-2 | 3-4 |
| Grading, % | 4 | 8 | 0 |
| Frost resistance 20 cycles, gravel weight loss, % | 0,4-2 | 0,2-1,2 | not regulated |
| Percentage of crushed particles, % | 3-10 | 3-10 | No |
| Thermal conductivity, W/m*K | 0,0912 | 0,0912 | 0,1099 |
| Water absorption, mm | 250 | 250 | 290 |
| Specific effective activity of natural radionuclides, Bq/kg | 270 | 270 | 290 |
Surface preparation
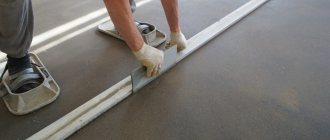
The installation of a water heated floor begins with cleaning the “sub-floor” of dust and dirt, which will help identify its unevenness. According to accepted standards, the height difference in the room should not exceed ±5 mm. There are two ways to achieve a flat surface:
- Having made a rough screed for a water heated floor - a layer that will hide all the unevenness of the base. It can be made from concrete (M300 grade is enough) or sand concrete;
- If the floor surface has many small irregularities, it can be leveled by scattering several buckets of sand and leveling it with a rule.