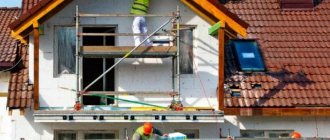
Insulating the outside of the walls allows you to retain heat inside the room. It is performed at the stage of construction or reconstruction of a building. Modern technology for facade insulation is carried out in two ways. A ventilated façade is a durable frame along the wall, which is filled with heat-insulating material and lined with porcelain stoneware or composite cassettes on the outside. And the second insulation system “wet facade” consists of insulation, reinforcing mesh, primer and requires final plastering.
The work is carried out using water, which is why the epithet “wet” arose. The advantage is that the construction of an expensive frame is not required, and the necessary materials are attached directly to the wall. They are then covered with a beautiful finishing layer.
How to choose materials for wet wall insulation
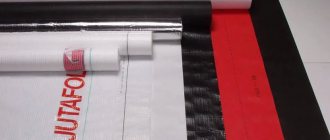
The raw materials used in the work must have a certain level of water absorption,
frost resistance, vapor permeability and thermal expansion.
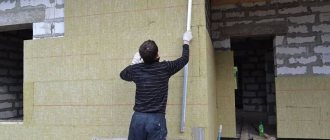
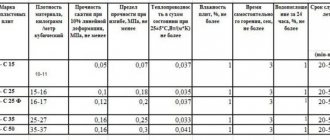
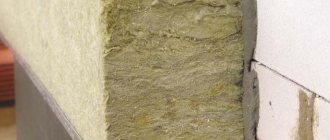
The insulation layer for a wet facade can be basalt (stone wool slabs) or polystyrene foam. Plates made of basalt wool with a density of 150 kg/m3. and a strength threshold of at least 15 kPa, are recommended for finishing the facade of a house.
Glass wool is not used as insulation for the plaster system, because the structure of the material is not intended for high loads.
Insulating facades with extruded polystyrene foam is no longer popular because it is more difficult to attach due to weak adhesion to construction adhesive. In addition, this material “does not breathe”, prevents the free conversion of air and steam, smolders in a fire, releasing toxic substances.
It is allowed to insulate the walls of a house with polystyrene foam only of façade grades that meet fire safety requirements. Additionally, for the same purpose, cuts are made from mineral wool.
When insulating a log house with penoplex, the protruding joint of the logs is not removed, because cut crowns will cause the corners of the house to freeze.
The choice of material depends on the thickness of the wall and its composition, on the climatic zone where construction work is carried out, and on the layer of interior finishing.
Benefits of technology
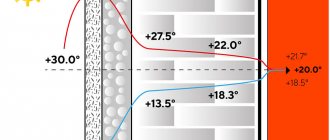
Plastering the insulation extends its service life, shifts the dew point.
The facade forms an impression of the architectural style of the building and belongs to the representative part of the house. External wall insulation finishes protect the home from wind, moisture, and precipitation compared to internal thermal insulation. Facade plastering moves the point of condensation formation to the outer surface, and moisture evaporates into the atmosphere rather than inside the room.
External cladding reduces the risk of cracks in the load-bearing wall and extends the service life of the building. Thin-layer finishing improves the internal microclimate and increases the aesthetic perception of the building. Visual defects are covered with decorative cladding.
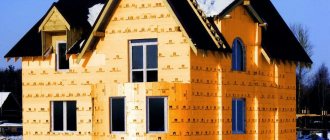
How to fix insulation boards
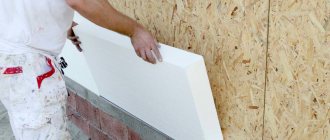
The insulation is glued to the previously prepared wall surface. The glue is carefully applied
perimeter of the material. This method reduces the consumption of adhesive and ensures the required fastening strength. During work, make sure that the glue covers at least 40% of the insulation area.
After drying for 3 days, the thermal insulation layer is additionally fixed with dowels. The fasteners enter 5-9 cm into the wall, depending on the volume and number of pores. The insulation must be secured with a dowel with a wide head. The dowel cap should be made of polyurethane foam so that wet spots do not appear on the facade.
Stains on the facade appear when using a dowel with a metal head.
Because the metal freezes at the base of the outer surface, and warm air leaves the house, condensation appears. As condensation appears on the surface, it forms a wet spot. Therefore, a dowel with a plastic head is used for façade plastering systems.
To ensure the quality of thermal insulation, it is recommended to follow a number of rules:
- continuous longitudinal joints cannot be formed between several rows;
- the seams of adjacent slabs must overlap;
- the inner side of the slab is pressed against the base of the wall, and the edge of the insulation is pressed against the edge of the adjacent slab;
- Any glue protruding between the seams must be removed immediately with a rag.
Manufacturers and models of basalt slabs - what to choose?
When choosing thermal insulation, it is recommended to take into account the characteristics of each model, the climate in the region, and the technical properties of the insulated structure.
Our store sells mineral wool from leading brands. TechnoNIKOL. Russian manufacturer, the quality is not inferior to imported analogues. The line includes:
- "Rocklight" for a flat pitched roof, interior design of floors, walls, partitions;
- "Technoacoustic" - for sound insulation of residential and industrial buildings, equipment, pipelines;
- “Technolight” - for protection against blowing of walls and partitions;
- “Technofas”, “Technovent” - for facades under siding and plaster.
Rockwool. Another leader in this industry. Presented in several series:
- "Light Butts" - basalt insulation for walls, partitions, ceilings in houses;
- "Acoustic Butts" - sound insulation for home and industry;
- “Sauna Butts” - foil insulation with additional protection against moisture;
- "Roof Butts" - special slabs for insulating roofs of various types;
- “Caviti Butts”, “Facade Butts” are excellent options for insulating facades and curtain systems.
Isoroc. A high-quality domestic manufacturer, its most popular models are “Izolight” (mounted on a simple roof, attic, frame walls), “Izoruf” (for structures experiencing increased loads).
Izovol. Focused on interior design.
Installation of the plaster layer
First, the reinforcing mesh is installed. Before work, cover doors and windows with film to protect them from damage. It is necessary to make sure that all hooks are installed at an angle of 30°, no less. It is recommended to stretch the mesh in vertical sections equal to the width of the roll, which is unrolled from top to bottom. The overlap of stripe on stripe must be at least 50 mm.
The mesh is secured with a locking pin. Can be secured by installing two fixing plates on top of each hook. The plates must not be pressed in so that the thermal insulation of the facade does not deform, which is especially dangerous for gas-filled plastic called polyurethane foam. Plastic spacers are attached between the mesh and the insulation surface so that the mesh becomes part of the first layer of plaster.
Base plaster layer
The first layer, reinforced with mesh, will replace the frame on which the entire wet facade insulation system will be supported. The solution consumption is 15–20 kg/sq.m., the dry mixture is mixed according to the manufacturer’s requirements. The solution is applied with a special pump or spatula, periodically pressing the mesh to the inner layer.
If the mesh is deformed in some places and comes out of the solution with bulges, you need to correct the mistake and fix the problem area with a special nail. To reduce such accidents, it is better to apply the solution from the bottom up. The thickness of the first layer should be the same over the entire surface of the wall.
After applying the base plaster layer, it is recommended to maintain optimal humidity on the wall surface. In dry weather and high air temperatures, the plastered area will have to be moistened.
Purpose
When building houses, especially in cold climates, much attention is paid to the heat-saving properties of the structure. Very often, the properties of building materials are such that to ensure the necessary thermal insulation, the thickness of the walls must be unreasonably large. The most effective way to solve this problem is to perform external insulation.
The thermal circuit is complete. The house is warm even in cold weather. It would seem that all the work is done and you can breathe easy. However, new problems emerge:
- unpresentable appearance of the insulation layer;
- the need to protect thermal insulation from exposure to precipitation.
The optimal solution that puts the finishing touches on façade work is to apply a layer of plaster.
How to apply a leveling layer
To ensure that the facade plaster on the insulation has a beautiful appearance, apply the following ball of plaster
mixtures. The task is to remove defects of the working surface and prepare it for flawless application of the finishing coating. The solution consumption is 15–20 kg/sq.m. First, moisten the work surface generously. The second layer can also be applied with a powerful pump or an ordinary spatula, provided that physical effort must be made.
The thickness of the ball is formed to be about 10–12 mm, taking into account that the entire three-layer system will take at least 25 mm. The marks on the beacons serve as a guide for leveling the applied solution. The excess is collected in a container and can be used for further finishing work. In summer, it is also recommended to moisturize the second layer.
Grinding and expansion joints
Grinding is done after the solution has moderately hardened. After applying the leveling layer, several hours pass depending on the weather. The tool is a construction float coated with polyurethane.
After hardening, the structure is cut through to form longitudinal and transverse seams. The expansion joint serves to reduce the load on structural elements in areas prone to damage. Danger may arise from an earthquake, ground settlement, or other natural and physical impacts on the structure. The cuts are made with a special tool, dividing the wall into conditional blocks that give the building elasticity. The seams are filled with insulating material, for example, mastic.
The width of the seam is 6 mm, and the distance between the cuts made is no more than 15 m. The extreme seam, going from top to bottom, is made no closer than 150 mm from the corner of the house. The cutting disc must cut through all layers, including the mesh.
How to apply a decorative layer
The installation of a wet facade, applied over insulation, ends with a top layer, which
performs a protective function from rain and wind, while at the same time being a design solution.
To form the top layer of plaster over the insulation sheathing, mineral mixtures are used; they are characterized by high air permeability.
Before applying the solution, you need to check whether the previous ball has dried well. It should take 5 days from the day the leveling layer is applied.
Before applying the solution, approximately 12 hours before, for example, overnight, the surface is thoroughly treated with a tinting primer.
Decorative plaster is applied in a thin layer and rubbed in a circular motion. The entire process is performed with the same grater. Bark beetle plaster can be acrylic or gypsum, depending on the method of application. The gypsum-based mixture is easier to apply and is recommended for home use. Acrylic solution requires certain work skills and application experience, so it is often used by specialists.
How to check quality
There are a number of tips that will help determine whether the work on installing thermal insulation is progressing correctly:
- At the preparatory stage, the walls are cleaned of dirt, previous coatings, and stains.
- Without deviating from the instructions, work is carried out with the adhesive composition.
- The insulation boards are fixed evenly.
- There is no unevenness at the joints between slabs or blocks.
- The dowels do not stick out above the insulation.
- The reinforcing mesh is laid in the base layer of plaster.
- Breathable materials are used, the plaster “breathes”.
- From the drains and from the roof, water will not get onto the façade finishing.
- There are no bulges on the surface of the wall, the façade is not covered with bumps.
- There are no cracks on the wall, in the corners of window and door openings.
Installing thermal insulation at home increases the lifespan of the building, significantly improves living conditions and reduces the cost of annual heating costs for the building in winter. It also protects walls from exposure to weather conditions, fungus and shock-absorbing destruction. Under sustained conditions and proper care, good thermal insulation of the external wall of a building can last 25 years.
Similar articles
- Fur coat facade
Facade
plaster
fur coat is the optimal solution for cladding a house.
...
Universal technology
for plastering
facades
using insulation
. Read more - Insulation for exterior walls of a house under plaster
Heat conservation is an important task for residents of private houses in most regions of Russia. Read more
- Bark beetle plaster on the facade
Bark beetle
plaster on the facade.
If, when finishing a building, it is necessary to preserve ...
of insulation
was previously fixed to the wall , it is necessary... Read more - Features of using façade plaster…
Features of using façade
plaster on
polystyrene foam.
...
This porous lightweight material is used as
insulation
under
plaster
for... Read more - Facade plaster: features and types
In addition, such
plasters
cannot be applied to all types of exterior finishes.
If polymer insulation
and surfaces are used... Read more - Facade plastering technology
To decide on
insulation
for
plaster
, read the article.
...
Facade
plaster on
aerated concrete. Read more
What type of insulation is optimal for facade plaster?
To correctly select insulating materials for exterior finishing, it is necessary to evaluate the following factors:
- Material rigidity - with sufficiently high rigidity values, you can do without additional strengthening (reinforcement);
- Affordable price;
- High thermal insulation properties;
- The shape is convenient for installation.
In accordance with the listed factors, the best option is stone wool and polystyrene foam. Since the materials are sold in the form of slabs, it is possible to carry out installation without the use of special equipment and obtain the expected result.
How to calculate the thickness of insulation?
To determine the required insulation thickness, you must use the appropriate calculations using the formula:
R ex.=(1/α (in)) + R1 + R2 + R3 + (1/α (n))
In this case, R refers to the heat transfer resistance of the wall layers - their actual quantity must be taken into account in the calculation formula. But α (n) and α (in) are the heat transfer from the outer and inner surfaces of the wall, respectively.
Insulation thickness for walls 27 cm thick R = 0.89 m²*K/W
The actual thermal resistance of the wall should be no less than the quotient of the layer thickness and thermal conductivity of the material.
For calculations, you can use an online calculator, which can be found on the Internet. Alternatively, you can not use calculations at all and use insulation, the thickness of which is 5 cm - this is the most common option, which will allow you to insulate a building in the middle zone, where winter is not characterized by severe frosts.