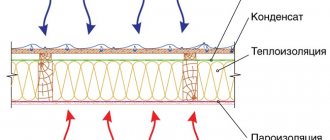
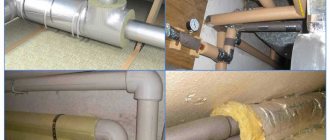
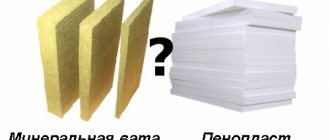
Today we will look at one aspect of working with materials to protect roofs and roofing coverings from moisture. Vapor barrier - which side to lay against the insulation, how to choose, how to fasten - these are not all the important issues that must be taken into account. From this article you will learn answers to the most important questions about vapor barriers.
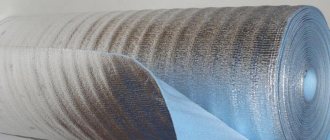
Types of materials for vapor barrier Source homehill.ru
What are the material options?
There are a number of specialized materials on the market:
- foil - have a thin layer of aluminum, the smooth side is attached to the insulation;
- membranes - durable, expensive materials, can pass air in one direction, must be installed, like the previous option;
- polypropylene - withstands different temperatures well, the material is durable, is mainly produced in two layers, and is laid in the same way as the previous ones;
Polypropylene films Source miremonta.ru
- polyethylene - the most inexpensive option, thickness not less than 150 microns, short service life and low strength, deteriorates in rooms with constant high temperatures;
- roll waterproofing - used to protect structures, can be laid on either side, has a high level of protection on both sides.
The most expensive materials are coated with aluminum on one side. However, they are the most effective in combating steam and are durable.
Types of materials offered
Which side to place the vapor barrier against the insulation is an important question. But first you need to understand what types of this material are:
- A – cannot be used as a vapor barrier; it removes water from one side.
- B - double-sided, are a complete vapor barrier, two-layer.
- C – increased density, thickness and protection, two-layer, more durable.
Vapor barrier for flat roofs Source edvans.com.ua
- D - used for heavy loads, modern high-strength fabric with lamination is used in production, can withstand heavy loads, is used for insulation and waterproofing.
The material can be one- or two-sided, in other words, it can be laid only on a certain side or on any of them. Many manufacturers produce films with an anti-condensation side - this is a fleecy layer that absorbs some of the moisture and retains it until it evaporates. It is this layer that should be directed towards the room.
See also: Catalog of three-story house projects
Types of vapor barrier films
If we talk about the main materials from which hydro-wind-vapour barriers are made, then there are two of them:
- polyethylene;
Polyethylene vapor barrier film
- polypropylene.
Polypropylene film for vapor barrier
For example, the UTA company (Czech Republic) produces multilayer polyethylene films, and the domestic corporation GEXA produces polypropylene films (known under the brand name Izospan).
Also, all vapor barrier films can be divided into:
- single-layer polyethylene;
- specialized multilayer.
A single-layer polyethylene film for vapor barrier does not have a reinforcing layer, and it does not withstand high tensile loads, but even in some current standards, instead of a specialized vapor barrier, polyethylene is “registered” as the main material. And in Finnish frame houses, using “native” technology, 200 micron polyethylene is laid inside the walls to vapor barrier mineral wool.
Watch a video on how to install vapor barriers using 200 micron polyethylene film:
Specialized films consist of several layers:
- Reinforcing layer , which is made in the form of a grid of strips of base material. It is responsible for the strength to mechanical stress when attached to the supporting frame (or sheathing) and during operation of the structure.
- Polyethylene or polypropylene film is the second layer, which is responsible for vapor barrier.
- Lamination on the reverse side is available for most modifications of vapor barrier films. This increases vapor permeability, since the basic principle of operation of a vapor barrier film implies that the thicker the material, the less water vapor will “leak” through a unit surface area in a fixed period of time.
There are universal films that can be laid on either side of the insulation (for example, materials from the YUTAFOL N series).
There are films with an “asymmetrical” structure - one side of them has either a rough or reflective surface. The first option is called “anti-condensation” vapor barrier films. The second option is vapor barrier films with a foil surface (fourth layer), which reflects part of the thermal energy towards radiation.
Properties of various types of vapor barrier films
When installing these types, it is important to know which side to lay the film on the insulation.
How to mount
Vapor barrier ensures the reliability and durability of the entire house structure. You need to understand which side to attach the vapor barrier, if it is not double-sided, and how to do it correctly. If you abandon this layer, then all the materials used on the roof will gradually begin to deteriorate and, over time, problems with the house will appear.
Installation of roof vapor barrier Source applesakhalin.ru
See also: Catalog of companies that specialize in engineering systems
This layer has its advantages:
- UV protection;
- high level of strength;
- resistance to temperature changes;
- multifunctionality.
Laying this layer has its own rules and requirements that must be taken into account. It is important to take into account the design features of the material. Different films are used on different sides of the insulating layer, carrying the opposite tasks discussed above. Materials may differ in installation method; there are single-sided or double-sided options. In the first case, the film is attached to a specific side, and in the second, both sides of the vapor barrier membranes are the same - this is a more practical option.
To find the required side, you must carefully study the manufacturer's instructions. But if nothing is indicated there, then you can determine the required plane yourself based on a number of factors. Izospan with the light side is mounted to the insulation. The fleecy side is the outer side, and the inner side is always smooth. Some manufacturers roll the rolls with the inside facing up, so when unwinding it is directed towards the floor.
Durable film option Source dekoriko.ru
Installation features
How to properly install a vapor barrier for a roof and prevent moisture accumulation - it is important to study the technology of its installation. This applies to all surfaces - floor, ceiling, walls.
Preparatory stage. The material is selected taking into account the features of its installation and characteristics. Surfaces are treated with protective or antiseptic agents, depending on the type of materials in the house.
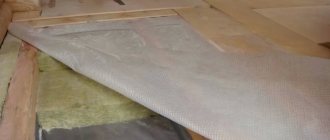
Laying. An appropriate base is prepared - insulation is installed, and then a vapor barrier is applied to the walls. The joints must be made on the joists and taped with reinforced tape. Then the counter-lattice is installed. On concrete, a self-adhesive film is used for fixation, and then a counter-lattice is mounted.
Ceiling vapor barrier Source i.ytimg.com
Installation on other surfaces (walls, floors) is similar to work on the ceiling. The wooden floor is insulated, then waterproofing, insulation and vapor barrier are installed. The overlap of the latter should be 12 cm and carefully glued on both sides, the overlap on the walls should be 10 cm. A sheathing with a waterproofing layer and a heat insulator is made on the concrete. There are many other important nuances that must be taken into account during the work process. Therefore, it is recommended to allow qualified specialists who specialize in these works to carry out the work. It is important to remember that mistakes made significantly reduce the service life of roofing materials. Over time, moisture will begin to penetrate the house and destroy not only the roof structure, but also the house itself. All this will lead to expensive and time-consuming repairs, so you should not save, but rather work with specialists.
To fasten materials, nails with a wide head or metal staples are used. Counter slats are considered the most practical option. If you use the wrong fasteners, there is a high probability of breaking through the material itself. In addition, over time, under their weight, the layers begin to break through thin fasteners, the film sags and the vapor barrier properties are significantly impaired. All this leads to the accumulation of moisture, all layers are gradually destroyed, wooden elements rot, corrosion appears, mold and mildew develop. If the problem is not eliminated, then over time, streaks appear on the walls and ceiling, facing materials deteriorate and the walls gradually collapse.
How difficult is it to make a vapor barrier with your own hands?
Despite the fact that vapor barrier of walls in a house is an important point for protecting the structure from destruction, it can be done independently. To do this you need to follow the rules:
- You need to know how to carry out installation correctly in specific cases (high humidity, wooden walls).
- Before carrying out installation work, you should familiarize yourself with the technical characteristics of the selected material.
- The roll must be cut by clearly measuring the correct length. The fewer joints there are, the better for the building.
- Fixing the layer cannot be done simply with nails to the surface. Over time, the vapor barrier will tear and weaken. Be sure to use either wooden slats or a stapler.
Vapor barrier of ceiling, roof, walls and floor
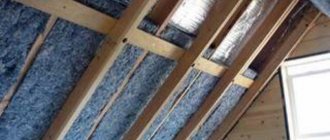
It is important to understand which side of the vapor barrier is correctly mounted on the ceiling, roof and walls. If you make a mistake, then over time the insulation will begin to rot, which reduces its thermal insulation properties and leads to the destruction of the walls. You can refuse thermal insulation of the roof only if you have a heated attic. A vapor barrier layer is laid on the living room side. The membrane is mounted with the rough side outward, the foil material with the aluminum layer down. The film is a very fragile material and is not recommended for use in the kitchen.
To furnish the attic, it is best to use a membrane film. It lies on the insulation with its smooth side. To prevent moisture from penetrating through the mounting holes, it is attached to the beams with a stapler. The material with foil is mounted in the same way as in previous cases. It can be fastened with wide-headed nails; the joints are additionally sealed with construction tape. When insulating walls from the outside, experts recommend using a double layer of vapor barrier.
Installation of film with foil Source stroy-podskazka.ru
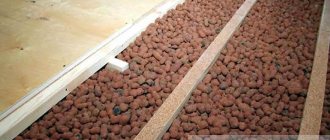
It's no secret that a lot of moisture can penetrate into the house through the floor. Even the best quality foundation cannot completely protect against this problem. To solve this problem, specialized vapor barrier materials are used when arranging the floor. The installation rules are similar to all other solutions. The best option for the floor is film, creating a waterproofing barrier. Closer to the room, roll material is used, laid overlapping, the joints are taped with tape or metallized tape. For attic or interfloor ceilings, the material is laid with the smooth side down.
Any underground structures, balconies and basements can also be built using such materials. They are constantly in contact with cold air, so vapor barrier is very important. Foamed polyethylene is used for balconies and is mounted with the reflective side inside the room. For all other cases, only membrane film is used.
Balcony vapor barrier Source stroy-podskazka.ru
Laying stages
Let's look at the process of installing a vapor barrier step by step. It must be taken into account that the installation of insulating material is only an integral part of the overall process of installing the roofing and insulation pie. Therefore, it is quite difficult to highlight only the installation of a protective film.
The insulator is laid on both sides - between the roof and the insulation, and on the attic side on top of the heat insulation.
- The first step is usually to lay the outer layer. Most often, diffusion membranes or similar materials are used to remove residual water vapor from the heat insulator.
The membrane is laid before the roofing is laid. The material is laid in longitudinal strips, starting from the bottom (from the eaves area); strips are spread, trying to avoid wrinkles
This is important, since the connections are glued with a special adhesive tape. In some cases, two types are used - double-sided tape and a special wide adhesive tape to secure the connection line; The amount of overlap is usually 10-15 cm (it is often marked on the film with special marks)
When laying, you must act carefully, avoid tears or cuts of the tape. Particular attention is paid to the tension of the material - it should not sag, but excessive load is also dangerous, since when fixing the strips with a stapler, breaks are possible; the finished canvas must be completely sealed. All areas adjacent to supporting structures, cornices or ridges must be secured with double-sided tape or a special adhesive.
- Laying the heat insulator. This procedure is performed from the attic side (from the inside). Different materials are used - mineral wool, polystyrene foam, penoplex, etc. There is no point in considering the installation of insulation, since this is a separate and responsible procedure.
- Installing a vapor barrier from the inside. It uses a basic insulating film that is completely impermeable to any moisture. If the region has frosty winters, it is recommended to use foil material to save thermal energy. Installation procedure:
- The first strip is laid from the bottom. The side edges are glued (or fixed with slats) to the rafters. It is necessary to provide a temperature reserve in case of changes in the length of the web. To do this, a deformation fold is made near the edge of the strip, which is fixed with a clamp. With any changes in length, it will maintain the strength of the fastening and the overall tightness of the canvas. The length of the strip is attached to the rafters using a stapler;
- subsequent strips are installed overlapping. Its size is marked on the film and is 10-15 cm. The strips are connected to each other with double-sided tape and adhesive tape connecting the joint from the surface side;
- All areas of passage through the roof, adjoining walls or supporting structures are carefully glued with special acrylic glue or other materials. If the surfaces are smooth, you can use double-sided tape.
The last step should be the installation of longitudinal strips on top of the vapor barrier sheet. They are needed for installation of sheathing (OSB, chipboard, plywood, other sheet materials) and subsequent finishing. These strips are attached horizontally to the rafters. It is imperative to cover the joint lines of the vapor barrier strips with them. This will help protect the joint areas of the material from damage.
All passages of pipes, antennas or other structures must be insulated with special care. Special materials are used - adhesive tapes, sealant, etc. There should be no cracks, gaps or other openings through which moist air can enter the roofing pie. Otherwise, all efforts and expenses will be useless.