Selecting a KN boiler
The choice of such a unit as an indirect heating boiler must be approached with all responsibility and, first of all, ask yourself the question: “Will it be convenient to use such a device?”
The pros and cons of the unit are described above. In this section, we will note several aspects that you need to know in order to understand whether you need to buy it. They will also help you choose the most suitable KN boiler option. To what extent will the purchase of such equipment be justified? The fact is that it makes sense to buy such a device if the water flow in the house or room is large enough and is at least 1.5 l/min. For comparison, this is exactly the water consumption observed in large families of 4 or more people.
The presence of such a boiler will certainly increase energy costs if it is connected to an electric boiler.
The volume of the boiler is also an important aspect. So, you need to calculate and take into account the hot water needs for your family. It must be selected taking into account the parameters of the room where it will be installed.
The materials from which the boiler is made also matter. So, those made of stainless steel will allow you to heat the water up to 90 degrees. In enamel, the temperature should be lower. But very heated water can always be diluted with cold water, which means that the efficiency of even a small tank in a boiler that warms up the water very much will be higher
It is also important to choose a boiler that will not rust.
The power of the heating boiler itself should also be taken into account. It should be enough to heat not only the unit, but also the heating system.
The pump for loading equipment should also be optimal
The operating instructions for the equipment will help you choose which one is suitable - it usually contains all the numbers you need to focus on.
The time for heating water will play a decisive role for many, so this point should also be taken into account. So, on average, it takes about 2 hours to heat 100 liters of water. But some models of tanks heat water faster - for example, a stainless steel tank will heat the same amount of water in 20-30 minutes.
The material for thermal insulation inside the unit can be represented by foam rubber, mineral wool or polyurethane foam. Foam rubber is found in cheaper models.
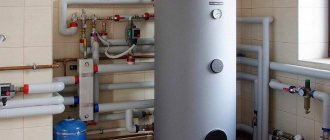
You can organize a constant uninterrupted supply of hot sanitary water in a private house using an indirect heating boiler
It is also better to buy boilers that have some protection elements - safety valves, thermostats, etc. Don’t be lazy and refuse to fill out the warranty card in the store when purchasing. The boiler is expensive, and it would be a shame to purchase it and find out that the quality of the product is inadequate. And it is difficult to change such equipment without a warranty.
Types and selection of devices
In addition to tanks of a simple design, there are also boilers of a more complex design, which allow you to realize some wonderful functions when integrated into the heating system.
One of the most popular functions is the use of a boiler as a heat accumulator. This is especially important for electric heating with an unstable power supply or when working at daily rates. Devices with heat accumulator mode have a significant capacity (more than 300 liters) and reliable thermal insulation.
Boilers with a recirculation system that provides instant supply of hot water to the mixer are considered more expensive. They have three pipes for connecting to the hot water system: one for supplying cold water and two for flowing hot water. Circulation is carried out by a small built-in pump. Boilers of this type are less economical, but with their help you can organize a small heating circuit, for example, to install a heated towel rail.
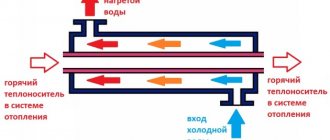
Some boilers have a “tank-in-tank” design; the name speaks for itself. The outer tank contains the coolant of the heating system, and the inner tank contains heated tap water. The advantage of this design is that water heats up very quickly, but due to the complexity of the device, such boilers are much more expensive than conventional ones.
Indirect heating boiler “tank in tank”: 1 - cold water inlet; 2 - hot water outlet; 3 - central heating input; 4 — internal tank made of stainless steel; 5 - central heating output
Types of strapping
By piping an indirect heating boiler we mean connecting the pipelines of the boiler itself with the water supply. The operation of the system as a whole depends on how the installation is carried out.
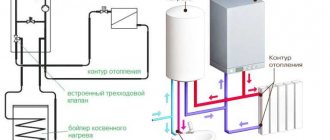
Piping with servo drive and three-way control valve
This is the easiest way to tie. It is used when a large amount of water is consumed.
The boiler is connected to the main circuit and an additional one. The first is used to distribute heat into the batteries, the second circuit heats the water in the boiler itself. For proper flow separation, a three-way distribution valve is connected.
The thermostat monitors the temperature of the water in the tank, and when it reaches a predetermined value, a signal is sent to the servo drive. And it already sends a flow of heated water to the main circuit for heating. If the water temperature drops again, a switch will occur in the opposite direction and the coolant will return to the coil.
Trim with two pumps
Another piping option is with the parallel use of two pumps. One is mounted on the heating circuit, the other on the hot water supply. The control of the pumps, as in the first case, is entrusted to the thermostat. It is he who switches the operating mode.
Trim with hydraulic boom
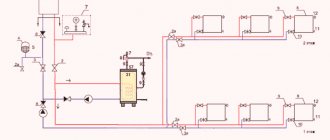
If the heating system has many branches, such as a multi-circuit battery system or a separate branch for a heated floor, then it makes sense to use this type of piping. To avoid difficulties with a system in which each circuit is equipped with its own recirculation pump, a hydraulic distributor is used.
Coolant recirculation
If hot water is needed as quickly as possible, then it would be more correct to use a recirculation system. Due to the fact that a ring coolant line is formed in the system. The constant movement of water through it leads to heating. That is why the waiting time for hot water is reduced to a minimum.
To ensure continuous movement of water, a recirculation pump is installed in such a system. This hot water flow must be installed so that it passes through installations that constantly need heating. A heated towel dryer is an example of such a device.
Advantages, disadvantages, types of equipment
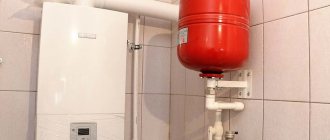
What is so good about this boiler? The most important thing is that the water in it can be heated without unnecessary costs. That is, you will not have to pay additionally for electricity or gas, unlike the same direct heating boilers, which have special heating elements such as burners in their design. The KN boiler uses the ready-made resource of the heating system in the house.
Indirect heating water heater
This aspect also allows us to talk about a reduced load on the electrical network in the house. At the same time, the boiler’s performance is quite high, it is safe and can serve for many years without complaints, because its internal part is even protected from contact with running water. Water from such a boiler is supplied to the consumer as soon as it is needed.
Of course, the equipment has disadvantages. This is, first of all, high cost - it costs more than a direct heating boiler. It is also worth understanding that the water in it takes longer to heat up, but it also stays hot longer. And such a boiler takes up a lot of space; it’s better to place it in a separate room. And one more main drawback - in the summer, in order to heat the water, you will have to start the heating boiler.
When installing a hot water system in a private home, the owner often has to decide which is better - an indirect heating boiler or a double-circuit boiler
On a note! There are several types of indirect heating boilers. Let's see how they differ from each other.
Table. Types of KN boilers.
| View | Description |
| With built-in control | Such heaters are connected to boilers that do not have controls. They are usually equipped with a special sensor that allows you to control the water temperature, and also allow you to accurately control the inclusion and shutdown of the liquid supply to the so-called coil - the coolant circuit. It is easy to connect such a boiler - you just need to connect the supply and return water from heating the house, as well as connect the supply of cooled liquid and the distribution of heated hot liquid. |
| Without built-in control | Such tanks are usually connected to a system equipped with an automated boiler. During installation, it is important to think about installing the temperature sensor and install it in the housing, then connect it to the boiler. |
| Wall | As you might guess, such a boiler is mounted on the wall. It is usually small in size, so it will not heat up a lot of water. It is important to understand that a boiler is not a lightweight structure, and the wall on which it will be mounted must be strong. |
| Floor | This option is placed on the floor and comes in a variety of sizes and capacities. It is rarely used in residential buildings - such a boiler can more often be seen in industrial premises. They put him in a separate room. |
| Vertical | The most common option, as it allows you to intelligently save space in the room. But such a boiler does not have a large capacity. |
| Horizontal | This is usually a fairly large boiler that will hold a lot of water. Often used in enterprises. |
Using an indirect heating boiler and an electric boiler
On a note! It is important to understand that the smaller the boiler, the faster the water will heat up in it. Although modern designs sometimes make it possible to heat a large volume of water in a very short time.
How is the boiler power selected?
Connecting the boiler to a non-volatile boiler
When used with non-volatile heating equipment, the boiler must be provided with priority supply of coolant. The easiest way to achieve this goal is to install the tank above the level of the radiators - which is why wall-mounted models are usually used in such situations. The optimal location of a wall-mounted boiler assumes that its lower part is located at least slightly above the level of the boiler and heating devices.
Of course, such a water heater piping can also work with floor-standing devices, but heating of the water will be slow and incomplete. At the bottom of the tank, the water will not be able to warm up completely (its temperature will be at the same level as the temperature of the liquid in the return pipeline), so the total volume of hot water will be reduced.
8c4f0d35d5bef25f1d19c11d98897c0d.jpe 3391bc362493c37579e3b0d110b3fe8e.jpe
Coolant circulation in non-volatile systems occurs naturally. To increase the efficiency of the system, you can embed a circulation pump into it, and if electricity is available, the water will be constantly heated. If desired, you can do without a pump - for normal supply of coolant to the water heater, the supply pipes to it must have an increased diameter compared to the heating circuit pipes.
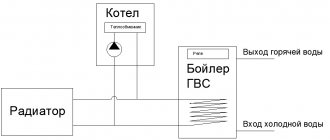
Connection diagrams and features
There are two principles for connecting an indirect heating boiler: with and without priority for heating hot water. When heating with priority, if necessary, all the coolant is pumped through the boiler heat exchanger. It takes a little time to heat up. As soon as the temperature reaches the set temperature (controlled by a sensor, thermostatic valve or thermostat), the entire flow is again directed to the radiators.
In schemes without priority for water heating, only a certain part of the coolant flow is directed to the indirect water heater. This results in the water taking a long time to heat up.
Scheme without priority
When connecting an indirect heating boiler, it is better to choose a scheme with priority - it provides hot water in the required quantity. At the same time, heating does not suffer much - 20-40 minutes are usually enough to heat the entire volume of water, and 3-8 minutes to maintain the temperature at a flow rate. During such a time, no house can cool down enough to feel it. But this is provided that the boiler power is comparable to the boiler power. Ideally, the boiler is more productive, with a margin of 25-30%.
General rules
To ensure the normal operation of all appliances connected to the hot water comb, an expansion tank for hot water (not for heating) is installed at the outlet of the boiler. Its volume is 10% of the tank volume. It is necessary to neutralize thermal expansion.
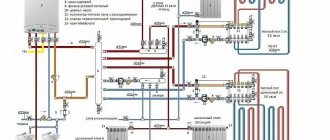
Detailed wiring diagram for an indirect heating water heater
Also, shut-off valves (ball valves) are installed in each connection branch. They are needed so that each device can be used - a three-way valve, a circulation pump, etc. — if necessary, disconnect and service.
Check valves are usually also installed on supply pipelines. They are necessary to eliminate the possibility of backflow. In this case, connecting an indirect heating boiler will be safe and easy to maintain.
Installation next to the boiler in a forced circulation system (with 3-way valve)
If the system already has a circulation pump, and it is installed on the supply side, and the forced heating boiler can be placed next to the boiler, it is better to organize a separate circuit that comes from the heating boiler. This connection of an indirect heating boiler is implemented with most wall-mounted gas or other boilers that have a circulation pump in the supply pipe. With this connection diagram, it turns out that the water heater and heating system are connected in parallel.
If there is a pump in the supply pipe and a water heater located next to the boiler
With this piping method, a three-way valve is installed after the circulation pump, controlled by a temperature sensor (installed on the boiler). One of the outputs of the three-way valve is connected to the boiler pipe to connect the heating. A tee is cut into the return pipeline before entering the boiler, and a pipe is connected to it to drain water from the heat exchanger. Actually, the connection to the heating system is completed.
The operating procedure of this scheme is as follows:
- When information is received from the sensor that the water temperature is below the set temperature, the three-way valve switches the coolant to the boiler. The heating system turns off.
- The entire coolant flow goes through the heat exchanger, the water in the tank is heated.
- The water heats up enough, the three-way valve redirects the coolant to the heating system.
As you can see, the circuit is simple, its operation is also clear.
Scheme with two circulation pumps
If you install a water heater in the system with a circulation pump, but not next to it, but at some distance, it is better to install a circulation pump in the circuit on the water heater. Connecting an indirect heating boiler for this case is shown in the diagram below.
Connection diagram to a boiler with automatic control
The circulation pump can be installed either on the supply pipe or on the return pipe. In this scheme there is no three-way valve; the circuit is connected through ordinary tees. The coolant flow is switched by turning the pumps on/off, and it is controlled by a temperature sensor, which has two pairs of contacts.
If the water in the tank is colder than that set on the sensor, the power circuit of the circulation pump in the boiler circuit is turned on. When a given degree of heating is reached, the contacts of the pump close, which drives the coolant into the heating system.
Scheme for a non-volatile boiler
In a scheme with a non-volatile boiler, in order to ensure priority for the boiler, it is desirable that it be located higher than the radiators. That is, in this case, it is desirable to install wall-mounted models. Ideally, the bottom of the indirect water heater is located above the boiler and radiators. But such an arrangement is not always possible.
The circuits will also work when the boiler is located on the floor, but the water will heat up more slowly and in the lower part it will not be hot enough. Its temperature will be comparable to the degree of heating of the return pipeline, that is, the supply of hot water will be less.
With energy-independent heating, the movement of the coolant occurs due to the force of gravity. In principle, you can connect an indirect heating boiler according to the traditional scheme - with a circulation pump in the circuit to heat it. It’s just that in this case, when the electricity is turned off, there will be no hot water. If you're not comfortable with this twist, there are several designs that will work with gravity systems.
Connection diagram for an indirect heating water heater in a gravity system
When implementing this scheme, the circuit that goes to the water heater is made with a pipe with a diameter 1 step larger than the heating one. This ensures priority.
In this scheme, after the branch, a thermostatic head with an overhead sensor is installed on the heating system. It runs on batteries and does not require external power. The thermohead regulator sets the desired water heating temperature (not higher than the boiler supply temperature). While the water in the tank is cold, the thermostat opens the supply to the boiler, and the flow of coolant goes mainly to the boiler. When heated to the required degree, the coolant is redirected to the heating branch.
With coolant recirculation
If there is a water heated towel rail in the system, constant circulation of water through it is necessary. Otherwise it won't work. All consumers can be connected to the recirculation loop. In this case, hot water will be constantly circulated by the pump. In this case, by opening the water at any time, you will immediately receive hot water - you will not need to wait for cold water to drain from the pipes. This is a positive thing.
The negative is that by connecting recirculation, we increase the cost of heating water in the boiler. Why? Because the water cools down as it runs around the ring, therefore the boiler will be connected to heating water more often and will spend more fuel on it.
Connecting the recirculation ring to a special indirect output
The second disadvantage is that recirculation stimulates the mixing of water layers. During normal operation, the hottest water is at the top, from where it is supplied to the DHW circuit. When stirring, the overall temperature of the supplied water drops (at the same settings). However, for a heated towel rail this is perhaps the only way out.
How to connect an indirect heating boiler with recirculation? There are several ways. The first is to find special indirect units with built-in recirculation. Very convenient - the heated towel rail (or the entire loop) is simply connected to the corresponding pipes. But the price of such water heater options is almost twice as much as the price of a conventional tank of the same volume.
Connecting an indirect heating boiler with recirculation
The second option is to use models that do not have an input for connecting the recirculation circuit, but connect it using tees.
Wiring a solid fuel boiler with an indirect heating boiler
Connecting a water heater with a solid fuel boiler solves two problems at once:
- obtaining hot water supply;
- obtaining a method for discharging coolant in the event of an accident.
Due to the fact that such a system places a thermostatic valve on the battery, comfort increases. But there is a danger of the boiler overheating. The same threat arises during power outages. If a boiler of increased capacity is installed, this process does not pose any danger. Because excess heat is spent on heating water in the water heating tank. Accordingly, for the normal operation of this system, a boiler with natural ventilation is needed.
See the following video for one of the options for connecting a solid fuel boiler to a boiler.
How to tie solid fuel boilers
The connection diagram for a wood-burning heat generator is designed to solve 3 problems (in addition to supplying the batteries with coolant):
- Preventing overheating and boiling of the TT boiler.
- Protection against cold “return” and excessive release of condensate inside the firebox.
- Work with maximum efficiency, that is, in full combustion mode and high heat transfer.
The presented wiring diagram for a solid fuel boiler with a three-way mixing valve allows you to protect yourself from condensation in the firebox and bring the heat generator to maximum efficiency mode. How it works:
- While the system and heater are not warmed up, the pump drives water through the small boiler circuit, since the three-way valve is closed on the radiator side.
- When the coolant heats up to 55-60 degrees, the valve set to the specified temperature begins to mix in water from the cold “return”. The heating system of a country house is gradually warming up.
- When the maximum temperature is reached, the valve completely closes the bypass, all water from the TT boiler goes into the system.
- A pump installed on the return line pumps water through the jacket of the unit, preventing the latter from overheating and boiling. If you put the pump on supply, the chamber with the impeller can fill with steam, pumping will stop and the boiler is guaranteed to boil.
The principle of heating using a three-way valve is used for piping any solid fuel heat generators - pyrolysis, pellet, direct and long-term combustion. The exception is gravity distribution, where the water moves too slowly and does not provoke condensation. The valve will create high hydraulic resistance, preventing gravity flow.
Watch this video on YouTube
If the manufacturer has equipped the solid fuel unit with a water circuit, the coil can be used for emergency cooling in case of overheating. Please note: the fuse on the safety group is triggered by pressure, not temperature, and therefore is not always able to protect the boiler.
A proven solution is to connect the DHW coil to the water supply through a special thermal relief valve, as shown in the diagram. The element will be triggered by a temperature sensor and at the right moment will pass a large volume of cold water through the heat exchanger.
Using the Buffer Capacity
The best way to increase the efficiency of a TT boiler is to connect it to heating through a buffer tank. At the inlet of the heat accumulator we assemble a proven circuit with a three-way mixer, at the outlet we install a second valve that maintains the required temperature in the batteries. Circulation in the heating network is ensured by a second pump.
A balancing valve on the return line is needed to adjust the performance of the pumps
What we gain thanks to the thermal accumulator:
- the boiler burns at maximum and reaches the declared efficiency, fuel is used efficiently;
- the likelihood of overheating is sharply reduced since the unit dumps excess heat into a buffer tank;
- the heat accumulator plays the role of a hydraulic arrow; several heating branches can be connected to the tank, for example, radiators of the 1st and 2nd floors, floor heating circuits;
- a fully heated tank maintains the operation of the system for a long time when the wood in the boiler firebox has burned out.
Watch this video on YouTube
TT boiler and storage water heater
In order to load an “indirect” boiler using a wood heat generator, you need to embed the latter into the boiler circuit, as shown in the picture. Let us explain the functions of individual elements of the circuit:
- check valves prevent the coolant from flowing in the other direction along the circuits;
- the second pump (it is enough to take a low-power model 25/40) provides circulation through the spiral heat exchanger of the water heater;
- the thermostat turns off this pump when the boiler reaches the set temperature;
- An additional air vent prevents the supply line from becoming aired, which will be above the standard safety group.
In a similar way, you can connect the boiler to any boiler that is not equipped with an electronic control unit.
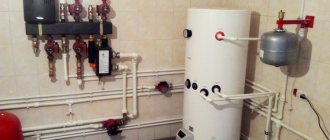
General principles
The procedure for piping a boiler means connecting it to the heating system and the water supply line. The productivity of the water heating system directly depends on the quality of the work.
That is why the installation of a boiler should not be carried out using arbitrary technology, but in compliance with the following mandatory principles:
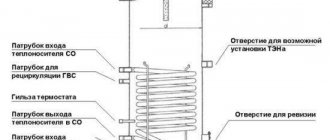
- Water supply is through a pipe in the lower zone of the boiler.
- Hot water must be drawn in through a pipe at the top of the equipment.
- The recirculation point should be in the center of the boiler.
- The coolant enters the boiler tank from top to bottom - through a pipe in the upper zone. And to exit, that is, return to the system, through the lower zone.
Boiler design
If all four principles are followed, the water dispensed in the upper zone of the boiler will always be hot, which will allow you to achieve maximum equipment efficiency.
Let's look at the specifics of different strapping methods.
Installation instructions for the recirculation system
It often happens that plumbing fixtures are located in the house at a considerable distance from the boiler or on the upper floors. In this case, the owners of the building usually have to wait until the water that has stagnated and cooled in the pipes drains from the taps in the bathrooms to get hot water. And this, of course, is inconvenient and not particularly economical.
This situation can be corrected by assembling a recirculation system in a country house. Installation of such a network is carried out approximately as follows:
- a tee is cut into the pipe supplying hot water to the consumer as close as possible to the consumer;
- a pipe of the required length is connected to the tee;
- the extended line is connected to the boiler through the recirculation pipe;
- Next to the boiler, at the nozzle, an additional pump of not too high power crashes into the circuit.
When using such a scheme, the water in the pipes between the boiler and the consumer, after turning on the pump in the electrical network, will not stagnate and, accordingly, will be cooled. That is, residents of the house will be able to use hot water immediately after unscrewing the tap valves.
Preparing the tank for water heater assembly
To make an indirect type boiler, you can use a new or old gas cylinder. This container is made of thick stainless steel 3-4 mm thick and is perfect for working with hot water.
Before assembling the heating structure, you will need to carefully prepare the cylinder. To do this, the product is cut in half using a grinder. The inner surface of the container is cleaned using an angle grinder with an appropriate attachment.
Before assembling the boiler, the cylinder must be opened and the inner surface cleaned
After this, the inside of the cylinder is washed, dried and coated with nitro primer paint. This work must be carried out without fail, otherwise after putting the boiler into operation, the heated water will smell like gas.
When using a tank from other metal containers, preparation is carried out according to a similar scheme.
Connecting several boilers to one system
In regions where there is an unstable supply of gas or electricity, they resort to installing two boilers, for example, solid fuel and gas. Two units can operate according to different schemes:
- Serial connection - a thermal accumulator is installed between the units, into which heated coolant is supplied from the solid fuel boiler. Then it is sent to the system with a gas device, and then distributed to consumers.
- Parallel connection - in this case, the operation of the solid fuel unit is controlled by safety sensors. A three-way valve is also installed, with which you can turn off any of the units.
Installation methods and shapes of boilers
Boilers come in wall-mounted and floor-mounted versions, horizontal or vertical models. The capacity of the product, which is mounted on the wall, is naturally lower: it does not exceed 200 liters. Floor-standing devices can hold one and a half thousand liters. Boilers are mounted on the wall using standard brackets and suitable dowels. The most common boilers are cylindrical in shape.
Working pipes for connecting the system are located at the rear of the unit for convenience and aesthetic purposes. There is a temperature sensor and a thermostat on the front panel. There are models with the possibility of additional connection of heating elements if the power of the main heat source is not enough.
Useful tips and tricks
An indirect heating tank is a new technology, however, many users who use this type of hot water preparation are happy to share their tips and recommendations:
- It is important to initially correctly select the heating power of the BKN, taking into account the number of users and water use mode. For calculations, SNIP water consumption standards and a maximum heating temperature of up to 65C are used.
- The productivity of the BKN is limited by the thermal power of the boiler unit; initially, heating equipment is selected with a margin of 30-50%.
- Pre-select the type of installation on the wall or on the floor; there should be enough space for maintenance and repair, as well as for placing an expansion tank with a volume of at least 10% of the working tank of the reservoir.
- The correct ratio of the power of the BKN and the boiler is chosen, for example, if the boiler unit has a power of 10-15 kW, it is not advisable to set the volume to 200 liters, because while the water is heating up, the temperature in the heating circuit of the house will cool down.
- It is better not to skimp from the beginning and purchase a “tank-in-tank” type unit design, which is the most efficient in operation and easy to maintain; it only requires annual cleaning from dirt and scale.
- Before purchasing, you need to check the useful volume of the tank; usually, it is 20-35% less due to the internal heat exchanger.
- Before mounting the BKN model on the wall, study the manufacturer's passport; usually the device is installed so that the cold water is at the bottom. If the tank is accidentally turned over, the coil will overheat, and the natural circulation of cold and hot media will be disrupted, which is unacceptable.
It is important to initially correctly select the heating power of the BKN, taking into account the number of users and the mode of water use.
These simple tips will help novice users of the BKN perform professional installation and fine tuning, guaranteeing a stable supply of heated water, ensuring the operation of systems and devices in the specified mode, preserving system elements from premature wear and ensuring savings on unforeseen repairs.
Common installation mistakes
During installation or during the commissioning process, you should try to avoid a number of mistakes:
- The boiler and boiler are installed far from each other. Their installation should not only be done as close to each other as possible. But, to simplify installation, the pipes are positioned correctly.
- Incorrect connection of the pipeline with the coolant.
- Incorrect installation of the circulation pump.
Proper installation, adjustment and configuration guarantee a stable hot water supply and allow all systems and devices to operate normally. This will prevent wear of parts and save on premature repairs.
Connection steps
Make the necessary calculations, mark the layout of the pipes and the installation location of the boiler and boiler on the floor plan. Prepare a solid foundation for the water heater, especially if it is designed for large volumes. Next, do this:
- Carry out the wiring, marking the locations of the hot and cold pipes.
- Install a tee and a safety valve. The latter allows you to get rid of excess pressure.
- Seal all connections securely.
- Connect to electricity and install an RCD.
- When finished, adjust the thermostat settings. Perform a test run.
Observe connections and pipes. There should be no leaks or suspicious noise. Remember that the heat source can be not only a boiler, but also a solar collector. Sometimes installing it is much more profitable.
To finally understand the principles of strapping, watch the video on the topic:
General requirements
In order for the piping system of a single-circuit boiler with a boiler to work normally, without interruptions and emergency situations, the following requirements must be met:
- At the outlet of the boiler, an expansion tank with a volume of at least 10 percent of the boiler is installed. (not to be confused with an expansion tank for heating). It plays the role of a neutralizer during the thermal expansion of water.
- Be sure to install ball valves on all pipes that lead to the tank. They will be needed for repair or preventive maintenance of circulation pumps, three-way valves or other elements of the system.
- A boiler is considered safer during operation if it is equipped with a thermostat to prevent excessive overheating. In the basic configuration, such water heating devices are equipped with safety valves that release steam from hot water and prevent rupture of the tank body.
Connection on the water supply side
If the water collection points are located close to the heating tank, the connection is made according to the standard diagram presented below. Let us explain the functions of some elements:
- It is recommended to use a pressure reducer for pressure surges above 6 Bar;
- a check valve on the cold water supply prevents the tank from emptying into the water main;
- the expansion tank compensates for the increase in the volume of heated liquid;
- a safety valve set at 7 bar discharges water into the sewer if the pressure rises to a critical level;
- The drain valve is used to drain water using the method of communicating vessels.
It is important to leave the drain line filled - then when the drain valve is opened, the water will flow out according to the law of communicating vessels
When consumers are away from the boiler, it is worth installing a recirculation line with an additional pump and check valve. If your heater model does not have a separate fitting for connecting this line, simply cut the return line into the cold water inlet line.
Before starting a system with a water heater of the “tank inside the tank” type, you must first fill the internal tank with sanitary water, only then pump in the coolant and perform pressure testing. The master will tell you the details in the video:
Manufacturing of an indirect heating boiler
The process of assembling a water heater may vary depending on the type of design, but in most cases, equipment for gas and electric boilers is manufactured in the following sequence:
- Two holes are drilled in a pre-prepared cylinder using an electric drill with a crown attachment. One hole will be located in the lower part and used for supplying cold water, the other - in the upper part for discharging hot water.
- The resulting holes are cleaned, fittings and ball valves are installed in them. Then another hole is drilled in the lower part, into which a tap is installed to drain stagnant water.
- To make a coil you will need a copper pipe with a diameter of 10 mm. It is better to make a spiral bend using a pipe bender. If such a tool is not available, then you can take any round piece - a large diameter pipe, a log, a barrel, etc.
- The coil is being manufactured according to the previous calculations. The ends of the heat exchanger are bent in one direction at a distance of 20–30 cm. To mount the coil, two holes are drilled in the bottom of the cylinder. Threaded fittings are installed and welded into them.
- Before installation, the coil is lowered into a bucket or large container with water and blown out. If the structure is sealed, then the coil is lowered into the cylinder, aligned with the inlet and outlet openings and welded.
- If the cylinder was cut in the middle, then an anode is mounted in the upper part. To do this, a hole is drilled into which a threaded nozzle is screwed in, and a magnesium anode is mounted into it. If the container is assembled from three separate parts - bottom, lid and central part, then the anode can be installed at the last stage.
- Thermal insulation material is installed on the outside of the boiler. It is best to use spray polyurethane. Before application, all pipes are protected with thick polyethylene and cloth. If funds are limited, then you can use regular polyurethane foam, which, after hardening, is wrapped in reflective insulation.
- Fastenings for hanging on brackets are welded to the back of the boiler. For floor-standing boilers, support legs made of angle steel or reinforcement are welded to the bottom of the equipment.
At the final stage, fittings and taps are screwed on and the top cover is mounted. If possible, you can not weld the lid, but make clamping fasteners from steel wire with a cross-section of 3 mm.
When making a boiler for use with solid fuel boilers, instead of a copper coil, a U-shaped steel pipe is used, which is mounted at the bottom of the device. From the side of the furnace or boiler, the pipe is connected to the outlet pipe. The pipe is taken out from the boiler and connected directly to the chimney.
Do-it-yourself boiler installation
You need to install a water heater yourself in accordance with existing rules and requirements, depending on its type. Thus, the features of installing a flow device will be somewhat different from installing a storage device. Let's look at both cases one and two.
How to install a instantaneous water heater
One of the key features of instantaneous water heaters is their compactness, which allows you to place them in the kitchen or bathroom right under the sink. The liquid in such devices is heated in a special metal pipe that contains powerful heating elements.
Such design features of the device require that the electrical wiring in the house or apartment works properly and is able to withstand heavy loads. It is advisable to install a separate circuit breaker for a flow-type heater, and connect a wire with a large cross-section to it.
After you finish working with the electricity supply, you can install the boiler itself. It is installed either temporarily or permanently.
The temporary scheme provides for an additional tee to be cut into the cold water pipe, which will be connected to the water heater through a special valve. To do this, you need to apply voltage to the water heater and open the tap that supplies hot water.
But the stationary scheme assumes that the supply and intake of water in the pipes will be carried out in parallel with the general water supply system. To install the structure according to a stationary scheme, tees for hot and cold water are cut into the pipes. Then you need to install shut-off valves and seal them with simple tow or fum tape.
Next steps are:
- connect the boiler inlet pipe to the pipe that supplies cold water;
- connect the outlet pipe to the hot water supply tap;
- supply water to the pipes and make sure that all connections are tight when turning on the water in the tap and shower;
- during normal operation of the system, you can supply electricity to the water heater, then hot water should flow from the desired tap;
- To increase the safety level of the entire plumbing system and water heater, immediately install a safety valve along with it.
You can clearly see the installation process of the flow apparatus in the video.
Rules for installing a storage boiler
If you plan to install a storage-type device with your own hands, then the requirements for the condition of the wiring will not be as strict as in the previous case. Storage heaters are also somewhat cheaper than flow heaters. In addition, their popularity can be explained by the fact that very often they are covered by a scheme in which water can be supplied to the tap and shower at the same time.
If you have the tools and materials, you can install such a unit quickly; the work itself will not seem too complicated; it consists of the following actions:
- eliminate faults in the electrical wiring or plumbing system, if any, check their condition;
- make markings on the wall for the structure and install the necessary fasteners for its installation;
- fix the water heater on the wall and attach the safety valve;
- after installing the boiler on the wall, connect it to the water supply;
- route the pipes through the valve to the corresponding inlets and outlets on the body;
- first install and connect cold water, and the safety valve must be closed at this time;
- Also, with the valve closed, install pipes for hot water;
- connect the structure to the electrical network and check how it works.
If all steps have been performed correctly, hot water should flow from the appropriate tap. At this time, all pipes and connections of the boiler should be well sealed, and the wires should not overheat.
Of course, if you are not confident in your abilities and even visual training material in video format cannot help you learn the features of step-by-step installation of a boiler with your own hands, then do not take risks, but invite a specialist. Incorrect installation of the heater can cause it to fail prematurely and cause leaks and other problems. Therefore, undertake self-installation only when you are confident in your abilities and know that everything will be done efficiently and correctly.