Here you will learn:
- Principles of installation of water-type systems
- Installation diagram of a warm water floor on a concrete base
- Modular scheme on a wooden base
- Rack laying scheme on a wooden base
- Polystyrene scheme
- Connection diagram for underfloor heating directly from the boiler
- Installation diagram of a heated floor from a three-way valve
- Wiring diagram for a heated floor from a pumping and mixing unit
- Connection diagram for heated floor from radiator
- Features of connecting the structure to a heat source
- Water circuit installation diagrams
- Commissioning
Order the footage of floor pipes only after making calculations. Without calculating the heated floor, you cannot start purchasing materials and assembling the system; the absence of a project will negatively affect the heating of the room.
Professional calculations of the water floor are carried out by heating engineers; a rough calculation can be done independently according to the instructions:
- We determine the installation location of the distribution manifold. We measure the area of the heated rooms and determine the diameter of the pipes in the heating circuit.
- When using a pipe with a diameter of 16 mm or 20 mm, the length of the circuit does not exceed 100 and 120 m. The circuit heats 15 - 20 m2 of floor, the difference in the length of the circuits does not exceed 15 m.
- Before drawing up a scheme for laying a water heated floor, we determine the permanent location of large furniture in which we do not lay a heated floor.
- The distance between the pipes in the circuit is 15 - 20 cm, depending on the negative temperature in winter. In northern regions, at temperatures below – 30*C, this distance is reduced to 10 cm.
- Based on the area of the rooms, we calculate the number of heating circuits, determine the need for coolant and select a collector. To learn how to calculate heated floors using the program, watch this video:
Principles of installation of water-type systems
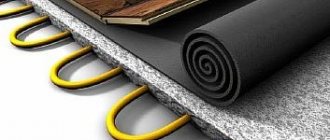
First you need to prepare the base: level it and clean it of dirt. After this, a layer of thermal insulation is laid, often using extruded polystyrene foam boards.
This material comes in the form of slabs that are not difficult to install. After this, the thermal insulation material is covered with a waterproofing film.
Before installation, a damper tape is placed around the perimeter of the room to compensate for thermal expansion during system operation. In large areas it is installed not only along the walls, but also in the seams running in the middle of the room.
If the insulation and tape are laid correctly, then the film can be carefully tucked over the edge of the insulating material, it will lie flat and with little tension.
A damper tape installed around the perimeter of the room is necessary when using a concrete screed for laying TP, in order to compensate for thermal expansion.
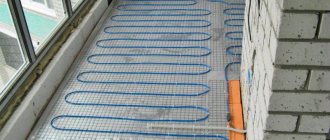
Hot water pipes need to be laid on top of the film, it is at this stage that the installation scheme for a water heated floor should be implemented, it is chosen in advance. The pipes should be laid evenly, trying to maintain an equal distance between them in order to achieve uniform heating of the floor.
Whatever the chosen TP scheme, you should bend the pipe correctly and carefully lay it out along the marking grid so that the floor is heated evenly
The laid communications are connected to the distribution manifold, through which they are connected to the heating system of the house, to the boiler, etc. The pipes are filled with concrete screed, after which it is necessary to wait for it to dry completely. All that remains is to check the operation of the system and lay the flooring.
Each pipe loop is connected to a manifold. It is desirable that individual sections of the system have approximately equal length and hydraulic resistance
There are no small details when installing systems of this type. A small error can cause serious damage in the future.
Therefore, it makes sense to consider a number of useful tips before starting installation work:
- It is better to completely dismantle the old screed, and place the waterproofing and insulation on the strongest possible base, carefully leveled horizontally.
- You should not think that under the screed the unevenness of the base will be invisible; all differences of more than 10 mm must be carefully leveled out.
- If several separate circuits of the system are installed in one room, the space between them should be divided with a damper tape, not limited to just laying it around the perimeter.
- In small areas, it is quite acceptable to use penofol as insulation.
- Above an unheated basement or on the ground, you need to make the most reliable insulation, for example, a layer of expanded clay and expanded polystyrene slabs at least 50 mm thick.
- When attaching pipes to the mesh, do not tighten the ties too tightly so as not to damage the pipe.
- The diameter of the pipe for such a system can vary between 16-20 mm, the material must be designed for a pressure of at least 10 bar and heating up to 95 degrees.
- If you have a limited budget, you should not spend money on pipes with options in the form of additional protection, although reinforcing polypropylene communications with fiberglass will not be superfluous.
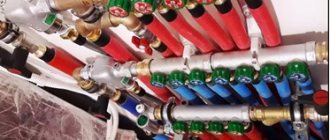
- To automate the operation of the system, you need to correctly select and install the collector, supplementing its design with servos, pressure sensors, air vents and other useful devices.
- The collector box is placed in a niche on the wall; it must rise high enough above the floor level so that the pipes entering it can be correctly bent.
- All pipes must exit the manifold downward, and never upward, to ensure proper operation of devices for removing air trapped in the system.
- It is not recommended to make a niche for the collector in load-bearing walls; if there is no other option, it is better to simply install the cabinet on the wall, and not inside it.
For obvious reasons, it can be very difficult to correct flaws after the installation of such a system is completed, so all operations should be performed very carefully. For example, each loop must consist of one solid pipe; no soldering or any other connections are allowed.
Types of water floors and their structure
There are 4 types of water heated floors. They all have a different structure and laying pattern. Which of these is better is up to you to decide. Everywhere has its pros and cons.
Wooden floor modular type
It consists of ready-made elements - modules (22 mm chipboard) in which they were pre-milled with channels. Installation takes place on floor beams. Insulation is laid between the joists. The pitch between the beams is 600 mm. When using ceramics – 300 mm.
Installation of the modules is very simple, just lay the modules on the floor. To connect the system to each other, a special lock is used, which is already installed in the elements.
The modular and slatted type of floor is used for a wooden base (in wooden houses), which is installed on wooden logs.
Step by step instructions:
- Make sure that the wooden floor on which you plan to install the heating system is level and clean. If the floor creaks, the wood is beginning to rot, there are cracks, or there is a feeling of draft under the boards - it is better to redo the surface.
- Make the distance between the lags strictly no more than 60 cm.
- Next, nail to the beams and to the bottom - plywood or board. This will be a raised floor to hold the heated floor.
- Place insulation on top of the raised floor. But first line it with a layer of polyethylene. On top of all this is polystyrene foam or, better yet, glass wool.
- Next, lay the finished modules, fastening them together with locks.
- Insert the coolant pipe into the grooves of the modules.
- Next, you can lay the laminate. In some cases, a layer of reinforcement (aluminum plate, substrate) is laid between the laminate and the heated floor.
Wooden slatted floors
This system differs from the modular type in its design. If the module uses ready-made elements, then it is necessary to form grooves in the rack system (laying out boards 28 mm thick and with a 20 mm distance between the slats).
The rack version is also installed on logs (beams) with the same spacing as in the modular version. Insulation is placed between them.
Aluminum plates are used if the laying step is 150, 200 or 300 mm. In places where there will be heat losses (corner wall of an apartment, windows), a step of 150 mm is used.
It doesn’t matter whether you choose a modular or rack system, you should know that for each of them a separate project is drawn up with a unique calculation of the load on the heating system.
The pitch of the circuits, their number, installation of distribution manifolds and other automatic systems are taken into account.
Concrete system
This system is most often used when installing heated floors. The idea is simple - pipes are installed and filled with concrete.
What does the scheme (filling) of a concrete system consist of:
- Thermal insulation (it is recommended to use polystyrene foam more often). Needed to keep the room warm. So that the heating does not go down to the floor, but up - into the room and its space.
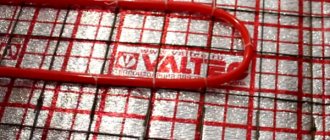
- Iron mesh. Installation is carried out on thermal insulation (polystyrene floor). Pipes are attached to it with special clamps. There are many other accessories for fastening this type of floor (clips, rails, harpoons).
- Damper tape. It is laid out around the perimeter of the room even before pouring. It is a compensator for thermal expansion when the screed heats up.
- Pipes (from 8 to 32 mm). The choice of pipe diameter directly depends on the volume of the heating area and the load on the heating system. Pipe laying is carried out only according to special instructions. project. Before filling them, the entire system is tested for operability and for leaks.
- Concrete pouring (screed). This is a concrete solution. It is poured last. The final stage of installing heated floors.
Watch the video in which craftsmen install the floor and fill it with concrete screed. You will see how to correctly distribute the screed along the base of the pipes: evenly, without differences or lumps.
We pour the screed over the warm floor. Screed on beacons. Details
Installation diagram of a warm water floor on a concrete base
Scheme of a water heated floor on a concrete base
Installation of water heated floors with concrete screed
Installing water heating on a concrete base contains several “layers of the cake”.
Conclusions and useful video on the topic
Detailed information on the installation of systems of this type is contained in the video:
Water heated floors are a convenient system, but you shouldn’t call it easy to install. Proper design, accurate calculations, selection of quality materials and elements will allow you to create a truly effective heating option.
Do you have personal experience in designing and installing water heated floors? Do you want to share your accumulated knowledge or ask questions on the topic? Please leave comments and participate in discussions - the feedback form is located below.
Modular scheme on a wooden base
Provides for the use of ready-made OSB boards with sawn grooves for pipes and metal plates. The thickness of the slabs is at least 22 mm; in the diagram, the installation of thermal insulation is provided in the ceiling. The variety of modules in configuration allows them to be placed in the desired sequence according to the developed scheme. Depending on the pitch of the plastic pipe, it is possible to use strips measuring 130–280 mm. They have convenient latches for fixing pipes. Sizes 150 mm, 200 mm and 300 mm. After assembling the pipes and checking them for leaks, the circuit is covered with gypsum fiber boards.
Warm floor on a wooden base
Photo of laying heated floor pipes
Laying thermal insulation
After preparing the base, the next step is to lay the insulation. Expanded polystyrene acts as the main heat insulator. You can use any brand, the main thing is to maintain a density of around 30-35 kg/m3.
In our experience, the thicker you put the polystyrene foam, the better. Especially on the first floor. The minimum recommended thickness is 5 cm. But even with it, downward heat loss is observed, although insignificant. If it is possible to lay 10 cm on the ground floor, then it is better to do so. It is also advisable to glue the sheets of expanded polystyrene together (if you use two layers). For this purpose, each brand often sells special glue along with thermal insulation.
If you use polystyrene with bosses, then you can immediately begin laying the heated floor. If not, then read on.
Rack laying scheme on a wooden base
The diagram is drawn taking into account the use of wooden or OSB slats with a thickness of at least 28 mm. The slats should be laid on the floor joists, the distance between them is slightly larger than the diameter of the pipes. Metal profile plates are used as fasteners; there are latches on top. The system is covered with gypsum fiber boards.
Warm floors on a wooden base
Features of the device and connection of the cable floor
Types of electric heated floors
Electric floors can be installed from infrared film or rod mats, but we will pay attention to the cable option, which is mounted under the screed. This is a modern and very reliable solution that allows you to organize heated floors not only in a private house, but also in an apartment, as well as heat rooms where there is no water, but there is electricity.
- The installation technology of such a floor is much simpler than a water pipe floor. The main thing here is to correctly connect the wires to the thermostat. The basic element of this system is the heating cable, and when purchasing it, you should find out its power per unit length. It is important that this figure does not exceed 21 W/m and is not less than 17 W/m.
Installing a cable floor is easier than installing a water floor
- To install heated floors, you can use a self-regulating cable. But it has one drawback. The level of heat it generates depends on the ambient temperature, and if the floor is covered with carpet or furniture, or tiled with ceramic tiles, the floor will cool itself.
- Therefore, in such systems, resistive cable is often used as the most optimal option, suitable for all types of coatings. It can be single-core or double-core, up to 3 and 5 mm thick, respectively. This cable is easier to install, but costs more. Wires of minimal thickness (2-3 mm) are laid under a dry screed, and thick ones are poured in a monolithic manner.
Cable heated floor
The second most important element, with the help of which, in fact, the entire system is controlled, is a thermostatic device . Its cost is the lion's share of the price of the floor, but you can't live without it. The only way to save money is by purchasing a model with a minimum set of options. And there are many options, there are wireless, touch, and push-button.
Thermostat for heated floors
You will still have to select a thermostat yourself, since it is not included in the floor kit.
Cable installation
The cable installation work is quite simple. For clarity, we present the instructions in the form of a table with pictures and comments.
Cable heated floor Electrolux Twin Cable
Table. Step-by-step installation instructions.
| Steps, photo | Description of work |
| Step 1. Calculation of the area of the heated floor | The amount of cable required to heat a room is calculated minus the area occupied by stationary furniture. The maximum power of a two-core cable is 2500 kW, and if more is required, then several cable sections are laid. |
| Step 2. Preparatory work related to installing the thermostat | First, a place is prepared for installing the regulator. It can be anything - the main thing is that it is no closer than 30 cm to the floor and does not interfere with the arrangement of furniture. If the floor is installed in a room with high humidity (bathroom, sauna), it is better to place the thermostat on the outside of the wall. |
| Step 3. Drilling a recess for the regulator box | Next, using a drill with a socket attachment, drill a hole for the thermostat housing. |
| Step 4. Cutting the grooves for the wire | A grinder is used to cut a groove with a cross-section of 20*20 mm for laying the wire. |
| Step 5. Cleaning the room | After preparing the wall for installing the thermostat, you should start preparing the floor for laying the cable. You start with cleaning. |
| Step 6: Prime the subfloor | If the base of the floor is concrete, it needs to be primed so that it does not collect dust. |
| Step 7. Laying insulation | Let the soil dry and lay the insulation with the foil up so that the heat is reflected into the room. On a note! In this case, the cable floor is installed in the apartment, and a material based on polyethylene foam is used as insulation. But if you, say, have ground floors on the ground floor of a private house, you can use thicker PPS insulation or even make 2 layers. The main thing is that there is foil on top. |
| Step 8. Fixing the canvases with tape | To prevent the canvases from shifting and forming cold bridges, they need to be secured with special foil tape. |
| Step 9. Cutting the mounting tape | A metal mounting tape is used to lay out the cable. Cut it into strips of the required length, for which you need to have metal scissors on hand. |
| Step 10. Installation of tape | The tape is mounted to the base in parallel with a step of 50 - 100 cm. Fastening to concrete is done using dowels and plastic screws. |
| Step 11. Cable Laying | Start laying out the cable. At the same time, keep in mind that there should be a distance of at least 5 cm between it and the wall, and if there is a radiator or other heating device in the room, then there should be more than 10 cm from it to the outer loop of the cable. |
| Step 12. Calculation of cable laying pitch | To lay the cable correctly, you need to calculate the steps. This is done according to the formulas that you see in the photo. When laying, you should try to ensure that deviations from the calculation are no more than 1 cm. |
| Step 13. Securing the cable in the mounting tape | Installation of the section begins with connecting the cable to the location of the thermostat. The end of the cable, connected via a polymer coupling to the temperature sensor wire, is fixed in the mounting tape as shown in the photo. And from this place the layout of the contour begins. |
| Step 14. Snake cable layout | Throughout the heated area, try to strictly follow the cable laying step. It should not be overly stretched or intersect; also make sure that there are no kinks. There should be no less than 8 cm between turns. |
| Step 15. Pull the end of the cable with the sensor into the corrugation | Insert the end cap with the floor temperature sensor into the corrugation and close it with a plug. |
| Step 16. Laying the corrugation in the groove | Place the corrugation in the previously prepared groove so that the end with the sensor falls in a smooth line to the floor. |
| Step 17. Laying the corrugation with the floor sensor | The bend radius of the tube should not exceed 5 cm. The length of the part of the corrugation that lies on the floor is approximately half a meter from the bend. |
| Step 18. Fixing the sensor in the tube | The position of the sensor must be fixed to the same mounting tape. Since the diameter of the tube is too large compared to the cable, this is done using a plastic clamp. Note! The length of the tube should be such that its second end reaches the thermostat box. This will allow, if necessary, to replace the sensor without dismantling the floor covering. |
| Step 19. Connecting the end of the cable to the thermostat | The end of the cable - the one from which it began to be laid along the contour - is brought out along the wall to the location of the groove. |
| Step 20. Connecting the cable to the thermostat | All that remains is to connect the wires to the thermostat. This is not difficult to do, since the terminals on its back side are marked in a color that matches the color of the mounting wires. Instructions are also included. |
| Step 21: Preparing the Wire Ends for Connection | The ends of the wires need to be tinned, connected to the thermostat, and, turning on the electricity for a minute, check the operation of the system. Measure the resistance with a multimeter and write down the readings in your passport. |
| Step 22. Sketching the outline of the floor | The instructions for installing a cable floor have a special appendix on which you need to sketch the location of all elements of the system with obligatory reference to the room. Your drawing should look approximately as shown in the picture. |
Example of a cut out technological window
If your heated floor will be covered with a monolithic screed, then before you begin its implementation, in the heat insulator, at a distance of 30-40 cm from each other, you need to cut out technological windows like those in the photo. When embedding, they are filled with a solution and tightly fix the substrate with the cable in the screed.
Prices for heated floors Caleo
heated floors Caleo
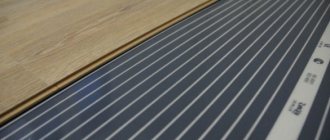
Polystyrene scheme
Polystyrene underfloor heating system
A more modern method, there is no need to make a concrete screed. This scheme significantly speeds up installation work and allows the system to be used not only during new construction, but also during major renovations of the building. Due to the minimum thickness of all layers, it is possible to reduce the height loss of the room and minimize the load on the floor.
Polystyrene system
The scheme involves embedding aluminum plates into polystyrene plates in which pipes are fixed. The thickness of the slabs allows you to hide pipes with a diameter of up to 20 mm in them.
Fragments of installation of a polystyrene system
The top of the system is covered with gypsum fiber boards. It is not recommended to use plywood or OSB; they have insufficient thermal conductivity, which will reduce the efficiency of the heating system. Gypsum conducts heat well, and the addition of synthetic fibers makes it quite durable. Finish flooring can be laid on top of these slabs.
The polystyrene system can have a base thickness from 15mm to 70mm
Water floor - heating cake diagram
*
In most cases, residents of the private sector, owners of country houses and cottages give preference to the concrete type of water floors. This option installs much faster. Equipment costs are significantly lower. And the heating system itself is practical and efficient in operation. In order to install a heated floor with your own hands, you should familiarize yourself with what a concrete water floor looks like in cross-section, what the so-called layer cake diagram is.
A layer cake is a layered structure that is required when laying a heating circuit on the floor. The lowest layer is a waterproofing coating, the purpose of which is to protect concrete floors from moisture.
After laying the waterproofing, a damper tape is laid around the perimeter of the heated room. This element compensates for the pressure of the concrete screed, which expands during heating, on the wall panels.
Important! Consistent laying of each layer in a layer cake of a concrete water-heated floor is a prerequisite. Neglecting technology can lead to the fact that your heating system will bring only hassle and problems, instead of creating comfortable living conditions.
Thermal insulation is the most important element in this option. Properly selected materials and the thickness of the heat-insulating layer will minimize heat losses by directing the main heat flow from the heating pipe upward. Thermal insulation is installed over the entire area of the heated room, regardless of whether there is a water heating circuit in this place or not.
Again, a layer of waterproofing is laid on top of the heat-insulating layer, which will protect all previous layers of the cake from exposure to moisture in case of leakage.
The heating circuit pipeline is already installed on the prepared base. Today there are many ways to attach heating pipes. Anchor shackles, plastic clamps and mounting strips are commonly used. The most convenient and practical way is to use molded thermal insulation boards for successful installation of warm water floor pipes. The design of such plates includes special fastening elements for the heating pipe.
You should know! When it comes to installing heated floors in small rooms, reinforcing mesh is not a necessary element. For large premises, laying reinforcing mesh or polypropylene fiber is mandatory.
The final step in forming a layer cake is pouring concrete. It is necessary to add a plasticizer to the sand-cement mixture. The final stage is the formation of the floor covering. Here you can already give free rein to your imagination, giving preference to one material or another. For the bathroom, the most suitable option is porcelain stoneware or tiles. For living rooms, the ideal option is to use laminated parquet or laminate.
The layer cake pattern is traditional. Differences may occur in the use of materials of different types and types. The layered structure, as a rule, has a thickness of 100-150 mm. The thickness of the screed can be varied depending on the design features of the living space and the building itself.
Connection diagram for underfloor heating directly from the boiler
This connection diagram for a water heated floor has a heat generator, safety fittings with a pump. The coolant directly from the boiler enters the distribution manifold of the heated floor and then diverges through the loops and is reversed back to the boiler. The boiler must be set to the temperature of the warm floor.
This raises two nuances:
- It is advisable to use a condensing boiler for installation, because Low temperature mode is optimal for it. In this mode, the condensing boiler has maximum efficiency. In a conventional boiler, when operating at low temperatures, the heat exchanger will very quickly fail. If the boiler is solid fuel, then a buffer tank is needed to correct the temperature, since this boiler is difficult to adjust temperature.
- A good option for underfloor heating is when it is connected to a heat pump.
Lay the floors into the project
As a first step, we recommend that you take into account the presence of a water floor system in your home at the project stage. To do this, you need to give clear instructions to the designer so that he takes into account the required heights of ceilings and doorways. Ideally, you need at least 14 cm of additional height. If possible, let him also lay down a diagram for installing a heated floor, so that there is a clear understanding of how to do it correctly.
A common problem with the impossibility of proper floor installation is precisely unaccounted for height issues.
Installation diagram of a heated floor from a three-way valve
Three way thermostatic valve diagram
In most cases, with such a scheme for installing and connecting a water heated floor, we have a combined heating system, there are heating radiators with a temperature of 70-80°C and a heated floor circuit with a temperature of 40°C. The question arises of how to make forty out of these eighty.
For this, a three-way thermostatic valve is used. The valve is installed on the supply side, after which a circulation pump must be installed. From the return of the heated floor, the cooled coolant is mixed with the coolant that is obtained from the boiler circuit and which is subsequently reduced to operating temperature using a three-way valve.
The disadvantage of this scheme for laying out a heated floor is that it is impossible to control the proportionality of mixing the cooled coolant with the hot one, and underheated or overheated coolant can flow into the heated floor. This reduces the comfort and efficiency of the system.
The advantage of this scheme is ease of installation and low cost of equipment.
This scheme is more suitable for heating small areas and where there are no high customer requirements for comfort and efficiency, where there is a desire to save money.
In real life, the circuit is extremely rare due to the instability of radiators connected to a single pipe. When the three-way valve is opened slightly, the heating circuit is energized, and the pump pressure is transferred to the main line.
Example implementation:
Subtleties and nuances of connecting water heated floors
*
Having become acquainted with the various options for equipment and installation of warm water floors, it is worth recalling the existence of some nuances that must be taken into account. Let's take a closer look:
- laying the water circuit;
- checking the functionality of the finished heating system;
- pouring screed, laying flooring.
The first thing that is important to pay attention to is the method of laying the heating pipe. If for you a warm floor is the only heating option in the house, then the pipe is installed with minimal deviations. The pipe pitch in this case is 15-20 cm. If the heated floor is only an auxiliary heating system for you, the pipe is laid in increments of up to 30 cm.
Important! The maximum permissible step for laying the water circuit should not exceed 30 cm. Otherwise, you will physically feel unheated areas in the floor.
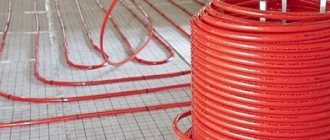
The pipe is fixed with special clamps or clips, however, without rigid fixation. When hot coolant is supplied, the pipeline expands, which will inevitably cause a dynamic displacement of the entire circuit. When laying the water pipe according to the snail pattern, do not forget about the presence of reverse. The most optimal pipe length for heated floors is 70 m. If the entire length is not enough to heat one room, make two water circuits of equal length.
For example: to heat a room of 10 m2 you will need 67 m of heating pipe (in increments of 15 cm).
The final stage of the work is a test run, which is carried out to check the functionality of the heating system and all structural elements. The first start is carried out for 2-4 hours. The pressure at start-up should exceed the operating pressure by 1.5-2 times. Every hour, the operating pressure must be reduced by 0.03 MPa, bringing it to optimal parameters. The heating temperature during this period should gradually increase to operating values.
Finally, when the entire system is working, you can begin pouring the concrete screed or equipping the stacked structure.
Wiring diagram for a heated floor from a pumping and mixing unit
Mixing module
This is a mixed scheme for connecting a water heated floor, where there is a radiator heating zone, a heated floor and a pumping and mixing unit is used. The cooled coolant is mixed from the heated floor return to the boiler.
All mixing units have a balancing valve, with which you can dose the amount of cooled coolant when mixing it with the hot one. This allows you to achieve a clearly defined temperature of the coolant at the outlet of the unit, i.e. at the entrance to the heated floor loops. This significantly increases consumer comfort and efficiency of the system as a whole.
Depending on the model of the unit, it may include other useful elements: a bypass with a bypass valve, a balancing valve of the primary boiler circuit, or ball valves on both sides of the circulation pump.
Connection diagram of the heating water pipe to the collector
Installing a concrete screed, laying a water heating pipe - engineering and technological aspects of installing a heated floor. The main stage of installation is connecting the pipeline to the mixing unit and to the manifold.
It has already been said above about where and how best to locate the manifold cabinet. Together with the installation of the mixing unit, the manifold and circulation pump make up the heating system control unit.
Usually the cabinet has dimensions of 50x50 cm. For better combination with the interior of the living space, the manifold cabinet is made in a recess of 10-15 cm. Accordingly, it is better to hide the water circuits at the connection points in the wall.
Having installed the collector, the necessary lines are connected to it. Traditionally, the connection diagram looks like this:
The difference may be in the heating method used. This can be the use of coolant supplied through a centralized heating system, or an autonomous heating system powered by a boiler.
Note: If you use underfloor heating and heating radiators at the same time, then you can get by with installing one pump. When it comes to a complete heating system, a warm floor for the entire building, a collector, a pump and the installation of a mixing unit are mandatory attributes.
The supply pipe and return pipe are connected to the manifold using special fittings. If the diameters of the pipe and the manifold inlet socket are different, adapters are used.
A shut-off valve must be installed in the system, which shuts off the supply of hot water to the water circuits. A drain valve must be installed on the return pipe.
To ensure precise regulation of the heating temperature of the heated floor, special valves and a mixing unit are installed on the collector. If you have the funds, you can purchase a ready-made, complex collector, the design of which includes all of the listed elements. Collectors may differ in their design, depending on the number of connected water circuits and the volume of heated rooms.
For reference: in houses where heated floors are installed in all living areas, collectors service all rooms at once. Under one condition, if the layout of the heating pipe is the same everywhere.
When using one pipe laying scheme, the collector has one number of inlet and outlet connection points. Using a combined installation, you will have to have a manifold with a large number of inlet and outlet pipes.
Connection diagram for heated floor from radiator
These are special kits designed to connect one underfloor heating loop to an area of 15-20 sq.m. They look like a plastic box, inside of which, depending on the manufacturer and configuration, there may be coolant temperature limiters, room air temperature limiters and an air vent.
The coolant enters the loop of the connected water heated floor directly from the high-temperature circuit, i.e. with a temperature of 70-80°C, cools down in the loop to a given value and a new batch of hot coolant enters. An additional pump is not required here; the boiler must cope.
The disadvantage is low comfort. Overheated zones will be present.
The advantage of this scheme for connecting a water heated floor is that it is easy to install. Such kits are used when there is a small area of heated floors, a small room with infrequent occupants. Not recommended for installation in bedrooms. Suitable for heating bathrooms, corridors, loggias, etc.
Let's summarize and put it in a table:
| Connection type | Comfort | Efficiency | Installation and configuration | Reliability | Price |
| Regular gas, TT or diesel | ± | ± | + | ± | + |
| Condensing boiler or heat pump | + | + | + | ± | — |
| Three way thermostatic valve | ± | ± | + | + | ± |
| Pumping and mixing unit | + | + | ± | + | — |
| Thermal mounting kit | — | ± | + | + | + |
Master plumbers and heat and gas supply experts recommend avoiding schemes for connecting water heated floors to working heating branches. It is better to power the heating circuits of the underfloor heating directly to the boiler so that the floor heating can function independently of the radiators, especially in the summer.
Various types of heated floors. Fundamental differences
In practice, in private households today, three types of underfloor heating are installed:
- concrete;
- lungs;
- thin.
Each type has its own technological features and a specific connection diagram, which are largely determined by the type of living space. Warm floors based on concrete screed are installed in houses and buildings with sufficiently strong floors. When choosing such a heating scheme, it is important to remember significant limitations from a technological point of view. We are talking about an additional load on the floor and a reduction in internal space by raising the floor by 10-15 cm.
Important! When installing a heating system of this type, technological limitations play an important role. The new concrete screed has a significant weight (200-300 kg/m2), so when laying a heated floor in an ordinary room of 15 square meters. m. a concrete monolith weighing 2-3 tons will put pressure on the ceiling.
Note: installation of heated floors with liquid coolant in residential premises of apartment buildings is prohibited. The main reason for the ban is the technological factor. The pipeline for the water floor is not able to withstand the increased hydraulic resistance. The functionality of the heating system can be affected by poor quality coolant. In addition, there is always a high probability of violation of the integrity and failure of the water circuit as a result of water hammer.
*
For residential buildings with a strong and reliable structure, a concrete water floor is an excellent solution for heating residential premises. For a city apartment, this option looks problematic. The only possibility of implementing such a heating scheme in a city apartment is to use a heated floor as an auxiliary, additional source of heating. The water circuit can be laid on the floor in small rooms. For example, a very common option is heated floors in the bathroom and nursery.
The sand-cement screed, in which the water circuit is hidden, will protect the pipeline well from damage and ensure good heat transfer.
Light water floor is a heating scheme specially designed for equipment in wooden houses. The main advantage in this case is the minimal load on the floors. In turn, light floors are divided into wooden and polystyrene structures based on the type of floor covering.
The third type of water floors used in everyday life are thin structures. Here the main emphasis is on small-diameter pipes, thanks to which the height of the entire pie is 25 mm.
Features of connecting the structure to a heat source
In a floor circuit, most often the average coolant temperature is 35-40 degrees. Installation diagrams for water heated floors in a private house operate using forced mixing of flows. Part of the coolant from the return flow passes into the supply circuit.
Thermostat connection diagram
Gas boilers are equipped with special automation. Solid fuel units require a more complex device. They are equipped with circulation pumps and a special buffer tank. In this case, more complex combustion adjustment is used.
Location of the boiler in a separate room
Electric boilers are considered the best option for underfloor heating systems. Special automation allows you to maintain the desired temperature without loss of thermal power.
Electric boiler in operation
Helpful information! To heat small houses, a direct connection to an electric boiler is used. In cottages with a large area, a special distribution comb is used.
Temperature requirements for heated floors
According to building codes and SNiP rules, the temperature of the floor surface should not exceed permissible values.
| Zone name | °C |
| Children's room | 24 |
| Living room, bedroom and kitchen | 26 |
| Parquet floors, carpeting | 27 |
| Corridor | 30 |
| Bath with toilet | 33 |
| Edge zones of premises | 35 |
Maximum floor temperatures cannot be exceeded for two reasons:
- Contact of the legs with a very heated surface causes venous dilatation of the veins.
- Overheating deteriorates the floor covering (the wood dries out).
The use of the HTP system in residential premises is allowed with a coolant temperature of no higher than 55 °C.
Water circuit installation diagrams
If the installation of warm water floors is carried out using a well-established, traditional technology in a clear sequence, then the installation of a heating pipe can be carried out in various variations. The main goal pursued when installing heated floors is to uniformly heat the entire area of the heated room. Laying a pipeline just the way you want means deliberately creating problem areas throughout the entire structure. The coolant tends to quickly lose temperature as it flows, so the pipes must be laid starting from the walls, then moving towards the entrance to the room or to its center. For this purpose, specially developed optimal schemes for laying the water circuit, each of which has its own characteristics.
The mixing unit and manifold are the beginning of the entire heating system. Water circuits are connected in a clear sequence. The beginning of the pipeline is to the inlet pipe, the end of the pipe is connected to the check valve.
You can install a warm water floor with your own hands, the contour of which will be laid as follows:
- pipe installation according to the snake pattern"
- laying the pipeline according to the snail pattern;
- combined scheme.
When installing heating in corner rooms, a pipe laying scheme is used for enhanced heating.
In each individual case, we can talk about the advantages of one or another scheme. For example: a snail is the simplest circuit. The bend of the pipe here reaches 900, while in a snake the heating pipe will be bent by 1800.
Note: the “snake” type water circuit can be powered by a low-power circulation pump. For a bathroom or children's room, this installation scheme looks preferable.
Where heated rooms have a linear slope, it is better to install the pipe according to the “snake” pattern. The pipeline is laid in the direction from the mixing unit towards the slope. Air pockets in this version can be easily removed, which cannot be said about a pipe laid in a snail pattern. In sloping rooms, removing air pockets can be problematic.
For large premises where it is necessary to use several water circuits of the same length for heating, the “snake” pipeline laying scheme is very convenient. Thanks to this installation method, it is possible to achieve balanced operation of the entire heating system.
Heating pipes laid on a prepared base are connected to a manifold that distributes the supply of coolant to the system. The distribution cabinet together with the mixing unit is installed either in the heated room or next to it, which significantly reduces the number of pipes and the consumption of other materials. The bends of the water pipe at the point of connection to the collector are sewn into a special protective box.
In each individual case, a certain order of laying the water pipe should be followed. When working with a snail circuit, the pipe is first laid along the perimeter of the walls, after which a turn follows from the farthest wall. In the opposite direction, the pipe is laid in a spiral, reaching the center of the heated room. For the snake circuit, the water circuit is laid out as follows. The pipe is laid along the perimeter of the walls, after which uniform bends are made in the opposite direction.
The combined installation schemes of heating pipes for heated floors, used in some cases, involve the simultaneous use of both options. One half of the room can be heated by a water circuit laid in a snake pattern, while the other part of the room will be heated by a pipe mounted in a snail pattern.
How to draw up a floor laying plan according to plan?
The diagram is created even before you have purchased all the materials. It helps not only to correctly install a heated floor, but also to plan the volume of purchasing materials.
To begin, draw a picture of the room in which you plan to install it. This could be 1 room, the whole apartment or the whole house (private). Make the drawing correctly, in accordance with the size of your room. A diagram “by eye” will not give any accuracy. Take into account the square meters of the room and transfer it to paper or the workspace of the software on your PC.
In this video you can familiarize yourself with a PC program for designing a heated floor plan. Video review, presentation of the program's capabilities, brief instructions on how to use it.
Warm floor program
What is included in plan accounting:
- building plan (including all floors);
- material of floors, walls, windows and doors;
- desired temperature in the heated room;
- location of collectors and heating boiler;
- detailed arrangement of furniture, its dimensions taking into account the square footage. meters of premises;
- average ambient temperature in winter;
- the presence of another heat source (battery, fireplace, split system, etc.)
Tips and tricks at the stage of creating a diagram:
- The approximate area for 1 circuit should be more than 15 square meters. m.
- In large rooms, install multiple circuits. They should not differ in length by more than 15 m.
- If the step is 15 cm, it will be equal to the pipe flow rate of 6.7 m per 1 sq. m. If the installation is every 10 cm, then the consumption will mean per 1 sq. m – 10 meters.
- The minimum pipe bend radius is 5 times its diameter.
- Considering that heated water will first pass through the pipes, and then it will gradually cool and return to the collector already cooled, installation should begin in those places that are most susceptible to cooling (windows, corner walls).
- The circuit plan can be drawn manually on graph paper.
In the video, the master manually draws a diagram for installing a heated floor on paper. Gives clear examples of calculations.
WARM FLOOR PROJECT, CALCULATION, PUMP (for a large room)
It is important to save the finished wiring diagram (drawn or printed). In emergency cases (leakage, sale of an apartment, repair work), precise knowledge of the location of the pipes may be necessary.
When drawing up a diagram, keep in mind that the collector is installed in the center of the room (see diagram below). It is important that the distance of all contours is approximately the same.
Which installation option is better? Preference should be given to the scheme that best suits a particular room. This has already been discussed above.
Scheme for a two-story house
The plan below shows a diagram of laying heated floors on 2 floors. The first floor has a large area, so the “Snail” double-circuit heating system is used.
Multi-room premises (house, apartment)
The plan shows that “Snail” is used throughout the room. This applies to both the bathroom and kitchen. Please note that the contours do not go under furniture, appliances or plumbing fixtures.
Scheme for a room with complex curved walls
When laying the floor, you may encounter some difficulties - curved walls, unique, designer layouts. In such cases, it is not easy to install an even snake or snail. A combined laying system is used.
The coolant is laid based on the shape and bend of the walls. Look at the picture below to see how you can plan your pipe laying scheme. The interior space is also taken into account when warming up.
Commissioning
Full maturation of the cement screed occurs after a month, which is when balancing needs to be done using collector flow meters.
Using balancing valves, the coolant flow is regulated; it should become the same in all circuits. If you have no experience with self-balancing, it is better to invite a specialist.
After manipulating with cold water, if the system is working correctly, you can conduct tests with heated coolant. At this point, the installation of the heated floor is considered complete.
Pressure testing of floors
An important point in our instructions. After laying the pipe, all circuits need to be pressurized. This is done in order to finally verify the tightness of the pipes and the absence of defects in them.
The system can be pressurized with either air or water. If you are sure that you will move into the house before winter, then you can resort to water pressure testing. In other cases, it should be pressurized with air. Pump the pressure around 4 bar and watch it “hold”. If the pressure drops a little, it's okay. This is often due to changes in temperature. But if the decline is significant, then you should look for the leak.
Technical characteristics overview
The water heated floor system consists of a circuit and a control unit. The first are located under the floor covering, the second is often built into niches with open access. This type of heating is used as the main or additional heat source.
The most effective option is considered to be a warm water floor under tiles or laminate. Carpets have low conductivity, so they act as a barrier between the system and the air.
Benefits and recommendations
Warm floors, unlike heating radiators, warm air masses over the entire area of the room up to 1.7 m in height. The readings will be higher in the area of the heat source, and not under the ceiling. This indicates greater productivity of systems built into the ceiling than other heaters.
Room heating efficiency of different heating systems Source floorheatmoshiriba.blogspot.com
If we compare the installation of electric and water heated floors, the second one will cost significantly more. But to obtain the same result, it will take more electricity than natural gas or solid fuel. Therefore, a water floor is about 5 times more profitable and is more often used as the main source of heat.
To maintain air temperature in the range of 20-25 0C, radiators heat up to at least 60 0C. The water in the underfloor heating system is brought to 35-45 0C. This also suggests that this type of heating system can be considered one of the most cost-effective. Savings will be up to 40%.
In favor of water heated floors, it is worth noting the fact that the system has minimal effect on the relative humidity of the air, that is, the air does not dry out. There is no active dust circulation. There is also no electromagnetic field, which negatively affects a person’s well-being.
Since the heated floor has a hidden installation system, you need to pay serious attention to the choice of pipes for it. Pipes must have high wear resistance, ductility, durability and low weight. All these characteristics, for example, are met by pipes from the manufacturer Lammin.
Disadvantages and consequences
Violations during the installation of water heated floors lead to leaks and repair work. Therefore, installing a water heated floor takes a lot of time. This fact is often considered a disadvantage, but there is no rush here.
To detect a leak, you will have to open the screed Source www.auckland.plumbing
If you plan to lay a heated floor in a screed, then the floor becomes noticeably heavier (up to 15% of the original weight). It is important to make prudent calculations. Not every foundation or load-bearing structure can handle such a load.
How to make a warm floor in an apartment? In a multi-storey building with a central water supply, the installation of the system must be accompanied by coordination with the service authorities. The connection is made to the water supply. There is an increase in hydraulic resistance, which is designed for vertical rather than horizontal systems. As a result, heating problems will arise in the neighboring apartments above, and the central system as a whole may fail. Therefore, it is not always possible to obtain permission to install heated floors.
The control unit includes several elements. They are expensive to install, configure and maintain. But overall, the costs are paid off by the results.
Heated floor control unit Source i.pinimg.com
Materials such as linoleum, carpet, and carpet are not recommended as finishing floor coverings. The list also includes laminate. But there are brands that are allowed for installation. The packaging must have the appropriate sign: water heated floor. It is important not to confuse it with electric, as the parameters there are slightly different.
Premises requirements
The installation of a water heated floor takes up space from 8 to 20 cm in height. Therefore, doorways must be higher than 2.1 m and ceilings at least 2.7 m.
It is important that the supporting structures and foundation cope with the load generated by building materials and coolant. Differences on the base are allowed within 5 mm to prevent the formation of air and an increase in hydraulic pressure.
Effective heating of a room with a water system is only possible with heat losses of up to 100 W/sq. m. This means that windows must be inserted, the walls must be plastered, and measures must be taken to insulate the structures.
What is included in a water heated floor system
Pump
The length of the circuit can reach 120 m, and the diameter of the pipes does not exceed 20 mm. In addition, highways have many turns. Without forced circulation, uniform flow of coolant is impossible. Therefore, the control system includes a pump. Also, thanks to this device, a stable temperature is maintained in the water supply.
Circulation pump for heated floors Source just-price.ru
For heated floors, a centrifugal pump is connected. It must be designed for different operating modes. That is, to change the temperature of the coolant, the device pushes water into the circuit at different speeds.
When choosing a specific device, 2 parameters are taken into account:
- performance;
- pressure
There are formulas for calculations (respectively):
- Q = 0.86 * circuit power / (t feed – t return);
- H = (hydraulic resistance of 1 running meter of pipe * maximum circuit length + sum of coefficients) / 1000.
Power reserve factors have different meanings:
- valve and fittings – 1.7;
- fitting and mixing unit – 1.2;
- boiler - 1.3.
As a result, low-power devices (from 40 to 150 W) are more often used, which make virtually no noise during operation. On average, relative to productivity for every 40 sq. m accounts for 0.5 cubic meters. m/hour. The values were calculated for central Russia. The pressure rarely exceeds 0.6 atm.
The pump body is made of different materials. It is not recommended to choose cast iron, as it has low resistance to oxidation. Preference should be given to stainless steel.
Rotors can be dry or wet. The latter are better for an autonomous system, since they come into contact with water and do not require constant maintenance. Plus they are less noisy. The former have greater power and are more often used in heating systems of apartment buildings or industrial complexes.
Centrifugal pumps Source dezveshnyaki.ru
If a water heated floor is used as the main source of heat for a 2-3-story private house, then it is recommended to install several low-power pumps instead of one stronger one. This approach will be more effective.
See also: Catalog of popular projects of inexpensive houses
Boiler
This is the equipment that is responsible for warming the coolant. It is not necessary only if the heated floor is connected to a central hot water supply. Autonomy requires installation of a boiler.
The main distinguishing feature of the system is the operating temperature, which does not exceed 45 0C. This fact is important if you are using a heated water floor from a gas boiler. Here are the reasons:
- Such boilers are effective when operating at maximum limits, which are 70-90 0C. If you reduce the indicator to 55 0C, then you will have to overpay for the resource, since the efficiency will be 10-15% lower.
- Operating a gas boiler at lower temperatures is accompanied by the formation of condensate. It contributes to shortening the life of the equipment.
To eliminate waste and wear, you can purchase a boiler with the required temperature limits (condensing) or complicate the heating system. This will be a combination of underfloor heating and radiators.
Combined water heating Source okoyogurt.com
The next most popular resource is electricity. Today it is the most expensive source of energy for heating a house with water-heated floors. There are three options for electric boilers:
- With heating element. The equipment is not expensive, but the heating element often burns out.
- Electrode boilers depend on the quality of the coolant, since their operation depends on the conductivity of water. Periodic maintenance consists of replacing the electrodes. To start, you need to prepare drinking water according to the rules or purchase ready-made liquid from the equipment seller.
- Induction models are more expensive compared to the first two, but they are economical units. Water heats up quickly and electricity consumption is less.
In terms of efficiency, natural gas is followed by boilers operating on pellets and briquettes. Regarding maintenance, it is important to periodically remove ash and monitor the presence of fuel in the bunker.
Solid fuel in the form of coal or firewood forces the owner to constantly monitor the firebox and remove ash and slag. To avoid this, you can choose a long-burning boiler. They are more expensive and have specific fuel requirements. But they are refueled once every few days (on average 5-7) and combustion products are removed less frequently.
Long burning boiler Source otopleniehouse.ru
There are combined models that run on solid fuel and electricity. The heating element automatically turns on and off when the set temperature limits for the coolant are reached.
Liquid fuel boilers are used less often. This is explained by the fact that the tank must be located at a distance from the house due to the smell and noise of the unit. The storage temperature must be maintained at a constant level. In total, the cost of fuel and equipment maintenance is more expensive than other options.
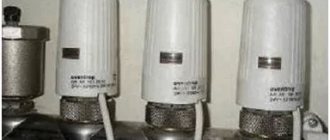
Collector
The circuits, boiler, pump and other elements of the control unit are connected to each other using fittings. The result is several contacts, which means seams and joints. The risk of leaks depends on their number. To reduce it to a minimum, a collector is used.
It consists of 2 combs. Each is represented by a pipe with holes (up to 8-12):
- for distributing hot water along circuits;
- to collect cooled coolant.
In addition, the collector performs other tasks:
- air escapes from the line through the drain valves;
- through shut-off valves the system is tested and water is drained;
- Through flow meters on the supply comb, pressure is equalized on different circuits.
Instead of manual control, you can set it to automatic. So, servos are installed on the return comb, and thermostats are installed in the room. The latter can be configured either for readings regarding air temperature or for the condition of the heated floor.
Temperature control device Source termopapa.com.ua
See also: Catalog of companies that specialize in home insulation
How to make a warm floor from heating in a private house? If the boiler is used within limits of 70-90 0C, then the collector can perform the function of reducing the coolant temperature. In this case, a mixing or pump-mixing unit is assembled. It can be installed next to a radiator, which will act as a heat source for the system.
When choosing a collector, you need to take into account not only the number of outlets, but also the material. Thus, stainless steel is considered an expensive but durable option. Brass is comparatively more fragile, and not every manufacturer’s plastic can be equal to metal.
For convenience, the entire control unit can be hidden in the manifold cabinet. It can be floor-standing with adjustable legs, wall-mounted or built-in. There are fastening fittings inside and holes for pipes on the sides of the body. It is not necessary to use it, but in a residential area its presence can be relevant. The outside of the cabinet is covered with a protective layer of galvanization and powder paint.
Thermostat
A water-heated floor rarely consists of a single circuit. Each of them is regulated separately. Using servo drives and thermostats, the system is controlled automatically. As a result, the owner of a water-heated floor receives a benefit of up to 30% on energy consumption.
Mechanical thermostat Source skidka-msk.ru
There are 3 types of thermostats:
- The sensor is installed between the turns of the circuit in a corrugated pipe. It takes temperature readings from the floor covering. It is usually used in underfloor heating for additional heating.
- The controller is built into the device body. The information contains indoor air temperature readings. Relevant for working with heated floors, which are used as the main source of heat. If the thermal insulation in the house is weak, then installing such a thermostat does not make sense.
- The combined device is equipped with two sensors. Control is carried out both simultaneously and separately.
Devices can also be mechanical, electronic and programmable. The first ones work on a principle similar to an iron. The latter additionally allow you to record the temperature and are controlled using buttons. Still others are fully automated. They set temperature limits, timers in hours and days.
There are also thermostats with remote and touch controls. They are equipped with full functionality. Used in smart home systems. If the owner prefers to abandon the installation of electrical cables, then a radio-controlled thermostat can be installed. The power source is a battery. Information is transmitted through a radio wave receiver and transmitter.
Remote control of heated floor Source pinterest.com
Devices are installed on each mixing unit. If the system is located in the bathroom, then the device is taken outside the room. This is important to eliminate errors in readings. A height of at least 1.5 m is maintained from the floor. It is not recommended to cover it with interior items.