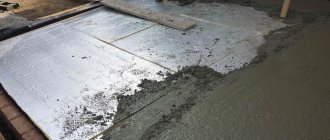
Insulating a floor by laying insulation on a concrete floor slab, followed by pouring a cement composition is a rather complicated process. In order to carry it out with guaranteed quality of the final result, you must first decide on the choice of the heat-insulating material itself. There are a considerable number of types of floor insulation for concrete under screed, and each has its own pros and cons. Let's look into them thoroughly.
The main thing about insulating concrete foundations
Concrete is a very cold building material.
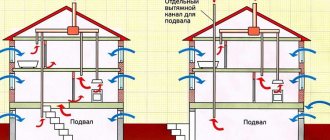
It has many operational advantages. But it is through concrete floor foundations in a private house that heat constantly flows out. In addition, if there is a significant difference in temperature from the inside and outside of concrete slabs, condensation appears on their cold part. This leads to a (significant) increase in humidity on the ground floor and in the basement of a residential building. High-quality floor insulation allows you to solve these problems. It is produced using different technologies using the following types of heat-insulating materials:
- molded foam, these include polystyrene and polystyrene;
- fibrous (fiberglass, basalt and mineral wool);
- sprayed polymer (penoizol, polyurethane foam).
We insulate a concrete floor
The effectiveness of insulation measures depends on the type of heat insulators used, since they all differ from each other in performance characteristics
When choosing a specific protector for a concrete floor in a private house from the cold, you should pay attention to the following parameters of these materials:
- Thermal conductivity index. The smaller its value, the more effective the insulation will be.
- Density. The lower this figure, the more porous the heat protectant will be. Porous materials are capable of retaining a large amount of heat in a private home.
- Moisture resistance. Insulation with high resistance to high humidity does not lose its characteristics for a long time.
- Strength (compressive and bending). Since floors are subject to serious loads, their strength indicators must be high.
- Moisture permeability. This characteristic is responsible for the rate at which the insulating material gains moisture. For residential premises, you need to choose insulation for a concrete floor with its minimum value.
- Environmental friendliness. If you do not pay attention to the cost of heat-insulating products, it is recommended to select materials that are made from natural ingredients.
Also consider the durability of concrete floor protectors from the cold. Everything is simple here. The higher the durability of the material, the better it is considered.
Manufacturers and prices
It is not difficult to insulate a concrete floor today, since the range of thermal insulation materials is very large. But you can only trust the following manufacturers in terms of choosing quality:
- Ekomix (extruded polystyrene foam) - price 1300 rubles per package.
- Isolon (foil insulation) - price 1200 rubles per roll.
- Paroc (mineral wool) – price 800-850 rubles.
- Rockwool (mineral wool) – price 1000 rubles.
- Neman (glass wool) – price 1200 rubles.
Insulation is one of the important processes in the field of construction, with which you can make any home warm and cozy
When choosing a material for thermal insulation of a concrete floor, you need to pay attention to the composition of the material, its thermal conductivity, moisture permeability and service life
Installation Tips
You should leave a gap of 1-3 cm between the wall and the floor.
To properly lay the insulation on the floor on the screed, you need to follow some simple recommendations. Every nuance can be decisive during the installation process.
When making a screed, you should leave a gap of 1-3 cm between the wall and the floor. Without waterproofing, thermal insulation for a concrete screed is not done. It is important to follow the sequence of work when organizing thermal insulation. The floor cake must consist of at least five layers.
Upon completion of laying the thermal insulation for the concrete floor screed, professionals recommend additionally installing insulation reinforcement.
Features of the structure
Once the issue of choosing the required fabric has been resolved, it is important to pay special attention to the tulle texture. In order to correctly determine the appropriate choice, it is important to take into account the placement of window openings and the correspondence of suitable fabric for curtains to the overall style of the room
There are several types of fabric texture:
- mesh;
- with pattern;
- smooth;
- with an embroidered design.
If you want to see a photo of kitchen tulle in a variety of product ranges, go to the catalog of our resource.
Requirements for insulation materials
Scheme of insulation of cement screed on the ground
Before using one or another thermal insulation option, it is necessary to take into account some operational characteristics, as well as the permissibility of using the material for the screed device.
- Any type of insulation at the time of installation and during its service life must retain the shape specified by the manufacturer.
- The material must be as environmentally friendly and safe as possible. Once fixed under the screed, it should not emit any unpleasant odors.
- Good vapor permeability will ensure that moisture escapes, so the material will not become damp.
- The dense structure will make it possible to create a sufficient level of thermal and noise insulation.
Each of the materials has individual installation requirements and is distinguished by its own characteristics, which are acceptable for use in a particular case.
Using Penoplex
The name Penoplex itself is a brand. And the material itself is a high-density polystyrene board. For screed floors this is the best option.
- It has low thermal conductivity - 0.031 W/m K.
- It has a high density - 45 kg/m³, which affects the compressive strength. And for genders this is one of the important indicators.
- Does not absorb moisture.
- Does not allow steam to pass through.
- Chemically inert.
- Absolutely environmentally friendly.
- Easy to process.
Today, manufacturers produce foam boards with a tongue-and-groove connecting lock, which makes it possible to assemble a seamless coating on the floor base.
The process of insulation with penoplex is simple. It is necessary to lay the slabs over the entire surface of the concrete floor, connecting them together with a lock, then stretch the reinforcing synthetic mesh over the top, and only then you can pour the solution.
Foamed polyethylene
It is also called penofol. This is a thin layer of polyethylene foam, which is covered on one or both sides with aluminum foil. The latter performs two functions:
Thermal conductivity – 0.037-0.051 W/m K depending on the thickness.
Polyethylene foam itself does not absorb moisture very much. But after its penetration it sharply loses its qualities. Therefore, it must be protected on both sides.
Penofol should be laid on the floor in strips, joint to joint. The connection boundaries are covered with self-adhesive foil tape.
How to insulate a concrete floor
When installing support beams, the maximum distance between the guides should not be more than 60 cm.
The basic technology for insulating concrete structures involves constructing a heat-insulating “pie” consisting of several layers.
Among the common methods of thermal insulation, three main schemes can be distinguished:
- Arrangement of a “raised floor”.
- Insulation under concrete screed.
- Thermal insulation with roll materials.
Thermal insulation with the installation of a “raised floor” involves the creation of a wooden flooring, under which various types of insulation are laid. This approach significantly reduces the overall load on the foundation and allows for insulation to be completed in the shortest possible time. The only negative is that the wooden structure significantly reduces the ceiling height.
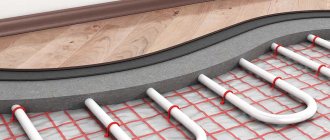
The second approach involves laying a thermal insulation layer on a concrete base slab, followed by pouring concrete mortar. The advantage of this method is that it is possible to install a water or electric heated floor, creating an absolutely flat and seamless surface.
When preparing a concrete solution, it is possible to add additional components to the mixture to improve the performance characteristics of the coating.
Nuances of arranging a “warm floor” system
The water system is more complex to arrange. It requires not only the installation of pipes under the screed, but also the installation of special equipment designed to heat and ensure forced circulation of water.
Nuances of arranging a “warm floor” system
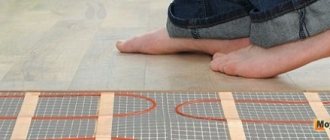
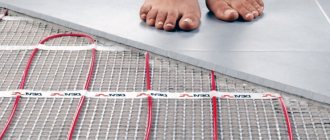
The heating system is installed directly on top of the thermal insulation material
It is important that the insulation has a foil coating, due to which more heat will be reflected into the room. If there is no foil barrier, it is recommended to lay it manually
The system is installed according to the instructions provided by the manufacturer. After checking its performance, you can lay a reinforcing mesh to strengthen the structure and begin arranging the screed. When using a “warm floor” system, the solution can be prepared without crushed stone, expanded clay and other fillers.
Insulation of the floor under the screed on the ground
Successful implementation of this type of insulation will be done if the master follows simple rules, the main one of which is high-quality surface preparation:
- ground level measurement. Beacons are placed along the perimeter and points inside it;
- the entire surface is compacted. It is better to perform this operation several times, each time generously filling the soil with water to allow it to shrink;
- After compaction, a control measurement of the soil level is made. Height differences are kept to a minimum. Ideally, the floor under the screed should not have horizontal discrepancies of more than 1 cm. In this case, the insulation boards will lie flat, and the foam screed will be of the same thickness.
Protecting the floor from heat loss with foam under wooden flooring
Thermal insulation for concrete floors under wooden flooring does not require additional leveling of the surface. It is enough to lay the timber logs level and firmly attach them to the concrete. The joists are impregnated with fire-retardant and antibacterial compounds, and the concrete is protected from moisture with primers with increased adhesion.
The waterproofing film is placed in the compartments between the joists with an overlap on the side surface, without covering the upper part of the beam. Heat insulation slabs are laid on top. Polystyrene foam for the floor under the screed is easily cut with a knife. You can accurately measure the size of the space between the joists and cut the sheets of insulation for concrete floors so that the resulting shapes fit closely without leaving large gaps. Small gaps are filled with polyurethane foam. The foam layer and the ends of the logs are covered with a vapor barrier material on top. Then slats are nailed along the joists to create a ventilation gap, thus additionally securing all the layers in the insulation system. Flooring made from tongue-and-groove boards is laid on a slatted frame.
You can easily lay a floor layer of decorative finishing material on a flat base.
Properly executed thermal insulation of the floor will help you save on heating costs and create a comfortable microclimate in your home.
Recommendations for choosing thermal insulation for concrete floors
At the stage of choosing a material for floor insulation, it is necessary to pay attention to some important characteristics
Recommendations for choosing thermal insulation for concrete floors
Density. The weight of thermal insulation directly depends on it. The less dense the insulation, the more pores it contains and the greater the amount of heat will be retained inside the room.
Strength. It is better that the strength of the material is as high as possible.
Thermal conductivity. This coefficient reflects the ability of thermal insulation to transmit heat. It is better for this indicator to be as low as possible.
Moisture resistance. The higher it is, the better.
Moisture permeability. This figure should be minimal. Otherwise, the insulation will very quickly become saturated with moisture, against which its thermal insulation characteristics will noticeably deteriorate.
Durability. At this point, everything is very clear: the greater the durability, the longer the selected material will last.
Environmental friendliness
Those who plan to build an environmentally friendly building using natural and completely safe materials should pay attention to this parameter.
Popular insulation materials for concrete floors
- Basalt and mineral wool. The most popular and widely used insulation materials. Among the advantages, low density and relatively low thermal conductivity should be noted. Also, mineral wool insulation is characterized by high sound insulation properties. The main disadvantage is the low environmental friendliness of the insulation. It also absorbs moisture, which does not have the best effect on its characteristics as a heat insulator and overall durability.
- Styrofoam. Along with mineral wool insulation, it is a very popular material. The only drawback is poor environmental friendliness. Otherwise, if we consider polystyrene foam as insulation, there are no complaints about it.
- Extruded polystyrene foam. Its properties are similar to polystyrene foam, but it is noticeably ahead of it in almost all respects.
- Polyurethane foam. It withstands temperature changes, water ingress and various mechanical loads well. For many years it perfectly performs its main function without deteriorating its thermal insulation qualities. The only negative point is that it is artificial and not environmentally friendly.
- Expanded clay. Characterized by very high thermal insulation properties. It is an environmentally friendly material with low thermal conductivity. Despite all the advantages, expanded clay is also not without its disadvantages. First of all, this is a fairly large weight of the finished insulation layer. Secondly, the material absorbs and retains moisture for a long time, which somewhat worsens its properties and can lead to other problems.
- Foam glass. It has many undeniable advantages, for example, low weight, very low thermal conductivity, environmental safety, moisture resistance, durability, etc. Among the significant disadvantages, one can highlight only the relative fragility of the insulation, i.e. it is not adapted to large mechanical loads.
- Cork. A completely natural material with good thermal insulation properties. Cork works best when used in the construction of raised floors, and also as a heat insulator under the main covering.
- Perlite. According to the method of application, it has much in common with expanded clay. The only difference is that perlite is noticeably superior in quality to expanded clay, which makes its use much more preferable.
The following is a simple table in which you can consider the main characteristics of existing insulation materials. Be sure to take them into account when choosing a material in order to choose the insulation that is best suited specifically for your concrete floor.
Table
Types and forms of polystyrene foam
Which is better - PSB or EPPS?
Expanded polystyrene is one of the most popular thermal insulation materials. And above all, thanks to its availability and very high insulating qualities. But it can be different - it is either the familiar white foam, or rigid panels of extruded EPS (EPS or, in the English abbreviation XPC). The materials, although made from the same raw materials, have different characteristics at the output. It's all about fundamental differences in production technology.
- Polystyrene foam (PSB) consists of air-filled granules, bonded together during molding in a press. The material can vary greatly in the density and quality of bonding of these very “balls”.
Loose foam granules and slabs obtained during molding under the influence of hot steam.
In loose foam plastic, large air cavities remain between the round granules, into which moisture can easily penetrate, contributing to both a decrease in insulating qualities and rapid deterioration of the material due to erosion. Despite the fact that the granules themselves are waterproof, moisture trapped between them at subzero temperatures can tear the material or even lead to its disintegration into individual granules.
Foam plastic with different densities: only the option with normal density can be considered as slab insulation. The rest won't last long.
The problem is that the simplicity of the technology for producing polystyrene foam encourages many small entrepreneurs to take up this business. And, naturally, a huge part of the products offered for sale are produced in conditions that are very far from normal, without any quality control.
And considering that in many important parameters this “white foam” is seriously inferior to extruded polystyrene foam, it is better not to consider it as a truly high-quality option for floor insulation.
- Extruded polystyrene foam (EPS), unlike PSB, is produced using more sophisticated equipment, so there are practically no low-quality fakes on the market. Of course, this cannot be completely ruled out, but still the likelihood of acquiring outright “junk” is low.
The picture clearly shows the microstructure of extruded polystyrene foam
EPPS is produced from molten raw materials, brought to a foamed state by special additives. This melt is passed through an extruder. The result is strips of specified thickness parameters, and after the material has completely hardened, it is cut into slabs of the required length and width. The dimensions of the slabs have certain standards; each manufacturer may have their own. The thickness of the slabs can be from 10 to 200 mm.
As you can see in the photo presented, the structure of EPS differs significantly from the structure of polystyrene foam. It consists of tiny closed bubbles filled with air, which together form a homogeneous material. Thanks to this structure, extruded polystyrene foam has excellent insulation qualities, high strength characteristics, and is famous for its durability, which is incomparably higher than that of foam plastic.
Among Russian consumers, the most popular EPS brand is Penoplex. It is distinguished by its characteristic orange color.
Comparative characteristics of PSB and EPPS are as follows:
| Name of characteristics | Styrofoam | EPPS |
| Material density, kg/m³ | 15÷35 | 28÷45 |
| Thermal conductivity coefficient, W/(m×℃) | 0,036÷0,050 | 0,028÷0,034 |
| Compressive strength at 10% linear deformation, MPa | 0,05÷0,2 | 0,25÷0,5 |
| Bending strength, MPa | 0,07÷0,20 | 0,4÷1 |
| Moisture absorption, % by volume for 24 hours | 2 | 0.2 |
| Moisture absorption, % by volume for 30 hours | 4 | 0.4 |
| Operating temperature range, ˚С | -50 to +70 | From -70 to +75 |
| Material flammability group | G4 | G4 |
Having examined the characteristics of these two materials, we can come to the conclusion that the best option for floor insulation would be extruded polystyrene foam, which has higher thermal and strength properties.
Extruded polystyrene foam and its advantages
It is not surprising that EPPS is so popular in construction, since, along with accessibility, it has a whole “list” of advantages :
- The material is a highly effective insulation material - in terms of its thermal insulation performance, it significantly exceeds such popular insulation materials as mineral wool and expanded clay.
- EPS is highly resistant to moisture - it does not penetrate its structure, does not reduce its insulating qualities and does not have an erosive effect.
- The affordable price of the material allows you to insulate large areas without too much expense.
- The slabs have a clear geometry and are easy to lay on the prepared surface. For installation on floors under a screed, it is better to choose slabs equipped with one of the types of joint locks, thanks to which you can obtain an almost airtight coating without “cold bridges”.
Eps boards can have straight ends or be equipped with peculiar locks - protrusions or grooves and ridges. For the floor, of course, a locking option would be preferable.
- The material is very light, so it is easy to transport, install and cut. Moreover, you can cut EPS boards with a sharp utility knife or an ordinary hacksaw.
However, the advantages of the material are good, but it is more important to become familiar with its disadvantages , since they are the ones that cause various problems:
- The biggest disadvantage of EPS is its flammability. Despite the fact that the manufacturer positions it as self-extinguishing, in practice even the highest quality material begins to melt and spread, continuing to burn, contributing to the spread of fire.
Of course, if the insulation is laid on a concrete slab, and a cement-sand screed is poured on top of it, then there is no risk of fire. Therefore, EPS can be used for thermal insulation of floors.
- But there is one more caveat specifically from this area. The flammability of EPS is not as dangerous as the smoke it emits during thermal decomposition, which is extremely toxic and often causes tragedies.
- Any polystyrene foam is not an environmentally friendly material. Moreover, this polymer does not have a final stable phase, that is, it may have a tendency to self-destruct. Over time, during the depolymerization process, the insulation may begin to emit toxic fumes that are harmful to the human body. Moreover, even a concrete layer of screed cannot contain these fumes. In connection with this feature (and noted in the previous paragraph), you should think carefully before “letting” expanded polystyrene into residential premises. However, many homeowners are not deterred by these factors at all, and insulation is widely used for thermal insulation of floors and walls of rooms and balconies.
What do you need to know when buying expanded polystyrene?
When purchasing expanded polystyrene, you should pay attention to some nuances
- Extruded polystyrene foam is most often produced by giving it some kind of bright color (orange, blue, yellow). In this case, the slabs must have a uniform color - this factor is a sign that the technology requirements were met during the production of the material.
- The insulation material should not have a strong chemical odor. Most often, high-quality slabs do not smell at all.
- The slabs, as well as their locks, must have a clear geometric shape, then their installation will be easy. The slab must be inspected visually, and also try to join the two slabs together. In addition, the edges of the slabs should not crumble.
The structure of high-quality foam without air cavities
- If you nevertheless purchase polystyrene foam (which, we repeat, is strongly not recommended), then it should at least be of maximum density and consist of granules of the same size. High-quality material should have no voids between the granules.
- The surface of the slabs must be smooth, without dents, otherwise the thermal insulation qualities of the material may be reduced.
Penoplex Comfort
What thickness of insulation will be required?
As mentioned above, expanded polystyrene (of any modification) can be sold in slabs of various thicknesses. What thickness should I choose?
This question has two aspects:
- Firstly, when making calculations, you must remember that the floor level will rise. Even with not the most effective thermal insulation - by 100÷120 mm (insulation boards 30÷50 mm, screed at least 50 mm, plus, possibly, some sheet material (plywood, fiberboard, OSB), and in addition - a finishing decorative coating from 3÷5 mm (linoleum) and up to 15÷20 (laminate with backing, parquet boards, etc.) Therefore, all calculations must be made in advance, taking into account the height of the ceiling in the room, doorways, etc.
- Secondly, the thickness of the insulating material must be such that it provides effective thermal insulation of the floor in order to minimize heat losses.
They need to somehow link these two aspects. At the same time, by the way, it can be taken into account that other materials included in the overall “pie” of the floor structure have thermal insulation qualities, and often very significant ones.
Using expanded polystyrene, the floor is also insulated on the ground. Here, most often, there are no such strict height restrictions as in high-rise buildings. And therefore, very often, preliminary filling with expanded clay is made as additional thermal insulation. This measure allows you to reduce the thickness of the main thermal insulation layer.
You can make the calculations yourself by using the offered online calculator for this purpose. By the way, it includes the ability to calculate insulation both with and without expanded clay. And not only two types of expanded polystyrene, but also other popular insulation materials are considered as possible thermal insulation materials. So in this regard, the calculator can be called universal.
When using this program for the first time, you will probably have questions. Impenetrable explanations are given both in the calculator itself and in the text footnotes below.
Calculator for calculating floor insulation under screed
Go to calculations
Explanations for using the calculator
- First, you need to find, using the map below, the value of the normalized heat transfer resistance for your region of residence. Moreover, of the three values in this case, we are only interested in one - for floors (it is highlighted in blue). This value is indicated in the first field of the calculator (a dot is used as a decimal separator instead of a comma).
Schematic map for determining the normalized value of thermal resistance.
- Well, then you will have to make decisions depending on the planned design of the insulated floor. To do this, half a fairy tale is included in the calculator itself:
Explanation No. 1.
— If the floor is insulated over the ground, and there are no special restrictions on the thickness of the layers, then you can completely limit yourself to one expanded clay - this calculation option is provided in the calculator. In this case, the final value produced by the program will be exactly the thickness of the expanded clay backfill. — A layer of expanded clay alone usually turns out to be too large, and therefore some other, more effective insulation is often used. And its use can also be accompanied by expanded clay pre-fill, or without it.
With this calculation option, additional fields for specifying the initial data and additional explanations will appear.
Explanation No. 2.
If expanded clay is not used in combination with the main insulation, then simply leave the value equal to zero in the field where you need to indicate the planned thickness of the backfill.
Explanation No. 3
It concerns the finishing floor covering. As already mentioned, coating materials can also contribute to the overall thermal insulation picture. But only some of them can be taken seriously. For example, an MDF laminate or linoleum will provide such little resistance to heat transfer that it is easier not to take it into account. Moreover, there is no point in taking ceramic tiles into account. Of all the finishing (or leveling) coating materials, probably only natural wood (boards 15÷20 mm thick or more), equally thick plywood, as well as natural cork, which even with a small thickness can make floors much warmer, deserve attention.
For these materials, after selecting them in the appropriate field, it makes sense to indicate the thickness. For everyone else, you can leave the default thickness of zero.
- The last field in the calculator is popular types of insulation materials. Not all of them are equally good - but I won’t shorten the list. Let them remain at least as an example - you can see how the thickness of the required insulation changes depending on the chosen material.
- It is clear that the result of the calculation is the thickness of the selected insulation. If necessary, it is rounded and reduced to standard thicknesses of materials on sale.
Floor insulation with polystyrene foam
If you chose the first method, then you should lay wooden blocks - logs - on the leveled and cleaned concrete screed, maintaining an interval between them equal to the width of the selected insulation. The lags are fastened with anchors or self-tapping screws on steel corners; their leveling is done using wooden spacers. Calculation of the height of the upper plane of the block above the floor looks like this: insulation thickness + 50 mm clearance for ventilation.
Now let’s talk about how to properly install the insulation. First, waterproofing is laid from a dense polyethylene film with an overlap of 100 mm between the sheets and the joints are taped. Then the thermal insulation slabs are laid. On top they are again covered with a vapor barrier film so that moisture from the premises does not penetrate into the insulation.
Penofol is often used instead of film; it allows you to reduce the layer of the main insulator and protect it from moisture. The joints are also taped, only with foil tape. This completes the insulation of the concrete floor; you can lay the coating and laminate or linoleum.
Floors under cement screed are also insulated using waterproofing laid on a concrete base. If the process begins with the soil itself, then it must be compacted, and then a concrete preparation 5 cm thick must be made. After it has completely hardened, the waterproofing layer film is laid out, and then polystyrene foam slabs are laid out. Usually the cement screed is poured directly on top of the insulation, but we recommend laying a second layer of film first. This is inexpensive, but it will help preserve the insulating material of the floors longer.
When it comes to a wooden house, it should be taken into account that such structures can be slightly deformed because the wood “breathes”. This is almost unnoticeable in an old house, but in a newly built one, concrete floor coverings can crack if damping is not provided. To do this, a thin layer of polystyrene (up to 15 mm) is laid along the entire perimeter along the walls, even before work begins, as shown in the photo:
Similar measures should be taken before installing heated floors, where a special damper tape is laid around the perimeter of the premises, and only then waterproofing is laid, which is reflected in the diagram:
Owners of old houses often wonder whether it is possible to insulate the floor without opening it. There is no definite answer, since everything depends on the condition of the concrete surface. If the screed has retained its strength and does not crumble or crack, then laying insulation on top of it is possible. Only then will you have to raise the thresholds of all the doors and trim their leaves, which will immediately affect the interior. So the best solution would still be to open up the old floors, insulate them and pour a new coating.
Laying heated floors on Penoplex
There are differences, but they only concern the laying of pipes or heating cables/mats. Preparation of the base, the first layers, including the waterproofing layer on Penoplex, were described above. A steel mesh is laid on the waterproofing film. It is needed to fix the cable or pipes in a given position. When using heating mats, they can be placed in a layer of tile adhesive - this is simpler and more effective, so this type of heating elements for the floor is rarely used at this stage (although no one prohibits it).
Which mesh should I use? Depends on the step at which you need to lay the pipe or cable. Can be laid 50*50 mm, 100*100 mm or 150*150 mm
It is important that the chosen scheme can be implemented. What is the thickness of the wire in the mesh? Not less than 3 mm
In the case of a cable, perhaps 2 mm is possible. And before pouring the screed, the pipes will be filled with coolant and need to be held in place, so a mesh made of 3-4 mm wire is needed.
You can use Penoplex under a warm water floor without any problems
To prevent the mesh with coolant from moving when filled, it must be attached to the Penoplex. There are several options:
- Plastic clips that are driven into the insulation. But the thickness of the mesh rods is at least 4 mm.
- The metal tie is aimed at the insulation on both sides of the mesh cell.
- Special harpoon clamps.
- Special tires, but they are expensive.
- A mat with bosses is laid on top of the Penoplex. Then the grid is not needed. But these mats are also expensive.
After the mesh is secured, we attach the pipes or cable. The easiest way is with plastic ties, or knitting wire. But the wire can theoretically fray a pipe or cable as it increases or decreases in size (from heating and cooling) during operation. Therefore, if knitted with wire, it is in a plastic sheath. Manufacturers of pipes for heated floors have it.
Actually, that's all. Then they pour the screed, level it, and wait until the concrete gains strength.
https://youtube.com/watch?v=sZfkUVlJ93M
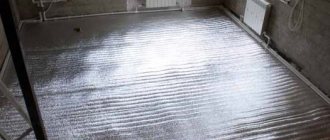
Insulation of concrete floors with roll insulation
In my opinion, this is the easiest way to insulate the floor. Roll insulation is used. This may be a more expensive cork insulation:
Or cheaper foamed polyethylene, the names of which are full with and without foil:
For insulation with roll insulation, the main requirement is a smooth and clean floor surface. Clean does not mean that the concrete slab needs to be washed and shampooed. It is enough to sweep it thoroughly so that there are no stones on it that could tear the insulation.
That's all. There is no additional hydro- or vapor barrier, because foamed polyethylene does not allow water or steam to pass through.
Next, we roll out our penoizol or whatever you chose. Most likely it will be in strips that need to be laid with the known overlap of 15 cm.
Further steps depend on the planned final coating. Under the tile you will have to put a layer of moisture-resistant plywood or OSB-3 on top of the roll insulation. Between the sheets of these materials we must leave gaps of 5...10 mm, which can be filled with sealant. We fasten the plywood (OSB) with dowels and nails to the slab, thus simultaneously fixing the penoizol. At this point, the insulation of the concrete floor with rolled material is completed; all that remains is to lay the finishing coating.
There is no need to put additional plywood under the laminate. And do not use penoizol that is too thick, otherwise in places where there are overlaps you will get too high “steps”...
If the final covering is a floorboard, then a gap is needed between it and the rolled insulation. If you've read about insulating a roof or wooden floor, you can already guess how to get this gap. If not, don’t worry, I’ll tell you here. We fasten the counter-lattice to the floor with the same dowel-nails, which again will help the insulation to be fixed. What a counter-lattice is can be understood from the figure, although it shows the insulation of a wooden floor:
The distance between the slats of the counter-lattice is 50...60 cm. The slats are perfectly obtained from a board with a cross-section of 25x100 mm (usually sold in 3 m lengths), if you spread it lengthwise, but you can also buy slats of 25x50 mm (for some reason they are already called a picket fence in the store , although they still need some work before the picket fence).
This is interesting: Insulation of the concrete floor of the first floor: we analyze it in detail
Installation of water or electric heated floors
Installation of a floor insulation system with water or electric coolants is carried out in rooms located above cold basements. Such a system, in addition to the basic functions of thermal protection of the floor, can serve as the main heating of the room.
Before describing the technology, we will answer a frequently asked question on the Internet: is it possible not to use additional insulating materials when installing heated floors?
No, tubular water coolants or cables must be placed on the insulation in order to direct the heat flow upward, eliminating its loss through the ceiling. Such a building material can be polystyrene foam. Cement floor screed with foam plastic 3 cm thick and density 30 kg/m³ with a foil side is the most preferable base option for coolants of any diameter.
The insulation boards are tightly mounted along the floor, connecting to each other with tongue and groove ends. A damper tape is laid around the perimeter of the room to compensate for the expansion of the foam due to heating. Insulation of the floor with foam plastic under the screed is carried out to increase the rigidity of the reinforcing mesh. It is fixed on top of the thermal insulation layer. Heating pipes are evenly distributed over the surface of the insulated floor and filled with cement-sand mortar 10 cm thick. The floor screed on foam plastic can be made with M200 concrete. Any finishing material can be laid on such a hard pillow.
Mineral wool
It should be noted that of all the insulation offered under the screed, this is the most inconvenient. The thing is that mineral wool is a hygroscopic material. It quickly absorbs moisture, becoming practically unnecessary. Therefore, it must be covered on both sides: on the side of the concrete floor with a vapor barrier film, on the side of the screed with a waterproofing membrane. Therefore, the pouring process itself begins with the installation and laying of the lower protection.
- Typically, the film is laid in strips with edges overlapping within 10-15 cm, which must be secured with construction tape along the joint. Be sure to lay it over the walls, taking into account the thickness of the entire insulated pie plus the screed.
- Next, the thermal insulation material itself is laid out. It is better to use mats for the floor. They should be laid tightly to each other so that there are no gaps left, which can later become cold bridges.
- The top film is laid, like the bottom one, in strips with overlap and installation of tape.
- A reinforcing frame in the form of a metal or synthetic mesh must be applied to such a heat-insulating cake.
Please note that if mineral wool is laid in two layers, then the mats should be offset by half the panel. The seams between the thermal insulation elements must not coincide vertically.
What is Penoplex, types, scope of application
Penoplex - under this brand back in 1998, extruded polystyrene foam boards - EPS - began to be produced in the Leningrad region. A little later, factories appeared in Perm and Novosibirsk, then in Taganrog, two factories in Kazakhstan, in the Tula region. So the geography of production sites is wide.
Penoplex insulation boards are orange in color
Brands for private construction
Currently, two types of Penoplex slabs are produced - for private and professional construction. For private there are three types: Comfort, Foundation and Wall. The names reflect the scope of application of the materials. They differ in density and compressive strength.
Penoplex Comfort and foundation are used for walls. What is the difference? Strength and density
The remaining characteristics are the same - they are produced from the same raw materials, using the same equipment. But their purpose is different: Comfort - sound and heat insulation, Foundation and Wall are more aimed specifically at thermal insulation. Although, according to the manufacturer, their noise reduction indices are the same. It’s just that in the Comfort category there is a larger selection of plate thicknesses: 20 mm, 30 mm, 40 mm, 50 mm and 100 mm. The rest have only two thicknesses - 50 mm and 100 mm.
Which Penoplex for flooring under the screed can be placed from this line? Penoplex Foundation. It fits all the criteria. Recommended for laying floors on the ground and on a concrete slab, above a ventilated underground, on a loggia or balcony. The only thing I'm not happy about is the thickness - there are only two options - 50 mm and 100 mm. This is inconvenient since the required/desired thickness is often different. This limits the use of this type of material in screed.
For professionals
Line for professionals - Base, Facade, Roof, Slope, GEO and 45. There are also blocks and shaped products. The blocks are used in heavy construction and private owners have not yet adapted them. Shaped products are a useful thing for insulating wells and solving other similar problems.
Of all the above, it is recommended to use GEO and Slope for floor screeding. The difference between them is in shape: GEO has a standard type of slabs, Slope - slabs with a longitudinal difference in height. They will come in handy if you need to create a floor slope. Their density and strength are higher than those of the materials of the previous category.
Characteristics of PENOPLEX, which can be placed under a screed
Penoplex GEO is convenient to use under screed because there are slabs of this category of different thicknesses - 40 mm, 50 mm, 60 mm, 80 mm and 100 mm. It is easy to dial the desired thickness.
Sometimes they think of using Penoplex 45 for the floor under a screed, but this strength is clearly excessive. This type of material is used in road construction. In any house there will not be even close to such a load. So this type of EPS should not be used.
Characteristics of thermal insulation materials for insulating concrete floors
Let us dwell in more detail on the performance properties of the most common insulation materials:
- fibrous. A typical representative of fibrous heat insulators is mineral wool;
- leafy Among the many sheet insulation materials, polystyrene foam is most often used;
- crumbly. Of the various types of crumbly materials, granulated expanded clay is popular;
- sprayed. One of the representatives is a polyurethane foam mixture, sprayed using special devices;
- polymer. They are represented by an expanded range of self-leveling mixtures.
Expanded polystyrene is most often used to insulate concrete floors
Let's start with mineral wool, which is offered in rolls or individual mats. The insulation is made not only on a mineral basis. Along with mineral wool, wool is used using dolomite, basalt or limestone raw materials. Glass production waste and slag are also used for production.
The main advantages of the material:
- ease of use;
- Fire safety;
- increased plasticity;
- reduced thermal conductivity.
However, mineral wool can absorb moisture and needs additional waterproofing.
Extruded polystyrene foam is sold in sheet form. The material is a type of polystyrene foam, but differs from it in the following properties:
- increased strength;
- long period of use;
- increased reliability;
- fire safety;
- resistance to aggressive environments;
- environmental cleanliness.
Among the advantages of polystyrene foam sheets the following are also noted:
- noise insulation properties;
- moisture resistance;
- vapor permeability;
- reduced thermal conductivity;
- ease of installation.
The disadvantages include the increased cost of the material.
Granulated expanded clay is a very popular insulation material among builders.
Expanded clay is used in the form of granules made by firing clay. The main properties of expanded clay are:
- environmental friendliness;
- fire resistance;
- frost resistance;
- durability;
- reduced thermal conductivity.
Polyurethane foam is a sprayed insulation material. Distinctive features of the material:
- reduced thermal conductivity coefficient;
- resistance to open fire;
- Possibility of use in damp environments.
In addition, there are no joint areas or cold bridges in the polyurethane foam coating. If it is necessary to further thermally insulate the surface, apply the first layer, after which it has hardened and then re-sprayed. The main disadvantage of polyurethane foam is the need to use special equipment to spray insulation onto the surface.
Polymer heat insulators include:
- working mixtures supplied in liquid form, intended for pouring heated floors;
- special paint, after application of which the thermal insulation properties of concrete increase.
The durability of the floor depends on the correct choice of material.
Advantages of polymer materials:
- thermal insulation characteristics;
- integrity of the formed layer;
- reduced hygroscopicity;
- resistance to temperature changes;
- perfect flatness.
Disadvantages include increased costs for the purchase of polymer materials.
Safety precautions
When working with flammable materials, fire safety standards must be observed. Fire extinguishing is carried out using water, foam, and dry extinguishing agents.
used during prolonged contact can cause irritation of the skin and mucous membranes and is dangerous if ingested. If a worker needs to provide first aid, he needs rest, fresh air, and calling a medical team.
If contact with the eyes occurs, they are thoroughly washed with the eyelids open with running water. Further examination by a doctor is necessary.
Insulation on floor slabs
You will need to acquire the following tools and materials:
- building level;
- polymer putty;
- primer;
- moisture-repellent film;
- insulation;
- polyurethane glue;
- self-leveling composition.
The sequence of work is as follows:
- First of all, the floor slabs are checked for flaws. Any protrusions, cracks, or depressions must be eliminated. The protrusions can be knocked down using a hammer drill, and the cracks and holes can be covered with polymer putty. If there are a lot of flaws, the base will have to be leveled with a self-leveling mixture. If the slabs are in normal condition and free from damage, you can limit yourself to removing debris and removing dust.
- If a floor no lower than the second floor is subject to insulation, then the penoplex is spread directly onto the floor, which has been pre-treated with a primer mixture. If the ceiling is part of the basement or first floor, then it is advisable to cover the floor with a water-repellent film. It turns out that, based on the location of the ceiling, it is either primed or covered with a protective layer of moisture insulation. In the latter case, the joints of the film must be taped.
- You need to apply a layer of glue to the underside of the insulation, then apply it to the floor and press down firmly. The position of each individual slab is checked with a building level, while simultaneously controlling the horizontality of adjacent pieces of insulation so that the surface is perfectly flat. Each subsequent row of slabs is laid with an offset of half the width of the segment so that the seams do not coincide.
- A layer of polyethylene film is laid on top of the insulation for waterproofing.
- A classic cement screed up to 5 cm thick, or a self-leveling compound can be poured onto the waterproofing layer. Once the screed is completely dry, you can begin laying the finished floor.
Preliminary preparation of the sexual base
- The floor base, made of concrete, just needs to be cleaned of dirt, various surface imperfections can be repaired with tile adhesive, and it can be used for further work. If the concrete slabs are not laid level enough, then the base needs to be leveled. For this, sand and foam granules are used. Before laying waterproofing material, it is imperative to check the subfloor for evenness. This task can be accomplished using a building level.
- Preparing the soil base for floor screeding is much more difficult. In this case, the base must be leveled and thoroughly compacted. Next, the soil must be covered with a ten-centimeter layer of crushed stone or gravel, also as densely as possible. Next, sand of a similar thickness is poured.
To ensure that the floor is level after work, it is recommended to make markings on the walls. To do this, using a water level, notches are made in the corners of the room, then solid lines are drawn using a cord. The completed mark will serve as a guide when pouring concrete mortar for the floor screed.
After the preparatory work, the floor base is waterproofed. The material, which will subsequently prevent the formation of moisture, must be applied to the walls, slightly above the expected level of the screed. When using pieced material to waterproof a floor, its individual pieces must be overlapped and secured with tape. Next, the cement mixture is poured, and the layer thickness should be about forty centimeters.
Styrofoam
Very often polystyrene foam is used for insulation. Its main advantages are:
- low cost;
- good thermal insulation characteristics;
- light weight;
- long service life;
- the material is easily cut using a regular stationery knife;
- resistance to combustion (if the heat-insulating layer is covered with a screed plate);
- moisture resistance and moisture resistance.
Among the disadvantages of foam plastic under floor screed is its toxicity. However, it all depends on the type of foam. Suitable for residential premises:
- PVC foam plastic. Polyvinyl chloride material is considered less harmful, since it contains a minimum of toxic substances.
- Polyurethane foam under the screed is foam rubber with good flexibility. This material is widely used in the production of furniture, so it is also safe for health. Thanks to the pores, polyurethane “breathes”, but it is flammable.
- Polyethylene foam for flooring under screed is completely non-toxic. This material is well known to everyone, since it is in it that various products are most often packaged.
In order for a floor screed with foam to have all the necessary parameters, it is necessary to select a material of a certain density. Therefore, when buying polystyrene foam, look at its markings - after the letters PPT there should be a number no lower than 25, such sheets are best suited for the heat-insulating layer of the screed
It is also worth paying attention to the PSB marking
Another disadvantage that this material has is the complexity of its installation. In order for the foam floor screed to be durable, it is necessary to create the most even surface possible. To do this, quartz sand is first poured onto the rough screed, and only after that the insulation sheets are laid.
Healthy! For even cutting of insulation sheets, it is best to use a special construction cutter with a hot wire.
Foam sheets must be laid very carefully. If cracks or gaps have formed between the plates, they must be eliminated using polyurethane foam. Otherwise, the thermal insulation properties of the material will noticeably decrease.
If the foam screed will be located close to the foundation (first floor), then you should choose a material with a thickness of at least 10 cm, and for the upper floors slabs 5 cm thick will be sufficient.
What should it be: requirements
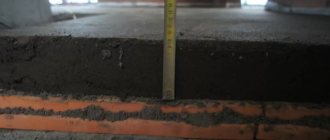
According to building codes and regulations (SNiP), the minimum thickness of the floor screed is 20 mm. In everyday life, such a minimum is rarely installed. It increases significantly if you need to hide equipment located on the subfloor. Thus, the thickness of the screed when installing a warm water floor should be determined taking into account the basic parameters of the pipes.
It is well known that the layer of mortar above the heating system should not exceed 40 mm. With a greater thickness, the installation of a heated floor is ineffective, since the bulk of the heat received simply will not reach the consumer. The internal layers of the screed will heat up, and the floor covering will receive virtually no thermal energy. The simplest calculations show that the thickness of the screed for a pipe diameter of 25 mm should be in the range of 50-70 mm. A standard screed consists of several components or layers.
The order of installation from bottom to top is as follows:
- waterproofing;
- thermal insulation;
- fittings;
- warm floor;
- screed
Different heated floor designs require different screed layers.
In some cases, the subfloor is first leveled with a thin screed; sometimes the solution is laid directly on the insulation. Its thickness should not be less than 2 cm. The layer is given 1 month to dry, and only after it has completely dried can you begin installing the heated floor, subsequently covering the installed communications with another screed.
An electric heated floor requires a low screed, especially if film heating was chosen. Infrared film is ideal for installation under laminate, carpet and linoleum.
If you plan to cover the floor with tiles, you should use a heating cable. In this case, you will need a less thick screed than when creating a water floor.
How to cheaply insulate the floor in a private house?
To make your home comfortable and cozy, it needs to be thoroughly insulated. Floors, along with walls, ceilings, window and door openings, are a source of large heat losses.
This problem is especially relevant in buildings standing directly on the ground, without a basement. In this case, even intensive heating of the home will not help.
Having a cold basement under the building will also not be a salvation.
Insulating the floor in a private home, done correctly, with your own hands, will relieve the homeowner from discomfort, allow you to save on the services of professional craftsmen and reduce heating costs.
Thermal insulating materials: advantages and disadvantages
Most often, owners of private houses insulate floors with expanded clay, polystyrene foam or mineral wool. The popularity of these materials is explained not only by their quite affordable cost, but also by numerous other advantages.
Today, the building materials market offers modern penoplex insulation, which also has many advantages, but is characterized by a high price.
Insulation technology
To lay the heat insulator, it is necessary to prepare the following materials: insulation in the required quantity, film (with a density of at least 200 microns), cement, sand, water, beacons, reinforcing mesh.
The foam insulation process consists of several stages.
Preparation
Before using polystyrene foam with your own hands, you need to remove excess soil to a thickness of 10-15 cm or, conversely, make a backfill of sand and crushed stone the same amount below the intended floor.
The surface needs to be leveled.
Waterproofing layer
A layer of waterproofing is created from dense oilcloth: it will retain groundwater, prevent an increase in humidity levels and the occurrence of condensation.
Then you need to install beacons.
Rough screed and laying insulation
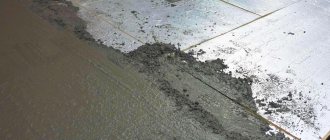
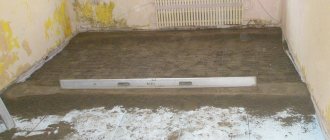
After this, a 40 mm thick cement screed is poured.
Polystyrene foam slabs are laid in a checkerboard pattern on the solution, fitting tightly to each other. Insulation will not allow heat to escape and will not allow cold to enter the house. Afterwards, take a break for 2 days, allowing the screed to dry.
Finishing
The final stage of work is finishing screed. To create a flat surface, beacons must be attached to the heat insulator.
Then the entire structure is filled with cement mortar, the layer thickness is approximately 70 mm. A reinforcing mesh is laid on top of it, which will prevent the screed from cracking and falling apart. The surfaces are allowed to dry, after which they are cleaned of deposits and leveled.
Insulation with expanded clay
If expanded clay is used as insulation, then you need to carefully calculate the thickness of the heat-insulating layer and the size of the screed, since the floors in a private house experience heavy loads. Experts recommend using expanded clay of different sizes, then the insulating layer will be denser.
The entire work process is similar to that described above. A layer of expanded clay at least 10 cm thick is poured over the rough screed. When laying there should be no slope, the layer must be even, otherwise the floor insulation will not be reliable. A control measurement of the distance between the beacons and the backfill can be carried out using a special template or tape measure.
Before pouring the finishing screed, expanded clay is treated with cement milk: this will speed up the setting of the insulation, making it more durable. A reinforcing mesh laid on top will prevent the surface from moving and cracking.
The floor cannot be used for a week. The entire structure will reach its final strength in about a month. After this, you can lay the decorative flooring.
Concrete base insulation
For floors where the ceiling is a monolithic reinforced concrete slab, it is better to use rigid mineral wool slabs as insulation.
This structure can be made even warmer and stronger by using a concrete screed poured over the heat insulator. The mineral wool must first be covered with a mounting mesh.
Insulation on joists
If the house is old, then before insulating the floor, you often have to dismantle the ceiling and go deeper into the ground.
After this, a rough, most often wooden, covering is laid. A layer of waterproofing is installed on top of it: this can be mastic or rolled materials. They will protect the insulation and joists from moisture.
Then logs (boards or blocks of wood) are installed on the subfloor with waterproofing. All wooden elements must first be treated with an antiseptic.
Installation of mineral wool
To insulate wooden structures, it is better to use mineral wool (it does not burn). If the material is in a roll, then it is unrolled in one piece and laid without first cutting it into pieces.
Waterproofing rough screed
Waterproofing the floor with film
The use of waterproofing is necessary primarily to protect the room from moisture and to preserve the properties of the insulating material.
Waterproofing is used in the construction of various premises and in the arrangement of floors that are located on the ground.
Various polyethylene sheets, preferably rolls, are usually used as insulating material.
When installing waterproofing, adhere to the following points:
- Rolled sheets are laid overlapping, after which their joints are carefully worked out (with construction tape);
- It is necessary to ensure the integrity of the coating.
Note!
The waterproofing of the rough screed is laid with a margin on the adjacent walls. (After completing the final screed, the screed is removed).
Laying the material is possible both in front of the rough screed and on top of it.
Preparation of the solution
To prepare the mortar from which the screed will be made, not only the main components (cement and expanded polystyrene), but also several additional components can be used. For example, adding sand increases the strength of the floor covering. Although this reduces the thermal characteristics of the material and, conversely, increases the density. Natural stone, which increases the abrasion resistance of the material, and gravel or pebbles can be used as fillers for underfloor heating screed. It is not recommended to add concrete chips, slag and ash to the solution, which reduce the strength of the floor covering.
Another composition is possible using sand, which you can make yourself
It is important to observe the correct proportions of cement; preparation without the use of sand is possible. To save money, the composition is as follows; take 1 part cement, 2 parts sand and 5 polystyrene foam granules and mix
This composition can be used in the construction of walls.
One of the most popular ways to make a heated floor screed with your own hands involves the use of polystyrene concrete grade 300, which requires 240 kg of cement per 1 cubic meter of polystyrene granules, 0.65% by volume of SDO and up to 120 liters of water.
The ratios of components required to obtain a material of a different strength can be taken from the table.
| Brand of polystyrene concrete | Volume of polystyrene, cubic meters. m | Mass of cement, t | Volume of water, cubic meters m | Percentage of SDO additive, % |
| 200 | 1 | 0,16 | 0,1 | 0,8 |
| 300 | 1 | 0,24 | 0,12 | 0,65 |
| 350 | 1 | 0,29 | 0,13 | 0,62 |
| 400 | 1 | 0,33 | 0,15 | 0,6 |
| 500 | 1 | 0,41 | 0,17 | 0,45 |
The process of preparing the solution is quite simple - when deciding how to make the right mixture for a warm screed, perform the following steps:
- The required amount of water is added to the container;
- Cement spills out;
- The mixture is stirred using a drill until its consistency becomes similar to yogurt;
- Polystyrene is poured into the resulting solution.
At the final stage of preparation, the mixer is set to press the polystyrene granules into the solution and used until most of them are covered with cement. After this, the direction of rotation is switched in the opposite direction and additional mixing is carried out for several minutes. The result should be a material resembling coarse-grained caviar, with virtually no fluidity.
Video:
conclusions
How to insulate a concrete screed? If you want to save money, you can turn to materials based on foam plastic and mineral wool. This is a good and effective solution for dry rooms where there is no possibility of leaks.
Foam insulation based on polystyrene foam is more resistant to moisture and, in fact, is a universal solution . But, it requires protection from high mechanical loads. The most effective, but also the most expensive method of thermal insulation is sprayed polyurethane. If the issue of saving is not urgent, you can use this modern solution.
Detailed technology for installing a concrete screed for a heated floor is shown in the video:
What properties should insulation have?
Thermal insulation for floors under concrete screed must have:
- Increased resistance to moisture. The fact is that water is an indispensable component of the mixture for a concrete slab. Therefore, the insulation under the screed should not lose its performance characteristics when interacting with moisture.
- Low thermal conductivity coefficient. Floor insulation under the screed, which has good heat-retaining properties, will make it possible to make a thinner base, since the height of the heat-insulating layer in this case will be less.
- Resistant to mechanical loads. The material must withstand daily walking on the surface, as well as the weight of furniture.
Based on these requirements, the most optimal insulation materials for concrete floors under screed are the following materials.
Expanded clay
If we talk about insulation under the screed specifically for a concrete base, then expanded clay was originally created for this purpose. These are granules of foamed clay, which are simply scattered on the floor, leveled in thickness (usually within 7-20 cm) and covered with a semi-liquid concrete composition.
It is not necessary to cover the material with waterproofing. Concrete penetrates into the top layer, forming expanded clay concrete, which in its thermal properties is not inferior to any insulation.
The thermal conductivity of expanded clay is 0.16 W/m K.
Pouring the mixture
The method for pouring a polystyrene concrete floor involves installing beacons that need to be leveled in the same plane. To obtain a sufficiently warm surface and, at the same time, not reduce the height of the room too much, the upper part of such guides is installed at a level of 5 cm from the base. Then they begin to screed, moving from one of the far corners of the room to the wall and leveling the material using a rule soaked in water. To speed up the process, it is advisable to perform the pouring not alone, but with an assistant - while one performer pours the material, the second levels it.
During the work, you should also pay attention to the walls from which the remaining mortar must be removed in a timely manner. And, having finished pouring the lightweight floor screed, it is recommended to immediately provide the correct conditions for its drying - from 15 to 25 degrees, low humidity and complete absence of drafts
Failure to comply with the permissible microclimate can lead to the appearance of cracks on the surface.
A day after finishing the work, it is necessary to remove the guides and seal the remaining holes with the same mixture. Date: September 25, 2022