Here you will learn:
- Pros and cons of potbelly stoves
- Assembling a potbelly stove
- Installing a potbelly stove in its original location
- Construction of a chimney for a potbelly stove
- First launch of the potbelly stove
- Modernization of a potbelly stove
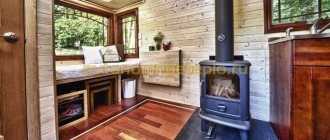
A potbelly stove is a homemade or factory-made stove designed for heating residential and non-residential premises. The stove has a simple design and is omnivorous - it works on almost any type of solid fuel. Having purchased or assembled this heating unit, it is necessary to ensure its correct installation. This review will tell you how to install a potbelly stove in a garage and how to properly connect it to the chimney.
Pros and cons of potbelly stoves
Heating garages using potbelly stoves is quite justified. Electric heating leads to high energy costs, given the large amount of heat loss. The same applies to heating with diesel fuel and liquefied gas. All that remains is to heat the garage space using a potbelly stove. This stove, simple in design, can operate on wood, coal, fuel briquettes and other types of fuel . It is omnivorous and does not require permission for installation and operation.
Let's consider the positive qualities of potbelly stoves:
A potbelly stove has a very reasonable efficiency indicator - it varies between 70-80%, which depends on its design and the type of fuel used.
- Suitable for heating garages and any other technical premises;
- They produce a large amount of heat, which depends on the type of fuel used - using firewood with a high calorific value, you will achieve good heat;
- Quick warming up - we remove the remaining ash from the previous kindling, load fresh firewood, wait 15-20 minutes. After this time, the garage will become noticeably warmer. In 30-40 minutes the temperature will reach a comfortable limit (do not raise it above +23-24 degrees);
- Simple installation - you need to mount it on a non-combustible base and connect the chimney;
- Possibility of modernization - the potbelly stove can be easily converted to use liquid and gas burners. There are also certain methods for increasing efficiency - we will touch on these points in the review.
- Not the most presentable appearance, but in a garage or other technical room this does not matter in the slightest;
- An incorrectly assembled potbelly stove may turn out to be too voracious and ineffective - 40-50% of the heat will fly out;
- You need to install a high chimney - proper draft is ensured by installing a chimney up to 4-5 meters in height.
In addition, potbelly stoves require regular cleaning. It is one thing to remove accumulated coals and ash, and another thing to remove resin from a pipe . The problem with resins is solved by installing a chimney from a pipe with a diameter of at least 100 mm (and preferably 120 mm).
General fire safety rules
Consumers are required to stop using any appliance once signs of malfunction are detected. This is especially true in situations where a gas leak is detected.
An important measure to prevent fire is the efficiency and correctness of the response when a danger is identified. First of all, you need to turn off the taps of gas appliances and open all windows
What will reduce the concentration of hazardous impurities in a room in a matter of minutes?
It is prohibited to disable automatic safety and regulation when using gas equipment.
And also you can’t:
- block access to the gas riser valves or complicate it in any other way;
- use smoke removal and ventilation systems after the certificate for their cleaning has expired;
- arbitrarily change the layout of gas equipment;
- prohibit employees of city gas companies from performing any work (some of them can be carried out at any time of the day);
- allow preschool children to operate any gas appliance and children must not be left unattended in the room where this equipment is located;
- store empty or full liquefied gas cylinders indoors or in basements.
Do not bend or twist rubber-fabric sleeves. If their outer layer is damaged, the product should be replaced. Otherwise, fuel leakage will begin after some time.
It is inappropriate to tie ropes to pipelines, as this leads to disruption of connections with subsequent gas leakage
It is prohibited to heat any premises using gas stoves and other appliances not intended for these purposes. Place flammable substances and liquids near them.
The standards and recommendations listed in the article are prescribed in the Fire Safety Standards NPB 01-93, put into effect by Order of the Ministry of Internal Affairs of the Russian Federation of December 6, 1993 N 521.
Assembling a potbelly stove
Installing a potbelly stove begins with its purchase or self-assembly. When choosing a purchase option, pay attention to the Soviet-style cast iron model.
They began to be produced in 1955 and are still stored in army warehouses. We won’t go into where they came from for sale. But let's say that these are excellent stoves. Judge for yourself:
A cast iron potbelly stove has a very impressive appearance and, due to its thickness, can last for decades.
- Thermal power is about 4-5 kW, which is enough to heat a garage of up to 40 square meters. m;
- Reliable cast iron - its thickness is 10 mm;
- Soviet assembly - no comments here, back then they knew how to make quality things;
- Omnivorous - works on coal, wood, sawdust;
- Suitable for installing a cauldron instead of a top lid.
The cost of the unit is between 4-5 thousand rubles. The thing is really cool, but it’s hellishly heavy, its weight is about 60 kg.
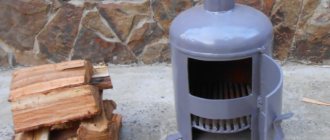
You can also assemble a potbelly stove for your garage yourself. For example, according to this scheme:
The assembly diagram of one of the simplest and yet quite effective and reliable potbelly stoves.
It is assembled from sheet steel. The recommended thickness is 4-5 mm. This is enough to prevent the steel from burning out in the next few years. The statement is most relevant when using coal, which burns at a higher temperature. For assembly, you need to cut the metal on a machine or using a powerful grinder. Legs may or may not be made - in this case, the potbelly stove is installed on a stone base.
To assemble the stove, you will need additional materials - a metal pipe, doors and fittings for assembling the grate. The pipe is necessary to create a chimney pipe - the chimney is connected to it. You need two doors - one large, the other small. The large one is welded opposite the combustion chamber (furnace), the small one is welded between the bottom and the grate . If you are making legs for floor installation, take strong metal corners or fittings with a thickness of at least 15 mm.
The diameter of the chimney according to this scheme is 100 mm - this is quite enough (for this drawing). The potbelly stove is assembled using a welding machine. Special attention is paid to the welds so that they can withstand heat and do not allow smoke into the garage itself. When assembling the housing, do not forget to install the grate and smoke circuits.
Preparation of the solution
Let's start by preparing the solution. For masonry work we use a special ready-made mixture. Sold in construction stores. It is a yellow-gray powder in 25 kg bags. All that remains is to dilute it with water in the correct ratio and mix. Detailed instructions are always indicated on the packaging; you need to follow them step by step. This solution is the best choice. It has only one drawback - its high price.
You can prepare the mortar for masonry yourself. For this we need clay and sand. First, let's determine the quality of the available clay and the content of impurities in it. We follow the following instructions:
- Roll the clay into a rope. Thickness - 10-15 mm, length - 150-200 cm.
- Take a rolling pin with a diameter of 50 mm and wrap a rope around it.
- The tourniquet should stretch smoothly and break, stretching by about 15-20%.
Expert opinion
Pavel Kruglov
Stove maker with 25 years of experience
If the rope stretches more, the clay is “fat”; if it breaks earlier, the clay is “skinny.” In the first option, the solution will shrink greatly under the influence of temperature, in the second it will crumble.
The next step is to prepare the sand. First, sift it through a fine sieve. The cell should not exceed 1.5x1.5 mm. Next we follow the instructions:
- using a handle and burlap, we arrange some kind of net;
- pour sand into it and begin to rinse it under running water;
- Rinse until the draining water runs clear.
Thus, we have rid the sand of impurities.
We do the same with clay. Now it should be soaked. To do this, pour the clay into a previously prepared container. Pour water so that the entire surface of the clay is covered. After 24 hours, mix thoroughly. We repeat the process until the clay has a consistency similar to toothpaste.
There is no universal proportion for a solution. Everything is installed by trial and error, depending on the characteristics of the materials used. The main thing is that the solution is convenient to work with.
To increase strength, experts recommend adding a little cement or salt.
Expert opinion
Pavel Kruglov
Stove maker with 25 years of experience
Here is a basic recipe for masonry mortar:
Take 2 parts of clay. Add one piece of sand to it. Using a construction mixer, mix until smooth and thick. We will need approximately 40 liters of solution.
Installing a potbelly stove in its original location
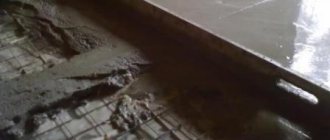
We have assembled the potbelly stove, now let's start installing it. The foundation is prepared for this. The stove cannot be installed on earthen floors - it will gradually push through them. It is necessary to pour a concrete screed on which the stove itself will stand. If you have ready-made concrete floors, there will be one less problem in the installation procedure. In the case of installing a potbelly stove on wooden floors, it is necessary to lay a sheet of metal 1-2 mm thick on them. The same sheet should be placed in front of the firebox - this will prevent fire if coals accidentally fall out.
Construction of a chimney for a potbelly stove
Making a pipe for a potbelly stove in the garage is not difficult. We have already left the pipe for installing the chimney; all that remains is to punch a hole in the wall or ceiling. We remind you that the height of the pipe should be 4-5 meters. A lower chimney for a potbelly stove can lead to loss of draft or air blowing in the opposite direction.
The pipe for a potbelly stove in the garage can be straight or curved in an L-shape - it all depends on the characteristics of the garage space. For example, if there are some rooms above the garage, the pipe is led out of the wall, then bends and goes up. It is desirable that it be higher than the roof of the entire building. The upper part of the chimney is closed with a tin or metal cone to prevent water and snow from getting inside.
Installing a chimney in a window is quite possible, but unsafe. A wooden window frame can catch fire if it comes into contact with an overheated pipe. Therefore, it must be insulated - for example, with mineral wool running between the metal and the frame. When venting the chimney through the roof, it is necessary to isolate it from the roofing and seal all cracks.
First launch of the potbelly stove
The slide valve allows you to control the draft in the stove, thereby affecting fuel consumption and temperature.
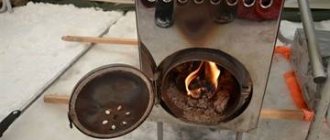
The installation is complete - you can perform the first launch. To do this, place a small amount of wood chips and paper inside and light a fire. Next, we stack a small amount of firewood and wait for the stove to warm up. The firewood must be dry (no more than 15-20% moisture), otherwise the soot from it will quickly pollute the entire stove and chimney. We make sure that the smoke goes into the chimney properly, add more firewood, close the firebox door and open the ash pan door (it works like an ash pan).
After 20-30 minutes the temperature will rise to a comfortable level. To save fuel, close the vent and the flame will go out. This achieves temperature regulation. You can also retrofit the chimney with a damper.
Modernization of a potbelly stove
Installing a potbelly stove in a garage will provide warmth and comfort. But the efficiency of this furnace can be increased by 10-15%. Here is a list of technical solutions:
- Installing a brick jacket on the back and sides - we have already talked about this. The thickness is half a brick;
- Installing a chimney with a long horizontal section - it will retain some of the heat escaping into the chimney. We put the stove in one corner, extend the chimney to the other, and then take it upstairs;
- We cover the walls with steel sheets - they will reflect infrared radiation back into the room;
- Installing a steel jacket around the stove - we surround the potbelly stove with steel sheets located at a distance of 40-50 mm from its walls. This solution forms a convector that forces air to circulate throughout the garage.
This is quite enough to “squeeze” the maximum thermal energy out of the stove. When installing a furnace to heat your garage, do not forget to take care of purchasing a fire extinguisher.
Hello! For heating, a Butakov stove, model student, was purchased. Power 9 kW.
Because I’ve never encountered such stoves before and there’s not much space in the garage. The question arose: where is the best place to put it?
There are several options
1)
The first option immediately disappears because curtain, and the minimum distance to flammable materials should be 50 cm. But at the same time, the machine can be placed closer to the racks and ensure the maximum distance to the stove.
2)
The second option, according to the rule, with an indentation of 50 cm. But the stove will be located near the gas tank and I don’t like this, the distance between the stove and the car is 90 cm. Also, the wall with the gate is frozen with frost;
3)
I'm leaning towards the third option. There is a closet in the corner, a very convenient place for it. Step back 50 cm from the cabinet and install the stove. The stove will be located relative to the car opposite the rear wheel or rear door, depending on how you stand. The chimney will be direct into the roof, and not, as many do, into the wall, so the location of the stove is free. Also, the stove will be located closer to the center of the garage, which will provide more uniform heating. And the work area is near the racks; there is no point in heating the gates.
And another question: a stove on one shelf can be heated for up to 8 hours. What to do in the following situation, for example, you lit the stove, did everything, but the stove is still heating? You can’t leave it unattended; you don’t want to sit and wait for several hours until the firewood burns out.
Comments 57
Why can't it be left unattended? make a proper hood for it so that nothing falls off, and you can leave it, I have a Buleryan, I leave it in the minimum burning mode, although it is on the left hand, in the same place as your stove, only on the side of the “face” of the car
Great thing, this stove. Recently I had the opportunity to work in an ordinary metal garage, although I don’t know how and with what it was insulated, but the fact that it was insulated is exactly where such a stove was installed. The garage warmed up to a comfortable temperature very quickly)
what kind of stove? is there any information on it?
Advantages and disadvantages of a potbelly stove for a garage
A potbelly stove is rightfully considered the most practical way to heat in winter. This is a small structure that is practically portable and can heat any room in size, regardless of the outside temperature and other climatic conditions. This is its main advantage. However, in modern conditions, a potbelly stove is used exclusively for heating outbuildings, for example, a garage. And this comes with a lot of disadvantages:
- the stove cools down quickly, which means that in order to maintain a constant temperature in the room, it must always be burning;
- uneconomical for the same reason;
- is a fire hazard, so when installing it you need to take care to protect the nearby wall and floor.
However, its omnivorous nature allows you to save a little on the purchase of fuel, especially considering the almost 100% efficiency of such a device.
The potbelly stove has a special design, thanks to which it is possible to obtain high efficiency
Treatment of wood against fire
Additional means of protecting wooden structures located in the immediate vicinity of an iron stove are fire-retardant impregnations and mastics. Beams, load-bearing structures, floors and walls adjacent to the furnace are subjected to this treatment. Mastic has a higher level of fire protection, and the impregnation is almost colorless.
Fire retardant treatment can be carried out by both representatives of the Ministry of Emergency Situations and the owners of a wooden house. In the latter case, before starting to operate the stove, it will be necessary to obtain a certificate from the inspector of the Ministry of Emergency Situations about the compliance of its installation with the requirements of the safety regulations.
All leading European and Russian manufacturers of solid fuel stoves describe in detail the rules for installing equipment and fire safety requirements in their technical documentation.
Design and operating principle
The peculiarity of a potbelly stove is that it does not require the construction of a foundation or the installation of a major chimney. In most cases, this is precisely why it is chosen for use in the garage. This room does not always have electricity or a gas pipeline, which means that a potbelly stove is the only solution to the heating problem.
The potbelly stove does not require the construction of a foundation
This design is a metal box with a door and a pipe, which is located outside the heated room.
The pipe can also serve as a heating element if it is slightly modified. Make it stepped rather than straight, which will allow the hot air to linger in it a little.
From a gas cylinder
How to make a potbelly stove for the garage with your own hands from a cylinder? A gas cylinder stove is made in various designs - horizontally and vertically.
When installed horizontally, the container itself is the combustion chamber. Instead of a grate, rows of holes are drilled in the wall and in this place I weld an ash pan box with a drawer. You can cut out a window and install a standard grate. A cutout for the door is made in the end part. The door can be made from this segment by hanging it on hinges and attaching a handle with a latch, or by welding a standard one. The chimney liner is welded on the opposite side.
The legs are attached at the bottom.
A window for the door is cut out in the upper part and the chimney liner is welded. The upper semicircular part can be cut off and a metal sheet welded to form a hob.
Calculation of basic parameters (with drawings and dimensions)
High efficiency of a potbelly stove can only be achieved if all the main design parameters are correctly calculated.
Pipe
In this case, the diameter of this element is very important. The throughput of the chimney should be less than the productivity of the furnace firebox, which is the main distinguishing feature of a potbelly stove. This will allow warm air not to immediately leave the stove, but to linger in it and heat the surrounding air.
It is very important to make an accurate calculation for it. The diameter should be 2.7 times the volume of the firebox. In this case, the diameter is determined in millimeters, and the volume of the firebox in liters. For example, the volume of the combustion chamber is 40 liters, which means that the chimney diameter should be about 106 mm.
If the potbelly stove provides for the installation of grates, then the height of the firebox is calculated without taking into account the volume of this part, that is, from the top of the grate.
It is very important to correctly calculate the diameter of the stove pipe
Screen
It is very important to force the hot gases not to cool, but to burn out completely. In addition, the fuel must burn through partial pyrolysis, which requires extremely high temperatures. A metal screen located on three sides of the stove will help to achieve a similar effect. It should be placed at a distance of 50–70 mm from the stove walls, due to which most of the heat will return to the stove. This air movement will give the necessary high temperature and protect against fire.
The screen of a potbelly stove made of red brick is capable of accumulating heat
Litter
It definitely has to be there. There are two reasons for this:
- some of the heat is radiated downwards;
- the floor on which the stove stands gets hot, which means there is a risk of fire.
The litter solves these two problems at once. As such, you can use a metal sheet with a projection of 350 mm (ideally 600 mm) beyond the contour of the furnace itself. There are also more modern materials that do an excellent job of this task, for example, a sheet of asbestos or kaolin cardboard, at least 6 mm thick.
You can use an asbestos sheet for bedding under a potbelly stove.
Chimney
Despite all the calculations, gases sometimes escape into the chimney not completely burned out. Therefore, it must be done in a special way. The chimney consists of:
- the vertical part (1–1.2 m), which is recommended to be wrapped in thermal insulation material;
- hog (slightly inclined part or completely horizontal), 2.5–4.5 m long, which should be 1.2 m from the ceiling, which is not protected with heat-resistant materials (1.5 m from the wooden surface), from the floor - by 2.2 m.
The chimney must be vented to the street
Photo gallery: diagrams of a potbelly stove for a garage
Required materials and tools
To make a potbelly stove with your own hands you will need:
- welding tool (or any other welding machine if you have relevant experience);
- chisel;
- soft cloth (you can use rags);
- hammer;
- sandpaper (fine-grained).
The list of materials depends on what container the potbelly stove will be made from. This could be a gas cylinder or a milk flask. If you have some experience working with metal, then a potbelly stove can be made from sheet material. However, you definitely need to take care of the availability of:
- refractory bricks;
- steel pipes;
- metal wire;
- grate bars (in some cases you can do without them);
- pipe with weather vane;
- door hinges.
About some important points
Typically, long-burning stoves are made of metal. The optimal metal thickness is 4 mm (more is possible). It is better to make the chimney consisting of several parts to make it easier to clean in the future. The chimney also needs a fairly thick metal - this will extend the service life of the element.
Making a stove with your own hands will not be very difficult for a person who has the necessary skills
For the body, you can use a piece of large pipe, a gas cylinder or an old 200-liter barrel; or, alternatively, it can be welded from pieces of metal. You need to make a hole on top of the body to install the chimney (its diameter should be about 15 cm); another hole (10 cm in diameter) will be required for air flow, without which the wood will not burn.
You will also need a load - it will put pressure on the fuel. This should be a heavy iron circle with a diameter slightly smaller (several millimeters) than the diameter of the body. The circle should have a small air duct through which oxygen will flow.
Preparatory work before assembling the furnace: choosing a location
Using a potbelly stove in a garage, like any other heating device, requires compliance with safety rules. First of all, this concerns the installation location of the device. The corner of the garage, which is located near the walls opposite the door of the room, is ideal for this.
Remember that you cannot place the stove in close proximity to the car. The distance between them should be at least 1.5 m. A similar distance should be from objects that are easily flammable, for example, from barrels of gasoline.
The walls near the stove must be protected with fireproof material
The distance from the stove to the wall depends on what material the garage is built from. If it is wood, then there should be at least 1 m from the stove to the wall. Additionally, it is recommended to protect them with asbestos boards.
Step-by-step instructions for making a potbelly stove for your garage with your own hands
The method of making a potbelly stove depends on its shape and the material used.
Classic stove-stove
To manufacture such a structure, you must have certain skills in working with a welding machine. All work consists of several steps:
- Make 5 blanks from sheet metal.
Blanks need to be cut from sheet metal
Grate bars and a potbelly stove are optional elements
It is recommended to make the door as wide as possible
The pipe must not have horizontal parts
When using sheet metal, you can make a potbelly stove of any size
Video: original potbelly stove for the garage with your own hands
Milk can oven
Making such a stove is quite easy, you just need to follow the step-by-step instructions:
- Carefully prepare the container that will serve as the furnace firebox. To do this, you need to clean the inner walls of the can from dirt and rust, if there is any there.
- Knock out a hole in the body of the future potbelly stove through which fuel will be loaded. This can be done using a chisel and a hammer.
- Secure the door hinges to the body, after which you can install the door. Don't forget to make a hook that will hold the door closed.
- It is necessary to make a round hole in the bottom of the container, which will serve as a chimney pipe. The diameter of this hole should be about 10 cm.
- Install a grate made of snake-shaped wire (in this case it is recommended to choose this kind). You can make it yourself. Why bend the steel wire several times and insert it inside the prepared milk can. First you need to take care of supports made of reinforcing rods for the grate bars, which need to be welded to the walls of the container.
- Weld the chimney.
Making a potbelly stove from a milk tank is quite easy.
Video: potbelly stove for a garage from a gas cylinder
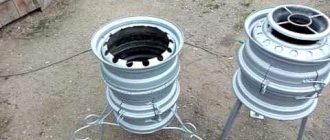
From rims
The materials to weld a potbelly stove, in addition to a couple of disks, will also require a piece of pipe 30 - 45 cm long with a similar diameter, a sheet of metal, and a pipe for removing smoke. This potbelly stove is easy to assemble:
- To adjust the diameter of the pipe to the size of the disks, the ribs are cut off at the joints. After welding, a vertical structure is obtained.
- An opening for the firebox is made on the side surface.
- A door is made from the cut piece.
- To allow air to enter the firebox, a square hole with a side of 10-12 cm is cut out in the lower disk.
- A hole is made on the back of the upper disk for the chimney pipe.
- To construct an ash pan, a metal circle is welded to the bottom.
- To heat food on a potbelly stove made with your own hands, install a hob made of metal 4 - 5 mm thick on the upper disk.
Features of operation
When operating a homemade potbelly stove, it is very important to follow certain rules. This is necessary not only for the safety of its use, but also for a long service life. These rules are:
- it is necessary to maintain a safe distance between the walls of the stove itself and the walls of the room (a distance of 50 cm is considered ideal);
- the chimney must be routed directly to the street; in no case should it be connected to the ventilation system of the garage (very often this desire arises when the stove is installed in the basement of the garage), since this is the only way to guarantee sufficient draft for proper combustion;
- places where the pipe is exposed to the street must be insulated with asbestos or other non-combustible material;
- You can increase the efficiency of a potbelly stove by insulating the room itself;
- It is necessary to install a box of sand and a fire extinguisher next to the potbelly stove, as this is required by fire safety regulations.
Conclusion
It is quite possible to make a brick potbelly stove from bricks yourself. Such a furnace increases efficiency from 50-60% to 70-75%. However, it is still not cost-effective enough to fully replace stove heating. Although it retains heat more efficiently than iron, it requires the connection of a heating panel for constant use.
As a temporary source of heat, a brick potbelly stove, made with your own hands in a garage or greenhouse, is fully justified.
The design can be further improved by clad in metal. This will increase the service life and protect the stove from damage.
How to improve oven performance
This stove has one significant drawback - it cools down very quickly. However, this is very easy to fix with the help of a brick screen, which is installed on three sides of the structure. This will allow you to accumulate heat and release it to the room even after the stove stops burning.
It should be placed at a distance of 5–7 cm from the walls of the stove, and in no case end-to-end. In this case, you need to take care of the presence of ventilation holes.
The screen should not be close to the walls of the stove
A structure with a brick screen will weigh much more than a conventional metal stove, so it is recommended to first build an individual foundation.
In some cases, it may be necessary to install a custom foundation. It's very easy to do:
- Dig a hole about 50 cm deep. All other dimensions depend on the size of the stove itself and the screen.
- Fill the bottom of the hole with sand (usually this takes about 3-4 buckets), after which it needs to be compacted. Cover the sand with a 10–15 cm layer of crushed stone and compact it as well.
- Level the backfill and fill it with prepared cement mortar. Leave it for a day (you can do it for several days, the foundation will only benefit from this).
- Cover the base with several layers of roofing felt.
- Now you can start laying out the screen in the brick floor. In this case, the first two rows should be laid out in continuous masonry directly on the roofing material. In rows 3–4 it is necessary to make ventilation gaps. Continue solid masonry.
- It is recommended to make the screen without a top covering.