In the vastness of our homeland, there are a huge number of places where there is no electricity or gas supply. This makes living in houses built in such conditions, even for a short time in autumn, winter or early spring, very problematic. Building a stove or fireplace is too expensive.
But what about those who live or work there on a permanent basis? How to create comfortable living conditions around the clock and organize a good and inexpensive heating system?
The answer is clear - a potbelly stove! This metal structure will provide heat to a small cottage, and you can also cook food on it. Thus, it performs two functions simultaneously.
Technical and operational characteristics
If the name “stove-stove” makes one think of a bulky, ugly and crude device, then for modern models this is irrelevant and incorrect.
A cast iron stove-stove is a metal structure that has high legs and a smoke exhaust. It has high efficiency, has good heat capacity, quickly warms up the room and maintains the optimal temperature for a long time.
The device is completely easy to use and does not require special knowledge or handling skills.
However, during use, basic safety precautions should be followed when working with open flames and hot objects.
Correct kindling
The process is actually simple
...but only if you have experience working with a potbelly stove. A beginner should do the following:
- Crumple the paper and place it on the grate.
- Place birch bark and brushwood on top of the paper.
- Then place two small logs. Firewood is an important element for a potbelly stove. They should be used at least for warming up.
- You should set the paper on fire with the blower half open. He is responsible for controlling draft in the furnace. There is no need to put a lot of firewood into the stove at once. The main thing is to control the traction force.
Why do you need a brick?
When a potbelly stove gets red hot, it poses a great danger. Even if you take into account all the fire safety tips, you can simply get burned on this structure. In addition, the oven cools down quickly, which is its disadvantage. Many people came up with the idea of covering the structure with bricks because:
brick retains heat for a long time, which accumulates and gently releases it to the room;- It is very problematic to burn yourself with a brick;
- the appearance of the potbelly stove becomes much more presentable with good cladding.
How to do it?
First of all, you should take into account the advice of professionals:
- — the brick must be laid on a clay or special adhesive solution;
- — it is necessary to make several air channels so that air penetrates into the room;
- - the first time after cladding, the potbelly stove should not be heated at full strength in order to strengthen the fastening seams between the bricks;
- - any brick can be used - fireclay, ceramic, but not facing.
The masonry technology is classic with a sling. First, the two side walls are covered, then the back. The front remains open. If you have design ideas, then you can realize your fantasies, everything is in your hands.
Places of use
The design is quite appropriate for living spaces, as it quickly provides the necessary heat and allows you to prepare tea or coffee, as well as quite complex dishes.
It is also often used for heating non-residential premises. You can install a potbelly stove in construction or security trailers, sheds, greenhouses, garages and other premises for various purposes.
If the heating area is large enough and maintaining the temperature is vital, then you can opt for an installation with a water circuit.
The stove can operate on wood, waste, peat, briquettes, etc.
Historical excursion
The history of the term “potbelly stove” takes us back to the beginning of the 19th century, when their first designs appeared. Initially, the stove was used as a heating device in the apartments of especially wealthy citizens. This is where the name “potbelly stove” comes from.
During the NEP it was also popular. Then each family received a plot of land for use - a “suburban garden” (the same dachas). There, small-sized, unpretentious stoves were used.
Potbelly stoves were produced in large quantities at factories and for the needs of the Red Army. And more advanced designs, artistically designed and decorated, were even exported outside the USSR.
Design parameters
A potbelly stove for a summer house or other buildings has such a simple design that it is easy to make it yourself. It is certainly cheaper with similar, and often even higher, performance and efficiency.
Compact dimensions and light weight make the structure very mobile, and allows it to be moved to another room or stored in a specially designated place for the warm season.
The device can be easily constructed from available materials. The collection scheme can be easily found on the Internet. Particularly zealous owners, to increase heat transfer properties, line the finished metal box with red brick.
If an improvised brick wall is made at a distance of several centimeters from the metal walls, then an air cushion is formed, providing long-term heat transfer.
The military stove-stove has a more modest appetite, that is, it consumes fewer resources, which makes it extremely economical and efficient. It is recommended for use in small spaces.
Security measures
To safely use the stove, you must follow the following rules:
- the stove must be installed only on a fireproof base;
- any flammable objects must be removed from the stove by 70-80 cm;
- simultaneous loading of fuel should not exceed three kilograms; The firebox door must always be kept closed. It can only be opened to load fuel;
- if the exhaust pipe has any damage, its operation is strictly prohibited;
- The operating oven must always be supervised. It especially cannot be ignored if there are small children in the room;
- Do not touch the oven body while it is running or after the flame has gone out. The heating temperature is very high and can cause severe burns.
If you follow all the above rules, you can operate the “potbelly stove” for many years.
Materials and manufacturing features
The structure is made of high quality metal sheet. The use of cast iron alloy requires special handling skills; it is difficult to cook and has a lower heat capacity.
The best option is steel, and the thicker the sheet, the better.
Before you make a potbelly stove with your own hands, you need to calculate its size, functionality (heating or heating + cooking) and shape. For work they can use molded profiles, angles, fittings, pipes, rods.
You shouldn’t specifically buy metal sheets - first, look around the household, you may find a square or cylindrical metal box of the right size
The square shape is the most ergonomic, stable and easy to use. To give it a more aesthetic appearance, you can make an external cladding.
Range of applications
Potbelly stoves are universal and are used:
- for heating cottages, country houses, rooms or garages;
- for cooking in the country: in houses, on verandas or even in the yard;
- as a camp kitchen if the model is compact;
- to provide hot water (if the model has a storage tank).
Read More at pechinfo.ru/material/iz-metalla/konstruktsiya-metallicheskoj-pechi-dlya-bani?preview_id=818&preview_nonce=a837fab63d&preview=true © PechInfo[/box]
The process of making a potbelly stove
When all the materials have been collected and a suitable scheme has been found, then it’s time to start collecting. The process consists of several stages.
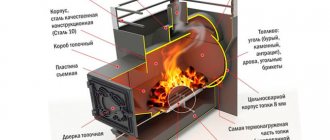
The combustion chamber occupies the largest area of the structure (250x250 mm), since this is where firewood is loaded. The larger the bottom area, the more convenient it will be to stack firewood.
Ash pan - not all models have it. Air supply can also be provided by making holes in the door. Ash can be removed directly from the firebox, and if an ash pan is installed, there is no need to weld it, just screw it in.
Grate – separates the combustion chamber and the ash pan. The distance between the bars of the grill should not be 1 cm. It is installed on the corners.
Doors are made of metal and are connected by welding and steel canopies.
Pages of history
This type of stove got its name because of its unique appearance. In America, at one time, a stove was widespread - the fat belly. It was actively used for heating small internal volumes, premises of railway stations, freight cars, temporary premises such as guardhouses and other similar types.
Such stoves came to Russia along with the American occupation corps at the turn of the First World War and at the dawn of the Civil War, and immediately attracted the attention of local residents, who immediately appreciated the simplicity and, at the same time, proper efficiency of the stove. And then, along with the civil war, devastation came and simple but effective designs became in great demand.
In general, the potbelly stove has spread across the country. Heat, along with food, is a fundamental factor in a minimally equipped life, and an individual stove, even if it was heated with trees from the family garden or marvelous half-chairs made by the English master Gumbs, could be afforded by fairly wealthy people, in a word, bourgeois.
Potbelly stoves successfully survived the civil war and devastation, collectivization and the Stakhanov movement, worked conscientiously in the dugouts and dugouts of the Great Patriotic War, and confidently entered the post-war life of ordinary Soviet people, heating barracks, dachas and sheds. The decline of stoves of this design came at the time of the mass introduction of centralized heating systems in the country, and now, when industrial technologies make it possible to do things cheaply and cheerfully, and manual electric welding has become commonplace, such stoves are experiencing a rebirth. How is it structured?
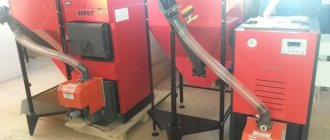
Ready-made potbelly stoves
There are no problems where to buy a potbelly stove - they are sold in a huge number of specialized stores. Manufacturers offer a large range of different sizes and types.
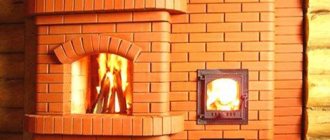
Modern devices have a very pleasant and aesthetic appearance and fit perfectly into the rustic traditional style.
This design at the dacha guarantees not only warmth, but also a fairly comfortable room environment in which all household members will feel good.
The fireproof glass door practically turns an ordinary potbelly stove into a classic fireplace.
You can choose the appropriate model from numerous photos of potbelly stoves on the Internet.
Installation Rules
It seems that the question is not relevant; installing a stove at the dacha is not at all difficult. In fact, this is true; you need to follow the installation recommendations in order to protect yourself and your home.
Manufacturers do not prohibit self-installation, but pay attention to some details:
- - if there is a wooden floor, it should be protected with non-combustible material, for example, ceramic tiles. During combustion, a potbelly stove generates a lot of heat, and to avoid damaging the wooden base of the floor, it is recommended to additionally screed or lay down blocks;
- - the potbelly stove can be placed on an asbestos sheet, under which there is a metal one;
- — a minimum distance of 1.5 meters must be maintained from the stove to the wall;
- - the walls next to which the stove is located should be protected with non-combustible material;
- — a few words about the chimney. It requires special attention. First of all, the design should be rectilinear with as few bends and turns as possible. It's good if its direction is vertical. Then, good insulation must be established. And also, if there is an unheated attic or the chimney goes directly to the street, then additional insulation is required. These measures are aimed at ensuring that carbon monoxide does not remain inside and that its condensate, which is an active acid, does not damage the pipes.
Today, sandwich pipes have gained popularity as a chimney. They are two pipes located one inside the other. The first pipe is made of heat-resistant material, through which carbon monoxide escapes, and the second protects the first from various structures and creates thermal insulation.
When the stove is installed in a garage, you don’t have to worry about sandwich panels because of their high cost. But, in the case of indoor installation, this is an excellent option.
Photo of a potbelly stove
What is a potbelly stove with a water circuit? The advantages and disadvantages of a popular stove
A potbelly stove is characterized by high heat transfer and fuel burning rate. These qualities are given to it by the materials from which the firebox is made (cast iron, steel, iron). The potbelly stove quickly flares up and heats up, and if a water circuit is connected to it, then the warm flue gases along the way also manage to heat the water for domestic needs.
When choosing the material from which it is best to make a potbelly stove, you need to be guided by the following indicators:
- Thermal conductivity is the property of metals, liquids and gases to conduct heat through themselves. The faster heat is transferred, the faster the object heats up or cools down. Foam plastic has low thermal conductivity - 0.036–0.050 W/m*C. Taking it in our hands, we will immediately feel that it is warm, because the foam does not transfer heat, but accumulates it. If you take a metal bar, you will feel the cold due to the high heat transfer.
- Heat capacity is the property of a material to accumulate heat. Water has the highest heat capacity, air is in second place, and cast iron, steel and iron are at the end of the list. Therefore, a metal stove heats up quickly and cools down just as quickly. In city houses, central heating radiators are filled with water, which gives off heat for a long time, heating the home.
List of materials used to create a potbelly stove:
- Steel.
- Cast iron.
- Iron.
- Brass.
- Aluminum.
- Copper.
Copper is the most thermally conductive material of all those listed in the table. Its disadvantages are cost and melting point. Aluminum and brass have the same limitations. At high temperatures, a cast iron or steel stove will only turn red, but will do its job, while a copper, aluminum or brass stove will melt.
Potbelly stoves are most often made of steel because it has a high melting point and the highest heat capacity among all available materials
Making a stove from steel, iron and cast iron is justified due to the prevalence of these materials. From the point of view of thermal conductivity and heat capacity, they need fine-tuning. It is more expedient to use the thermal energy of the stove to heat water, otherwise it will simply go down the chimney
To limit heat loss, it is also very important to achieve complete combustion of the fuel.
The ideal way for a potbelly stove to work is when barely warm air comes out of the pipe, and all the energy is directed into hot water supply and heating the house.
Table: advantages and disadvantages of a potbelly stove
As can be seen from the table, a potbelly stove has a lot of disadvantages, so if you decide to install this design, you will have to take into account all its weaknesses.
Installation work
For water heating in the garage you will need a set of instruments and parts, including:
- heating boiler;
- metal radiators with good thermal conductivity;
- connecting pipes made of metal or plastic;
- accessories for fastening;
- locksmith tools.
Project development
Before installing the heating system, you need to determine the diameter of the pipes that will connect the radiators. Risers with a large cross-section will increase the flow of hot water to the batteries, increasing the efficiency of the design.
It is worth considering that heating large volumes of liquid will lead to increased electricity costs. The optimal scheme is a balance between the room temperature and the cost of heating. These parameters are also affected by the number of radiators in the insulated garage.
Expansion tank
The design of the garage heating system involves the use of expansion tanks. These items are made from simple plastic containers or large canisters with fill holes cut in the top.
The water circulating in the system constantly evaporates and requires regular addition of liquid, and the steam formed during boiling needs to be removed. The tank is installed at the lowest point of the heating system and at a half-meter distance from the floor.
Boiler
Before installing the boiler with your own hands, you will need to prepare a metal pipe of a certain diameter with a half-meter or meter length. Its extreme end is tightly welded with a metal sheet.
The next step will be assembling flanges for attaching tubular electric heaters and fixing them to the boiler using bolts. To supply the working fluid to the installation, two sections of pipe with the diameter that will be used in the heating system are welded.
Radiators
Heating batteries are attached to the walls of garages using special reinforced dowels. The distance from the floor to the radiator should be at least fifteen centimeters. For effective heating, you need to leave a few centimeters of free space between the walls and the heating elements for air circulation.
The individual structural elements are connected into a system using metal or plastic pipes with special fittings. The seams of their joints and forks require special attention during installation so that leaks do not occur in the future during operation.
Installation
The connection of metal pipes is carried out using a welding machine. Working with polypropylene will require the use of a special soldering iron. Regardless of the material of the pipes, they should be placed on the walls at a slope - this will improve the circulation of liquid.
The water heating system is considered ready after connecting the radiators to the risers and connecting them to the boiler using a rubber hose. Before starting operation, it is recommended to re-inspect the line, search for defects and seal problem areas.
In minimalism
For those who like simplicity, a compact cast-iron fireplace without frills is suitable. Simple shapes fit perfectly into the surrounding environment. Minimalism is distinguished by a calm color scheme in natural tones, monochrome elements and a rejection of unnecessary decor.
The potbelly stove will be the detail that will give the room character.
In eclecticism
This direction combines several elements of different styles. It most fully meets the main principle of interior design, as it strives to reflect the character of a person.
Give preference to a simple design so that the potbelly stove does not overload the space, or choose an unusual model to make it the main decoration of the room.
Styles
There are many current trends and design ideas. The kitchen-living room in a modern style looks simple and minimalistic.
At the same time, it is not necessary to strictly adhere to any style; you can take its main idea as a basis and cleverly play with it with accessories and other details.