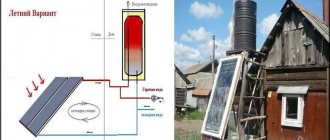
Among the types of alternative energy, solar air heating of individual housing occupies a special place. You will not need complex installation work or permission from the regional energy inspectorate. All you need is as much sun as possible and unused roof/wall space. The rest is available for DIY.
General principles of air heating by ultraviolet solar rays
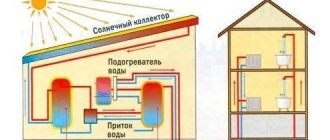
Solar heating refers to a renewable energy system that collects energy from the sun in the form of heat rather than using it to produce electricity, such as using solar photovoltaics.
Such heating systems are used for local heating of water and air. Heating technologies circulate heated air or fluid in a radiant heating system through ducts in walls or floors so that the heat can naturally warm interior spaces.
There are two types of systems that use the energy of ultraviolet solar rays:
- Active heaters . Here, solar energy is used to drive heat pumps, which, in turn, circulate water or other coolant. Such heaters are structurally more complex, since they require the presence of mechanical moving units;
- Passive heaters . By heating outside air, which is then circulated indoors, these systems heat the rooms of your home using renewable energy. Passive solar heating systems have no mechanical parts.
Passive heaters can have two designs - collectors and plates. The plates generate energy using photo-semiconductor elements, which is used to drive a pump that circulates the coolant. The air solar collector heats the air in the pipes, from where it moves to the heat exchanger and tank due to the difference in volumes. Next, the heated air either naturally or forcedly enters the premises.
Read about how swimming pool heating works, solar collectors that can be used for this and how to assemble the entire structure.
System installation
It is necessary to install a collector system at the stage of design and construction of a private house. Because after laying the finishing floor covering, installing this system is extremely impractical and labor-intensive. The only installation method is open mounting.
Comb installation
For horizontal wiring of the heating system, a manifold cabinet will be required to install control equipment, a circulation pump and a distribution unit. It is placed in niches of rooms that are protected from moisture. As a rule, a place in the pantry, dressing room or hallway is equipped for this.
When organizing the heating of a two-story house, it is necessary to place several collector groups, one per floor. Additional distribution combs will make it possible to create approximately the same length of the circuit.
As an option, you can choose a scheme where the first group is responsible for supplying coolant through separate circuits, and the other is the main element during the installation of a “warm floor”.
The number of inputs and outputs of the distribution unit should always be equal to the number of heating devices located on the floor. For each room it is necessary to lay its own branch, which, by connecting several radiators, can implement a dead-end or associated system.
To reduce the cost of connecting heating batteries, a “pass-through” system is used. During installation of this circuit, several radiators connected in series are perceived as a single element.
Laying methods
During collector wiring, as a rule, the method of installing the pipeline in a cement screed is used. In this case, the thickness of the screed is made in the region of 60-70 mm, this is quite enough to “solidify” the wiring. However, taking into account SNiP, only solid connections can be installed in a cement base, for which metal-plastic pipes with a cross-section of 15 mm are often used. Due to the fact that they are elastic, the pipeline can be easily laid under the floor.
If you decide to fill the pipeline with a screed after pressing the system, you must first wrap the pipes with thermal insulation. This layer will make it possible to minimize the risk of damage to the pipeline under the influence of thermal expansion, since the pipes will begin to “rub” not against the cement screed, but against the thermal insulation. It is necessary to lay plywood on top of the screed, and then make the finishing floor covering.
The pipeline can also be routed to the heating radiators from above, for example, under a suspended ceiling. Some experts often lay pipes using the external method, installing them along the walls and masking them with decorative skirting boards. However, this installation option will inevitably entail an increase in the length of the pipeline.
It is not recommended to place pipes under door openings: during the installation of the door threshold, the pipe may be damaged during drilling. If pipes need to be laid through walls, then to prevent their deformation during shrinkage of the house, sleeves are inserted into the holes.
Shut-off valves must be installed separately on each distribution circuit coming from the comb. To allow accumulated air to be released, install:
- on heating radiators - Mayevsky taps;
- on the comb there are air outlet valves.
Due to the fact that each heating circuit coming out after the distribution unit is an independent system, it is convenient to use it when organizing “warm floors”.
The collector heating circuit is ideal in terms of efficiency. The autonomous supply of water heated from the boiler to each battery makes it possible to create a comfortable microclimate in each individual room. The high price, unlike traditional heating systems, slightly restrains the popularity of this type of home heating, but if money allows, then heating using a collector system is the best option.
How to calculate the thermal efficiency of a solar air collector
Obviously, a block of airborne solar collectors is more compact than solar panels, and is characterized by lower losses that occur when converting one type of energy into another.
This type of “green” energy becomes profitable when the ratio of collected solar energy to that available in a given area is maximum.
The total amount of energy is expressed in kWh/(m²×day). It is believed that on a clear sunny day the average amount of direct solar energy available per 1 m² of area per hour should be at least 1 kW. But the collector is a thin pipe made of metal with high thermal conductivity, so heat losses in the collector itself are minimal. Therefore, the efficiency of the air manifold will depend on:
- The active area of the collector (that which is exposed to sunlight).
- Number of collector pipes.
- Location of collectors relative to the main direction of the rays.
- The length and complexity of the heated air transportation route.
In the case of independent installation of air collector heating, the efficiency of the collector can only be measured using a high-temperature thermometer. Next (since it is risky to hope for spontaneous displacement of heated air with an increased volume into the premises), a fan will be required. Since the system will have an open circuit, the heat collected by the collector per unit will be directly proportional to the temperature difference and the heat capacity of the air over time. Multiplying this value by the duration of operation of the collector and neglecting radiation losses from the grazing action of the rays, we obtain the total value of the heat flux density. By comparing it with the nominal one (1 kW), we will find out the efficiency of the collector.
Now all we need is a pyranometer to check the intensity of sunlight. The presence of this device will eliminate labor-intensive measurements of collector efficiency in various weather conditions. The most convenient pyranometers are the ICB200-03 type, which can be purchased or rented.
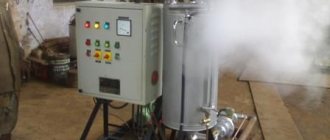
Technical specifications
The design, despite its simplicity, shows good results: if the temperature outside is +10-12 °C, then the air entering the room will heat up to +54-57 °C. The data is valid only for sunny weather. If the external temperature is about 5 °C, then the air will warm up to 34-46 °C.
A solar collector made of corrugated sheets is a budget device that will help you heat a living space or warehouse without extra cash costs. Moreover, there is nothing complicated in the assembly process, and most of the materials can be found in your own garage.
What does a solar collector consist of?
A number of designs have been developed and patented:
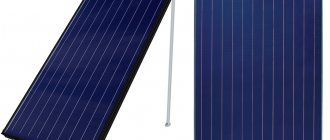
- Flat.
- Tubular.
- Vacuum tubes.
- Thermosyphons.
The easiest way to make a solar collector with your own hands is in a flat or tubular design.
We recommend reading: what are vacuum solar collectors, principles of their operation and types.
How to assemble the installation? One collector block (their number is already approximately known from calculations performed using the above method) consists of the following elements:
- A set of copper or aluminum tubular elements;
- Absorbent plate;
- Sealed thermally insulated housing;
- Covers that can be made from transparent heat-resistant polymer or tempered glass.
The effectiveness of the insulation determines the efficiency of the collector. It can be increased if a storage circuit is included in the design, which can provide heat on cloudy days or for the operation of cooling systems.
The process of manufacturing and subsequent installation of solar collectors is possible not only for the roof, but also for the southern walls of the building. In this case, the housings are equipped with perforations to facilitate air flow. When the heated air rises to the top of the wall, it is directed into the building's ventilation ducts for subsequent distribution.
Advantages of a radiant heating system
When comparing the radial system (when an industrial or home-made heating collector is used) with classical analogues, its advantages are as follows:
- it is possible to carry out hidden installation of various elements of equipment for heating the building;
- there are no connection points in the area where the heating collector was installed and right up to the heating radiators;
- simple work on installing the component elements, as a result of which the work can be done independently, without having the appropriate skills. During the installation process, the number of connections is minimal and assembly is completed in the shortest possible time;
- stable operation of the system is due to the impossibility of water hammer, which is important for owners who decide to install expensive heating devices;
- quick replacement of elements that have become unusable, for example, pipelines, without complex installation work and destruction of the surface of the concrete screed. It will be enough to turn off the beam in need of repair and eliminate the defect that appears without turning off the heat supply system;
- affordable cost of equipment and components;
- simplified installation;
- the design of the system is carried out in the shortest possible time based on calculations of its parameters, including the calculation of the heating collector;
- compatibility with other sources of thermal energy, including alternative ones.
About self-installation of a heating collector in the video:
Manufacturing and installation
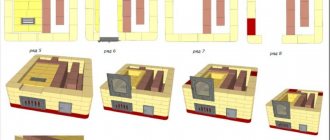
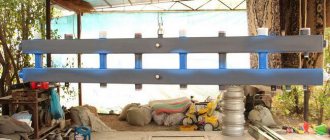
Below we consider a budget option for obtaining a solar heating collector, using a microfan, empty Pepsi-Cola cans, metal casings of used lighting fixtures (preferably from fluorescent lamps), tempered glass and black paint. You will also need a glass cutter, silicone sealant (with a gun), aluminum tape, a thermometer with a temperature sensor, metal scissors, self-tapping screws, an electric drill, a hammer, a screwdriver and a marker. You must wear protective gloves when assembling and making components. It only takes 7 steps:
- Making the body: cut the lamp box to a predetermined size and wrap it with aluminum tape.
- Sealing the case: we fasten the corners with self-tapping screws and carefully seal all cracks, grooves and possible cracks with silicone. We paint the entire structure black.
- We mark with a marker and cut out the safety glass (instead of glass, you can use a polymer sheet material suitable for transparency).
- We cut and install the cans into the body, connect them together and seal them. We bring the ends of the pipes outside the sealed housing, while agreeing on the method of connecting the inlet holes of the microfan. We paint the jars with black paint.
- On the opposite side of the case we get ventilation holes. We provide the opportunity to make additional holes if testing of the collector shows a defect. The location of the holes should take into account the overall dimensions of the fan.
- We seal the gaps between the protective glass and the body.
- Attach the microfan to the rear holes of the case. Before doing this, you need to make sure that the fan connection is correct and it will work for suction.
- We check the efficiency of the assembled collector. To do this, we place a loose block on a selected section of the wall or on the roof, turn on (after some time) the fan and, using a thermometer, find out the temperature of the air heated by the sun.
Tests are carried out throughout the daylight hours, at regular intervals (in summer, for example, from 9.00 to 17.00, every hour). If the air temperatures recorded by the sensor are from 45 °C to 70 °C, then the collector is manufactured correctly, otherwise the number of blocks should be increased. The finished structure is installed near the ventilation openings of the house.
What to pay attention to
Any solar installation is characterized by a rated power , which is indicated in kilowatts. This is the amount of energy that is generated when the sun is bright at its zenith. This means that the system's efficiency will decrease in the morning and evening. At night, most likely, it will be possible to use hot water only from the boiler , where water has accumulated throughout the day.
When choosing a collector model, pay attention to whether it can be used in winter. And on what power the system to which the collector is connected should have. The installation of collectors is usually carried out on the roof or on a frame, which is mounted separately.
Classification according to temperature criteria
There are quite a large number of criteria by which certain solar system designs are classified. However, for devices that can be made with your own hands and used for hot water supply and heating, the most rational option would be to separate them by type of coolant.
So, systems can be liquid and air. The first type is more often applicable.
Image gallery
Photo from
Step 1: Assembling the Corrugated Pipe Manifold
Step 2: Painting the Solar Instrument Black
Step 3: Installing Air Connections
Step 4: Making a cover for the solar device
In addition, a classification is often used based on the temperature to which the working components of the collector can be heated:
- Low temperature. Options capable of heating the coolant up to 50ºС. They are used to heat water in irrigation tanks, in bathtubs and showers in the summer and to improve comfortable conditions on cool spring-autumn evenings.
- Medium temperature. Provide a coolant temperature of 80ºС. They can be used to heat rooms. These options are most suitable for furnishing private homes.
- High temperature. The coolant temperature in such installations can reach up to 200-300ºС. They are used on an industrial scale, installed for heating production workshops, commercial buildings, etc.
High-temperature solar systems use a rather complex process of transferring thermal energy. In addition, they occupy an impressive amount of space, which most of our lovers of country life cannot afford.
The manufacturing process is labor-intensive, and implementation requires specialized equipment. It is almost impossible to make such a version of a solar system on your own.
It is quite difficult to make high-temperature solar panels using photovoltaic converters at home