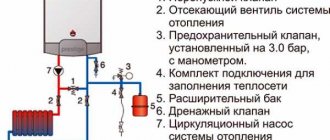
To provide the coolant with the opportunity to expand when heated, it is necessary to install an expansion tank in the heating system. This is a very important event. It will protect pipes and radiators from unnecessary loads and significantly increase the service life of the functional elements of the autonomous heating system.
We will talk about how the expansion tank works in open and closed circuits. We'll show you how to install it correctly in both versions of the system. In our article you will find a description of the technology for connecting this backup capacity and useful recommendations.
Installation and connection of the expansion tank
Careful preparation will help you install the expansion tank without unnecessary difficulties. Correct installation simplifies the setup of the heating system and its subsequent operation.
Where to put the expansion tank
The specific layout of the heating system is the determining factor when deciding where to place the tank (hydraulic accumulator). If it is open, then air will accumulate at the highest point. It is there that it is recommended to mount a container that compensates for the expansion of the coolant when heated.
If necessary, the hydraulic accumulator is made of metal sheets using welded joints. A hole with a lid is left in the upper part to fill in water as it evaporates. Of course, you can purchase a suitable factory-made tank.
If a closed heating system is used, then the buffer tank is installed near the boiler. The tank must be installed on a straight section of the pipeline, up to the pump. Fastening is carried out in a vertical position.
For a closed heating circuit, a membrane-type hydraulic accumulator is purchased. In it, part of the volume is blocked by a flexible sealed partition, which acts as a damper. To bleed excess air from the tank, manufacturers equip them with automatic valves.
Advice! It is possible to accurately determine the mounting location of the buffer tank only taking into account the architectural features of the facility, the technological equipment used and user preferences.
Installation of a tank in an open heating system
H2_2
The expansion tank is placed at the top point, but the tank installation diagram allows not only its connection to the pipeline after the boiler, but also its mounting on the return line.
The latter option will allow you to work with cooled coolant. This means that the boiling problem will be eliminated and no extraneous noise will arise. A large tank is installed on a fairly solid foundation.
It is connected using standard fittings to the heating system.
This hydraulic accumulator is not sealed; additional adjustment of its operation is not required. Contact of water with ambient air activates corrosion processes, so it is necessary to regularly inspect the buffer tank. When leaks are detected, they are eliminated and the integrity of the walls and welds is restored.
Attention! Since the installation of a tank in an open heating system is often carried out in the attic, it is necessary to ensure that the temperature in this room never drops below 0 ° C.
Installation of a tank in a closed heating system
Installing an expansion tank in this case will be more difficult. When performing operations with the tank, do not apply too strong mechanical stress to the tank.
It is necessary to make sure that there are no static loads on it from other elements of the heating system.
After completion of the work, free access to the protective air valve, tap, and other functional parts of the buffer tank must be maintained.
To correctly connect the hydraulic accumulator, the necessary tool is selected in advance. To comply with the technology for working with metal-plastic pipelines, special keys are used.
The connections of the expansion tank are sealed using sealants.
These consumables must be designed for pressure plumbing systems within the appropriate temperature range.
When the installation of the tank is completed, all other elements of the engineering system are installed, and a test run is performed. Identified leaks are eliminated. The functionality of the air valve of the buffer tank is checked. To ensure that subsequent use is not accompanied by problems, it is imperative to follow the official instructions of the expansion tank manufacturer.
Advice! To make it possible to service the tank without unnecessary difficulties, a tap is installed in front of it. This solution is, in particular, useful for replacing a damaged expansion tank membrane.
Errors and tips for eliminating and preventing them
The correct options for installing the tank were discussed above. But ordinary users are capable of performing incorrect actions without understanding the essence of possible problems. To prevent such situations from occurring, the following information will be useful:
- A hydraulic accumulator placed directly behind the boiler will work with coolant heated to the maximum temperature in the circuit, which is not recommended. In this area, the liquid expands more strongly, which can cause too large pressure drops;
- Frequent changes in pressure occur immediately downstream of the pump. That is why it is also not recommended to install a tank there;
- When fully filled, the expansion tank becomes significantly heavier compared to its original state. That is why the mounting of the buffer tank must be designed for appropriate loads;
- The hydraulic accumulator is selected with a volume of at least 10% of the amount of coolant in the entire heating circuit.
Source: https://DomOtopim.ru/obsluzhivanie-otopleniya/proektirovanie-i-montazh/montazh-rasshiritelnogo-baka-sistemy-otopleniya.html
How to mount radiators
The most suitable mounting method for heating batteries (radiators) is chosen according to their size and weight, as well as the location where they are supposed to be installed. Most often, the radiator is attached to the wall under the window, but sometimes it becomes necessary to attach it to the floor. Depending on this, the required type of fastener is used - for wall or floor installation.
Immediately before installing the radiator, it is advisable to completely prepare it: paint it if necessary, install the Mayevsky tap, thermostat and plug.
Mounting the radiator to the wall
Mounting heating radiators to the wall directly below the window is considered more practical. This ensures the creation of a thermal curtain that prevents the direct passage of cold air into the room.
To perform battery installation work you will need:
- several brackets (their number depends on the length of the battery), and the same number of dowels for them;
- a hammer drill with a drill corresponding to the wall material;
- spirit level, tape measure, meter ruler.
Brackets for heating radiators must match the type of metal from which the heating equipment is made - cast iron, steel or aluminum.
Cast iron batteries are the heaviest among all types of heating devices. Therefore, when installing them, they use fasteners for cast iron heating radiators that are strong enough to withstand such a large weight. In addition, brackets for cast iron radiators allow you to adjust the distance to the wall.
Fasteners for bimetallic radiators must be no less durable than for cast iron ones. Although batteries of this type themselves are not too heavy, if there are a large number of sections they can create a serious load on the wall.
Installing aluminum batteries is much easier because they are lighter. To install them, brackets are used for attaching aluminum heating radiators, which have a fixed length.
Fastenings and holders for heating expansion tank
The heating system is a necessary and important element in the house, and you can organize it with your own hands. During the installation process, it is important to correctly attach the expansion tank to the wall.
Purpose and types of expansion tanks
The expansion tank is an integral part of the liquid individual heating system. It is a container designed to hold excess water as it expands when heated.
When the coolant cools, the expansion tank returns the previously received coolant to the heating network.
Thus, it helps maintain the stability of the heating network pressure under different temperature conditions.
The entire variety of models is classified into two types:
- Open. Used less frequently. As a rule, this option can be found in houses that are more than 10 years old. They are a tank with an open top and a connection at the bottom. They are built into the heating system at its highest point.
- Closed. The option is a sealed container with two chambers. The rubberized membrane acts as a separator between them.
The market offers mostly closed-type options. The expansion tank in such equipment is the most important element. A closed heating network has many advantages, in particular, contact with the atmosphere is completely eliminated. Thanks to this, there is no need to recharge the system, since the water does not evaporate. And the membrane container can be installed in any convenient place.
To select a container by volume, you need to perform a standard calculation using the formula Vрб (volume in liters) = Vсо × (k / 100) × (Pv + 1) / (Pv-Ps), where:
- k – water expansion coefficient;
- Vсо – volume of the heating system in liters;
- Ps – pressure in the heating network;
- v – pressure of the safety valve.
Types of fasteners
There are certain requirements for installation and operation of each specific model. In particular:
- Installation is carried out in a room where the temperature is kept no higher than zero all year round.
- The container is installed above the boiler. The connection to it must be vertical.
- Emergency overflow is provided.
- There must be constant access to the air valve, drain tap, and nameplate.
- The reducer is placed after the water meter.
The structure can be attached using the 8-35 membrane tank mounting kits.
Standard brackets
This type of fastening is suitable for almost all container options. They have a standard shape. As a rule, they are made of metal. The kit includes everything you need - washer, gaskets, etc. It is important to choose a quality-made mount.
Adjustable brackets
The option is a metal bracket with a retractable console. The design includes a locking bolt(s). The holder is made by contact electric welding.
An adjustable bracket is used to mount the tank directly to the wall. It comes complete with a polystyrene foam gasket and a stainless steel washer.
Bracket with steel clamp
Designed for attaching the expansion tank to the wall. It is also used for floor mounting of the container. The length of the bracket can be adjusted independently.
Expansion tank for heating systems
When the heating system operates, the coolant often changes its temperature - it either heats up or cools down. It is clear that the volume of liquid changes. It either increases or decreases. Excess coolant is forced out into the expansion tank.
So the purpose of this device is to compensate for changes in the volume of coolant. There are two water heating systems - open and closed. In a closed system, coolant circulation is provided by a circulation pump.
It does not create additional pressure, it simply pushes water at a given speed through the pipes. In such a heating system there is a closed expansion tank for heating. It is called closed because it is a sealed container, which is divided into two parts by an elastic membrane.
In one part there is air, in the other the excess coolant is displaced. Due to the presence of a membrane, the tank is also called a membrane tank. An open heating system does not require a circulation pump.
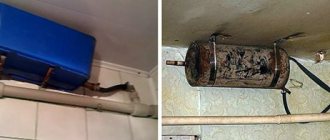
In this case, an expansion tank for heating is simply any container - even a bucket - to which heating pipes are connected. It doesn't even require a lid, although it may have one. In the simplest version, it is a container welded from metal, which is installed in the attic. This option has a significant drawback.
Since the tank is not sealed, the coolant evaporates and it is necessary to monitor its quantity - top up all the time. This can be done manually - from a bucket. This is not very convenient - there is a risk of forgetting to replenish water supplies. This threatens to cause the system to become airy, which can lead to its breakdown.
Automated water level control is more convenient. True, then, in addition to the heating pipes, you will also have to run a water supply into the attic and also somewhere to route the overflow hose (pipe) in case the tank overflows. But there is no need to regularly check the amount of coolant.
Volume calculation
There is a very simple method for determining the volume of an expansion tank for heating: 10% of the volume of coolant in the system is calculated. You should have calculated it when developing the project.
If this data is not available, you can determine the volume experimentally - drain the coolant, and then fill in a new one, measuring it at the same time (put it through a meter). The second way is to calculate. Determine the volume of pipes in the system, add the volume of radiators.
This will be the volume of the heating system. From this figure we find 10%.
Formula
The second way to determine the volume of an expansion tank for heating is to calculate it using the formula.
Here you will also need the volume of the system (indicated by the letter C), but other data will also be needed: the maximum pressure Pmax at which the system can operate (usually the maximum pressure of the boiler is taken); initial pressure Pmin - from which the system begins operation (this is the pressure in the expansion tank, indicated in the passport); coolant expansion coefficient E (for water 0.04 or 0.05, for antifreeze it is indicated on the label, but usually in the range of 0.1-0.13); Having all these values, we calculate the exact volume of the expansion tank for the heating system using the formula.
The calculations are not very complicated, but is it worth bothering with them? If the system is open, the answer is clear - no. The cost of the container does not depend very much on the volume, plus you can make it yourself.
Expansion tanks for closed type heating are worth counting. Their price depends greatly on volume. But, in this case, it is better to take it with a reserve, since insufficient volume leads to rapid wear of the system or even its failure.
If the boiler has an expansion tank, but its capacity is not enough for your system, install a second one. In total, they should give the required volume (the installation is no different).
What will result from insufficient expansion tank volume?
When heated, the coolant expands, its excess ends up in the expansion tank for heating. If all the excess does not fit, it is released through the emergency pressure relief valve. That is, the coolant goes into the sewer.
Then, when the temperature drops, the volume of coolant decreases. But since there is already less of it in the system than there was, the pressure in the system drops. If the lack of volume is insignificant, such a decrease may not be critical, but if it is too small, the boiler may not work. This equipment has a lower pressure limit at which it is operational.
When the lower limit is reached, the equipment is locked. If you are at home at this time, you can correct the situation by adding coolant. If you are not there, the system may unfreeze. By the way, working at the limit also does not lead to anything good - the equipment quickly breaks down. Therefore, it is better to play it safe and take a slightly larger volume.
Calculation
To determine the volume of the expander, you can rely on several different methods. To do this, it is advised to contact specialists in special bureaus. As a rule, to carry out all the necessary calculations, they use special programs that allow them to take into account all the features and nuances that affect the operation of the heating system. However, it must be taken into account that the services of such specialists are in most cases expensive.
You can also calculate the volume of the tank yourself. To do this, use the generally accepted formula. In this case, you need to be as careful as possible, since even a small mistake can lead to incorrect values.
When making calculations, it is important to take into account absolutely all the nuances: the volume of the heating system, the specific type of coolant, and even its physical properties
In the given formula:
- C is the total volume of coolant in the system;
- Pa min – indicator of the initial absolute pressure in the tank;
- Pa max is the highest pressure parameter that can occur in the unit.
If you are afraid of making a mistake or you do not have time to carry out all the required calculations, then you should turn to the help of special online calculators. However, in this case, it is recommended to double-check the results obtained on several sites so as not to encounter incorrect operation of one or another portal.
Some people make it simpler - they estimate the necessary parameters by eye. In this case, the specific capacity of the heating system is equal to 15 l/kW. The result will be approximate values. But keep in mind that this method is only allowed during the feasibility study process.
How to install a heating expansion tank: where to put it, installation and insertion into the heating system
In a water heating system, the most important element is the expansion tank. Its main task is to level out the increase in water volume when heated.
Modern gas double-circuit boilers are equipped with expansion tanks. But the volume of the built-in container is not always enough to compensate for the thermal expansion of the liquid.
In this case, the house owner has to think about how to install an additional expansion tank in a closed heating system.
Expansion tank device. Click on photo to enlarge.
If the house is heated using a double-circuit gas boiler, then the built-in expansion tank should compensate for the excess water. When the liquid in the heating system heats up, the pressure increases.
The incoming valve of the expansion tank opens and part of the liquid enters the container. As the temperature drops, the volume of water decreases, and excess liquid in the tank fills the pipes and batteries.
This way the heating system maintains the required water level.
Double-circuit gas boilers are most often equipped with expansion tanks with a volume of 6-8 liters. Such a container can work successfully in small houses.
If it is necessary to heat a large area, and the heating system uses many radiators, then a large volume of capacity is required. The expansion tank built into the gas boiler is not able to accommodate the entire volume of excess water.
Therefore, for the smooth operation of the heating system, the installation of additional capacity is required.
If you neglect the additional capacity, then after the standard tank is completely filled, an emergency discharge of water from the boiler will occur. The liquid will continue to be removed from the heating system until the pressure in the batteries stabilizes.
After the temperature drops, water from the tank will begin to flow into the heating circuit. But after an emergency release, the pressure in the system will drop so much that the boiler will not be able to automatically start working.
Delay in refilling the heating system with water may result in its defrosting or destruction.
Installing an additional tank will avoid an emergency discharge. After filling the container installed on the gas boiler, water will begin to fill the auxiliary tank. And when the water temperature drops, the liquid goes into the radiators, maintaining a constant volume in the circuit.
It is better to install an additional tank of a larger volume than the calculated value. In most cases, a 10-12 liter expansion tank will cope with excess fluid.
Preparation for installation
Before you begin installing the expansion tank into the heating system circuit, you must configure it. To do this, the container is turned upside down. The plastic plug needs to be removed, then access to the nipple for connecting the car pump will open.
The nipple should first be unscrewed to bleed the air from inside. The pump is connected to the nipple and air is pumped into the tank until a pressure of 1.1 kPa is reached. It is worth considering that the pressure in the heating circuit should be slightly higher than in the expansion tank (by about 0.1-0.2 kPa). After this, you can install additional capacity in the system.
To insert an additional tank into the heating system, the following operations must be performed sequentially.
The double-circuit boiler must be disconnected from the network. Close the liquid supply taps to the heating device. The water should be drained from the heating circuit by opening the Mayevsky taps.
Installation of additional capacity in a polypropylene heating system is carried out using a soldering apparatus, fittings, couplings and corners. So that the tank can be removed without draining the liquid from the heating system, it is better to install a tap with a fitting called “American”. “American” is a detachable two-part element.
A polypropylene pipe is soldered to one part, and the other part of the “American” is mounted to the thread on the additional tank. To connect the two parts of the “American” you will need a seal. Linen is traditionally a reliable sealant.
It is enough to apply a little sealing paste to the threads, wind the flax and use a gas wrench to tighten the “American” one.
Before starting installation, you need to check whether there is any water left in the heating circuit. Manufacturers of expansion tanks recommend installation in that area of the heating system where the pressure is minimal.
This section will be the return line. An additional expansion tank that will be installed in the heating system should not disturb residents. It is important to think carefully about where it is best to install the container.
It is most convenient to place the tank on the floor in a corner or near a wall.
Harness
First, the expansion tank is connected. A piece of pipe is soldered to the tee. Then the stopcock is installed to the pipe. On the other side, a pipe with a coupling is soldered for connection to the container. It is better to do all work on a table or floor. And only installation into the system will have to be done in weight.
Physical properties of water
One of the physical properties of water is its almost zero ability to compress. This means that when you try to reduce its volume (that is, compress it), a sharp increase in pressure occurs.
And water (like other materials) can increase its volume when heated. This property is called thermal expansion . Near water it begins already at a temperature of +4°C. However, when the temperature drops below this mark, the water also begins to expand. This phenomenon is called the water paradox. At a temperature of +4°C, water has the highest density: weight 1 liter = 1 kg.
However, for heating systems this paradox is not important, because the temperature of the water supplied by the boiler to the radiators is much higher.
The volume of water increases when heated. Photo from the site agrovodcom.ru
Let's take a container with an overflow that limits the volume to 1000 cm³. Let's pour 1 liter of water into it at a temperature of +4°C, and then start heating. The density of water will begin to decrease, and the volume will begin to increase.
Since overflow limits a known volume, excess water will spill out. When heated from +4°C to +90°C (usual water temperature in the heating system), this excess will be 39.95 cm³ (or 34.7 g). This is exactly the process that occurs in the heating system when the boiler heats the water.
Do-it-yourself installation and installation of an expansion tank in a heating system
1. Types of expansion tanks
2. Features of installation of expansion tanks 3. Mistakes made when installing an expansion tank
Today, it is possible to install a heating system in a private home in the shortest possible time. The main thing that is necessary for this is sufficient financial capabilities of the property owner, and then the plan will be implemented, since the domestic building materials market offers a wide selection of heating equipment and components.
One of the main points of creating a system is the installation of an expansion tank in the heating system. The performance of the heating network of a private home largely depends on it.
Types of expansion tanks
The place where the expansion tank of the heating system, such as in the photo, should be installed is determined based on the type of structure, which can be:
It should be noted that heating systems made of an open type are installed extremely rarely today.
They are found in buildings built about several decades ago. The expansion tank, which is designed as an open type, looks like a container with an open upper part and a threaded connection at the bottom, at the bottom. It is used to connect an open type expansion tank for heating.
The tank of such an outdated model is located at the highest point in the system.
In a closed-type heating structure, an expansion device is used, the installation and further operation of which has its own characteristics and differences.
The tank is made in the form of a sealed capsule having two chambers, separated from each other by a rubber membrane. Therefore, the product is also called a membrane expansion tank for the heating system.
The installation of a closed expansion tank is allowed anywhere in the heating network, with the exception of inserting a container after the circulation pump in the immediate vicinity of it. Otherwise, pressure surges throughout the system are possible. The operating principle of a closed tank is simple. After the coolant has heated up and increased in volume, its excess fills the empty space in the membrane device. As a result, the pressure in the system continues to remain at an acceptable level (read: “Selecting an expansion tank for heating”).
Features of installation of expansion tanks
Installation of an expansion tank in a heating system is carried out taking into account some points:
- installation of the device is allowed in a room where the temperature does not fall below zero;
- easy access to the air valve should be provided in order to regulate the pressure in the air part of the tank if necessary;
- when the installation of the device is completed, there must be access to the shut-off equipment, drain tap and nameplate;
- it is impossible to allow the application of a static load to the membrane tank (pressure from pipes and other devices);
- if the reducer is located after the water meter, this measure will allow maintaining a constant initial pressure in the membrane tank. When the safety valve is activated, the pressure should not exceed the level of the maximum permissible operating pressure in the tank (read: “Safety valve for heating - what are they, how to use it correctly”);
- The expansion tank for heating is mounted in such a way that the safety valve is located up to the flow fittings in the direction of flow of the coolant.
A heating scheme with an expansion tank always provides that it is installed only on the side from which cold water is supplied to the heating boiler. Installation of the device at the exit is prohibited.
Installation nuances
Installation of the expander can only be done at temperatures of 0 degrees and above.
Not all models of closed expansion tanks are equipped with an emergency liquid release valve. If it is not available, you must purchase it separately. The fuse is installed in close proximity to the tank in the direction of the water supply.
A pressure gauge to control pressure is placed near the expander and the valve connecting the heating to the plumbing system.
The size of the tank used must be no less than 1/10 of the amount of water pumped inside the heating network pipes. An additional criterion is the power of the heating boiler: the more powerful the boiler, the larger the volume required.
In order to be able to remove the cylinder at any time for repair or complete replacement, it is recommended to immediately connect the second tap and fasten the emptying fitting.
Some craftsmen advise hanging the expander any way you like, even “upside down”. There is a valve at the bottom that lets water in and out. This is allowed, but if the membrane breaks, the device will immediately fail. The correct location, even in the event of a breakthrough in the membrane layer, ensures that air and moisture will mix for a long time, and the installation will last for some time until it breaks completely.
Expander location
Some manufacturers intentionally fix the fitting below the middle mark so that it would be impossible to attach the expansion unit otherwise.
Large models are allowed to be hung on the wall, provided that it can withstand the expected load due to its bearing capacity.
General rules
Having determined the hypothetical location of the expansion tank, choose the correct actual location for its installation.
The expansion tank must be installed so that it is easy to maintain.
- the compensating tank must be installed so that it is convenient to service: free space must be left between the tank and the wall or other equipment;
- the water supply fittings should not put pressure or pull on the tank pipe: secure the supply pipes separately; this will also simplify dismantling the container if necessary;
- For dismantling and repair or replacement, install a separate shut-off valve in front of the tank.
After installing a closed expansion tank, it may be necessary to calculate the pressure and adjust it.
StroikaPortal.Ru
We are all about do-it-yourself construction and repairs
- home
- Articles
- Question answer
- Site Map
Suburban construction:
- Foundation and soils
- House walls
- Roofs
- Interior Design
- Wooden house
- Stone house
Engineering systems:
- Sewerage, water supply
- Heating, gas supply
- Lighting, climate control
- Home Security
Garden plot:
- Landscape design
- Garden Garden
- Construction of baths, etc.
- Fences, stairs, terraces
Repair and arrangement:
- Windows and doors
- Floor and ceiling
- Furniture
- Plumbing
Tools:
- Building tools
- Finishing tools
Decoration Materials:
- For floor, ceiling, walls
- Roofing materials
- paints and varnishes
- Lumber
- Tile, stone
- Bulk materials