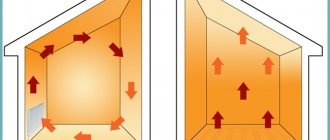
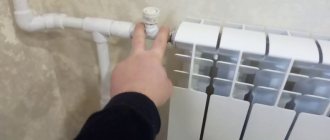
In order for an autonomous type heating system to work as efficiently and efficiently as possible, it is important not only to correctly select the heating devices included in its design, but also to connect them appropriately, using optimal connection diagrams for heating radiators in a private home.
The comfort of living in the house directly depends on how competently and professionally this is done, so it is best to entrust the calculations and installation of the system to specialists. But, if necessary, you can perform the installation work yourself, paying attention to the following points:
- Correct wiring installation.
- The sequence of connecting all elements of the system, including pipelines, shut-off and control valves, boiler and pumping equipment.
- Selection of optimal heating equipment and components.
Selecting the connection location and installation norm
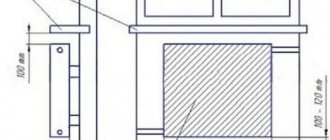
Before connecting a heating radiator in a private home, you must familiarize yourself with the following standards for the installation and placement of these devices:
- The distance from the bottom of the battery to the floor is 10-12 cm.
- The gap from the top of the radiator to the window sill is at least 8-10 cm.
- The distance from the back panel of the device to the wall is at least 2 cm.
Important: Failure to comply with the above standards can lead to a decrease in the level of heat transfer from heating devices and incorrect operation of the entire heating system.
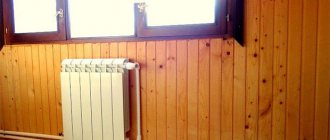
Another important point that is worth considering before installing heating radiators in a private house: their location in the premises. It is considered optimal when they are installed under windows . In this case, they create additional protection from the cold entering the house through window openings.
Please note that in rooms with several windows, it is better to install radiators under each of them, connecting them in sequential order. In corner rooms it is also necessary to install several heating sources.
Radiators connected to the system must have an automatic or manual heating control function. For this purpose, they are equipped with special thermostats designed to select the optimal temperature regime depending on the operating conditions of these devices.
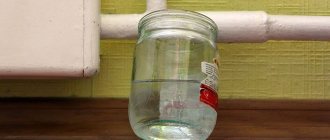
Let's move on to assembling the auxiliary sections of the radiator
Place the extension sections and battery on a flat surface. At first glance, it may seem to you that it is much easier to carry out this work on a table. However, believe me, this is not the case; place everything you need on the floor, it will be more convenient. Nipples and intersectional paronite or rubber gaskets must be screwed into the threaded entries of the battery, having previously cleaned them of all kinds of dirt and rust.
The free end of the nipple needs to be slightly pressed with an additional section, which is used for extensions. For some reason, many people use a special plumbing sealant to seal the joint as much as possible, but believe me, this is absolutely not necessary. If there are remnants of factory gaskets at the ends of the crimping plane of the old battery and the new section, they must be removed as carefully as possible; no subsequent cleaning is necessary. Tighten the threads evenly, do not apply excessive force.
No one is immune from the nipple breaking when tightening the thread, so you should not think that the tighter you tighten the thread, the better the system will work. This is a misconception. By applying excessive force, you unreasonably risk damaging the threads of the radiator section.
Tighten 2 nipples alternately with a wrench. We divide the work into 2 stages:
- Preliminary - twist at half strength.
- The final one is to put in more effort, without fanaticism.
As a result, we should achieve complete closure, therefore, the individual sections will become a single whole. During the tightening process, it is advisable to alternately make 1 turn for each nipple. This approach will completely eliminate thread overload. This recommendation applies not only to cast iron batteries, but also to aluminum and bimetallic radiators.
By and large, the procedure for expanding a battery by attaching additional sections differs in the size of the keys and nipples. Well, you should also take into account the fact that disassembling old cast iron radiators is more difficult. Elements of such a design “stick” much more strongly, which in turn creates additional difficulties.
Pre-prepare metal brackets on which you will fix the already optimized radiator. Then connect the battery to the central heating system pipes. Actually, that's all, you have improved the battery power by adding additional sections.
Types of pipe routing
Connecting heating radiators in a private house can be done using a single-pipe or two-pipe scheme .
The first method is widely used in multi-storey buildings, in which hot water is first supplied through a supply pipe to the upper floors, after which, after passing through radiators from top to bottom, it enters the heating boiler, gradually cooling. Most often, in such a scheme there is natural circulation of coolant.
The photo shows a single-pipe diagram for connecting a radiator in an apartment with a bypass (jumper)
Its main advantages:
- Low cost and material consumption.
- Relatively easy to install.
- Compatible with underfloor heating systems and various types of radiators.
- Possibility of installation in rooms with different layouts.
- Aesthetic appearance due to the use of only one pipe.
Minuses:
- Difficulty in carrying out hydro- and heat calculations.
- The inability to regulate the heat supply on a separate radiator without affecting the others.
- High level of heat loss.
- Increased coolant pressure is required.
Please note: During operation of a single-pipe heating system, difficulties may arise with the circulation of coolant through the pipeline. However, they can be solved by installing pumping equipment.
The two-pipe scheme for connecting heating radiators in a private house is based on the parallel method of connecting heating devices. That is, the branch that supplies the coolant is supplied to the system is in this case not connected with the branch along which it returns, and their connection is made at the end point of the system.
Advantages:
- Possibility of using automatic temperature controllers.
- Ease of maintenance. If necessary, shortcomings and errors made during installation can be corrected without damaging the system.
Flaws:
- Higher cost of installation work.
- Longer installation period compared to single-pipe wiring.
The diagram shows an example of a two-pipe heating distribution
Relocating the battery to a balcony or loggia - can this be agreed upon?
One of the factors determining the admissibility of redevelopment is maintaining the level of heat loss by the building (preserving the thermal contour).
We are often asked whether it is possible to move the battery to a balcony or loggia, provided that glazing and thermal insulation are installed there?
In Moscow, moving the battery to a balcony or loggia is prohibited by clause 10.7 of City Government Resolution No. 508-PP, and in the Moscow region - by local regulations.
In this case, the presence of glazing and thermal insulation does not matter at all, since balconies and loggias are summer rooms for which heating is not provided.
Therefore, moving the battery to a balcony or loggia cannot be agreed upon. In addition to a fine, the owner of an apartment with such a violation risks receiving an order and having to move the heating battery back at his own expense.
At the same time, current legislation does not prohibit the use of electric heating devices to maintain the required temperature on a glazed balcony (loggia). It is important that their energy consumption does not lead to exceeding the power allocated to the apartment.
Often, during redevelopment, the window sill block between the balcony (loggia) and the room (kitchen) is dismantled in order to combine the rooms.
Current regulations prohibit combining rooms directly - the redevelopment project requires the provision of French glazing in the form of translucent doors of at least double glazing, which is installed between the rooms instead of the demolished section of the wall.
Such redevelopment requires the inclusion of a thermal engineering calculation in the project, confirming that heat losses will not increase after the renovation.
If you are going to do redevelopment, we are ready to help you with this. Our organization has been developing project documentation and its coordination with all government authorities for many years.
Our company’s specialists will answer all your questions and help you decide on possible options for changing the layout of your apartment.
From us you can order a redevelopment project and a technical report, as well as a service for coordinating turnkey repair work
Radiator connection options
To know how to properly connect a heating battery, you need to take into account that in addition to the types of pipeline wiring, there are several schemes for connecting batteries to the heating system. These include the following options for connecting heating radiators in a private home:
- Lateral (unilateral).
In this case, the connection of the outlet and supply pipes is made on one side of the radiator. This connection method allows you to achieve uniform heating of each section with minimal costs for equipment and a small volume of coolant. Most often used in multi-storey buildings, with a large number of radiators.
Useful information: If a battery connected to the heating system in a one-way circuit has a large number of sections, the efficiency of its heat transfer will significantly decrease due to weak heating of its remote sections. It is better to ensure that the number of sections does not exceed 12 pieces. or use another connection method.
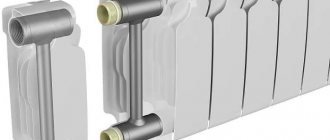
- Diagonal (cross).
Used when connecting heating devices with a large number of sections to a system. In this case, the supply pipe, just like in the previous connection option, is located at the top, and the return pipe is at the bottom, but they are located on opposite sides of the radiator. Thus, heating the maximum area of the battery is achieved, which increases heat transfer and improves the efficiency of heating the room.
Responsibility for unauthorized transfer of battery
Since any changes to utilities without appropriate permission are a violation of the law, unauthorized transfer of the battery is fraught with:
- administrative punishment in the form of a fine of 2-2.5 thousand rubles (clause 2 of article 7.21 of the Code of Administrative Offenses of the Russian Federation);
- forced by a court decision to restore the premises to their previous condition, which will require additional material costs.
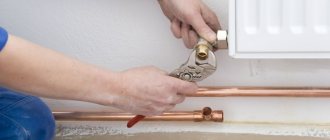
Installation
As a rule, installation of the heating system and installation of heating radiators is carried out by invited specialists. However, using the listed methods for connecting heating radiators in a private house , you can install the batteries yourself, strictly observing the technological sequence of this process.
If you carry out this work accurately and competently, ensuring the tightness of all connections in the system, there will be no problems with it during operation, and installation costs will be minimal.
The photo shows an example of a diagonal method of installing a radiator in a country house
The procedure will be as follows:
- We dismantle the old radiator (if necessary), after first closing the heating line.
- We mark the installation site. Radiators are fixed to brackets that need to be attached to the walls, taking into account the regulatory requirements described earlier. This must be taken into account when marking.
- We attach the brackets.
- Assembling the battery. To do this, we install adapters on the mounting holes available in it (included with the device).
Attention: Usually two adapters have a left-hand thread, and two - a right-hand thread!
- To plug unused collectors we use Mayevsky taps and stop caps. To seal the connections, we use plumbing flax, winding it counterclockwise around the left thread and clockwise around the right thread.
- We screw the ball valves to the connection points with the pipeline.
- We hang the radiator in place and connect it to the pipeline with mandatory sealing of the connections.
- We carry out pressure testing and test run of water.
Thus, before connecting a heating battery in a private house, you need to decide on the type of wiring in the system and its connection diagram. In this case, installation work can be performed independently, taking into account established standards and process technology.
The video will clearly show you how to install heating radiators in a private home.
The efficiency of the heating system depends on a number of factors, including the connection of batteries. After all, if connected incorrectly, part of the radiator may remain cold even at high coolant temperatures. Therefore, in this article we will look at how to properly connect heating batteries and in which cases, which circuits are advisable to use.
Transferring the battery to the loggia in a legal way
Removing the radiator onto the balcony falls under the category of apartment redevelopment, which means that in order to legally move the heating device, the apartment owner needs to develop a project, the result of which should be a change in the status of the loggia.
To legally remove the battery, the loggia from a non-residential premises must be turned into a living room. Only under such conditions can the owner of the living space count on approval of the transfer procedure.
Before figuring out how to legalize the transfer of the battery to the loggia, you need to stock up on strength and patience, because this is a very complex bureaucratic procedure. Let's look at the step-by-step process of legalizing moving a battery to a loggia/balcony:
Contacting the BTI
Since moving the battery is a redevelopment, the owner needs to contact the BTI so that a specialist can draw up a new apartment plan.
To do this, the owner must present the title documents for the apartment, a passport, as well as the current apartment plan.
The cost of drawing up a plan varies between 8-15 thousand rubles, but for accelerated preparation you will have to pay how much extra.
Contacting the design office
With a new apartment plan, the owner should go to the design office, where the designer will draw up a redevelopment plan, taking into account the current state of the heating devices, the loggia itself, etc.
The specialist must go to the site, carry out an inspection, listen to the customer’s wishes, but make a decision in accordance with the law and established requirements for the operation of residential premises.
It takes an average of 2 weeks to develop a new apartment redevelopment project, and the cost of designer services starts from 5 thousand rubles (depending on the region, the size of the apartment, the features and difficulties of the redevelopment).
Obtaining permission from the relevant authorities
When the redevelopment project is ready, the owner needs to obtain permission to remove the battery from several authorities:
Connection features
Methods for connecting radiators
When installing heating systems in private homes, the following connection methods are used:
| Unilateral | In this case, the supply pipe is connected from above, and the return pipe is connected from below to the same section. This connection diagram for the heating battery allows the radiator to heat up evenly. However, if the accordion has a large number of sections, then significant heat loss will occur, so it is better to use other connection options. |
| Saddle and bottom | This method is an excellent option for cases where pipes run through the floor. The connection is made to the pipes located at the bottom of the structure, in opposite sections. The only disadvantage of this method is its low efficiency, since heat loss can reach 15 percent. |
| Diagonal | Used when connecting devices with a large number of sections. As you might guess, the inlet pipe in this case is connected from above, and the outlet pipe from below, in the opposite section. This scheme for connecting heating radiators in a private house promotes uniform distribution of coolant and maximum heat transfer from appliances. |
Note! When using a thermostat for heating parallel to the radiator, a bypass must be installed. This will allow you to regulate the degree of heating of the device.
As we can see, the methods for connecting heating radiators depend on a number of factors, such as the method of laying pipes, the power of the equipment, etc. In particular, the type of system is of great importance. We will talk in more detail about the types of heating systems below.
Types of system
When installing heating systems, two schemes are used:
- Single-pipe - is the simplest, since the coolant circulates through one pipe, to which heating devices are connected in series . Its disadvantage is that it does not allow you to regulate the heat supply. Therefore, heat transfer corresponds to the design norm laid down during the design. This scheme is used in small systems, since with a long pipeline and a large number of radiators, the devices will heat up unevenly.
- Double-pipe - its meaning is that hot water flows through one pipe, and cooled water returns to the boiler through the other . In this case, the connection of heating batteries in a private house is carried out in parallel. The advantage of such a device is the uniform heating of the sections, as well as the ability to adjust the heat transfer. The only drawbacks that can be highlighted are the need for more pipes, and accordingly the cost of the structure increases.
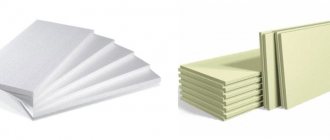
Alternative options for insulating a loggia
A battery on a balcony is a dangerous undertaking that will require a lot of effort and time. And this idea may end unsuccessfully. Thanks to modern technologies, it is possible to insulate a loggia using alternative methods.
In terms of heating quality, they are in no way inferior to the classics, and some even surpass them:
- The heater is an outdated, but reliable and economical method. The time for outdated air cannons and similar devices is over. Now heaters are made using infrared film. This significantly reduces energy consumption. Read more in the article “balcony heating”.
- Warm floor. An excellent replacement for the general heating system not only on the balcony, but throughout the entire apartment. Does not take up space, heats the entire area evenly. You can adjust the temperature yourself. Installation is not complicated, it does not consume much electricity, and the overall cost will be lower than paying for central heating. Disadvantage: installation will cost more than a radiator. But you can do the installation work yourself and reduce the cost.
Read in detail in the article “Warm floor on the loggia“.
And if you combine two alternative methods, the loggia will maintain a comfortable temperature even on the coldest days.
The owner can use the property at his own discretion. However, the constitutional rights of citizens living nearby must be respected. Moving a radiator to a balcony is a dangerous undertaking and permission for it is not easy to obtain. New buildings have an advantage; Soviet-built houses rarely receive the necessary confirmation. It is better to entrust the installation to professionals so as not to damage the overall communications system.
Methods for connecting heating radiators
Heating radiators are mounted on the wall, or, occasionally, on the floor. There are several ways to connect them.
The methods themselves are divided according to the side of the pipe connection (side, bottom) and according to the scheme for connecting several radiators at the same time (parallel, serial, cross).
The choice of a specific option is made based on several conditions:
- design number of radiators in the room;
- outlet side of connecting pipes: top, bottom, side;
- type of heating system: two-pipe or one-pipe;
- type of pipe laying: open or under plaster.
Let's look at connection methods in more detail.
Lateral
This option is the simplest and most common, since most radiator models have side pipe outlets. This is how it is calculated by the manufacturer.
The side connection is also convenient because unscrewing the nuts from the side is much more convenient than from below under the device body.
In addition to the bottom connection, there are wall-mounted radiators with top connection. The top side is usually clearly visible, so the connection will be visible and such a scheme is rarely used by manufacturers. The technological connection with it does not differ from the options with a bottom or side arrangement.
Lower
Bottom pipe connections are most often used when they are laid hidden under plaster. It must be taken into account that pipes with coolant, when laid even in non-combustible walls, require good thermal insulation.
Coolant temperatures up to 90 C do not pose a fire hazard. Thermal insulation is constructed so that only the radiator is heated, and not the wall from the inside. With properly designed thermal insulation, the efficiency of the heating system does not decrease.
Main reasons for relocating batteries
- The room does not maintain the temperature required for comfortable living.
- The owners decided to carry out renovations, and the battery does not look good in the interior.
- The wall on which the battery was located was demolished.
- In the event that a loggia is connected to a room, creating a space that requires heating.
- All heating devices will be replaced with newer models.
- Existing batteries will be replaced with a different type of radiator.
Types of heating systems
One heating circuit is usually used for several rooms. The radiators in it can be connected either in series or in parallel.
In this case, a parallel connection requires the supply of two pipes to each radiator: with hot coolant and return with cold.
Parallel connection is justified for devices with high heat transfer. Consistent - ensures pipe savings.
Connection to a one-pipe system
In a single-pipe system, several radiators are placed sequentially one after another in a pipe section. The circuit is convenient for lateral connection. Then you will need a minimum number of pipes.
It must be remembered that one closed tap will disrupt the operation of the entire group that is connected in series behind it. A single-pipe scheme is usually used on the scale of one room.
Connection to a two-pipe system
A two-pipe system requires twice as many pipes. This disadvantage is largely eliminated if cheap heat-resistant polymer pipelines are used.
When is a two-pipe system beneficial:
- the purchased radiators have too much power and massive design for serial connection;
- There is only one radiator installed in the room; in any case, two pipes must be drawn to it;
- Only one room needs to be heated (for example, a studio apartment).
A two-pipe design will provide a higher level of reliability than a single-pipe design. It will also be possible to install taps on radiators and each individual tap will in no way affect the operation of the others.
Connection steps
The operating technology depends on the selected set of fittings and pipe material. If pipes are laid along the surface of the walls in a room, then the best option is classic metal pipes.
If heating lines are laid in advance under the plaster, or in specially designed channels, then a more modern option can be used. For example, polypropylene heat-resistant pipes.
Work with steel pipes is carried out with a standard plumbing tool kit. Plastic pipes and fittings require specialized crimping tools. They are not needed for all fittings. Many systems have a threaded crimp system.
How to install a heating radiator in a private house?
In a private house, everything is determined by the boiler and the existing heating wiring. A radiator is selected for it, and the selected model can have any design, material (aluminum or steel) and any suitable dimensions, but it must be consistent with the main technical characteristics:
- heat transfer power;
- operating pressure;
- compatibility by type of connection (classic threaded or fitting).
How to properly connect a radiator in an apartment?
In an apartment with a gas boiler (such options are especially common in older buildings where it is possible to install a chimney), radiators are installed in the same way as in a private house.
However, much more often you have to deal with the option when the apartment is connected to a common centralized heating network. In this case, the choice of the required radiator model must be consistent with it in terms of power and type of connections available.
Radiator connection diagrams
The figure below shows connection diagrams for a one-pipe and two-pipe system:
Let's take a closer look at the correct location of the valve, faucet, jumper and air valve:
What taps should be installed on heating radiators?
Various designs of taps are placed in front of heating radiators. They serve to solve several problems:
- Mayevsky valve - to remove air;
- a regular tap - to adjust the amount of circulating coolant;
- The tap can be used to completely shut off the water during repairs.
The use of plastic pipe allows the installation of simple rotary taps. In an autonomous heating system made of metal pipes, it is better to use threaded valves that do not cause water hammer when closing.
In private autonomous heating systems, taps are placed at the entrances to the premises, in front of vertical sections and in other places. Their presence turns out to be very convenient when carrying out repairs of individual sections of the network.
What the law says
Issues of maintenance and repair, reconstruction and redevelopment of residential premises in an apartment building are regulated by the norms of the Housing Code (LC RF).
Relocating a battery is essentially a refurbishment of a living space that requires changes to the technical documentation.
Guided by the provisions of Art. 26 of the Housing Code of the Russian Federation, before you begin redevelopment of the heating system, changing the location of the radiators, you must obtain permission from local authorities.