To ensure maximum efficiency and harmonious functioning of the heating system, it is necessary to resolve a number of important issues at the design stage:
- one- or two-pipe piping
- parallel or serial connection of radiators
- gravity or forced circulation of coolant
- bottom, diagonal or side diagram for connecting batteries to the common line
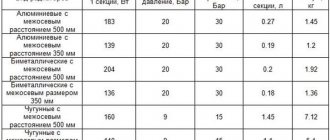
Based on the selected type of heating complex, the required power, number of devices, number of sections or panel area of each of them is determined.
Necessary tools
To form such a connection of heating devices, the following components will be required:
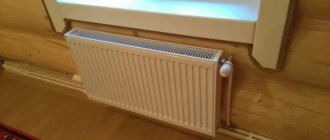
- Pipes : for the main line, it is advisable to choose a pipeline made of steel, galvanized or metal-plastic with the corresponding diameters of 2.2 cm, 2.2 cm and 2.6 cm. Polypropylene pipes are also allowed to be used, but not in a system with three or more radiators . The pipes extending from the main are made of the same materials, but have smaller diameters.
Photo 1. Cross-section of metal-plastic pipes of different diameters: a layer of metal between two layers of plastic is visible.
- Radiators : the choice of necessary equipment is based on personal preferences and expert advice. For such a scheme, the most optimal is 5 batteries , and for a larger number, a well-calculated project is required.
- Tapes for sealing threads on batteries.
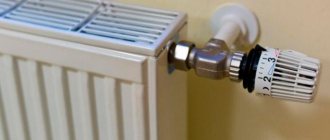
- Thermostatic valves for regulating the heating of radiators.
- Fittings for connecting pipes to each other.
Direct components are also an expansion tank and a heating boiler.
Correct installation of the structure without a bypass pipe
Such a scheme will not require parallel pipe laying based on welding or fastening using adapters and fittings.
Primitivism in installation and some cost savings will subsequently bring a lot of problems to the homeowner. The most expensive item is shutting down the system due to local leaks in the pipeline or radiator.
Tools
To organize heat supply, you do not need to purchase special sets of tools - plumbing fixtures and the keys that a home handyman has available will handle the task. Add only specific tools to your home kit:
- special keys for connecting American women;
- tools for screwing on adapters;
- torque wrenches for “delicate” parts.
Reference.
Professionals advise not to purchase expensive equipment for attaching parts with a union nut. An open-end (or adjustable) wrench with pliers copes with the task. The first one holds, the other twists.
Connection diagrams and methods
With a single-pipe scheme for connecting heat supply to a home, several schemes for obtaining energy from a heat source are used.
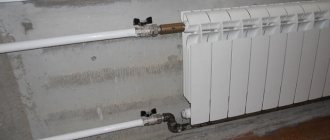
Diagonal connection is an effective method. The pipes alternate with upper and lower connections within the border of one radiator: the heat input is at the top pipe, the output is at the bottom of the battery. This system has proven itself to be excellent when connecting radiators of more than 10 units; the batteries are heated evenly.
Photo 2. Connecting a heating radiator in a diagonal pattern. Hot coolant is indicated in red, cold coolant in blue.
- The lower piping, according to experts, is less efficient in terms of thermal conductivity, but is used in closed heating systems, when pipes run horizontally from the boiler and are hidden under the floor.
- The vertical connection is based on the installation of a riser in the boiler area; the remaining elements of the heating structure are connected to it. The advantage of this method is the absence of air pockets when water flows by gravity.
- Top wiring (incoming and outgoing pipes are installed at the top on different sides) is used in radiators of a special design, where forward flow is excluded. The carrier descends down the first section and passes through the remaining links.
How to connect radiators correctly
When installing a heating system, it is important to install the radiators correctly, securing them to the wall under the window openings. According to the standards, the distance from the floor and window to the battery cannot be less than 10 centimeters. The allowed gap from the wall is twice as small
The allowed gap from the wall is twice as small.
To secure these elements, 3 brackets are used for each unit: two are attached at the top points, one at the bottom.
Level the surface of the battery vertically; A slight lowering is allowed horizontally so that air does not accumulate in the upper part.
Achieve such a level that the radiator plugs directly fit the location of the pipes. Screw the Mayevsky tap onto each battery (to the top point), mount the plug down. If necessary, install heat controls.
With the help of adapters (futures) transitions are provided from right to left threads, from pipes of different diameters. To connect batteries to the pipeline, kits with connectors, adapters, couplings and taps are sold. The kit is supplemented with gaskets that do not require additional waterproofing. Sometimes, when threading pipes and adapters, gaskets do not help, then use flax impregnated with drying oil.
Important! Start screwing on the adapters by cleaning the pipes and joints: no paint is allowed at the joints. Sand until bare metal. Otherwise, the paint will peel off over time and the connection will leak.
Otherwise, the paint will peel off over time and the connection will leak.
Preparatory actions
Before starting the process, a detailed design of the heating system for each specific room is calculated.
Then one of the serial connection options is selected: horizontal or vertical, based on the characteristics of the living space and personal preferences.
Then, focusing on the selected type of circuit, you need to decide on the coolant. For vertical connections, it is better to use antifreeze diluted in water, and for horizontal connections, use plain water.
How to connect two heating radiators, diagram
- Initially, with a series connection, the location of the heating boiler is determined. It is usually located in the basement on a special fire platform. The expansion tank is firmly fixed above it.
Attention! The height of the expansion tank relative to the boiler must be at least three meters.
- At the same time, proper adjustment of the chimney is thought out : the draft should be sufficient, and the smoke itself should go outside without remaining indoors.
- Afterwards the main pipeline is connected . It is important to avoid bends when laying.
- running along the perimeter of the entire house , parallel to which all the batteries run .
Photo 2. Diagram of serial connection of batteries in a one-pipe system with a boiler and circulation pump.
- Radiators are placed under window openings.
- Such a circuit should be closed on the heating boiler.
Attention! It is recommended to place a filter to clean the coolant from any impurities.
- It is also necessary to provide an element through which the system will be filled with water and drained.
- In a series connection scheme, you can add taps and thermostats to each battery.
With vertical piping, a circulation pump is included in the circuit for forced circulation of the coolant, and with horizontal piping , a slope of the supply pipe is created, and a Mayevsky valve is mounted in front of each radiator to remove excess air from the system.
Varieties of methods for connecting heat exchangers
When the optimal option for installing the heating system has been chosen, and radiators have been installed, you need to decide how to supply coolant to the batteries. There are different options for this:
Depending on the locations of the supply and return connections, the following types of connections are distinguished:
Depending on the version of the selected system (one-pipe or two-pipe), the connection will not only have a different design. This will also affect the efficiency of the radiators and the entire heating system as a whole.
Bottom connection
The bottom connection method depends on the type of radiator used. Such products have corresponding holes in the lower part into which the coolant enters and exits. Which hole to connect the supply to, and where to return, must be indicated in the instructions for the radiator.
Radiators are connected to both single-pipe and two-pipe systems with bottom supply.
Side connection method
Heat exchangers with a side connection method are the most common, as they allow insertion into the battery from any side. Installing such batteries allows you to save on material and also try out different options.
The best option is a lateral connection, made using a two-pipe or one-pipe scheme.
Side radiators are connected in three ways: diagonal, side and bottom.
Pros and cons of connecting batteries in series
Pros of serial connection:
- low cost of consumables;
- All types can be ;
- if necessary, pipeline;
- heating devices cover the entire perimeter of the room;
- easy installation;
- small amount of consumable material.
Minuses:
- complex process design;
- high heat loss coefficient : due to the characteristic elongation of such a line, the coolant cools towards the end;
- in the absence of a circulation pump, stagnation of the liquid moving through the radiators occurs and a decrease in the efficiency of the system as a whole;
- in the absence of thermostats on batteries, there is a lack of control over the heat supply.
Purpose and selection of bypass
When installing a bimetallic radiator in a single-pipe system, it is imperative to use a bypass. This is the name given to the jumper between the supply and return pipes. It allows excess coolant to bypass the battery. This scheme allows you to avoid blocking the drain and subsequent troubles with the management campaign. Most often, the bypass is made offset: its optimal location is between the radiator and the riser. If you insert a tap into the jumper, this will make it possible to adjust the temperature of the radiator. However, in this case there is a possibility of blocking the riser.
A more effective solution is to use an unregulated bypass, equipping the radiator directly with control valves. This is mainly done in cases where the room is very hot. If there is no such problem, then it is better not to reduce the efficiency of radiators, which inevitably happens when installing regulators.
The automatic fittings are designed for a pressure of 10 atm. Therefore, when the testing pressure drops below 15 atmospheres, operation does not encounter any difficulties. Exceeding this limit will most likely lead to device failure. If it is absolutely impossible to do without a thermostat, and the test pressure is very high, it is better to dismantle the device before starting the circuit and replace it with a drain. Upon completion of the pressure testing, the device is mounted back, which makes it possible to clean the valve at the same time.
Methods for connecting heating radiators
Heating radiators are mounted on the wall, or, occasionally, on the floor. There are several ways to connect them.
The methods themselves are divided according to the side of the pipe connection (side, bottom) and according to the scheme for connecting several radiators at the same time (parallel, serial, cross).
The choice of a specific option is made based on several conditions:
- design number of radiators in the room;
- outlet side of connecting pipes: top, bottom, side;
- type of heating system: two-pipe or one-pipe;
- type of pipe laying: open or under plaster.
Let's look at connection methods in more detail.
Lateral
This option is the simplest and most common, since most radiator models have side pipe outlets. This is how it is calculated by the manufacturer.
The side connection is also convenient because unscrewing the nuts from the side is much more convenient than from below under the device body.
In addition to the bottom connection, there are wall-mounted radiators with top connection. The top side is usually clearly visible, so the connection will be visible and such a scheme is rarely used by manufacturers. The technological connection with it does not differ from the options with a bottom or side arrangement.
Lower
Bottom pipe connections are most often used when they are laid hidden under plaster. It must be taken into account that pipes with coolant, when laid even in non-combustible walls, require good thermal insulation.
Coolant temperatures up to 90 C do not pose a fire hazard. Thermal insulation is constructed so that only the radiator is heated, and not the wall from the inside. With properly designed thermal insulation, the efficiency of the heating system does not decrease.
Parallel
Powerful sections are connected in parallel. The advantage of this method is that the radiators are well separated from each other.
They can be replaced, repaired, turned off, and the operation of the entire heating network is not disrupted. The option is often used in private homes and autonomous heating systems.
Sequential
The sequential scheme is beneficial when low-power radiators are installed and there are a large number of them in one common heating system.
In a sequential circuit, maximum savings in connecting pipelines are achieved. That is why it can often be seen in centralized networks, while the two-pipe parallel circuit is practically never found there.
Cross
By cross we mean a combined connection scheme with parallel and serial connections.
This option is suitable when you need to use radiator models of different power. Many centralized heating systems are assembled using a cross pattern.
Radiator integration location
Whether you have a serial connection of heating batteries or a more complicated parallel connection, in any case, remember that heat supply is not the only function of these units. An additional bonus of such devices is that radiators provide good protection from the “cold” intrusion of winds and drafts.
Serial and parallel connection of heating radiators
Therefore, it is not surprising that it is under the window sills that these life-saving devices find their home. Heating radiators can provide an excellent thermal curtain, especially in the localization of window openings.
Advice. Do not mount two radiators close to each other - this is fraught with loss of expensive heat: the density of the hot air flow will decrease significantly, which will entail a sharp drop in the efficiency of the heat supply itself.
Before using a specific type of connection, draw up a schematic plan on which you clearly and visually indicate the locations of the devices, and make correct calculations of the installation distance.
Radiators are positioned correctly in the following cases:
- devices are located at a distance of 100 mm from the bottom line of the window sill;
- distance to floor – 120 mm;
- distance to walls – 20 mm.
Types of heating systems
One heating circuit is usually used for several rooms. The radiators in it can be connected either in series or in parallel.
In this case, a parallel connection requires the supply of two pipes to each radiator: with hot coolant and return with cold.
Parallel connection is justified for devices with high heat transfer. Consistent - ensures pipe savings.
Connection to a one-pipe system
In a single-pipe system, several radiators are placed sequentially one after another in a pipe section. The circuit is convenient for lateral connection. Then you will need a minimum number of pipes.
It must be remembered that one closed tap will disrupt the operation of the entire group that is connected in series behind it. A single-pipe scheme is usually used on the scale of one room.
Connection to a two-pipe system
A two-pipe system requires twice as many pipes. This disadvantage is largely eliminated if cheap heat-resistant polymer pipelines are used.
When is a two-pipe system beneficial:
- the purchased radiators have too much power and massive design for serial connection;
- There is only one radiator installed in the room; in any case, two pipes must be drawn to it;
- Only one room needs to be heated (for example, a studio apartment).
A two-pipe design will provide a higher level of reliability than a single-pipe design. It will also be possible to install taps on radiators and each individual tap will in no way affect the operation of the others.
How to connect the battery
Without understanding how to connect heating batteries, without knowing the operating principle of the heating system, you will not be able to properly expand the radiator.
Preparatory work
The first step is to carry out preparatory work. This includes removing the radiator. It is necessary to remove the sections that are planned to be built up.
The battery must be cleaned, rust, dust and dirt removed.
You should inspect the threaded hole that connected the structure to the pipe. There may be growths here. They must be removed using sandpaper. Otherwise, the intersection gasket will not be installed airtight. And this can lead to the heating system leaking.
Attaching sections
Next, the sections are joined.
The connected sections are placed tightly against the battery. They make a gasket. Using a radiator wrench, measure the distance to the nipple. The nipple is inserted into the battery to the marked length. Use a pipe wrench to turn the radiator wrench. Then the nipple is wrapped into two opposite sections. Make 3 turns with the radiator wrench. Similar actions are performed with the lower part of the battery. Next, paronite gaskets and side plugs are taken and installed in the battery. In this case, a pipe wrench is used. The main thing is to tighten it very tightly to create a reliable, airtight structure. The section is attached to the radiator. The remaining sections are connected in a similar manner.
Mounting the radiator to the wall
After all additional sections are attached, the radiator is mounted to the wall. To do this, install hooks at the level of the battery location. The structure is being hung. All joints are fixed using fittings. Tighten with a wrench. All joints are treated with sealant. Recently, special adhesive tapes for pipes have appeared on sale.
Test work
The resulting structure is inserted into the pipe at one end and into the battery at the other. The connections are tightened tightly with a wrench. When installation of the fitting is completed, waterproofing is carried out.
After the assembly of the heating batteries is completed, the system is inspected for defects. If everything is in order, a test run of the coolant is carried out. The first time the water is released under reduced pressure. This allows you to detect where the connection is poor and leaking. If leaks are detected, the water is turned off and work begins to eliminate the problem. The second time the coolant is started under normal pressure.
After you have succeeded in connecting the heating battery, you need to let the radiator run for several hours. And after this time, check the condition of pipes, fittings, batteries.
Connection steps
The operating technology depends on the selected set of fittings and pipe material. If pipes are laid along the surface of the walls in a room, then the best option is classic metal pipes.
If heating lines are laid in advance under the plaster, or in specially designed channels, then a more modern option can be used. For example, polypropylene heat-resistant pipes.
Work with steel pipes is carried out with a standard plumbing tool kit. Plastic pipes and fittings require specialized crimping tools. They are not needed for all fittings. Many systems have a threaded crimp system.
Tying with polypropylene pipes - implementation principle
Recently, polypropylene pipes have become increasingly popular. Of course, the correct connection of heating radiators and piping can be done with any other pipes, but most professionals still recommend choosing these.
Tying with polypropylene pipes is carried out as follows:
a coupling with a union nut is inserted into the multiflex, connecting to any output; pipes are fixed to the wall using pre-attached brackets
It is important that they do not touch the wall, but are located 2-3 cm from its surface. The advantage of polypropylene pipes is that they can be laid in the wall itself, and the edge of the pipe, necessary for piping, is brought out in close proximity to radiator
A variety of fasteners can be used to secure batteries. Most often, professionals use a pin connection for this purpose that is fixed to the wall surface. If you want to hang radiators, use regular brackets for this. A small clarification - panel batteries are (mostly) sold complete with fasteners. But for sectional radiators, the mount must be purchased separately
The advantage of polypropylene pipes is that they can be laid in the wall itself, and the edge of the pipe required for piping is brought out in close proximity to the radiator. A variety of fasteners can be used to secure batteries. Most often, professionals use a pin connection for this purpose that is fixed to the wall surface. If you want to hang radiators, use regular brackets for this. A small clarification - panel batteries are (mostly) sold complete with fasteners. But for sectional radiators, the mount must be purchased separately
We already practically know how to properly connect a heating radiator. The taps are connected as follows:
- initially the crane must be disassembled;
- a fitting with a union nut is screwed into the radiator;
- Using a special wrench, tighten the nut.
In addition to this key, during installation and piping of radiators, as well as during how to connect two heating batteries, you will also need:
- seals;
- a set of keys;
- tow;
- thread paste;
- threads for carving.
Tools and materials for installing heating radiators
How to properly connect a radiator in an apartment?
In an apartment with a gas boiler (such options are especially common in older buildings where it is possible to install a chimney), radiators are installed in the same way as in a private house.
However, much more often you have to deal with the option when the apartment is connected to a common centralized heating network. In this case, the choice of the required radiator model must be consistent with it in terms of power and type of connections available.
Two-pipe heating system diagram
In two-pipe schemes, the supply of hot coolant to the radiator and the removal of cooled coolant from the radiator are carried out through two different pipelines of the heating systems.
There are several options for two-pipe schemes: classic or standard, associated, fan or beam.
Two-pipe classic wiring
Classic two-pipe heating system wiring diagram.
In the classical scheme, the direction of movement of the coolant in the supply pipeline is opposite to the movement in the return pipeline. This scheme is most common in modern heating systems, both in multi-storey buildings and in private individual ones. The two-pipe circuit allows you to evenly distribute the coolant between radiators without loss of temperature and effectively regulate heat transfer in each room, including automatically through the use of thermostatic valves with installed thermal heads.
Such a device has a two-pipe heating system in a multi-story building.
Associated scheme or “Tichelman loop”
Associated heating wiring diagram.
The associated scheme is a variation of the classical scheme with the difference that the direction of movement of the coolant in the supply and return is the same. This scheme is used in heating systems with long and remote branches. Using a passing circuit allows you to reduce the hydraulic resistance of the branch and distribute the coolant evenly across all radiators.
Fan (radial)
A fan or radial scheme is used in multi-storey construction for apartment heating with the possibility of installing a heat meter (heat meter) in each apartment and in private housing construction in systems with floor-to-floor piping. With a fan-shaped scheme in a multi-storey building, a collector is installed on each floor with exits to all apartments of a separate pipeline and an installed heat meter. This allows each apartment owner to account for and pay only for the heat they consume.
Fan or radiant heating system.
In a private house, a fan diagram is used for floor-to-floor distribution of pipelines and for radial connection of each radiator to a common collector, i.e., each radiator has a separate supply and return pipe from the collector. This connection method allows you to distribute the coolant as evenly as possible across the radiators and reduce hydraulic losses of all elements of the heating system.
Note! When distributing pipelines in a fan pattern within one floor, installation is carried out in solid (without breaks or branches) sections of pipes. When using polymer multilayer or copper pipes, all pipelines can be cast into a concrete screed, thereby reducing the likelihood of rupture or leakage at the junction of network elements.
Radiator connection diagrams
The figure below shows connection diagrams for a one-pipe and two-pipe system:
Let's take a closer look at the correct location of the valve, faucet, jumper and air valve:
What taps should be installed on heating radiators?
Various designs of taps are placed in front of heating radiators. They serve to solve several problems:
- Mayevsky valve - to remove air;
- a regular tap - to adjust the amount of circulating coolant;
- The tap can be used to completely shut off the water during repairs.
The use of plastic pipe allows the installation of simple rotary taps. In an autonomous heating system made of metal pipes, it is better to use threaded valves that do not cause water hammer when closing.
In private autonomous heating systems, taps are placed at the entrances to the premises, in front of vertical sections and in other places. Their presence turns out to be very convenient when carrying out repairs of individual sections of the network.
Single-pipe heating system diagram
Single-pipe heating system: vertical and horizontal distribution.
In a single-pipe heating system, the supply of hot coolant (supply) to the radiator and the removal of cooled coolant (return) are carried out through one pipe. All devices relative to the direction of movement of the coolant are connected to each other in series. Therefore, the temperature of the coolant at the inlet of each subsequent radiator along the riser is significantly reduced after heat is removed from the previous radiator. Accordingly, the heat transfer of radiators decreases with distance from the first device.
Such schemes are used mainly in old central heating systems of multi-storey buildings and in autonomous gravity-type systems (natural coolant circulation) in private residential buildings. The main defining disadvantage of a single-pipe system is the impossibility of independently adjusting the heat transfer of each radiator separately.
To eliminate this drawback, it is possible to use a single-pipe circuit with a bypass (a jumper between the supply and return), but in this circuit, the first radiator on the branch will always be the hottest, and the last the coldest.
Multi-storey buildings use a vertical single-pipe heating system.
In multi-storey buildings, the use of such a scheme allows saving on the length and cost of supply networks. As a rule, the heating system is made in the form of vertical risers passing through all floors of the building. The heat output of radiators is calculated during system design and cannot be adjusted using radiator valves or other control fittings. Given modern requirements for comfortable indoor conditions, this scheme for connecting water heating devices does not satisfy the requirements of residents of apartments located on different floors, but connected to the same heating system riser. Heat consumers are forced to “endure” overheating or underheating of air temperature during the transitional autumn and spring period.
When is the best time to change heating radiators in an apartment?
It is best to replace it outside the heating season. These are all the summer months and part of the spring and autumn (determined by the climate in your region).
Before replacing, we check the condition of the taps. In older networks they usually do not provide complete coverage.
Is it possible to replace heating radiators in winter?
It is not advisable to carry out replacement while the heating system is on, but it is possible. The main requirement for this is reliable shutoff of the coolant outlet. You can use a standard faucet and additional accessories.
If the radiator is removed for a long time, then the pipe outlets can be short-circuited with a segment so as not to disrupt the operation of the overall system.
To keep your home warm, it is important to properly develop a heating scheme. One of the components of its effectiveness is the connection of heating radiators. It doesn’t matter whether you are going to install cast iron, aluminum, bimetallic or steel radiators, it is important to choose the right way to connect them.
The way the radiator is connected affects its heat transfer
Placement of heating devices
It is of great importance not only how to connect heating radiators to each other, but also their correct location in relation to building structures. Traditionally, heating devices are installed along the walls of rooms and locally under windows to reduce the penetration of cold air flows in the most vulnerable place.
There are clear instructions for this in SNiP for installing heating equipment:
- The gap between the floor and the bottom of the battery should not be less than 120 mm. When the distance from the device to the floor decreases, the distribution of heat flow will be uneven;
- The distance from the back surface to the wall on which the radiator is mounted should be from 30 to 50 mm, otherwise its heat transfer will be impaired;
- The gap from the top edge of the heating device to the window sill is maintained within 100-120 mm (no less). Otherwise, the movement of thermal masses may be hampered, which will weaken the heating of the room.
Bimetallic heating devices
To understand how to connect bimetallic radiators to each other, you need to know that almost all of them are suitable for any type of connection:
- They have four possible connection points - two upper and two lower;
- Equipped with plugs and a Mayevsky valve, through which you can bleed the air collected in the heating system;
A diagonal connection is considered the most effective for bimetallic batteries, especially if we are talking about a large number of sections in the device. Although it is not advisable to use very wide batteries equipped with ten or more sections.
Advice! It is better to think about the question of how to properly connect two heating radiators of 7-8 sections instead of one device of 14 or 16 sections. It will be much easier to install and more convenient to maintain.
Another question - how to connect sections of a bimetallic radiator may arise when rearranging sections of a heating device in various situations:
The place where you plan to install the heating device is also important.
- In the process of creating new heating networks;
- If it is necessary to replace a failed radiator with a new one - bimetallic;
- In case of underheating, you can expand the battery by connecting additional sections.
Aluminum batteries
Interesting! By and large, it should be noted that a diagonal connection is an excellent option for any type of battery. You don’t know how to connect aluminum radiators to each other. connect diagonally, you won’t go wrong!
For closed-type heating networks in private homes, it is advisable to install aluminum batteries, since it is easier to ensure proper water treatment before filling the system. And their cost is much lower than that of bimetallic devices.
Of course, over time, moving through the radiators, the coolant cools
Of course, you will have to try hard before connecting the sections of the aluminum radiator for regrouping.
Advice! Do not rush to remove the factory packaging (film) from installed heating devices until finishing work in the room is completed. This will protect the radiator coating from damage and contamination.
https://youtube.com/watch?v=y9a35JHa0TM
The work process itself does not take much time, you do not need any special skills or expensive equipment, you can purchase all the necessary tools at any hardware store. And don’t forget, the connection will serve you for a long time and without hassle only if you used high-quality materials in your work and followed all the rules for installing the heating system.
We are talking about exactly what is indicated in this figure.
In the video presented in this article you will find additional information on this topic.
Types of heating systems
The amount of heat that the heating radiator will emit depends not least on the type of heating system and the selected type of connection. To choose the best option, you must first understand what kind of heating systems there are and how they differ.
Monotube
A single-pipe heating system is the most economical option in terms of installation costs. Therefore, this type of wiring is preferred in multi-storey buildings, although in private buildings such a system is far from uncommon. With this scheme, the radiators are connected to the main line in series and the coolant first passes through one heating outlet, then enters the input of the second, and so on. The output of the last radiator is connected to the input of the heating boiler or to the riser in high-rise buildings.
Example of a one-pipe system
The disadvantage of this wiring method is the impossibility of adjusting the heat transfer of radiators. By installing a regulator on any of the radiators, you will regulate the rest of the system. The second significant drawback is the different coolant temperatures on different radiators. Those that are closer to the boiler heat up very well, those that are further away become increasingly colder. This is a consequence of the serial connection of heating radiators.
Two-pipe wiring
A two-pipe heating system is distinguished by the fact that it has two pipelines - supply and return. Each radiator is connected to both, that is, it turns out that all radiators are connected to the system in parallel. This is good because the coolant of the same temperature enters the input of each of them. The second positive point is that you can install a thermostat on each of the radiators and use it to change the amount of heat it emits.
The disadvantage of such a system is that the number of pipes when laying out the system is almost twice as large. But the system can be easily balanced.
Installation
The question of how to install a heating radiator is the most important after abandoning the centralized system or dismantling the old radiator.
- The radiator must be installed on a prepared surface: painted or plastered.
- Use a pencil to mark the mounting level of the new radiator. The following are considered optimal distances: from the window sill - up to 10 cm, from the wall - up to 5 cm, from the floor - up to 12 cm.
- After this, the radiator can be mounted. It must be remembered that during installation the radiator must remain in its original packaging. Cuts are made on the packaging where necessary.
- Couplings are installed at the inlet and outlet; a Mayevsky valve is required for air release. Next, you can install the tap and valve. It would be useful to use a sealant.
- After installing the heating radiator, it is necessary to carry out pressure testing.
Let us remind you that all work on the assembly and installation of radiators must be performed by craftsmen who have professional tools and experience in this field. Only thanks to this, you can avoid the cost of expensive repairs in the future.
Calculation
So, we have made our choice. How to calculate bimetallic heating radiators according to the parameters of your apartment?
With standard (2.5 - 2.7 meters) ceiling heights, you can use the simplest calculation scheme:
- For 1 square meter of room, 100 watts of heat is taken;
- Depending on the climatic zone, a coefficient from 0.7 (Crimea) to 2.0 (Yakutia) is used;
Low winter temperatures increase the need for heat.
The heat output of the section is estimated on average at 180 watts.
Fastening
How to hang a bimetallic radiator on the wall?
- Standardly, pin brackets are used for fastening, which are screwed into plastic dowels;
- Instead, you can use pieces of smooth steel reinforcement with a diameter of 10-12 mm, driven into pre-drilled holes of a slightly smaller diameter.
Harness
What components for bimetallic radiators will be needed when installing them yourself?
- Set of radiator plugs (4 pieces, external thread DN25). The diameter of the internal thread of the passage plugs is determined by the number of sections of the device: if there are fewer than 10 of them, a liner with a nominal diameter of DN15 is sufficient, if more, it is better to take plugs with an internal thread of DN20;
- Throttle or thermal head and ball valve with American connectors for connecting to plugs. The throttle will allow you to regulate the heat transfer of the device manually, the thermal head – automatically, depending on the air temperature in the room;
- In the apartment at the top of the riser, the radiator will have to be equipped with a Mayevsky valve to bleed air.
Radiator connection kit.
What pipes should I use for connection? Preferably corrugated stainless steel.
We invite you to familiarize yourself with an overview of Purmo heating radiators and their technical characteristics
What is this instruction related to?
They have high tensile strength;
- They bend with a minimum radius and do not require precise sizing;
- They are mounted with compression fittings using a pair of adjustable wrenches.
The radiator in the photo is connected with a corrugated stainless pipe.
Assembly Tips
Radiator plugs are sealed with paronite or silicone gaskets - the same ones that are used to build up a bimetallic radiator with additional sections.
Other connections are wound with Tangit Unilok sealant thread or flax with paint.
A diagonal connection will allow you to heat the maximum number of sections.
Where to put radiators
Traditionally, heating radiators are placed under windows, and this is no accident. The rising flow of warm air cuts off the cold air that comes from the windows. In addition, warm air heats the glass, preventing condensation from forming on it. Only for this it is necessary that the radiator occupies at least 70% of the width of the window opening. This is the only way the window will not fog up. Therefore, when choosing the power of radiators, select it so that the width of the entire heating battery is not less than the specified value.
How to place a radiator under a window
In addition, it is necessary to correctly select the height of the radiator and the location for its placement under the window. It must be placed so that the distance to the floor is around 8-12 cm. If you lower it lower, it will be inconvenient to clean, if you raise it higher, your feet will be cold. The distance to the window sill is also regulated - it should be 10-12 cm. In this case, warm air will freely go around the obstacle - the window sill - and rise along the window glass.
And the last distance that must be maintained when connecting heating radiators is the distance to the wall. It should be 3-5 cm. In this case, rising currents of warm air will rise along the back wall of the radiator, and the rate of heating the room will improve.
What you need for efficient battery operation
An efficient heating system can save money on fuel costs. Therefore, when designing it, you should make informed decisions. After all, sometimes the advice of a neighbor in the country or a friend who recommends a system like his is not at all suitable.
It happens that there is no time to deal with these issues yourself. In this case, it is better to turn to professionals who have been working in this field for at least 5 years and have grateful reviews.
Correct connection is guaranteed to ensure comfortable living in the house for all family members. After all, when choosing a scheme, you need to take into account a number of features of your home
Having decided to independently connect heating radiators, you need to take into account that their efficiency is directly affected by the following indicators:
- size and thermal power of heating devices;
- their location in the room;
- connection method.
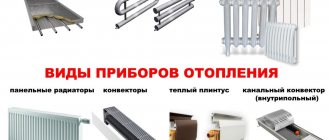
The choice of heating devices amazes the imagination of the inexperienced consumer. Among the offers are wall-mounted radiators made of various materials, floor and baseboard convectors. They all have different shapes, sizes, heat transfer levels, and connection types. These characteristics must be taken into account when installing heating devices into the system.
Among the models of heating devices on the market, it is better to choose based on the material and thermal power specified by the manufacturer
For each room, the number of radiators and their size will be different. It all depends on the area of the room, the level of insulation of the external walls of the building, the connection diagram, the thermal power indicated by the manufacturer in the product passport.
The location of the batteries is under the window, between windows located at a fairly long distance from each other, along a blank wall or in the corner of the room, in the hallway, pantry, bathroom, in the entrances of apartment buildings.
Depending on the location and method of installation of the heating device, there will be different heat losses. The worst option is a radiator completely covered with a screen
It is recommended to install a heat-reflecting screen between the wall and the heating device. You can make it yourself using one of the heat-reflecting materials - penofol, isospan or another foil analogue. Also, you should adhere to the following basic rules for installing a battery under a window:
- all radiators in one room are located on the same level;
- convector fins in a vertical position;
- the center of the heating equipment coincides with the center of the window or is 2 cm to the right (to the left);
- the length of the battery is at least 75% of the length of the window itself;
- the distance to the window sill is at least 5 cm, to the floor - no less than 6 cm. The optimal distance is 10-12 cm.
The level of heat transfer from devices and heat loss depends on the correct connection of radiators to the heating system in the house.
By following the basic standards for the placement of radiators, you can maximally prevent the penetration of cold into the room through the window
It happens that the owner of a home is guided by the advice of a friend, but the result is not at all as expected. Everything is done like his, but the batteries don’t want to heat up. This means that the selected connection diagram was not suitable specifically for this house, the area of the premises, the thermal power of the heating devices were not taken into account, or annoying mistakes were made during installation.
Radiator connection diagrams
How well the radiators will heat depends on how the coolant is supplied to them. There are more and less effective options.
Radiators with bottom connection
All heating radiators have two types of connection - side and bottom. There can be no discrepancies with the bottom connection. There are only two pipes - inlet and outlet. Accordingly, coolant is supplied to the radiator on one side and removed from the other.
Bottom connection of heating radiators for single-pipe and two-pipe heating systems
Specifically, where to connect the supply and where the return is connected is written in the installation instructions, which must be available.
Heating radiators with side connection
With a lateral connection, there are many more options: here the supply and return pipelines can be connected into two pipes, respectively, there are four options.
Option #1. Diagonal connection
This connection of heating radiators is considered the most effective, it is taken as a standard and this is how manufacturers test their heating devices and the data in the thermal power passport for such a connection. All other connection types transfer heat less efficiently.
Diagonal diagram for connecting heating radiators with a two-pipe and one-pipe system
This is because when the batteries are connected diagonally, the hot coolant is supplied to the upper inlet on one side, passes through the entire radiator and exits from the opposite, lower side.
Option #2. Unilateral
As the name implies, pipelines are connected on one side - supply from above, return from below. This option is convenient when the riser runs on the side of the heating device, which often happens in apartments, because this type of connection usually predominates. When the coolant is supplied from below, this scheme is used infrequently - it is not very convenient to position the pipes.
Lateral connection for two-pipe and one-pipe systems
With this connection of radiators, the heating efficiency is only slightly lower - by 2%. But this is only if there are few sections in the radiators - no more than 10. With a longer battery, its farthest edge will not heat up well or will remain cold at all. In panel radiators, to solve the problem, flow extenders are installed - tubes that bring the coolant a little further than the middle. The same devices can be installed in aluminum or bimetallic radiators, thereby improving heat transfer.
Option #3. Bottom or saddle connection
Of all the options, saddle connections for heating radiators are the least effective. Losses are approximately 12-14%. But this option is the most inconspicuous - pipes are usually laid on the floor or under it, and this method is the most optimal from an aesthetic point of view. And so that losses do not affect the temperature in the room, you can take a radiator a little more powerful than required.
Saddle connection of heating radiators
In systems with natural circulation, this type of connection should not be made, but if there is a pump, it works well. In some cases, it’s not even worse than the side one. It’s just that at a certain speed of movement of the coolant, vortex flows arise, the entire surface heats up, and heat transfer increases. These phenomena have not yet been fully studied, therefore it is not yet possible to predict the behavior of the coolant.
How to add sections
After you have experimentally determined that the reason for the cool temperature in the house is not a clogged radiator, you should find a store near your home (so that you don’t have to travel far away and thereby waste your time) that sells heating equipment. You need to buy the same sections that your radiator is equipped with - made of cast iron, aluminum, or bimetallic.
It should not happen that you select inappropriate sections - because of such an error, you simply will not be able to add them, that is, the money spent will be thrown away, so be careful. The procedure for increasing sections is carried out in the same sequence of actions for all types of heating radiators.
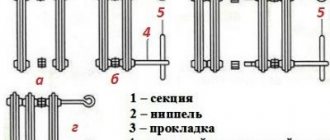
To join sections, you need a connecting nut - nipple
Let's proceed directly to increasing the number of sections. The first step is to unscrew the fitting using a radiator wrench on the side to which you plan to add one or more elements. After you have unscrewed the fitting, a nipple (connecting nut) is placed in the area where the sections join. The following important feature must be taken into account: the threads at different ends of the nipple are different, and in order to correctly install new sections you must follow the following rules:
- The right side of the nipple should be directed towards the direction where the connection to the new element will be made;
- Accordingly, the left one is towards the already present sections of the heating radiator.
In order to prevent further leakage of the battery, you should put intersection gaskets on the nipple (they can be rubber, paranitic, or gel)
At the same time, they must be put on carefully and carefully - this will guarantee that the gasket will be positioned as evenly as possible, without unwanted distortions. Next you need to tighten the thread
This action should also be carried out without sudden movements, in a leisurely rhythm, and carefully. If you want to build a high-quality heating radiator, then there can be no rush.
To prevent leakage, an intersection gasket is required
Damage to metal threads is extremely undesirable - this may result in not the most harmless problems, the solution of which will require you to additionally spend your own time and financial resources.
The enlarged radiator must be placed back on the bracket and the connection to the central heating pipe restored. To do this, you need to arm yourself with a wrench of the appropriate diameter and tow, which is necessary for wrapping the pipe threads when screwing the radiator.
It’s not difficult to add sections to a heating radiator; you don’t need to work in a team of heating installers for 10 years. But this process cannot be done without a serious approach, the availability of basic tools and the removal of your personal time. However, you can resort to the second option for solving the problem of insufficient heating of the room - becoming a client of a company providing such services, whose employees will do everything themselves, quickly and efficiently.