Home / Heating
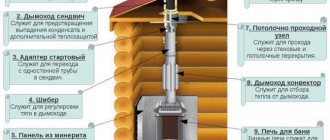
Back
Published: 02/16/2020
Reading time: 6 min
0
2634
Wood-burning solid fuel boilers today are the best alternative to municipal heating systems.
Many people regard such units as something outdated and ineffective, although this is not at all the case. Modern wood-burning boilers are no longer those Russian stoves with low efficiency and high fuel consumption.
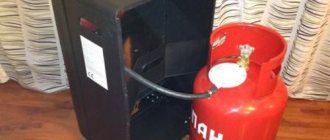
Their place has long been taken by long-burning furnaces operating on the principle of gas generation. Today, there are quite a lot of different modifications of long-burning boilers in the retail chain, but the important thing is that these simple units can be made at home, for example, a boiler from a gas cylinder.
- 1 Modern wood-fired heating boilers
- 2 Heat exchanger for wood-burning boiler
- 3 Fuel requirements
- 4 Features of the design and operation of the pyrolysis boiler
- 5 Long-burning boilers with a water circuit
- 6 Making a boiler from a propane cylinder with your own hands 6.1 Calculation of parameters: drawings and recommendations
- 6.2 Required materials and tools
- 6.3 Step-by-step instructions
Strengths and weaknesses of Bubafoni
The pyrolysis stove has a number of positive qualities:
- Simplicity of design. Having welding skills and experience working with metal, building a stove will not be difficult.
- Universalism. Bubafonya is very unpretentious in terms of fuel: you can throw firewood, coal, sawdust, chips and other types of wood waste into it. The stove also copes well with pellets – inexpensive, environmentally friendly granules.
- Duration of work. The time it takes for one stack of firewood to burn out is almost a day: during this time, the stove regularly generates heat. This indicator may vary depending on the modification of the device, the volume of its firebox, the oxygen circulation rate, etc.
It is also worth mentioning the main disadvantages of Bubafoni:
- Low efficiency. The reason for this is uneven heating of the device body with sufficiently low heat transfer. More “advanced” pyrolysis furnaces are much more efficient in this regard: their efficiency often exceeds 90%.
- Inconvenient to clean. There is no ash pan as such in the design, so the remaining combustion products are removed through the top. Some modifications of the stove are equipped with a door at the bottom, which facilitates the procedure for removing ash and ash.
- Low aesthetics. The appearance of Bubafoni can hardly be called beautiful, so it is mainly used for heating utility rooms.
The main advantages of pyrolysis ovens
- High efficiency - from 90% or more.
- Fuel efficiency - one bookmark is enough for 12-24 hours.
- Modern models of factory-produced pyrope stoves operate on one fuel fill for more than 48 hours.
- Minimum human intervention, simplified operation. Night shifts are excluded.
- From an environmental point of view, the fewer combustion products released into the atmosphere, the better. A pyrolysis oven produces a minimum of carbon monoxide and particulate matter. Almost all CO burns out.
- If you have competent drawings for making a pyrope stove with your own hands and high-quality, precise execution, it is possible to obtain a unit that operates with almost complete combustion of dry fuel. There is very little ash and soot, everything burns without a residue, and there is no need to clean the stove and chimney.
- You can use cheap fuel - dried wood waste, light plant biomass, leaves, branches, straw, etc.
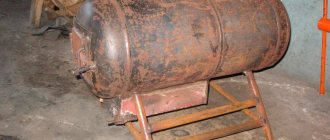
Vertical oven assembly process
A vertical oven is more difficult to manufacture, but requires less space for its installation and has better user qualities. The volume of the cylinder is used more rationally. The principle of operation of the furnace does not change, but is implemented with greater efficiency. In the vertical version, two doors are made - for loading fuel and for the ash tray. Grate bars made of reinforcement are welded between these doors.
In principle, the entire upper part of the furnace can be dedicated to loading fuel, which will ensure long-term operation on one load. However, the volume of the combustion chamber is often reduced to accommodate additional heat exchangers in the upper part. One of the interesting options is through metal pipes welded into the upper part of the gas cylinder, through which air is driven by a fan (necessarily heat-resistant).
The process of assembling a vertical stove from a cylinder
Such a device will significantly increase heat transfer and reduce the heating time of the room several times. If forced water circulation is established through the passage pipes, a water heating system can be installed.
Heat exchanger for wood boiler
Heat exchangers are quite often considered the “heart” of a solid fuel boiler. It takes heat from the flue gases through the walls of the heater and releases it to the coolant circulating inside the housing.
Heat exchangers can be made of cast iron or steel, the former is more expensive and has high thermal efficiency, operating time and endurance.
Such a device is large-sized and has a certain inertness both during heating and during cooling. Cast iron units are unpretentious and exhibit anti-corrosion resistance. With proper operation, the device can operate trouble-free for about 30 years.
Steel heat exchangers are made of pipes and sheet steel up to 6 mm thick. They are designed for open heating systems operating with natural coolant circulation, are susceptible to corrosion and can operate for no more than 15 years.
Features of operation, cleaning and repair
Here are a number of useful tips for proper and economical operation of the stove.
- The stove is installed 20-30 cm from the surface on which it stands. This is the optimal gap for heating the room.
- It is recommended to install a shut-off damper (view) in the chimney to save firewood by reducing/increasing natural draft.
- You can create a radiator version by welding metal strips/plates to increase the heating area of the stove walls at a distance of 5-7 mm.
- It is not necessary to paint the stove, but if the aesthetic appearance is important, only heat-resistant paint should be used.
- The stove must have a concrete/brick/metal support underneath it for fire safety purposes.
- It is advisable to clean the chimney 1-2 times a year before and after the heating season. To reduce heat loss, the chimney is sometimes insulated with non-combustible materials.
- All chimney joints must be made as airtight as possible, or at least they should not let harmful combustion products and smoke into the garage.
- A prefabricated chimney is the optimal solution. The assembly should begin from its outer part, and not from the potbelly stove. In this case, its dismantling for maintenance, cleaning or repair will be more comfortable.
- In a garage made of brick or concrete, the shortest distance to the wall is not defined. But in any case, everything that is not fireproof must be at least half a meter away from the stove body.
- If the interior decoration of the floor, walls or ceiling of the garage is made of flammable materials, the floor must be covered with a sheet of non-combustible material. It should protrude from the firebox by 700-800 mm, the adjacent walls are covered with a non-flammable substance to a height exceeding the dimensions of the stove by at least half a meter.
The following video will clearly show you how to make the most convenient and functional version of a potbelly stove from a gas cylinder.
How to choose a cylinder
A 5 liter household gas cylinder is too small to heat the room. And fuel can only fit in it in the form of briquettes or wood chips. A 12-liter cylinder will allow you to develop thermal power up to 3 kW. This stove can warm a small lodge or tent. Gas cylinders of 27 liters provide up to 7 kW, we can talk about heating a small garden house, greenhouse or garage.
Gas cylinder options
And finally, the king of household gas cylinders is the 50-liter giant. This is the best option for creating a potbelly stove with your own hands, suitable for heating a country house. 40-liter industrial gas cylinders have too small a diameter and thick walls. It is better to cut and shorten them. Thick walls will take longer to warm up and retain heat longer. Such a stove will also last significantly longer.
Making from a barrel
Among other options, you can use a barrel to make a homemade stove. For example, a sauna stove made from a 200-liter barrel would look good; let’s look at the stages of its manufacture:
- The first step is to determine the required height of the barrel using a grinder;
- Next, the inner walls of the barrel are lined with refractory bricks;
- You can limit the combustion chamber using metal sheets or mesh. Remember that the minimum height of the combustion chamber is 60 cm;
- Stones are laid out on a sheet of metal or mesh;
- Next, you should weld a lid to the barrel and install special doors for ease of use.
Recommendations for masters
When making a stove from a cylinder with your own hands, you need to take into account several nuances. It is necessary to adhere to the basic recommendations and operating rules:
- the chimney should consist of broken sections, since all the heat will quickly escape through a short pipe;
- fuel can be anything - coal, firewood, wood waste, household waste;
- the efficiency increases with increasing chimney length, but straight and downward sections must be avoided;
- heat transfer increases if another container is placed inside the main body, but of a smaller size. This way you can increase draft and prevent smoke from entering the room.
More information about a wood-burning stove made from a gas cylinder:
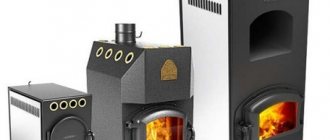
Range of gas stoves on the market
Today you can buy similar equipment for a bathhouse to suit any request. A Russian company from Novosibirsk, which produces heating units under the Teplodar brand, has worthily declared itself in the domestic and foreign markets with high-quality certified products that meet international standards. The great popularity of gas stoves for baths "Teplodar" is caused by their ability to quickly heat up and high efficiency. Thanks to the special design of the stove, the steam room is evenly heated and filled with high-quality steam.
The popularity of Termofor gas units, which are also installed in bathhouses, has also been deserved.
The first thing that attracts the consumer’s attention to such products is their rather original appearance. In their reviews of the Termofor gas bath stove, numerous fans note ease of use, high efficiency and excellent performance characteristics
Such a stove fits harmoniously into the interior of any bathhouse, adding special comfort to the room and creating a warm atmosphere. All of its internal technical components are hidden behind the translucent glass on the device's door. The price of a gas stove for a Termofor bath ranges between 10-12 thousand rubles.
The main competition for the products of domestic companies is the German gas furnace Kusatek. This device for heating baths has many advantages. These are, first of all, compactness, which simplifies installation, ease of use and rapid heating, ensuring the achievement of the optimal temperature in a short time. Adjustment of operating modes is achieved by slightly turning the valve. There is no need to remove ash from the stove, since there is simply none. In addition, the internal surface of the device does not require regular cleaning.
German products are distinguished by a high degree of safety, which is why manufacturers confidently recommend installing such a stove in bathhouses. The risk of emergency situations is also eliminated due to the built-in control system, which is responsible for the quality of combustion and fuel pressure indicators.
Long burning stoves
The cylinder is used to create not only ordinary potbelly stoves, but also long-burning stoves. Today there are several ways to create such heaters. Bubafonya stoves are especially popular. The design has many advantages, among which it is worth highlighting:
- simple design;
- high efficiency;
- the ability to use various types of solid fuel.
If desired, the stove can be connected to a water heating system. The only drawback is the difficulty of maintenance. To get the ash, you need to turn the case over.
Ready-made long-burning boilers
Design
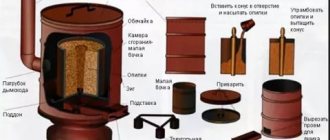
Furnaces of this type use top combustion. Thus, the wood burns from above and the flame spreads downwards. The principle of operation is explained very simply. The flame comes on slowly, but this does not reduce the heating efficiency. Within a few minutes after starting, the oven will begin to release a sufficient amount of thermal energy.
Often a vertical round furnace is made, which makes it possible to use a gas cylinder or barrel as a workpiece. The design has only a bottom
The secret of the furnace lies in the presence of an important element - the load. This is what ensures air circulation
The firebox has a simple design
The load is presented in the form of a circle with a pipe, which is welded in the center below. Corners or channels are welded from below along the radius. The structure is covered with a lid in which there is a hole for a load pipe. The chimney is installed on the wall closer to the top.
How does the stove work?
The body is filled with fuel and set on fire. A lid is placed on the pipe. When the wood is burning, install the lid. The pipe provides the air needed to maintain combustion.
The weight circle has a slightly smaller diameter than the furnace body. This ensures the movement of combustion products, which generate a lot of heat. To ensure sufficient air flow, the lid must be leak-proof.
The efficiency of the stove is ensured by the ignition of gases, which provide heat no less than firewood. Exhaust gases are discharged through the chimney. When the wood burns out, a new stack is carried out. After combustion, a small amount of ash remains, which must be removed after several deposits.
The operating principle is based on the movement of gases
Manufacturing
The oven is manufactured in the following sequence:
Rinse the container and cut off the top part. It will be used as a lid. Therefore, cut off a few centimeters from the walls. File the cut areas.
It is important to wash the bottle thoroughly
- Remove the valve and adjust the hole. A pipe will pass through it. Weld a metal strip around the perimeter of the lid, which will ensure reliable fastening to the stove.
- Cut a circle from a metal sheet, the diameter of which will be slightly smaller than the diameter of the cylinder. File the edges.
The balloon is cut very carefully
- Weld a pipe to the circle and make a hole. Secure the corners that will not reach the edge. The welding must be well done. This will determine how efficiently the air in the furnace chamber will flow.
- Cut a hole on the top of the body and secure the iron chimney. Check the seam for tightness.
At the final stage, handles are welded to the body and lid. All that remains is to assemble the structure and test it in operation.
The valve is removed as the pipe will pass through it
Improvements
We are talking about the introduction of modern techniques that ensure ease of use and maintenance of the structure. The main disadvantage is that for cleaning you need to turn the structure over. Therefore, an ash pan and grates are additionally made. The door must be airtight to prevent unnecessary suction.
The improvement also affected the corners that are welded to the load. It is recommended to use curved strips instead. Thanks to this shape and quantity (6-8 pcs.), uniform air distribution is ensured.
Modern models of fireboxes are somewhat improved
How to increase efficiency
To increase the efficiency of a solid fuel boiler made from a propane cylinder, work is carried out in two directions: increasing heat removal, that is, reducing the temperature of the flue gases and reducing heat loss.
There are a number of options to increase the efficiency of solid fuel boilers running on wood with a water jacket:
- Reconstruction of the chimney size. It must be done higher; the ideal distance from the boiler to the end of the pipe is 6 m.
- Install a deflector that not only protects the boiler from precipitation, but also increases draft.
- To conserve thermal energy, a damper is installed in the pipe structure to regulate the air supply to the firebox.
- The boilers are reinforced with heat exchangers in the form of water jackets. There are devices that fit directly onto the chimney.
Thus, the effectiveness of such home-made devices can be increased without the assistance of specialists and large financial investments.
The main thing is to experiment a little, because the specific results will depend on the type of fuel and the geometry of the boiler. It is also important not to overdo it in this matter, since a decrease in the flue gas temperature below 55 C will cause abundant formation of acidic condensate in the flue gases.
The acid will flow down the walls of the chimney and firebox and can damage not only the combustion chamber, but also the smoke exhaust system.
Potbelly stove in the garage: pros and cons
Car enthusiasts install a homemade potbelly stove in the garage for several reasons:
- the stove heats the room in winter;
- you can cook food or heat a kettle on a potbelly stove;
- With a design approach, a homemade heating device can become a decoration for the garage.
We advise you to read in more detail why a potbelly stove smokes and find answers to your questions.
A potbelly stove has a number of advantages compared to other heating devices:
- For kindling, you can use a variety of fuels - firewood, coals, construction waste, petroleum products, waste oil, etc.
- The main advantage of a potbelly stove is the speed of heating the room. Thanks to its high efficiency and power, the stove will heat a garage of 50-60 square meters. m. in 15-20 minutes.
- The stove distributes heat evenly regardless of where it is located.
- A potbelly stove is an economical heating device. For example, heating a garage with a potbelly stove will cost several times less than with an electric heater.
- An additional advantage of a potbelly stove in the garage is the ability to cook or warm up food. When creating a stove yourself, it is enough to attach a metal cooking surface to its upper part.
- A homemade stove will cost the car owner almost free if there is an unnecessary barrel, sheet of metal and pipe lying around in the garage.
We previously wrote an article about installing a potbelly stove for heating and recommended adding it to your bookmarks.
The potbelly stove will fit harmoniously into the interior of any garage. In addition to the heating function, the heating device has a “cooking mode”. A hob is installed at the top of the stove, where you can heat a kettle or cook food.
The disadvantages of a potbelly stove in the garage are:
- the need to install a chimney in the garage;
- periodic cleaning of the chimney;
- the need for constant fuel supply;
- inability to accumulate heat.
Reviews about the stove on the forum pages
The craftsmen who have made and use a top-burning stove speak mostly positively about it, but with caution. Here are some reviews from real participants of the famous forum:
Andrey, Naberezhnye Chelny, Russian Federation.
I made such a stove to heat a 6 x 6 m box in 2 days. I'm happy with the result; it burns on waste chipboard for 6 hours. What improvements are needed: an air casing and a blower, then the room warms up completely and quickly. Second: you need an ash unloading hatch; turning the body over is very inconvenient.
Valentin, Saransk, Russian Federation.
Bubafonya is good for garages and other similar premises; it cannot be placed in a house. It smokes when there are gusts of wind outside and when reloading with firewood, and with a water jacket it quickly becomes clogged with soot due to the drop in temperature. I made conclusions after a year of testing and modifications to the design. You can also heat with damp wood, but then the heat is much less, which is natural.
Yuri, Vytegra, Russian Federation
I made Bubafonya from an old sauna stove - 500 mm pipe and 8 mm wall, height - 1 m. After launch, the result was pleasantly surprising; it burned on birch logs for almost 9 hours. Only it takes too long to warm up, but in my case the reason is clear - the metal is too thick, you need twice as thin, then the efficiency will increase.
Vitaly, Grodno, Republic of Belarus.
This device was installed at the dacha, the initial goal was to heat at least one large room. Everything turned out better than I expected, the room is very warm, and you load firewood twice a day. Next winter I want to do it with the water circuit and connect the old batteries in the adjacent rooms.
Self-production of a balloon furnace
We take a medium or large cylinder, but it should not be too small. In addition, we will need:
- a small curved pipe (diameter approximately 15 cm);
- a long pipe of the same diameter for making a chimney;
- material for making the door handle;
- door hinges;
- box needed for making a ventilation hole;
- long rod to regulate air flow.
Tools:
- angle grinder;
- welding machine.
The furnace manufacturing process begins with emptying the gas cylinder:
- To do this, in a well-ventilated place, open the cylinder valve and let the gas escape. But that is not all. Then you need to unscrew the valve and release the gas. Then you need to fill the cylinder with water, which will finally displace the gas from the cylinder.
- Next, cut off the top of the balloon. The resulting edges need to be sanded. We mark a hole in the side for the door and on the opposite side for the chimney. Next you need to cut out the door and attach it in place on the hinges. It will be closed using a special latch. The cut is made using an angle grinder.
- Next, a hole for the chimney is made in the same way and a pipe that was prepared in advance is welded. The chimney pipe is made by welding two pieces of pipe: a curved one and a long one.
- Next, a third hole is made - the air duct. It is made below the door. This is a rectangular hole 5 by 5 centimeters. A rectangular box without a lid is welded there. There, a piece of metal is welded onto the central axis. By rotating it using a small lever, you can adjust the airflow for the oven.
- In order to get rid of gaps on the door, small steel strips can be welded around the perimeter. This completes the furnace manufacturing process.
How to assemble a structure with a water jacket
The manufacture of the chimney is carried out in the following sequence of operations:
- Carefully cut the balloon at the top. The resulting cap is subsequently used to make a lid for the boiler.
- The bottom of the cylinder is equipped with homemade legs. Each of them must be exactly level before fixing.
The piston is constructed in three stages:
- A steel circle is cut out: in cross section it should be approximately 35-45 mm smaller than the internal diameter of the cylinder. Thanks to the side gaps, pyrolysis gases will leak into the secondary chamber without interference. A hole is made in the center of the circle for the air duct: this pipe should be inserted into it quite tightly.
- Next, the metal circle and pipe are welded to each other.
- A piece of channel is welded on top of the piston base.
To make a furnace lid, you can use the upper cut part of the cylinder. On its surface, markings are applied for the air duct pipe with a fixed supply piston. In this case, it is necessary to provide a certain margin for the free movement of the pipe. Cutting is done along the drawn lines. On the side, the homemade lid is decorated with handles, for which fittings bent in a vice are used. Now you can begin installing the chimney at the top of the improvised pyrolysis oven. Using a grinder, a cutout is made for the pipe blank: welding is also used to fasten the parts.
To increase the quality of chimney draft, it is recommended to make it from two elbows perpendicular to each other. To do this, a cut is made at the end of the pipe section leaving the furnace at an angle of 45 degrees, after which it is connected by welding to a piece of pipe of the same diameter. It would not be superfluous to take care of additional protection for the chimney from the ingress of debris and climatic precipitation - a reflective cap is usually made for these purposes.
At this point, the main part of the work on the construction of Bubafoni is considered completed: it can be put into operation. It is advisable to install the stove on a pre-arranged foundation.
A little more about the chimney
It is worth noting here that thanks to the design of the stove, which consists of two sections, a chimney pipe that is too long will not “steal” heat - an increase in draft will only contribute to increased combustion and an increase in temperature. The main thing is to secure it so that the wind does not uproot it. But it’s worth thinking about the deflector (protective cap). If there is snow or a blizzard at night, the pipe may become completely clogged. In this case, lighting a potbelly stove will be quite problematic. In the photo below you can see that I raised the chimney quite high. However, when this photo was taken, the deflector had not yet been installed.
This is the chimney pipe I got
Making a stove from a gas cylinder with your own hands
In this case, it is necessary to select the orientation of the stove position (horizontal or vertical).
The difference between these options is the purpose of use.
- A horizontal stove is usually used more for cooking.
- A vertically located stove is for heating due to greater draft and space saving.
Manufacturing of horizontal version:
- the upper part of the cylinder, where the valve is located, is cut off to install the door (the photo shows another option, where instead of cutting off the upper part, a ready-made cast iron door is used);
- holes for the grate are drilled in the wall of the cylinder, or fasteners are welded inside to install a removable grate;
- supports/legs/runners, etc. are attached from below;
- if the grate is drilled into the cylinder body, an ash pan made of sheet metal is attached to the bottom;
- an adapter for the chimney is welded into the wall of the cylinder as close to the bottom as possible;
- the chimney pipe must contain a so-called “elbow”.
Manufacturing a vertical version:
- cut off the valve and weld a 10-15 cm chimney pipe in its place;
- Make a hole 5-7 cm above the bottom for the blower;
- another 5-7 cm are retreated from it and an opening for the door is cut out;
- inside the container, in the opening between them, a grate is inserted, or fasteners for a removable grate are welded;
- install doors with latches and supports/legs/runners.
Recommendations for increasing the efficiency of a homemade stove
How to increase the efficiency of bubafoni?
What problem is preventing this heat generator from working to its full potential? One of the problems is that the stove body heats up unevenly. Because of this, we get poor heat exchange in the room. Is it possible to solve this problem? Of course you can. To solve this problem, let's take a sheet of corrugated metal profile. We wrap it around the stove, obtaining a protective “shirt” and spot-weld the profile sheet to the cylinder. You can find another solution besides welding. It's up to you to decide. By implementing this solution into a finished design, we will obtain a long-burning furnace device that forms rising air currents. Cold air will rise from the bottom of the ribs. After passing along the body of the cylinder, the air will heat up and become hot at the outlet. In addition to this modification, you can do the following.
Cover the entire structure with bricks. This will allow heat to accumulate from the generator, releasing it evenly over the entire area of the building for quite a long time. In addition to the profile sheet, you can use pipe scraps. Profile or regular round pipes are suitable. They are welded around the cylinder body, resulting in an effective design for generating heat with uniform heating.
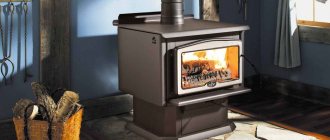
Potbelly stoves - proven and simple designs
Potbelly stoves were a hit of the 20s of the last century. At that time, these stoves competed with brick stoves and were installed everywhere, even in apartments. Later, with the advent of centralized heating, they lost their relevance, but are used in garages, dachas, and for heating utility or outbuildings.
Sheet metal
Potbelly stoves from a cylinder, barrel or pipe
The most suitable material for making a potbelly stove for a garage is propane cylinders or a pipe with a thick wall. Barrels are also suitable, but you need to look for ones that are not very large in volume and have a thick wall. In any option, the minimum wall thickness is 2-3 mm, the optimal is 5 mm. Such a stove will serve for many years.
By design they are vertical and horizontal. It is more convenient to burn horizontally with firewood - longer logs will fit. It’s easier to make one extended upward, but the firebox is small in size, so you’ll have to cut the wood finely.
A potbelly stove for a garage can be made from a cylinder or pipe with a thick wall
Vertical
First, how to make a vertical stove for a garage from a cylinder or pipe. Divide the selected segment into two unequal parts. Below is a smaller one for collecting ash, above is the main one for storing firewood. The following is the order of work:
- Cut out the doors. Small at the bottom, solid at the top. We use the cut pieces as doors, so we don’t throw them away.
- We weld the grates in the chosen place. Usually this is steel reinforcement cut into pieces of the required length with a thickness of 12-16 mm. The reinforcement installation step is about 2 cm.
- Weld the bottom if there is none.
- We cut out a hole in the lid for the chimney, weld a strip of metal about 7-10 cm high. It is better to make the outer diameter of the resulting pipe fit standard chimneys. Then there will be no problems with the installation of the chimney.
- We weld the lid with the welded pipe into place.
- Using welding, we attach the locks and hinges to the cut-out door pieces and install it all in place. As a rule, potbelly stoves are not airtight, so there is no need to make seals. But if desired, you can weld a strip of metal 1.5-2 cm wide around the perimeter of the doors. Its protruding part will cover a small gap around the perimeter.
Overall, that's it. All that remains is to assemble the chimney and you can test a new stove for the garage.
Horizontal
If the housing is located horizontally, the ash box is usually welded from below. It can be welded to the required dimensions from sheet steel or a piece of channel of a suitable size can be used. Holes are made in the part of the body that will be directed downwards. It’s better to cut something like grate bars.
How to make a potbelly stove for a garage from a gas cylinder
Then in the upper part of the body we make a pipe for the chimney. To do this, you can weld a cut piece from a pipe of a suitable diameter. After the piece of pipe is installed and the seam is checked, the metal inside the ring is cut out.
Next you can make the legs. The best fit is pieces of a corner, to which small pieces of metal are attached from below so that they stand stable.
The next step is installing the doors. You can cut a piece of metal onto the ash pan, attach hinges and a lock. There are no special problems here. The gaps around the edges do not interfere - combustion air will flow through them.
There will be no difficulties if you are making a door from metal - welding the hinges is not a problem. Only here, in order to be able to at least slightly regulate the combustion, the door needs to be made a little larger - so that the perimeter of the opening is closed.
How to install stove casting on a metal stove
It is problematic to install furnace casting. Suddenly someone wants to have not a steel door, but a cast iron one. Then you need to weld a frame from a steel corner, attach the casting to it with bolts, and weld this entire structure to the body.
From two barrels
Anyone who has used a potbelly stove knows that very hard radiation comes from its body. Often the walls become heated to a red glow. Then it is impossible to be near her. The problem is solved with an interesting design: two barrels of different diameters, inserted one into the other. The gaps between the walls are filled with pebbles, clay mixed with sand (calcined over a fire, then filled in only after it has cooled). The inner barrel acts as a firebox, and the outer one is just the body.
This stove will take longer to heat up. It will not immediately begin to give off heat, but it will be more comfortable in the garage and after the fuel burns out, it will warm the room for another couple of hours - releasing the heat accumulated in the bookmark.
https://youtube.com/watch?v=PEWZxL2ebXE
Selecting the design of a wood stove
Outdated and inefficient heating equipment is gradually becoming a thing of the past, which also affects homemade stoves. Nowadays, no one needs primitive iron boxes with a pipe and doors that devour firewood without good heat transfer. A modern potbelly stove should be economical and heat the room well. Therefore, advanced craftsmen are constantly working to improve steel furnaces.
To achieve the most efficient operation of a wood-burning heater, it is necessary to solve 2 questions: how to increase the efficiency of a potbelly stove and the burning time from one load, without increasing the quantity and price of the materials used. We present 3 homemade options where these tasks were successfully solved and implemented:
- three-pass stove made of two propane cylinders;
- pyrolysis stove with an air-fire-tube heat exchanger and a secondary chamber;
- A very popular design is “Bubafonya” with top burning of wood from a gas cylinder.
For reference. The first 2 units were developed, made and tested by our expert Vitaly Dashko, who kindly provided his photos and video materials.
If you are comfortable with a welding machine and have the necessary tools, then there will be no technical problems with production. Below we will present drawings and explain the technology of how to make a potbelly stove from a gas cylinder using all three options. But first, make your choice by reading the review of these stoves.
To make a stove you need a welding machine, a grinder, plumbing and measuring tools. You will need several clamps, at least 2 pieces
Three-way potbelly stove - operating principle and pros and cons
The master gave this homemade stove the playful name “Collider” because of its unusual appearance and good heat transfer. This wood-burning stove is made from two standard 50-liter propane cylinders welded to each other at an angle of 90°, as shown in the drawing. The operating principle is as follows:
- The first tank, laid horizontally, plays the role of a firebox and is accordingly equipped with doors and grates. An impressive portion of firewood is placed in it and set on fire.
- The second vessel is an air heat exchanger with internal partitions that slow down the flow of flue gases and force them to change direction three times and give off more heat. At the end, combustion products leave the heater through the chimney pipe.
- To increase the heating surface, both parts of the housing are equipped with additional ribs.
- An ash pan made of sheet metal is welded to the firebox below, the door of which regulates the supply of combustion air.
Sectional drawing of a homemade three-way wood-burning heater
Note. With the same success, instead of cylinders, you can use a steel pipe for a potbelly stove with a diameter of 300 mm and thin walls (4-5 mm).
The estimated power of the “Collider” is 10 kW with an efficiency of about 55%, which allows you to heat a room of up to 100 m² - a cottage, a greenhouse or a large garage (box). Practical tests have shown that in the mode of maintaining heat in a heated room, 1 load of firewood lasts for 1.5-2 hours. If you use a heating unit in a house with a smaller area (25-50 m²), the combustion duration will increase to 3-4 hours. Anyone who understands the topic will understand that for a homemade potbelly stove this is good economics.
Photo of the finished Collider stove with heat exchange fins
This long-burning stove has one downside - its strange appearance. But it is compensated by numerous advantages:
- ease of manufacture;
- quick warm-up and decent operating time from 1 load of solid fuel;
- the design is cheap, you only have to buy comfortable handles and also a pipe for the potbelly stove if you don’t have propane cylinders;
- due to the size of the firebox, long (80 cm) and massive logs are placed in the stove, which contributes to the duration of combustion;
- the unit can be made with a hob, as shown in the photo.
The "Collider", like any potbelly stove made from a gas cylinder, welded by yourself, can be supplemented by installing a water circuit, regulating the air damper in the ash pan door and an external fan. The dimensions of the stove can be changed in any direction by selecting smaller tanks or pipes of a different diameter.
The operation of a potbelly stove used to heat a 100 m² cafe is described in the video:
Review of a pyrolysis oven for 2 chambers
This small wood-burning stove, made from a 24-liter gas cylinder, was named “Pyaterochka” after the number of air heat exchanger pipes. It operates according to this principle:
- As in the previous case, the cylinder laid on its side serves as a combustion chamber, and an ash pan is attached to the bottom. The role of the grate is played by slits cut in the wall of the vessel.
- There is an opening at the top of the tank where 5 vertical heat exchanger pipes are adjacent. Hot flue gases move along them and thus release some of the heat into the room.
- From the heat exchanger, combustion products enter the secondary chamber, where heated air is supplied separately through a separate tube. Thanks to this, the combustible gases formed in the firebox are burned and release additional heat, after which they are directed into the chimney.
Drawing of a long-burning pyrolysis potbelly stove with a gas afterburning chamber.
The results of practical tests of the heater are as follows: a room of 30 m² is heated to 20 °C for 1 hour, after which one laying of wood is enough for 1.5-2 hours, depending on the operating mode. Approximate power – 5 kW. As you can see, in this design the burning time is reduced due to the reduction of the firebox, but the stove is very compact and will fit in any room. Yes, and it heats up quite well.
Advice. Do you want to increase the burning time to an average of 4 hours? Then study the drawing of another option, which shows the same pyrolysis potbelly stove, made with your own hands from a 50-liter gas cylinder. The design of the heating units is identical, the only difference is in the volume of the tanks used as a firebox.
This is what a two-chamber homemade stove looks like.
2 rods are welded on top - you can put a saucepan or kettle with water. Thanks to the efficient burning of wood, the Pyaterochka stove is more economical than the Collider, although it is more difficult to assemble. In terms of the cost of materials, the difference between them is small - the first has 2 cylinders, the second has 5 pipes with a diameter of 57 mm and a length of 40 cm. A separate advantage of the stove is the ability, after heating, to burn wet wood and any debris without losing heating intensity. The remaining advantages are the same - low cost, ease of use and the possibility of modernization.
Another good piece of advice. It is quite natural that after replacing a small cylinder with a standard one (50 l), you want to increase the power of the heater and add 2-3 more pipes to the heat exchanger. Remember that the flow area and chimney draft should increase accordingly. Otherwise, you will waste materials and time, because due to insufficient draft, the outer sections will remain cold and the furnace power will not increase.
An enlarged version of Pyaterochka from a large 50 l cylinder
Top burning stove "Bubafonya"
By and large, “Bubafonya” cannot be classified as a potbelly stove, since it has a radically different operating principle. But it is impossible to ignore this stove due to its wide popularity due to the burning time from 1 load of wood from 6 to 10 hours. At the same time, the heater is famous for its numerous shortcomings, which we will discuss later.
The operation algorithm of the Bubafonya long-burning stove shown in the drawing is as follows:
- The fuel tank is a 50 liter propane cylinder standing vertically. Through a hole in the top cover, an air supply pipe enters inside, ending with a thick metal disk. Steel strips are attached to the bottom, distributing air in all directions.
- When the firebox is filled to the top with firewood, the heavy disk presses it down and causes it to sag as it burns. Ignition is also done from above, and only then the pipe with the load is lowered.
- The combustion air supply is regulated by a damper installed at the upper end of the pipe. The chimney pipe is cut into the side wall of the cylinder under the lid itself.
Drawing of a top combustion furnace and arrangement of air distributors
Note. The place where the pipe passes through the lid is not sealed and secondary air is sucked in there, which helps to burn out the flammable gases above the disk when the oven is properly heated.
The strengths of “Bubafoni” are a decent operating time, simplicity and the possibility of conversion into a top-combustion boiler (a stove is made with a water jacket, which is described in a separate material). But the weaknesses forced many garage owners to abandon such potbelly stoves:
- the stove cannot be loaded until all the fuel has burned;
- if the damper is closed, the firebox will not go out and will smolder for a long time, because secondary air enters it;
- without good draft, the heater smokes into the room;
- in the slow burning mode, the stove heats weakly, and the chimney pipe becomes intensively clogged with soot;
- To enter normal mode, the unit must warm up well, which consumes ¼ of the fuel.
On the left in the photo is a close-up of the air damper, on the right are homemade heat exchange fins from profiles for installing gypsum boards
For reference. To burn off soot in the chimney, you need to run the Bubafonya at maximum speed every time you light it.
Finally, let's sweeten the pill a little. Despite all the shortcomings, a long-burning stove made from a gas cylinder does not lose popularity; in addition, it successfully operates on sawdust and various flammable debris.
Other stove options
Of course, not everyone chooses potbelly stoves. Many car owners, in search of the most economical ways to heat their garage in winter, opt for options that run on exhaust gas or from gas cylinders. Despite the fact that the operation scheme of such furnaces is approximately similar, we will still dwell in more detail on the alternatives so that you can complete the project yourself without any help from specialists.
On used oil
The main difference between this design and a standard potbelly stove is that it consists of 2 chambers. They are connected to each other by a metal pipe with holes: it is from them that the flame comes out.
- lower chamber - designed for spent fuel, here it burns and turns into gas;
- the upper chamber is for mixing the resulting gas with air; the more optimal the design, the better the heat transfer.
Operating procedure:
- we take sheet metal and give it the desired configuration, you can skip this step if you have a ready-made round or rectangular metal container;
- we make a lower section out of it, into which spent fuel is poured, and make a damper so that the air entering the chamber can be regulated;
- we attach legs from the bottom made of thick wire or any available material - they will ensure the stability of the stove;
- We insert a perforated pipe with thick metal walls into the hole from above - it serves as a support for the upper compartment and is constantly exposed to high temperatures, so it must be reliable;
- to make the upper chamber, we take a cylindrical metal blank;
- the final touch is the chimney, installed on top.
Long burning
Such a stove can be easily made from an old gas cylinder. Or a metal barrel with strong walls. Required conditions:
- cylindrical shape;
- vertical arrangement.
To make it, you need to weld together a metal circle that acts as a weight and a small pipe. They are placed directly into the workpiece and ensure uniform combustion of fuel due to a stable air supply.
A removable lid should be installed on top, and the smoke will come out through a pipe from the top side. It’s good if you can weld the handles - convenience!
Firewood, sawdust and any other type of solid fuel are placed both in the primary combustion chamber - the very bottom of the cylinder, and directly on a metal circle. Such stoves are called long-burning precisely because the wood used for kindling slowly smolders and releases gas, which burns in the upper part, providing the required level of heat.
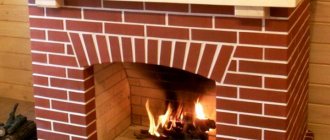
Brick
Perhaps the most labor-intensive and not always justified option, which captivates with its aesthetic appearance and high efficiency.
In order to give the structure stability and increase fire safety, it is necessary to build a foundation.
Brickwork is also carried out according to a special scheme in order to increase strength to the maximum level. Clay mortar is used for gluing, and the seams between the fragments reach 1.5 cm.
You will also have to make a combustion and blower door. For ash you need to install a grate. Don't forget about the cast iron panel: solid fuel will be placed on it. The final point seems to be the execution of the valve, but this is a trifle in comparison with what remains to be done before.
Drawings of projects already tested in practice will help you.
Pyrolysis oven made from cans
Camping stove made from tin cans (bottom view).
Who needs a pyrolysis oven made from cans? Obviously, a person who spends a lot of time in nature. These are tourists, fishermen, hunters and travelers. Considering the fact that factory models are quite expensive and weigh a little more than 300 grams, it is best to start making them yourself. Let us immediately note that for work you will need:
- metal scissors;
- drill.
If you can still use a knife instead of metal scissors, then nothing can replace a drill. Therefore, it is hardly possible to make this device in the field. And there’s no need for this; it’s easier to heat up everything you need over a regular fire. As they say: “Get your sleigh ready in the summer.” In order to make a simple pyrolysis oven with your own hands from cans, you will need just two cans of different diameters. No other materials are needed. Sequence of work:
- in a thicker jar, cut the bottom to the diameter of the thinner jar. The latter should fit very tightly;
- in a thin jar we make holes along the top and bottom edges, as well as in the bottom;
- in a thick jar we make holes only along the top edge, where we did not cut a hole;
- connect two banks. The small one is inserted into the cut hole in the large jar until it stops.
The drilled holes must be wide enough to provide good traction. After you have succeeded in making a pyrolysis oven, all that remains is to check the product. Place it on the ground and put small sticks and paper inside. Since this device is used in field conditions, it is very likely that it will have to be lit with a flint. Matches and paper may get wet. What to do in this case?
A useful life hack for tourists is tinder made from a cotton pad. Tinder is a means of starting a fire. To make waterproof tinder from a cotton pad, simply dip it in melted paraffin. This disc repels moisture and is easily ignited with both matches and flint. To ignite it using only sparks, the cotton wool needs to be torn into small pieces. Once the disk has flared up, it can only be extinguished with water; gusts of wind will not extinguish it.
Read how to choose pipes for heating boilers here.
Drawing up a drawing
The main proportion in the process of making a homemade Bubafonya stove from a gas cylinder is the mathematical ratio of the parameter of the internal diameter of the body and its height. It should be between three and five to one. The optimal diameter is from 30 to 80 cm.
Making the diameter of the stove body less than 30 cm is not effective, since oxygen will circulate too quickly through the combustion chamber without fully reacting with the wood. This leads to a noticeable decrease in the efficiency of the device. In chambers with a diameter of more than 80 cm, another problem arises - in it, the firewood on the edge burns very slowly, and in the center - faster. As the fuel burns out, a hole appears into which the piston descends. As a result, the flame gradually fades away. In the drawing, it is more convenient to denote the diameter by the letter D, and the height by H.
Preparatory activities
Since constructing a Bubafonya stove from a gas cylinder will require a welding machine, it is necessary to find a suitable room for the work in advance. It must be equipped with effective ventilation, uninterrupted power supply and reliable wiring (as a rule, the use of welding provokes power surges in the network). The workroom must be well protected from climatic influences and have sufficient space. It is also desirable to have good sound insulation, since the grinder and welding machine are quite noisy tools.
You also need to prepare the following materials:
- Old gas cylinder. This is the basis for a pyrolysis oven. Also suitable for this role is a steel or cast iron barrel with a volume of approximately 200 liters, which has strong, rust-free walls. Often, large fire extinguishers or metal pipes with welded bottoms are used for this.
- Pieces of reinforcement. They will be needed to make handles, which are usually installed on the sides of the case and on top of the lid. This significantly simplifies the procedure for cleaning the stove from combustion residues and moving it from place to place.
- Steel sheet for piston.
- A pair of metal pipes. They are needed for the manufacture of a chimney and air duct. The optimal cross-section for the air pipe is 85-100 mm. Moreover, it is approximately 150 mm higher than the height of the cylinder. For the chimney you will need a wider pipe: its diameter must be at least 150 mm. The length of the smoke channel should not be less than the cross section of the cylinder.
- Channel.
- Material for laying the foundation for the stove.
List of tools required for work:
- Hammer.
- Vise.
- Shovel.
- Master OK.
- Portable welding machine with a set of electrodes.
- Grinder for cutting blanks.
- Tape measure, pencil, plumb line and level.
Balloon oven options
There are several main options for such designs:
The simplest of them is an ordinary potbelly stove. It is customary to use a 12-liter or 27-liter cylinder for it. For efficient heating, it is advisable to use a horizontal elbow for the chimney. The most difficult part is attaching the door for the opening through which the fuel is loaded. Convenient for storage in a city apartment. It is short-lived due to the gradual burning out of the walls of the cylinder.
Special long stoves. They work as long-burning stoves. The basic principle of operation is that the fuel burns continuously with only a small amount of fuel. Pyrolysis products are then formed, which burn in a separate combustion chamber. To ensure combustion efficiency, it makes sense to preheat the air that enters the furnace. The oil garage stove requires vertical installation. Used engine oil is used as fuel. Adjusting the combustion temperature The design looks something like this.
"Rocket". Its name comes from the fact that it sometimes makes a noise similar to the roar of rocket engines. However, this can happen if the oven is not adjusted. A properly functioning structure makes only a quiet rustling sound. Its design is not particularly complicated and a 50 liter gas cylinder is very convenient for its manufacture. This type has many important advantages. They heat the room well, are economical to use, and relatively simple to manufacture. They can be adapted to heat a bed. But, on the other hand, they must be done accurately and carefully. If the furnace is poorly adjusted, it will be ineffective. The fuel is firewood (usually thinly chopped chips or branches). It comes through a pipe from above. Air enters through the hole at the bottom left. Combustion occurs in the lower pipe. The blowing here is very strong. The combustion products rise upward and exit through the pipe on the right, heating the room. Let us tell you what a stove called “bubafonya” is. It uses a special principle of working with pyrolysis products. The combustion chamber is located vertically. Pyrolysis products are contained by a special metal “pancake”, which limits the combustion space from above. The efficiency of this design can reach eighty-five percent. This stove is not designed to use wet fuel. Humidity should not exceed 12 percent. The stove is very economical in fuel consumption. Convenient to use for heating garages or other utility rooms.
A rocket stove can be made not only using gas cylinders, but also using barrels, cans and other means.
The manufacturing process of an atmospheric gas burner
An atmospheric burner is easier to build, since it is structurally much simpler than its fan counterpart. The most typical example known to most Russians is the burner block in old-style geysers. There are no energy-dependent elements in its design that force gas and air to mix in the required proportions.
Air is drawn into the chamber with the atmospheric burner module spontaneously as needed. Blue fuel processing products are discharged naturally through a standard chimney due to the presence of draft. All the work consists of constructing a manifold with gas nozzles through which gas will flow at the required speed.
If you want to build a gas burner with your own hands, it is better to take a factory-made product as a basis, or rather, the drawing available in its technical passport with the dimensions and designation of structural elements
To make a burner with your own hands to equip a gas heating boiler, you will need:
- Valve series VK-74. Typically used on oxygen cylinders, designed for a maximum pressure of 20 mPa. The package should include a 3/4″ union nut, with which you can tightly connect to the gas supply pipe or hose. The valve will serve as a support base for fixing the nozzle.
- Nozzle cap. The device will hold the gas supply dispenser and form a narrowly directed jet. A hole is drilled at the top of the cap into which the nozzle is to be placed. The base screws onto the valve.
- Nozzle. It is better to buy it ready-made with the expectation of supplying main gas or a liquefied gas mixture. The injectors have different outlet diameters. Instead of nozzles for boilers, you can use a jet from a gas burner.
- Homemade injector. It is constructed from a steel tube with a wall thickness of up to 2 mm. You will need a piece of pipe approximately 10 cm long.
- Piezo element. It is installed at will, although you can do without it. Homemade products can be set on fire with matches.
All of the above elements are assembled mainly by welding. Therefore, skills and minimal knowledge in welding will be very useful for an enterprising “do-it-yourselfer”. However, where it is possible to use threads, it should remain a priority.
The gas supply channel must be impeccable and sealed, because safety depends on its condition. A distance of 10 cm must be maintained between the gas inlet into the device and the nozzle, which is necessary for mixing fuel with air.
Image gallery
Photo from
Large gas burner
Gas burner combustion process
Ignition of the atmospheric burner block
Burning oxygen indoors
The home craftsman just has to figure out how to secure a homemade gas burner in the combustion chamber of a used water heater or in the firebox of a former wood-burning boiler. Please note that you need to leave room for air flow. Air must be regularly supplied to the chamber, for which round or longitudinal holes must be cut in the door.
Do not forget that the above option can hardly be called a safe gas supply device. The design does not have automatic equipment that interrupts the operation of the boiler in case of blowing out or unstable flame. Owners will not have the opportunity to adjust the pressure and gas flow, so there can be no talk of either convenience or savings.
Requirements
If the oven is used for cooking food, then one important problem arises. There must be a surface where food will be placed. At the same time, the heat flow in this place should be sufficient for high-quality cooking.
If, first of all, the tasks of heating the room are important, then other features come to the fore. Here the following are of particular importance:
- long burning;
- fuel efficiency;
- high requirements for fire safety.
The last requirement plays a vital role in the operation of various types of furnaces. However, when heating, the stove, in fact, can be left without direct supervision for a long time. This greatly increases the risk of an accidental fire. Another important issue is the possibility of legalizing a self-made stove. This process is not simple or easy.
Drawings, dimensions and calculations
You can make a small stove with your own hands to heat a garage or other space using scrap materials.
It’s easy to create a sketch plan and drawing of a small metal stove-stove yourself
An obligatory step is the creation of a drawing or diagram of the future structure. To do this, you need to determine the shape and dimensions of the case, the location of the cameras. After this, the power sufficient to heat the room is calculated. The parameters are determined as follows:
- Let's assume that 10 kW of heat is required to heat the room at the lowest outside temperature. We determine the required power of the furnace in normal combustion mode. It is known that in the gas generation mode the furnace power is 10-30% of that which develops in the flame combustion mode. Consequently, to obtain 10 kW with gas generation, the unit, when burning with a flame, must develop a power of W = 10 / 0.3 = 33.3 kW (we assume a 30 percent power ratio);
- We choose the least energy-intensive fuel. For example, dry beech is optimal;
- We calculate the volume of fuel that can provide the required power. A portion of firewood burns in flame mode in approximately 4500 s. Therefore, during this time it should provide the following amount of heat: Q = 33.3*1000*4500 = 149.85 MJ. Let's calculate the required mass of fuel, taking into account that it burns only 80% completely, and the efficiency of a homemade stove is approximately 50%: M = 149.85 / (15.5*0.8*0.5) = 24.17 kg. Knowing that the density of dry beech is 620 kg/m3, let’s convert the resulting mass value into volume: V = 24.17 / 620 = 0.039 m3 = 39 l;
- We calculate the volume of the firebox. The average furnace load factor is 0.63. It should have a volume: Vt = 39/0.63 = 61.9 l.
You can make a drawing or technical drawing of the product yourself, taking into account the shape and features of the stove. A ready-made image of a suitable unit is taken as a basis.
Tools and materials
List of required consumables and working tools:
- sheet steel grade St20, thickness 3–4 mm;
- steel equal angle angle 4x50 mm;
- pipe with a diameter of 50–60 mm;
- steel reinforcement with a cross section of 8 mm;
- steel pipes with a diameter of 110 or 120 mm for the chimney;
- bricks in the amount of 15 pieces;
- electric welding machine and several packages of electrodes;
- drill and metal drills, grinder with 230 mm circles;
- building level, tape measure, pencil, hammer.
Choose consumables that are high-quality and reliable. Not only the operation of the pyrolysis furnace, but also the safety of the surrounding area during the heating process depends on this.
Preparation and selection of installation site
The assembly of the structure is carried out directly in the room where the stove will be installed. It is best to order sheet cutting into blanks from specialists in the store. This will ensure a good quality base for the product.
The space around any stove must be safe and heat-resistant, and the floors must be level.
The site for installing the unit must be prepared.
- a base of bricks or other non-combustible material is laid on the floor;
- the base area should be larger than the dimensions of the oven;
- install the unit at a distance of at least 80 cm from the nearest walls;
- the floor within a radius of 1.2 m in front of the heating device must have a fireproof coating (iron sheet 1.5 mm thick).