Home/Types of heated floors/Rod floor. Installation of a heated rod floor./Infrared rod heated floor: Advantages and disadvantages
Every year, new types of systems for supplying heat to premises appear on the consumer market. Currently, an improved system is the infrared rod-heated floor, which has gained great popularity in a short time. In order to find out what makes it unique, you need to familiarize yourself with its structure and operating principle.
Structure and properties
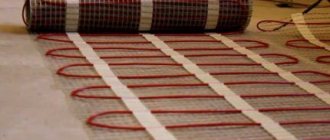
This type of infrared floor heating heater has the form of many rods that are connected in parallel using flexible connecting wires. They are somewhat reminiscent of a rope ladder. The rods contain a material consisting of carbon, silver and copper. When carbon is exposed to current, it intensely releases thermal energy. What is good about a rod carbon floor is that it has self-regulating properties: the amount of heat generated depends on its temperature. That is, with a local increase in temperature (you put something on the floor, the floor became hot due to poor heat transfer), it emits less heat and the temperature drops. This property does not mean that a system with rod heaters does not need a thermostat. The thermostat controls power consumption (saves money on heating), and self-regulation prevents overheating (extends the “life”).
Rod infrared self-regulating mat
A heating rod heating system, like all electric underfloor heating systems, requires the installation of a thermostat and a floor temperature sensor. Without them, the heating elements work, but constantly at the same power. In this case, we are not talking about any savings, and the service life becomes much shorter.
How to identify a low-quality product?
Carefully study the components of the mat kit you are purchasing. It should include:
- The mat included in the kit should be 83 cm wide. Anything less is a fake.
- The kit should include special brackets for fastening. If there are self-tapping screws, then the manufacturers saved on materials.
- After complete installation of the heated floor, you need to check it for serviceability. If it works, then this is only part of the success. The floor should not emit a pungent odor of plastic or something burnt.
- The kits must be labeled, instructions and installation rules.
Any deviation from the norm on any point may indicate a bad product; be careful when choosing.
Disadvantages of a rod floor
The main disadvantage is the high price. It is much higher even than that of infrared film heated floors, which also cannot be called cheap. The second drawback is the rather complicated electrical connection (for the ignorant). And the third is “wet” installation in screed or tile adhesive. This means that there is no talk of any mobility or horizontal device, and also that if repairs are necessary, the screed will have to be broken.
Installation
It all starts with choosing a location and installing a thermostat. It needs to be located in a convenient place. Most often it is somewhere around the switch. If you are installing the floor in a room with high humidity (bathroom, etc.), then the thermostat is placed in a dry room. At the same time, do not forget that you will connect the temperature sensor and wires from the heating mats to it.
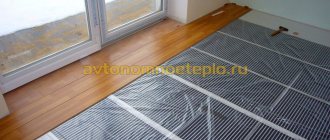
Then draw a plan of the room to scale, highlight areas on it where installation of heaters is not needed (under sofas, cabinets, etc.). In the remaining area, develop a plan for laying infrared rods. The mats should begin and end at a distance of 15-20 cm from the walls. The standard width of this material is 83cm. That's why you can't think of anything special here. The strips of heating rods can be located at some distance, but they should not intersect or touch.
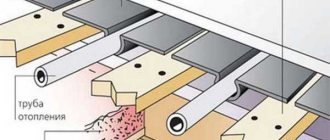
Installation diagram of a warm rod floor
To lay a rod heater, the floor must be smooth and clean, otherwise you will not achieve the same thickness of the screed, which means you will not achieve uniform heating of the surface. Another condition for normal operation: for good heating efficiency and so that you don’t have to pay a lot for electricity, you need to make good thermal insulation of the floor. The thickness of the insulation material depends on what type of room you have below. If this is an apartment with heating, a roll of not very thick thermal insulation is sufficient. If you live on the ground floor, you will need more serious materials: polystyrene boards, mineral wool mats, etc. - depends on the climate and flooring material, how the subfloor is made, etc.
To reduce heat loss for heating the walls, it is necessary to lay a heat insulator along the wall (with an approach to it). It can also be a damper tape, which at the same time will prevent cracks from forming under the influence of thermal expansion. Or you can lay tape insulation or a strip of polystyrene foam ten centimeters high. After laying the screed or tile, cut off the excess and then install the plinth.
Rod heated floor characteristics
To insulate the floor surface, it is recommended to use a heat insulator with a metallized top layer. Note! Not foil, but metallized. Although externally similar, the characteristics of the materials are different. Foil and foil-coated materials in screeds are destroyed very quickly, literally crumbling into dust. And metallized coatings with lavsan or other coatings feel great in concrete for many years.
Read about what materials are best to use when laying heated floors here.
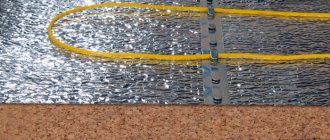
The slabs or sheets of material must be laid closely, without gaps. If there are any gaps, they need to be filled. We glue the joints with tape or metallized adhesive tape (if we use the same materials). Now you can roll out the core roll. Start from the wall on which the thermostat is located.
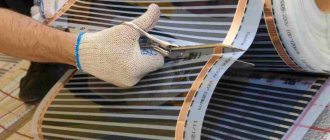
Installation of warm core flooring under soft floor coverings
Having reached the mark where you need to turn, take scissors or side cutters and cut the connecting wire in the middle between the two rods (not near one of them, but in the middle). Turn the roll 180° and roll it out in the opposite direction. Repeat this until you cover the entire area. There is another way - to buy not one large roll, but several small ones of suitable length. Then you don't need to cut anything. For example, the Unimat rod heated floor is sold in sets from 1 to 7 meters (with a step of 1 m). There is also a 25 meter roll. For example, if the heated area in your room is 6 meters, but you are planning two strips of three meters each, then you can either buy one set of 6 meters and cut it in the required place, or buy 2 sets of 3 meters each and simply roll them out side by side. You will pay the same in both cases (prices are taken from the official Caleo website, because Unimat is also their product).
Having laid out the mats on the surface, secure them with tape to the insulation and to each other. Then, in a checkerboard pattern, you cut out windows in the insulation for better joining of the tile adhesive or screed with the subfloor (from here, by the way, it follows that the subfloor should be cement or concrete, which the manufacturers do not say).
Electrical connection of core floors
Now it’s time to assemble the electrical circuit. In those places where the connecting wires were cut and an electrical connection is required, strip the insulation to about 0.7-1 cm. Take the connector that comes with the heating element and insert the bare conductor into one of the contacts. Using pliers or pliers, clamp it and check for the strength of the connection (pull).
Installation of rod infrared heated floor
You put a heat-shrink tube on the wire, also strip it of insulation and then insert it into the second contact of the connector and clamp it. After checking the strength of the connection, take a hair dryer and heat the heat-shrink tube into which the connector is inserted. Then you pull on the second one and also heat it up until it crimps the connection. We received a reliably insulated contact. In this way, you assemble the entire circuit (see the example of the connection diagram for a rod-heated floor in the figure). Those current-carrying wires that are not used are insulated with end kits (included in the kit).
Installation of rod infrared heated floor
Having assembled the circuit, proceed to install the temperature sensor. It is advisable to install it in a corrugated hose so that it can be quickly replaced. For hidden installation, you need to make a groove in the floor (in the screed). We put a hose into it and insert the sensor, connect the wires to the thermostat, and connect them to the appropriate sockets. We also connect wires from the rod mats to the thermostat and connect them to the required terminals (a connection diagram is on each thermostat). Now you can apply power. But this operation must be performed by an electrician. After this, you can carry out tests - turn on and check the heating of the strips and the absence of a spark at the contacts (set the thermostat to no more than 30 ° C). Now you can start finishing.
Installation Features
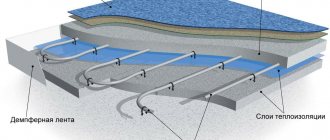
Rod infrared floors are a multi-layer structure, which can be installed in two ways.
Laying on screed
On a screed - this means pouring a subfloor from a concrete solution that expands during the heating process. A layer of heat and waterproofing, mats, and reinforcing mesh are placed on it, on top of which a thin screed is poured and the floor covering is installed.
For your information! Carbon fiber floors without screed can only be installed on a smooth surface.
On a wooden floor
The essence of installation on a wooden floor, the method is also called laying, is to construct a “pie” consisting of an insulating substrate with a foil layer, a wooden log, a reinforcing mesh to which the heating elements will be fixed, and a finishing coating.
For your information! Do not allow the IR floor to come into contact with metal or foil coating,
Floor coverings
The most successful use of a rod heated floor is under tiles. Simply because you can immediately use the adhesive and tiles without any other operations. Only two conditions:
- Use only special mixtures for heated floors.
- The thickness of the adhesive and tile layer should not be less than 2cm.
If you want to save on glue, make a screed, and when it dries, lay the tile on top.
Installation of a warm core floor under tiles
For all other types of coating, you need to make a screed with a minimum thickness of 2cm. In any case, the first switching on is possible only after the solution or glue has completely dried naturally. The use of heating rods to speed up the process is unacceptable. Firstly, because in a damp environment the insulation may be damaged and a short circuit may occur, which will disable the system, and secondly, because artificial heating will cause the formation of cracks in the screed, which will greatly reduce the efficiency of the heated floor. So: we wait for the due date and then turn on the heated floor.
In this video material, the entire installation process of Unimat rod-based heated floors is filmed. Very detailed and accessible.
Manufacturers (Unimat, Kaleo)
Today, among the manufacturers of carbon core heated floors, the leading Korean companies are Unimat and Kaleo.
Video
Rod carbon heated floor gtmat Caleo – installation from Master Tiler
Unimat
Unimat specializes in the production of warm electric floors. Two types of rod heating devices are produced under this brand:
- Rail Unimat - has a simple design, the width of which is 830 mm. The product has a power of 120 W. Installation under tiles using adhesive or a small layer of screed is recommended.
Important! The floor covering layer must have a thickness of at least 2 cm.
- Unimat Boost is a distinctive feature of this model, the presence of a smaller pitch (9 cm). Model power 160 W. It is capable of heating a large area.
All models include mats, fasteners, wires, corrugated pipe, and the “End” kit. In addition, there is a warranty card, manufacturer’s instructions and a video with a step-by-step installation process that will help you do the floor yourself.
Kaleo
Kaleo is a leading manufacturer producing these heating devices. The company's products are high quality, long service life, reliability, and affordable price.
The products are manufactured using high-tech methods, which ensure fire safety and prevent overheating during operation.
Kaleo systems are characterized by quick installation. You can build such a floor with your own hands, without the help of specialists, within 2 hours.
There are models from this manufacturer that have increased functionality; they are also called “Smart Floors”. They are recommended for heating large areas in order to save money (cottages, offices).
Manufacturers of rod heated floors
This segment of underfloor heating mainly includes products from Korean manufacturers. First of all, this is the Caleo campaign, which produces Unimat floor heating rods. They are available in two powers - the more powerful Boost (133W per linear meter) and Rail (113W per linear meter).
Rod heated floor Unimat "Unimat"
There is also a company that produces similar products HOTmat RHE and GT-mat. There is a South Korean company DYS Tech Co., Ltd, which also produces Starke rod-based floor heating.
Reviews
Since all the manufacturers mentioned above indicate the word Unimat in parentheses, it is almost impossible to figure out who bought what. Now about the reviews themselves. Almost everyone is unhappy. Moreover, the picture is approximately the same: the first year/heating season everything is fine, but in the second year problems begin. Moreover, the nature of the damage is the same for all: the junctions of the rods and the supply conductor burn out. Apparently, this is the weak point of such systems. But there are reviews, according to which, people have used such floors for years without incident.
Results
The idea of infrared floor heating seems very attractive: probably everyone wants not only to warm up, but also to be treated and relax at the same time. Moreover, they promise that rod heating mats will consume little electricity: they only work for 6-8 hours, the rest of the time they are turned off. But after reading the reviews, you wonder if it’s worth it. Maybe infrared film would be better? The reviews there are normal. Or even cable heating? It's much cheaper...
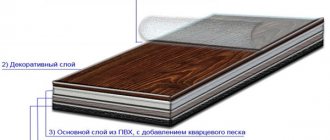
Carbon mat on the floor – warmth throughout the house
A system of heating elements made of carbon strips fixed to a polypropylene base effectively heats the floor in a relatively short period of time.
Carbon elements appear in the form of thin rods, fibers or strips.
Such structural components are fastened together by soldering and layers of polypropylene.
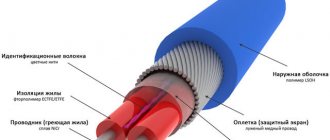
To connect the elements to each other, the manufacturer also uses copper wire, which is in a protective sheath. As a rule, the connection type is parallel. Due to this fastening feature, uninterrupted operation of the floor is ensured even if individual elements are burnt out or do not work.