Autonomous heating has a significant advantage - the owners can decide for themselves what temperature level should be in the rooms. Of course, you can regulate the gas supply, and therefore the heating level of the coolant, manually, but this is extremely inconvenient. It is much easier to install a special device - a programmer, which will automatically regulate the operation of the gas boiler.
The air temperature in the room depends on many factors, including weather conditions. If in cold weather you need to turn on the boiler at maximum power, then during a thaw such heating will be excessive.
A special device – a programmer – can monitor the air temperature in the rooms and send signals that regulate the operation of the gas boiler. For some models of heating units, the programmer is included in the delivery package; for others, this equipment must be purchased separately.
Functions
Many people believe that a thermostat installed on a heating unit is enough to maintain the optimal temperature in the rooms. Actually this is not true. After all, it is unlikely that the owners have the opportunity to monitor the thermometer readings around the clock and manually regulate the heating of the coolant in a timely manner.
By installing the programmer, you can forever forget about the need to manually adjust the heating level of the coolant. The device will constantly monitor the air temperature in the rooms, regulating the operation of the boiler.
This will not only allow you to maintain a comfortable indoor microclimate, but also effectively save fuel. After all, there is no point in heating the coolant and then opening the windows because the rooms are too hot.
How does it work?
The programmer works according to a simple but effective scheme:
- a sensor is installed in the room that constantly monitors the air temperature;
- at the moment when the air warms up to the values specified by the owners, a signal is sent to the boiler automation, as a result of which the gas supply is cut off;
- when the air cools to the limit values, a signal is sent again and the boiler automation resumes heating the coolant.
Advice! Due to the fact that the programmer allows you to effectively save gas, the purchase of this device pays for itself in just a few months.
Connection features
To install the device, you only need two communication wires: power supply and a cable for connecting to the boiler automation. The entire installation process consists of the following stages:
- 1. Choosing the optimal location for the thermostat. You need to install it in an area inaccessible to small children and pets. The level of elevation above the floor does not play a special role, although they usually try to install the programmers lower, because heated air is lighter than cold air, which means it is more logical to measure the temperature near the floor.
- 2. Next, technological holes are made in the wall to mount the device. An ordinary household drill, which every owner probably has, is suitable for this.
- 3. Then connection to communications and laying of wires is made. If the apartment is undergoing renovation, then they need to be hidden directly in the wall so as not to spoil the aesthetic appearance. Otherwise, you will just have to pull the cable under the wall so that it is out of the way and there is no risk of accidentally snagging it.
- 4. After connection, a test run is performed. It is necessary to ensure that all readings correspond to reality. You can then carry out customization and enjoy the improved ergonomics of the system.
Varieties
Devices for regulating boiler operation come in different types. Before purchasing a device, it is worth getting acquainted with the functionality of the devices. In terms of functionality, two types can be distinguished:
- a simple device that allows you to program only the temperature;
- Daily programmer allows you to set the operating mode of the unit for 24 hours. After 24 hours, the cycle repeats;
- weekly programmer, which allows you to set the boiler operation program for a week, changing the heating level of the coolant during the day and during the week.
Another feature by which devices are classified is the connection method:
- Wired. A simple, but not very convenient device, which is connected to the counterpart installed on the boiler by wires.
- Wireless. When using these devices, the unit installed in the room is connected to the unit installed on the boiler using a radio signal.
Advice! In most cases, the maximum distance between wireless programmer units should not exceed 300 meters in open space and 50 meters in the presence of concrete walls.
A wireless device has important advantages:
- there is no need to string wires that can ruin the interior if the installation is carried out after renovation;
- if necessary, the programmer unit that is installed in the room can be moved to another place.
Top 6. MINCO HEAT MK-605
Rating (2021): 4.75
169 reviews taken into account from resources: AliExpress
Best price
This device is cheaper than other thermostats from AliExpress. He managed to bypass not only electric, but also mechanical models.
- Characteristics Average price: 808 rub.
- Maximum current: 25A
- Power supply: 220–240 VAC
- Temperature range: 5–60°
- Measurement accuracy: 1°
- Time modes: 5/6/7
MINCO HEAT MK-605 is considered the most budget thermostat on AliExpress. Of course, for a minimum price you can only get a device without Wi-Fi and backlighting with a power of 3A, although for many buyers this is enough. There are 16 or 25 Ampere versions, but you will have to pay extra for them. Reviews praise the reliable packaging and relatively fast delivery of the goods. The thermostat works well: the floor is really warm, the temperature is comfortable. The plastic case is made with high quality, although the material is quite soft. The main complaint expressed in the reviews is that the display is too small. In addition, at an angle, the indicators become almost unreadable.
What are the advantages of using it?
Even using a simple device can save fuel. But greater savings can be achieved if you use devices that allow you to set a program for the week.
When using such devices, gas savings reach 30%. How is it possible to save such a significant amount of fuel? Having a weekly programmer, you can:
- reduce fuel consumption at night while everyone is sleeping;
- reduce fuel consumption when no one in the household is at home. For example, if during the day everyone is away on business, but during the absence of household members, you can heat the coolant to a minimum, and by the time you return, bring the air temperature in the rooms to acceptable values.
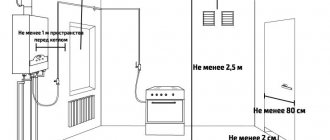
How to connect?
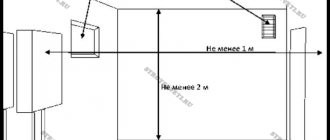
It is necessary to choose the correct installation location for the programmer. Experts recommend installing this device in the bedroom or living room. But installing the device in the hall, kitchen or other non-residential premises makes no practical sense.
It is advisable to choose the coldest room to install the programmer, for example, a corner room, or install the device where the family spends most of the time. Additional conditions for choosing an installation location:
- there should not be a heating radiator or other heat source nearby;
- The device should not be exposed to direct sunlight;
- Do not cover the device with curtains or hide it behind furniture.
In short, you need to choose an installation location that creates minimal thermal interference. Modern heating units have contacts for connecting a thermostat, so there are no problems with installing the device. Connect the device in accordance with the manufacturer's instructions given in the technical data sheet.
Once the device is installed, it will need to be configured according to the needs of the family. To configure, use buttons and switches located on the front panel of the device.
Installing a programmer will allow you to effectively regulate the operation of a gas boiler and save fuel. Using this device allows you not only to reduce costs, but also to create the most comfortable living conditions in your home. Programmers are not too expensive, so the purchase of such a device will quickly pay for itself by reducing gas costs.
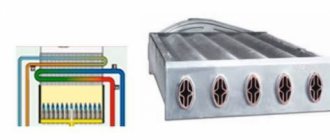
Connection diagram of an electric boiler to the network
Before connecting an electric heating boiler, please note that the electric boiler must be connected to the network using copper wiring. The cross-section of the wire must be no smaller than that specified in the document that came with the device. Electrical connections of the external type device must be made through special cable terminals. These pins should be located in the lower left corner. There should also be a brass grounding terminal with an M6 bolt.
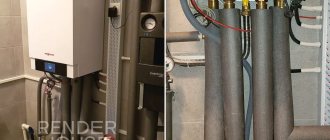
Power cable connection diagram
When inserting an electric boiler into the heating system and installing grounding, you need to ensure that good and reliable contact is ensured between the metal body of the device and the brass bolt. Before connecting the bolt to the frame of the device, you need to thoroughly clean the connection area.
If electric heating is planned to be organized for a building with a large area, then when purchasing equipment you need to choose one that provides the possibility of installing a cascade. In order for the devices to operate normally in a cascade, the terminals of the control device must be connected to the unit that is being controlled. If the system installation is controlled using a room-type regulator, then the control contacts must be connected to the terminals of the control device.
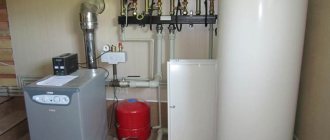
Diagram of the electrical heating system of a two-story house
The device must be inspected visually and make sure that it is in the correct position, the water pressure in the system is normal, and all communications are connected. All this is defined in the unit documentation.
After this, the installation diagram for an electric heating boiler involves the following steps:
- It is necessary to check the serviceability of the pipeline fittings located in front of the unit. To do this, you need to switch it from the “closed” to “open” position, and vice versa.
- All pipeline fittings of the electric heat generator are moved to the “closed” position. It is also necessary to move the pipeline fittings of the water supply and heating systems to this position.
- On those pipelines that supply cold water to the unit, you need to open the shut-off valves. If you use an electric heating system, it is not recommended to use antifreeze liquids for it. This is because they have properties that can affect the operation of equipment in a negative way. Antifreeze fluids have a composition that can cause aging or rapid wear of rubber components.
- It is necessary to install a sump filter or filter before entering the unit on the return pipeline. You can install both of these elements.
- After the heating system is completely filled with water, you need to check how tight it is.
When the installation of an electric boiler with heating radiators is completed, you need to check how efficient the system sensors are. These include sensors such as: temperature controller, water pressure sensor, signal and control components of the unit, emergency temperature sensor.
During repairs to the heating unit or during unfavorable installation conditions, an electric heating unit can be connected using rubber hoses.
For the heating system it is necessary to use water with a minimum hardness level. Then the service life of the heating elements can be significantly extended.