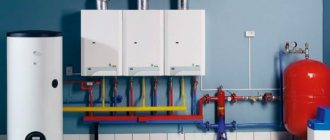
Material for installing a wall-mounted gas boiler
Installation of a wall-mounted gas boiler begins in the store. Of course, this is not the installation itself, but preparation for it. When purchasing or ordering a wall-mounted gas boiler, you need to find out or inspect whether the boiler is equipped with fastening elements. Usually these are hooks and power dowels. If this fastener is not included with the boiler, it must be purchased.
Boiler manufacturers complete the boiler with special installation patterns, which are used to mark and drill holes for mounting the boiler.
Note: Let me remind you that when choosing a wall-mounted gas boiler and purchasing it, you must inquire and request a certificate of conformity for the selected boiler model. Without this certificate, legalization (obtaining permission to connect) will be very problematic.
Main types
Gas boilers are classified according to various criteria: purpose, power produced, type of draft and installation method. Single-circuit boilers are installed exclusively for heating the house, while double-circuit boilers allow not only to warm up the premises, but also to provide the house with water with the possibility of heating it.
Low-power boilers are regulated according to a single-stage principle, medium-capacity units are regulated according to a two-stage principle. High-performance boilers usually provide modulated power control.
Closed-type boilers operate on ventilation draft. There are also gas boilers with natural draft - open type, or atmospheric.
Installation of gas boilers in a private house is carried out either by mounting on the wall or on the floor. In the first case, copper heat exchangers are used, and in the second, cast iron or steel.
The optimal solution for use in a private home is considered to be a flow-through double-circuit boiler with a boiler operating on automation. It provides heating of rooms in the cold season and heating of water for cooking, washing dishes, and taking a shower.
An automatic system, which includes a double thermostat and a microprocessor, greatly simplifies the process of adjusting the equipment, allows you to monitor the temperature indoors and outdoors, set a program to reduce heating to a minimum if there are no people in the house (for example, in the daytime, when everyone has gone to work). work).
Installing a boiler with fully automatic control will help you save from 30% to 70% of fuel compared to equipment with manual or semi-automatic control.
At the same time, in the absence of electricity, an automatic home boiler room will not be able to provide full heating of the house, so when installing the boiler, force majeure situations must also be taken into account.
When purchasing a gas boiler, be sure to check the availability of the certificate and equipment. If necessary, purchase additional fasteners for mounting the unit on a wall.
Tool for installing a gas wall-mounted boiler
For work you need to prepare the following tool:
- Electric drill or hammer drill. A drill is needed to drill holes for mounting a gas boiler.
- Construction level, more than 1 meter long.
The construction level plays an important role in the installation of a gas boiler, and especially a condensing gas boiler. Any tilt of the condensing gas boiler will lead to its failure in the shortest possible time. It’s a good idea to replace the building level with a laser level, this will improve the accuracy of installation.
Recommendations for reducing operating costs
If all operational settings are made in accordance with the tabular data given by the manufacturer, then the equipment will consume energy very economically, generating the necessary heat in the volume required by the owners.
To do this you should:
- For systems with radiators or thermosiphons, select the temperature of the coolant at the boiler outlet +60ºС. It is worth increasing it only if, during operation of the unit, comfortable heat in the room was not obtained.
- Adjust temperature conditions in accordance with the manufacturer’s instructions and the purpose of the room. To heat bedrooms and other rarely visited rooms, the heating temperature can be set below average.
- Do not exceed the temperature background recommended by the manufacturers of the heating devices included in the circuit.
- Use indoor and outdoor temperature sensors that record temperature increases/decrease. The thermostat connected to them will independently start/stop the boiler as needed.
- Adjust the temperature of the coolant by the hour using a timer. At night, for example, it can be lowered by 3-5 ºС.
It should be remembered that by increasing the temperature in the room being treated by just 1º, we immediately increase costs by approximately 6%.
In order not to constantly change the coolant temperature settings during the difficult autumn-spring period, it is better to install an outdoor temperature sensor. If you don’t find a suitable model or don’t have the funds to buy the original, you can build a homemade device like this:
Image gallery
Photo from
Stage 1: Assembling a homemade street sensor
Stage 2: Drilling the Wall to Externally
Stage 3: Adjusting the coolant according to the outside temperature
Step 4: Attaching the outdoor temperature sensor
In case of prolonged absence, it is better to disconnect the boiler from the power supply, but you should not turn off the frost protection system. It is turned off only for the summer period, during which the heating function is abandoned, completely turning off the single-circuit model and switching to the dual-circuit version for the supply of hot water.
In order to save on heating, you should not cover radiators with screens and heavy curtains. They will disrupt normal air circulation and force the boiler to work at full capacity for no apparent reason.
Also, the equipment manufacturer does not recommend micro-ventilation in rooms, keeping the transoms constantly ajar. It is better to open the window wide and ventilate in one gulp than to artificially lower the readings of the room temperature sensor for a long time. It has been proven in practice that it is more economical.
When using the water preparation function, it is better to initially select a temperature that is comfortable for use, without counting on mixing heated and cold water in the mixer. Believe me, thanks to this solution, the thermal energy generated by the generator will not be wasted. In addition, limescale will not settle on the inner walls.
Preparing the wall for installing a gas boiler
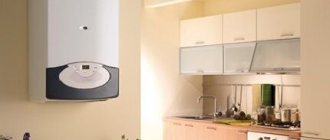
The room where the wall-mounted gas boiler will be located must meet a whole list of requirements for the combustion room. Often, wall-mounted gas boilers are installed in the kitchen and the space in the kitchen must be prepared for installation of the boiler.
In addition to ventilation, airing and other rules, special attention should be paid to the wall on which the boiler will be placed.
- The wall for hanging the gas boiler must be strong. The material or structure of the wall must be adapted to install the power fasteners on which the boiler will hang.
- If the wall for hanging the boiler is made of plasterboard, then in advance in the frame of the plasterboard structure, it is necessary to provide and lay firmly fixed wooden blocks in the place where the fasteners are installed.
- If the material of the wall or its finishing is potentially flammable, a non-flammable gasket of 3 mm thick and 10-15 cm larger than the dimensions of the boiler is installed between the wall and the boiler body.
- According to standards, a wall-mounted gas boiler should be 40-45 mm away from the wall. Therefore, the gas boiler is not mounted on the wall, but on bars previously fixed to the wall.
How to choose the right installation location?
Depending on the design, the installation requirements for wall-hung gas boilers are somewhat different. If a heating device with a closed combustion chamber is installed, it can be placed in almost any room of the house. For gas boilers with an open combustion chamber, the requirements are more stringent and a properly equipped boiler room should be provided for them. The general requirements imposed by regulatory documents (SP 42-101-2003, SNiP 42-01, SNiP 31-02-2001, MDS 41.2-2000) and controlled by gas services are as follows:
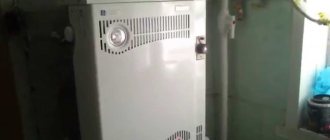
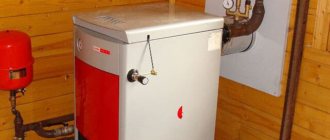
Photo 2: Equipped boiler room for a wall-mounted gas boiler
- When installing household mounted gas heat generators with a power of up to 60 kW, the volume of the room in which the installation is carried out must be at least 15 m³. Mounted boilers with an open combustion chamber must be placed in a separate room on any floor of the building. Turbocharged heaters with a power of up to 35 kW can be installed in the kitchen.
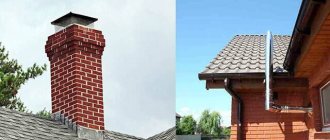
- The room in which installation is planned must have a ceiling height of at least 2.5 m. If a model with an open combustion chamber is used, it is required to equip it with a chimney for a gas boiler made of stainless steel or other suitable material.
- The boiler room or kitchen where the mounted boiler is installed must have a window with an area of at least 0.03 m² per cubic meter of room.
- When installing wall-mounted gas boilers with an open combustion chamber, it is important to ensure proper ventilation. The hood should produce three air exchanges in the room within an hour, and the supply ventilation should replenish the volume consumed by the hood plus supply the air necessary for normal operation of the burner.
- The external gas pipeline is supplied directly to the room where the boiler is installed. The section of pipe passing indoors must comply with the requirements of SNiP 2.04.08 for low-pressure gas mains.
- It is necessary to provide a connection point to the electrical network with grounding and artificial lighting. The temperature in the boiler room should be in the range from +5 to +35 °C with air humidity not exceeding 80%.
Photo 3: Installing a wall-mounted boiler in the kitchen of a country house
For more detailed information, you should refer directly to the regulatory documents given above. They regulate in detail the installation of mounted gas boilers and in them you can find answers to all questions that arise during the design.
Return to contents
Hanging a gas boiler on the wall
- Mark the installation level of the gas boiler. Height from the floor from 800 to 1600 mm.
- Attach a non-flammable material (asbestos) and a piece of metal sheet (galvanized sheet) to a wooden wall.
- Other types of walls, for aesthetic installation of the boiler, should be covered with ceramic tiles.
- If the boiler is not equipped with a special bracket, install bars at the level of the gas boiler mounting to ensure that the boiler is indented from the wall.
- Mark the mounting locations for the gas boiler. Usually, the packaging or instructions contain the exact dimensions of the boiler mounting points or an installation template. It is important to maintain the exact horizontal level of the gas boiler.
Important! A condensing gas boiler should hang with a slight slope, “away from you”, that is, the distance from the boiler to the wall at the top should be less than the distance to the wall at the bottom.
Important to remember! Whatever material the heating system in the house (apartment) is made of, the boiler is connected only with metal pipes.
Launch and setup
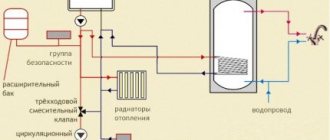
Before starting the boiler, check the pressure in the expansion tank; it must be at least 0.5 atm. Monitor the condition of the valves on the supply and return lines; they must be open.
The unit must be disconnected from power. Then they fill the heating system through the make-up valve to 1.5 atm and begin to bleed the air if a non-automatic air vent is installed in the network.
When air is released, the pressure will drop, so the device is alternately fed to the specified operating pressure.
Next, you will need to bleed the air from the internal circuit in the boiler; to do this, remove the working panel of the device; there is a screw for bleeding air on the pump.
Start the boiler in minimum mode, and warm up the circuit to a temperature of 50 C, turn it off with buttons, and from the power supply, and bleed the air at the boiler pump. The operation is repeated several times until all the air is removed from the air-filled heating system.
Next, the boiler is turned on to the operating temperature of the thermostat and the operation of the heating system is monitored to ensure that the set temperature is sufficient.
Preparing a gas boiler for hanging
In front of the gas boiler canopy:
- The boiler is removed from the package;
- The marking plate on the boiler body is checked against the certificate and invoices;
- The bracket included in the boiler kit or other selected fasteners is screwed to the installation location on the wall;
- All factory plugs on the boiler are removed;
- The internal pipe system MUST be washed.
- The gas boiler is hung in place.
After hanging, the horizontal position of the boiler is checked and adjustments are made if necessary. All! Hanging, or rather, installation of the wall-mounted gas boiler is complete. The next step is connecting the gas boiler to the system.
Heating unit wiring diagrams
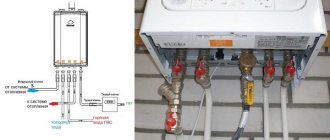
A wall-mounted gas boiler with a closed combustion chamber (turbocharged) is connected to 3 utility networks of a country house/apartment:
Atmospheric heat generators (open chamber), which take combustion air from the room, are connected to a traditional chimney. If you need to use a single-circuit unit for preparing domestic water (DHW), add 1 more connection - to the indirect heating boiler.
First, let's consider the option of connecting the boiler to a radiator heating system or heated floors. For piping you will need the following pipeline fittings:
Addition. If the amount of coolant in the system exceeds 70 liters, an additional expansion tank will be required. To install the tank, purchase 2 more ball valves - shut-off and drain.
We wire the wall-mounted boiler according to the standard diagram presented below. We screw the taps to the fittings of the device with the American side facing down, then we connect the pipes. We place the dirt trap on the heating return, in front of it there is a tap that allows you to clean the filter mesh without emptying the system. It will also allow you to remove the entire boiler in case of major repairs or replacement.
Connection to an indirect heating boiler
Many manufacturers supply wall-mounted gas heaters with connections for connecting the boiler. There will be no difficulties here: we buy 2 ½” ball valves with American ones and connect the water heater heat exchanger. You will also need an overhead thermostat with a temperature sensor installed in a special boiler sleeve. From it we lay an electrical cable to the corresponding terminals of the boiler.
When there are no fittings for an indirect water heater, we purchase a three-way valve with an electric drive. We connect the wall-mounted unit to the boiler according to the following diagram:
How does this scheme work:
An important nuance. When the DHW tank is heated, the boiler automatically turns on at full power, so loading the boiler takes 15–30 minutes, depending on the volume. Returning to heating mode, the unit reduces output according to your settings.
How to connect 2 boilers - wall-mounted gas and solid fuel
In this case, a parallel connection method is used. The problem is different - how to coordinate the operation of heat generators so that they start and turn off automatically. We offer a standard circuit with 2 check valves, a thermostat and a room temperature controller.
How it works:
In a similar way, you can connect 2 other wall heaters - electric and gas. If you need to connect an indirect boiler, radiators and heated floors to two heat sources, we recommend using the diagram of primary-secondary rings shown in the picture.
The diagram shows a wall-mounted electric heat generator; instead, a gas heat generator is connected in the same way
Electrical connection
A wall-mounted water heating device is a mini-boiler room with its own electronic control unit, circulation pump and safety group. The boiler cannot simply be plugged into the first outlet you come across; you must lay a separate cable power supply line, protected by a two-pole circuit breaker, as shown in the diagram.
Recommendations for installation and connection:
Advice. Some wall-mounted imported boilers may be capricious due to incorrect phase location. If after switching on the unit does not want to start, try swapping the neutral and phase wires.
Related video: Installing a gas boiler
©Obotoplenii.ru
Other articles in the section: Gas boiler
- What is a condensing heating boiler
- Advantages of a condensing heating boiler
- Single-circuit wall-mounted gas boiler
- How to flush the heat exchanger of a gas boiler
- Installation of a gas boiler: preparatory work for installing a gas heating boiler on the wall
- Circulation pump in the design of a gas boiler
- Various pipes for piping a wall-mounted gas boiler
{
Installation cost
When contacting gas boiler installation specialists, many clients are interested in the cost of the work. It is important to understand that pricing policies may differ in different regions.
A comprehensive boiler connection with a hole and start-up starts from 5,000 rubles. This amount will be asked from you provided that there is no additional work. If the heating system is made of metal pipes, then the cost of installing wall-mounted gas boilers will be higher. Around 6000-8000 rubles.
Also budget 3000-4000 rubles for the purchase of materials (hose, pipes, taps, fittings, etc.)
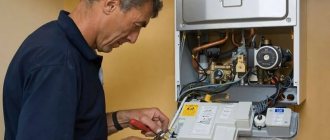
Only competent people who have access to this type of work can install a gas boiler. Even if the boiler is installed by company specialists, you need to know its operating system. The boiler itself is as safe as possible in operation as it has many degrees of protection.
Normative documents
Gas equipment
Before making a final decision to install rather expensive equipment, you need to carefully study the official documents. These are standards that regulate the use of gas boilers by the population.
They have the general name “Building Norms and Rules” (SNiP) and contain general rules and specific, clear requirements for those wishing to equip home boiler rooms.
The main specialized SNiPs, where you can find all the information of interest, are collected in the table:
| SNiP number | Name | Regulate |
| 31-02-2001 | Single-apartment residential houses | Operating and safety requirements |
| 41-01-2003 | Heating, ventilation and air conditioning | Installation and use of heating systems |
| 21-01-97* | Fire safety of buildings and structures | Fire protection rules for premises |
| 42-01-2002 | Gas distribution systems | Design of gas distribution networks |
Infrared ceiling heater with thermostat - modern technologies in your home (Prices) + Reviews
Wall mounted
Nuances of installing wall-mounted boilers:
- To operate, you will need two heat exchangers and four pipes, which are necessary for reliable fixation of the pipes. One such element heats the coolant for the heating system, but the second is installed to supply water to the hot water compartment.
- Installing a double-circuit wall-mounted gas heating boiler in a private wooden house is more difficult than in a stone one. The requirements for installing equipment are related to the fact that the basic heat exchanger is connected to the heating, and the second such element is connected to the water supply. Each model has its own network installation points, so you must first read the equipment installation instructions.
The coolant circulates from the base heat exchanger to the additional compartment and back. According to this scheme, the liquid reaches the optimal temperature for operation, in this case we can safely speak of high efficiency in heating water for domestic needs (heating the liquid up to +85 °C).