Electric heating units are in high demand due to their convenience and safety of use. They can serve as the main supplier of heat, but are more often used as an additional heat generator, since electricity is the most expensive energy carrier. Installing an electric boiler in a private home does not require permitting; installation of the unit can be done on your own.
Connecting an electric boiler in a private house
Tools and materials
Installation and installation of an electric boiler requires the use of
:
- tape measure, building level, pencil or marker;
- hammer drill/electric drill;
- fasteners (the diameter of the anchors must correspond to the diameter of the drill);
- electrical wires, cables (the cross-section is determined at the stage of preparation for installation);
- metal or metal-plastic pipes;
- fittings, fittings corresponding to pipes.
It is also important to have a pre-prepared diagram for installing the electric boiler in the heating system and the user manual that comes with the unit.
Installation Rules
When considering how to connect an electric heating boiler, pay attention to the choice of installation location for the unit. Ideally, this is a separate room - a boiler room, equipped with electrical power equipment, where unauthorized persons and children have no access. New models of factory-made electric boilers can be installed in the kitchen.
The heating unit is installed in such a way that there is free space above its top and on the sides. This will make it possible to carry out preventive and repair work in convenient conditions. The following distances are observed
:
- to the ceiling - from 80 cm;
- to the floor (for a wall-mounted model) - from 50 cm;
- from the body to the walls - 5 cm;
- to pipelines - from 50 cm;
- in front of the front panel - from 70 cm.
When learning how to properly install a boiler to heat a house or apartment, pay close attention to the markings of the installation site. The unit must be positioned strictly horizontally, so markings are carried out using a level and the result is checked with the same tool after installing the boiler on the fastening elements.
Mechanical electric heating boiler
Before installing an electric heating boiler, it is necessary to develop a diagram for connecting the heat generator to the heating circuit and to the electrical network. The cross-section of the pipelines must correspond to the parameters of the circulation pump built into the boiler.
When choosing the cable cross-section for connecting to the electrical network, take into account the power of the unit. Please note: for low-power models, a connection to a 220 V household network is sufficient; for powerful units, a three-phase 380 V network is required.
In addition to wall-mounted models, manufacturers offer floor-mounted units. Installation of floor-standing electric boilers is carried out using a standard stand or they are installed on a specially prepared site.
How to make grounding
Laying a grounding loop near a private house is a simple matter and very useful from the point of view of electrical safety. For installation, find 3 steel rods Ø16 mm 2 m long and a strip with a cross-section of 40 x 5 mm.
Stepping 3 m away from the wall of the building, arrange grounding according to the step-by-step instructions:
- Mark a triangle with sides of 2 m on the ground and dig a pit to a depth of 50 cm.
- Sharpen the ends of the rods with sandpaper or a grinder, install them at the vertices of the triangle and drive them into the ground to their full length.
A bunch of grounding conductors (on the left in the photo) and laying a busbar into the house (on the right) - In the pit, securely connect the protruding ends of the rods with a strip by welding.
- Make a supply bus from a strip, welding it to the circuit and securing it to the base. Grab a bolt to it, screw on the copper busbar and conduct the grounding conductor inside the house, connecting it to the metal body of the electrical panel.
Upon completion, treat the welding seams and the above-ground section of the strip with bitumen and bury the hole. For more information about the grounding device for an electric boiler and home appliances, watch the video:
Safety regulations
Installation of an electric boiler must be carried out in compliance with safety rules:
- Before starting work, make sure that the electrical supply is turned off.
- It is prohibited to install an electric heating boiler in close proximity to a water supply or water source.
- The recommended distances between the unit body and building structures should be observed.
- Make sure that the electrical wiring parameters correspond to the power of the boiler (connecting a powerful unit to a 220 V household network can cause overload and short circuit).
- The boiler must be connected to a grounding circuit.
- Installation of an electric boiler is permitted on a wall made of non-combustible material. If the wall structures are made of wood or other material prone to fire, non-combustible sheathing made of basalt cardboard and sheet metal is mounted on the wall.
- Power cables must not be laid under heating circuit or water supply pipes. If this cannot be avoided, use special sealed housings made of metal or plastic to protect the cable from possible moisture ingress.
- When installing a heating boiler with your own hands, the heating circuit pipelines that are connected to it should be securely attached to the wall so that they do not add load to the body of the unit.
Installation of a residual current device
Installation work
The installation diagram of an electric heat generator depends on its type. Today, heating element boilers, as well as electrode and induction models, are used to heat an individual home. The unit with a tubular heating element is equipped with a circulation pump and automation for controlling and monitoring operation. Such boilers only require connection to the heating circuit and the electrical network. When connecting electrode and induction electric boilers, installation of external piping is required.
At the first stage of installing an electric boiler, markings are made in the selected location, away from the water supply system. When installing a floor-standing unit, a metal stand is attached to the floor.
For a wall-mounted model, the installation locations of fasteners are marked on the wall and holes are drilled. During the work, it is important to check the horizontal position of the fasteners using a building level. Before starting work, make sure that the wall can withstand the entire boiler filled with water. Next, a mounting profile with a mounting strip is mounted on the wall, and the boiler unit is hung. It must be held securely and hang strictly horizontally.
Installed heating unit
Connection to the heating circuit and water supply
The installation of an electric boiler is accompanied by a connection to the heating system. If the unit is double-circuit and is designed to prepare hot water, it is also connected to the water supply.
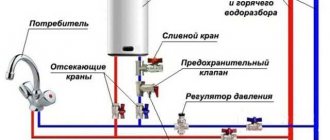
A heating element unit for heating a private house, in the housing of which a circulation pump and automation are located, is connected to the system as follows
:
- Pipes are attached to the inlet pipes for connection to the supply and return pipes of the heating circuit; the connection is made through ball valves with American fittings for quick installation/dismantling;
- a dirt filter is installed on the return line (it is advisable to install a ball valve in front of it to make cleaning the filter more convenient), as well as a membrane-type expansion tank, if there is no built-in one or its volume is insufficient for the existing system.
Note! The diagram does not indicate the location of the pipe for draining the coolant from the system. It is mounted on the return pipe after the ball valve.
We will separately consider how to install an electric boiler if it is electrode or induction. Connecting an electric heating boiler in this case requires the installation of a piping with a centrifugal pump and a safety group, which includes a pressure gauge, a safety valve and an air vent operating in automatic mode. The scheme for connecting the unit to the heating system is shown in the diagram:
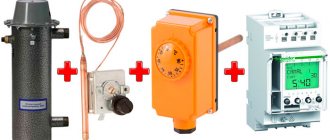
The two best ways to reduce electric boiler consumption
How to choose an external thermostat for an electric boiler and save up to 30% on heating every month
A programmable room thermostat controls the operation of the boiler based on measurements of the air temperature in the room in which it is installed, and not on the coolant temperature
However, the main and most important task for saving purposes is the programming mode of work settings for the next day and week. For example, during working hours when the owners are away from home, you can set the temperature to 15°C
And during sleep – 18 or 19°C. Such parameters will not affect comfort, but will significantly reduce the final energy consumption.
The second indispensable element when heating with an electric boiler is an electric meter, which differentiates electricity consumption by two, or better yet, by three time zones. For example, for the Moscow region the following tariffs are differentiated by time zones:
- peak zone (from 7:00 to 10:00 and from 17:00 to 21:00) – 5.06 rubles per 1 kWh;
- half-peak zone (from 10:00 to 17:00 and from 21:00 to 23:00) – 3.89 rubles per 1 kWh;
- night zone (from 23:00 to 7:00) – 1.68 rubles per 1 kWh.
In practice, the costs of purchasing, designing and installing a metering device that differentiates consumption pays off in a few months, since it reduces costs in monetary terms by 15-25%.
Theory
What is a heating element in an electric boiler? From the point of view of electrical engineering, this is an active resistance that generates heat when an electric current passes through it.
In appearance, a single heating element looks like a bent or curled tube. Spirals can be of very different shapes, but the connection principle is the same; a single heating element has two contacts for connection.
When connecting a single heating element to the supply voltage, we simply need to connect its terminals to the power supply. If the heating element is designed for 220 Volts, then we connect it to the phase and working zero. If the heating element is 380 Volt, then connect the heating element to two phases.
But this is a single heating element, which we can see in an electric kettle, but not in an electric boiler. The heating element of a heating boiler is three single heating elements mounted on a single platform (flange) with contacts located on it.
The most common boiler heating element consists of three single heating elements mounted on a common flange. On the flange there are 6 (six) contacts of the electric heating element of the boiler for connection. There are boilers with a large number of single heating elements, for example, like this:
Boiler heating element connection diagrams
Option 1. Connection diagram to a single-phase network
Typically, three single heating elements in such a design are placed so that the contacts from different heating elements are located opposite each other.
To connect a heating element to 220 Volts, you need to connect three contacts from different single spirals with a jumper and connect them to the working zero.
The three remaining contacts also need to be connected and connected to the working phase. This will ensure that all heating elements are turned on simultaneously for heating when power is applied.
However, the connection is not made directly this way, and for every second contact the heating element is connected to a phase after its own machine or, what is done more often, it is connected from its own control line (automation).
Option 2. Three-phase connection
If we look at the heating elements for boilers sold, we will see that almost all of them are labeled as 220/380 Volt heating elements.
If you have this version of the heating element, and you have the opportunity to connect to a three-phase power supply of 220 Volts or 380 Volts, then you need to use connection diagrams called “star” and “delta”.
According to the “star” circuit of 220 Volts, three phases, you need to connect the three contacts of single heating elements with a perm and connect them to the working zero. Apply to the second free contacts via a phase wire. Each single heating element will operate from 220 Volts, independently of each other.
According to the “triangle” circuit of 380 Volts, you need to connect contacts 1-6, 2-3, 4-5 with jumpers, for single heating elements 1-2.3-4.5-6 and supply phase wires to them. Each single heating element will operate at 380 Volts, independently of each other.
What determines the actual power consumption?
The most significant power consumption of an electric heating boiler depends on:
- Operating conditions. Namely, on the desired temperature regime (a decrease in temperature by 1°C implies up to 5% savings), constancy of residence in the house and regulation of indicators during sleep or absence of the owners of the house.
- Technical condition of the boiler. Namely, its heating elements (tubular electric heaters). When using hard, untreated and constantly replaced water as a coolant, scale forms on heating elements, which reduces efficiency from 99% to 90.80 and even 70%. To heat the coolant to the previous temperature through a layer of scale, the electric boiler requires more energy and time.
- Equipment. The circulation pump and advanced automation consume from 60 to 150 W. However, these are not so significant values against the background of already expensive operating costs.
- Automation functionality. Advanced modern automation has several operating modes, more competently controls the switching on and off of heating elements, the operation of the circulation pump, smoothly regulates the temperature, and allows you to set hysteresis values. Electric boilers in the middle and higher price categories are often equipped with the ability to program the operating mode, which significantly affects consumption.
Tags: automatic, sconce, view, choice, switch, alignment, hysteresis, house, , grounding, ground, insulation, test, cable, how, design, circuit, , installation, power, nominal, connection, potential, principle, wire, gasket, start, , work, size, calculation, regulator, relay, repair, row, homemade, network, system, connection, resistance, circuit, ten, type, current, current, triangle, , installation, phase, photo, shield, electrical panel
Installation options
So, first, let’s look at the options for connecting an electric boiler in a private house or apartment with our own hands:
- If the power of the water heater does not exceed 3.5 kW, then it is usually powered from an outlet. In this case, the use of a single-phase 220V network is allowed.
- In the event that the power varies between 3.5-7 kW, it is necessary to carry out the electrical installation yourself directly from the junction box. This is due to the fact that the outlet may not withstand high current loads. As in the previous case, a 220-volt network is allowed for use.
- Well, the last option that may come up is an electric boiler with a power of over 7 kW. In this case, it is necessary not only to run a separate cable from the distribution box, but also to use a more powerful 3-phase 380V network.
Minimum required power of an electric boiler for heating a house with an area of 150 m2
Classic heating element electric boilers have compact sizes and a minimum of communications around them; they can be installed in any room.
If the house is average (standard 2-brick masonry, no insulation, ceilings up to 2.7 m, climatic zone of the Moscow region), the minimum required power of heating equipment is calculated quite simply: 1 kW for every 10 sq. m of heated area. We also recommend keeping a power reserve of 15-25%.
Of course, conditions are always individual and if the house is located in the extreme northern or southern part of the country, is well insulated, has high ceilings or an unusually large glazing area, it is necessary to make accurate calculations taking into account correction factors. You can do this using the calculator below.
Calculator for accurate calculations
The thermal power of the electric boiler must provide the total power of the radiators, which in turn is calculated based on the heat loss of each room separately. Therefore, find the values for each heated room and add them up, this will be the minimum required electric boiler power for the entire heated area of your home.
Electrical installation in a single-phase network
As we have already said, you can connect the water heater to a single-phase network through a plug or a separately powered cable. There is no point in even stopping at the first option, because... Anyone can insert a plug into a socket.
As for the second option, first you need to calculate the current cross-section of the cable (if the required diameter of the cores is not indicated in the product data sheet), and then bring the conductor to the installation site of the boiler. Then everything is simple - we connect the phase, neutral and grounding to the corresponding terminals in the unit (they are marked on them). For your attention, a schematic diagram of connecting an electric boiler with a thermostat to the heating system:
What machines should be installed on an electric boiler?
It was said above that an electric boiler, even 3 kW, is best connected with a separate wire and through a circuit breaker. To calculate the rating of the machine, it is enough to know what current the cable can withstand.
A cable with a cross section of 4 mm² can withstand a current of 27 Amps. Therefore, you need to install the closest 32 Ampere circuit breaker, since a 25 Ampere circuit breaker can trip as a result of overloads. As for a cable with a cross-section of 6 mm², it can withstand a current of 40 Amps. Therefore, the circuit breaker must be selected with an appropriate value, no less than 40 Amperes.
So, let's summarize:
- Although they say, it is better to connect electric boilers with a power of up to 3.5 kW through a separate cable and a separate automatic circuit breaker; it is also possible with an RCD;
- Electric boilers with a power of 7-10 kW must be connected through a separate automatic device and, if possible, with an RCD;
- To connect electric boilers with a power of more than 10 kW, permission is most often required.
Electrical installation in a three-phase network
The diagram for connecting an electric boiler to a three-phase network is more complex, but even a beginner can do it.
The three phases must be connected as follows:
Please pay attention to the following nuances:
- Each water heater comes with a technical passport, which must indicate the manufacturer’s recommended wiring diagram for the electric boiler. Be guided only by this document in your case, because... The examples provided on the Internet may not always be suitable for your heating system.
- Be sure to protect the boiler with a circuit breaker and RCD. These devices will prevent overload of the unit, short circuit and current leakage in the electrical network.
- The wiring must be grounded.
For your attention, a visual project of electric heating in a two-story dacha using a boiler:
In addition, we recommend watching a video that clearly demonstrates connecting a 380 V electric boiler:
Connecting a three-phase electric boiler
Connecting a three-phase electric boiler
We install protective equipment
When all the input wires are connected to the electric boiler, it will be necessary to additionally protect it with RCD circuit breakers installed in the main panel.
The purpose of the first device is to protect equipment from short circuits and wiring overloads. Connecting an electric boiler through an RCD will protect you from leakage currents.
It is also recommended to connect a voltage stabilizer, since even small surges can damage the unit. I don’t think it’s worth talking about the need to ground an electric boiler. The main requirement is that the ground wire runs directly from the bus to the equipment frame.
Electric boiler connection diagram: reliable protection and energy saving
Greetings, comrades! Do you know how to connect an electric boiler to electricity? Are you interested in what elements should the boiler piping include? Today I want to answer these questions in detail and as clearly as possible and tell you which electric boiler connection diagram will allow you to heat your home at minimal cost.
Diagram of an electrical boiler room with an automatic control system for boiler power.
Before undertaking the implementation of any project, you need to clearly formulate its goals. Here is their list.
Safety
It consists of three components:
- Reliable automatic shutdown . The electrical circuit must prevent electric shock to the user and ensure that the power is turned off in the event of a short circuit;
- Correct wiring calculation . When the boiler is operating at full power, it should not heat up: high temperatures can damage the insulation. This is especially important when installing hidden wiring;
Relative cost of thermal energy obtained from different sources. Prices change from year to year, but their ratio remains constant.
The main reason for the popularity of electric heating is its complete autonomy. The boiler does not require the owner’s attention from the word “at all”: it is capable of maintaining the temperature you set in the house indefinitely. However, the owner of an electric boiler, of course, wants to reduce his electricity bills. I will tell you how to do this in the corresponding section of the article.
Position three – type of fuel for the generator
Selecting a generator by power and type of fuel
Before choosing which electric generator - gasoline, diesel or gas - you should purchase for your home, you should take into account some circumstances. If power outages are short-term, then it is more preferable to purchase and connect a gasoline generator, which, moreover, is much cheaper than a diesel one
If there are long and frequent outages in the main network, then it is better to buy a diesel generator. These units are more expensive than gasoline units, but the cost of diesel fuel and maintenance is several times lower than that of gasoline units.
And finally, if the house has natural gas or a gas tank for heating, then it is advisable to connect a gas unit as a backup power source.