Almost any electric boiler requires automatic control.
You cannot install one single switch at the input that will turn the heating on and off.
There must be a certain security system and devices for monitoring coolant temperature. Let's look at how to assemble such a system, analyze its diagram and functionality of individual elements.
At the same time, we will focus on the most minimalistic and simplest options that you can assemble yourself with your own hands.
After all, as you know, the fewer elements, the greater the reliability of the entire system. Therefore, the simplest options work longer and more reliably than others.
What is the difference between an electric boiler
Experts consider an electric boiler to be the simplest equipment for creating heating. You don't have to do any complicated work during the installation process.
What does not need to be installed with an electric boiler:
- No chimney is created;
- Supply and exhaust ventilation is not used;
- No special room is used to organize the boiler room.
But how is this possible? Is it really possible to connect an electric boiler in a private home without all this? And what will work reliably?
Yes! Thanks to modern technologies, the latest models have control elements and components for operation: a pump for forced circulation of coolant, an expansion tank, security systems and other equipment.
Therefore, in the case of assembling a simple heating system for private use, a lot of space or developed communications are not required. Due to this, the installation process requires little knowledge to make a reliable connection yourself.
Important: Unfortunately, many manufacturers make special requirements for warranty service. The installation must be carried out by a qualified technician from a special organization under a contract.
The only advantage in this situation can be seen in the low cost of such a service. Why charge a lot of money when anyone can do it after a little familiarization with the installation process. It's really very simple.
Boiler selection
The choice of boiler unit for heat supply is made according to thermal power, electrical network parameters and the principle of the heating element. The price of the heating set depends on the last parameter. Such electric units have increased functionality - all models are equipped with block automation with a temperature controller.
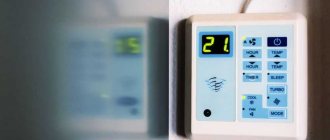
Modern modifications of electric boilers are implemented with various peripheral devices - weather-sensitive sensors, room thermostats and GSM modules for adjusting the indoor temperature at a distance from a mobile phone via the Internet.
The level of assembly of block units is very high, which allows you to install such heating with your own hands. The only exception is the installation and adjustment of power supply lines to the unit, which must be performed by certified specialists.
Before connecting an electric boiler, the thermal power is calculated using a simple formula. Knowing the total heated area of the house, multiply it by 0.1 kW and a safety factor of 1.2, the result will be the thermal power of the device.
For example, for a house with a total area of 150 m2, the boiler power will be required: 150x1.2x0.1= 18 kW.
Rules for connecting an electric boiler
Many people thought that there were no rules. Therefore, you can familiarize yourself with the connection diagram of the electric boiler. Then connect everything yourself and use it for many years. In fact, everything is not so simple.
Connection rules based on PUE (7th edition):
- If the power of the electric boiler is more than 10 kW, permission is required from Energonadzor specialists. But there are many models on sale that do not exceed this limit. They have sufficient heat output to heat a small house;
- But in the case of installing a differentiating meter, there are no exceptions. You will have to obtain permission from Energonadzor. This is a very useful addition because it helps save energy. Therefore it is better to install it.
No other permits will be required. But it is necessary to understand the nuances of equipment installation.
Types of boilers by heater type
Today there are many modifications of units that differ in the connection diagram of the electric boiler, and are classified according to:
- configurations;
- characteristics of thermal conditions;
- design solutions;
- type of heating;
- manufacturing plants;
- cost.
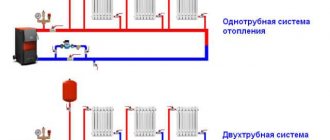
All electric boilers designed for water heat supply, according to the method of heating the coolant, are divided into 3 main categories:
- Heating elements that use tubular electric heating elements.
- Electrode or ionic/electrolysis, operating using the ability of water to heat up when passing alternating current through an electrode.
- Induction, using the properties of ferromagnets to heat up under the influence of induction current.
Electric boiler installation
It is worth realizing that all electric boilers differ mainly only in operating power. For power greater than 6 kW, a three-phase 380 V power supply is used.
Although models with a power of 8-12 kW can be used from a single-phase network and 220 V, their performance will not be at maximum efficiency.
As we have already mentioned, the electric boiler can be installed anywhere. Use of the corridor, kitchen, hallway is allowed.
Although, taking into account the need to install pipes for the movement of coolant, adjust grounding, and add associated communications, it becomes clear that even in permitted locations, installation is characterized by significant difficulties. And it is prohibited to place a boiler in a bathroom.
If you use wood to mount a wall, you will have to provide a layer of non-combustible material: xylitol sheet or basalt cardboard.
Standard requirements for the space around the electric boiler:
- It is necessary to leave 0.7 meters of free space on top;
- Provide 0.5 meters of free space on the sides of the boiler;
- There should be 0.7 meters left to the boiler unit;
- There should not be less than 3 cm between the surface of the boiler and the wall.
But in general, these are not complex restrictions and requirements in comparison with similar heating equipment.
Easy adjustment of electric heating power
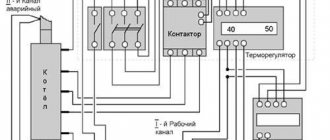
The closed or open position of the contacts depends on whether voltage is applied or removed from its control coil. It turns out that in order to assemble the automation, we must supply control signals (voltage) to the terminals of these same coils through some other elements.
The coil has two contacts A1, A2.
When purchasing, pay attention that starters can come with 380V and 220V coils. It's better to take the last option.
In this case, you directly connect the neutral conductor to one of the contacts, and install microswitch buttons into the gap of the second.
What are they needed for? Thanks to them, you have the opportunity to turn on 1,2 or 3 heating elements alternately, thereby increasing or decreasing the heating power.
For example, the temperature outside the window is -5C. You press one button and start up just one heating element with a power of 2 kW. The frost hit -25C, press all three buttons and increase the power three times.
In this case, the number of heating stages will depend on the rated power of each heating element. If they are all 2 kW, that’s only three steps.
But if one is 2 kW, the second is 3 kW, and the third is 4 kW, then the number of stages automatically increases to seven!
Everything will depend on which phases (heating elements) are connected and in what sequence.
- individually 2kW – 3kW – 4kW
- together 2kw+3kw+4kw
- separately 2kW+3kW
- separately 2kW+4kW
- separately 3kW+4kW
That is, thanks to these small buttons and separate modular starters, you get the simplest circuit for adjusting the power of electric heating.
The current in the coil control circuits is very small (several milliamps). Accordingly, there is no need to install full-fledged switches here.
All these three microswitches must be supplied with one phase. Let's say phase C. Take it from the lower contacts of the input circuit breaker.
It is from this point that the entire further automation scheme begins.
DIY electric boiler installation
You may not be able to do everything yourself. But some of the work can be done without the involvement of craftsmen. It's interesting, educational and will help you save money.
Stages of work:
- The wall is cleaned of dirt and dust accumulations until a shine appears;
- We will use a hinged mounting plate, screws and dowels. Usually all this is offered along with the boiler;
- Markings are created on the wall along the mounting strip. Holes are drilled to match the diameter of the dowels;
- The dowels are inserted into the holes;
- The boiler is hung on the wall using threaded hooks. Now you need to tighten the screws.
But don’t be surprised if other fasteners are offered with the model. It's normal they may differ. The instructions must indicate the method of fastening.
Electrical installation in a single-phase network
As we have already said, you can connect the water heater to a single-phase network through a plug or a separately powered cable. There is no point in even stopping at the first option, because... Anyone can insert a plug into a socket.
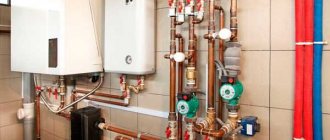
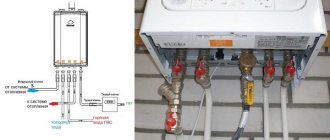
As for the second option, first you need to calculate the current cross-section of the cable (if the required diameter of the cores is not indicated in the product data sheet), and then bring the conductor to the installation site of the boiler. Then everything is simple - we connect the phase, neutral and grounding to the corresponding terminals in the unit (they are marked on them). For your attention, a schematic diagram of connecting an electric boiler with a thermostat to the heating system:
Electric boiler wiring
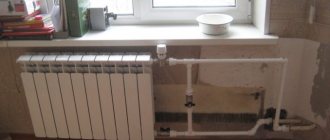
If a modern model of electric boiler is used, then elements for full operation are already installed in its monoblock housing. Therefore, we connect to the pipes based on the supply and return pipes. It is important to understand that the water starting system should be connected to the return line, thanks to the make-up tap.
If we use a simple option, then we will have to use the circuit and connect the electric boiler sensors ourselves. But overall it's a simple job. It should not lead to serious difficulties.
Stages of piping a simple electric boiler:
- A hydraulic manifold and a volumetric expansion tank are installed on the basis of a special fastening;
- Pipe laying is in progress. A circulation pump, a filtration system, and safety elements are added.
Important: After and very important before each element, it is worth installing a special shut-off valve to cut off the coolant in this part of the system. This will help in the process of carrying out repair work, since you will not have to drain water throughout the entire system. For reliability, some moving elements are additionally secured; a tourniquet is used for this. Threaded connections are reinforced with sealing tape.
Now we understand the differences between an electric boiler and have studied the rules for connecting it. Unfortunately, this is not enough for reliable operation; installation of grounding and connection to the electrical network should be left to specialists, since this is very important and difficult to do without specific knowledge.
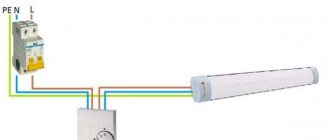
Why do you need a limit thermostat?
A mandatory element of such a scheme is a limit thermostat.
This is a protective device that will turn off your electric boiler if it goes into what is called a breakdown.
For example, the circulation pump has stopped working or a blockage has formed somewhere. As a result, the temperature began to rise sharply and exceeded permissible values.
You set this temperature yourself using a manual regulator.
Since this is a protective element that must completely “extinguish” the boiler, it must be connected in series to the control phase break, as in the figure below.
Photos of the best electric boiler models
Equipment classification and operating principle
An electric boiler converts electrical energy into heat and, depending on the design features, can be:
- TENOV;
- electrode;
- induction.
Regardless of the type, modern models are equipped with a thermostat, with which you can adjust the power of the device and the degree of heating of the coolant.
Usually it is also possible to receive information from an external sensor to control the temperature of the air mass in a specific room.
Device with heating element
Inside the container intended for water, heating elements are installed - heating elements. They can be made in the form of tubes or plates. To regulate the degree of heating, the heaters are turned on one by one.
Water enters the tank, is heated, and then transferred to the circuit. As it cools or heats up, individual heating elements turn on or off. The movement of the coolant is controlled by a built-in circulation pump.
Depending on the size and type of heating elements, electric boilers are wall-mounted or floor-mounted. You need to choose a place to install the device so that it is convenient to service.
You can choose double-circuit models of such boilers; they heat water not only for heating, but also for plumbing. Heating element devices are popular due to their simple design and relatively low price. When used correctly, they rarely break down.
In addition to water, antifreeze or oil compositions of various concentrations are used as a coolant. But the sizes of such devices are usually quite large, which limits the possibilities when choosing a place to install them. Over time, plaque settles on the heating elements, and the heating elements need to be replaced periodically.
Electrode boiler for heating
For heating, the potential difference at two electrodes and the natural resistance of water, which arises due to the salts dissolved in it, are used here. These are compact devices that can quickly heat small volumes of water.
Electrode boilers are very compact and easy to install, but such devices only work with water that has a certain resistivity
A built-in circulation pump is not needed here. This is a simple device that almost never breaks. And if this happens, it is not difficult to repair it. The price for devices of this type can be called affordable.
But oil and antifreeze are not suitable for such a boiler; only water, not distilled water, is acceptable as a coolant. Over time, the electrodes wear out and dissolve in water. They need to be periodically replaced with new elements.
Induction heating device
In such boilers, the heating element is made of a dielectric housing with a coil and core wound on it. The current in the coil causes a potential difference in the core, which heats up quite quickly. Thermal energy is transferred to the coolant.
Boilers with the induction operating principle are resistant to wear, they have high efficiency and last an exceptionally long time. The design is so simple that it can be made from available materials
This is a boiler with high efficiency and a long service life. Industrial models are quite expensive, but if you wish, you can make a homemade induction analogue. Any coolant liquid is suitable, and breakdowns are extremely rare.
Useful features and disadvantages
It is also worth considering installing a universal solid fuel boiler with built-in electric heating elements. Some models even have a hob, which does not require additional external finishing.
Electric boilers can easily withstand power outages for up to 6 months. This makes them a good option in case of irregular use of the system or in case of interruptions in the supply of electricity needed to heat a private home.
The disadvantage of using an electric boiler is the need for powerful supply cables with a large cross-section.
How to make grounding
Laying a grounding loop near a private house is a simple matter and very useful from the point of view of electrical safety. For installation, find 3 steel rods Ø16 mm 2 m long and a strip with a cross-section of 40 x 5 mm.
Stepping 3 m away from the wall of the building, arrange grounding according to the step-by-step instructions:
- Mark a triangle with sides of 2 m on the ground and dig a pit to a depth of 50 cm.
- Sharpen the ends of the rods with sandpaper or a grinder, install them at the vertices of the triangle and drive them into the ground to their full length.
A bunch of grounding conductors (on the left in the photo) and laying a busbar into the house (on the right) - In the pit, securely connect the protruding ends of the rods with a strip by welding.
- Make a supply bus from a strip, welding it to the circuit and securing it to the base. Grab a bolt to it, screw on the copper busbar and conduct the grounding conductor inside the house, connecting it to the metal body of the electrical panel.
Upon completion, treat the welding seams and the above-ground section of the strip with bitumen and bury the hole. For more information about the grounding device for an electric boiler and home appliances, watch the video:
Absolutely not
- Connect the generator through a regular house socket using a plug-plug wire, turning off the input circuit breaker. Why? We answer:
- The power of the most popular generators for private homes usually ranges from 5-6.5 kW. A household socket, if installed correctly, can hold a load of up to 16A (~3.5 kW), and if installed incorrectly (non-GOST wire, cross-section less than 2.5 sq. cm., Chinese socket, weak contact connections, etc.) 10A or less . When the load increases, a fire hazard arises.
- According to GOST (12.2.007.0-75 clause 3.1.7), the presence of uninsulated live parts in electrical installations is not allowed, and when using a plug-to-plug connection, we have the possibility of dangerous voltage on one of the plugs.
- This circuit allows for the mechanical possibility of supplying counter voltage to the generator, which will lead to its failure. This is possible if, while the generator is running, one of the household members turns on the input circuit breaker, knowing that there is voltage from the network.
- It is prohibited to connect the generator through a distribution board using a switching circuit on automatic machines. Let's look at an example that we encountered in practice:
Incorrect generator connection diagram
Let's take a look at the build quality of this shield. Why is such a scheme dangerous? When two machines are turned on simultaneously (in this case, “Input” and “External Rose and Generator” at the bottom left), we receive counter voltage on the generator line, which leads to its failure. A family member uninitiated in the scheme or the owner of the house who is thinking about the meaning of life can turn on two machines at once. It is necessary to use three-position reversing switches I-0-II (for example, ABB OT40F3C)
- It is strictly forbidden to connect one of the generator outputs to a common neutral bus unless the neutral is re-grounded in the main panel (TT circuit) and/or on a pole and/or in the metering cabinet. Such grounding, as a rule, is absent in old SNT or in villages where the norms for laying power lines are violated. By violating this rule, we transfer dangerous half-phase voltage from the output of our generator to the “public” neutral. This can lead to electrical injuries to your neighbors and electricians working on the line. How to determine if there is re-grounding? The neutral is grounded either at the top of the pole through the reinforcement terminal, or on a steel strip that runs along the pole and goes into the ground. One example of a circuit with grounding of the neutral on a pole and organization of grounding according to the TN-CS scheme
Grounding the neutral in the ASU
This is interesting: If you connect wires of different sections, which one will burn out first? (video)