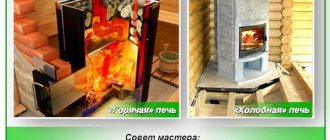
Even in a house with gas heating, owners often design and install stoves, fireplace stoves, and fireplaces. The reasons for this are home comfort and hearth, color and tradition, open fire, design and decor... And backup heating in case of any outages will not hurt. One of the most popular heating devices in this case is a stove with a stove bench.
Not everyone knows what opportunities there are today for laying stoves with a stove bench. Even fewer stove makers directly admit the shortcomings of classic and modern stoves with stove benches... We are, of course, not talking about a Russian stove with a stove bench. That would be a completely different, separate topic.
But nothing compares to the warmth, comfort and chic of a bed covered with a blanket and pillows. She instantly gathers guests and children around her! But let's talk about everything in order...
Would Emelya take a ride on a modern stove with a stove bench?
I think that Emelya would not ride on modern stoves with a stove bench. The stoves are not right, the stove is low, it gets too hot - you can get burned, and it doesn’t work very well, it’s standing on a foundation. This is not a Russian stove with a stove bench...
Let's dot the T's right away. A modern stove with a stove bench and a Russian stove with a stove bench are different stoves.
Pragmatically choosing a good heating device for their home - a brick stove, many immediately dismiss the Russian classics with a stove bench. And in many ways they are right:
- Low efficiency compared to modern furnaces - once;
- A bulky design that will not fit into any interior - two;
- The high cost of masonry - three and much more.
But some stove makers now know how to make a Russian stove with a stove bench of a more efficient design. Namely, this is a Russian stove with a stove bench - with bottom heating. No flooding, no slab. But read about this in my other articles.
Laying stoves with your own hands - Swedish order
Traditionally, a Swedish stove is assembled with your own hands from red ceramic bricks, and second-hand material is absolutely not suitable here. But fireclay brick is suitable for the firebox.
In addition, even before starting work, you will have to prepare such basic elements of the furnace as:
- blower,
- oven,
- combustion design,
- grate bars and valves,
- doors for cleaning
- as well as a steel strip.
Moreover, the amount of materials required for work for each specific case will be determined by the dimensions and arrangement of the furnace.
It is important to note that a Swedish stove can be placed with your own hands only on a pre-prepared foundation. Moreover, at this stage the work does not differ from the construction of other heating or heating and cooking structures.
laying Swedish stoves
In any case, the foundation should be slightly larger than the dimensions of the future stove. It uses concrete, which is poured in layers between broken bricks and crushed stone. After pouring the last layer, a layer of waterproofing must be laid. Only after this can you begin laying bricks in order, see drawings and diagrams.
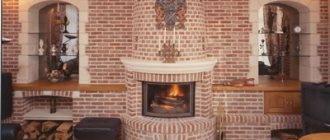
Modern stoves with a stove bench - what are they?
A modern stove with a stove bench, of course, is very different from the classics and has many advantages. The simplest stove with a stove bench today is a heating stove. But most often they make so-called “Russian heated cars” with a couch. Such ovens are equipped with a hob and a bread chamber (with a door).
The main difference between a modern oven and a classic oven is that it has a baking space with a door and is heated from the main firebox - you don’t need to heat the oven separately to cook - and there is no ash left in it. But this is not the most important thing. It is important that a properly folded stove with a stove bench heats up evenly and quickly enough.
Another feature of modern stoves with a stove bench is its height - it is made low, about 8-12 bricks, on average 11. The height of a brick row with a stove seam is 69-71 mm. The result is about 80 cm tall.
It should be noted that any stove with a stove bench will be more heat-intensive, if only because it contains approximately more bricks per pallet - that’s how many bricks are needed to lay a good - not small - stove bench. Although you can make a warm “chair”.
It is very convenient to heat the stove, oven and bed from one place - from the firebox. This is both economical in terms of wood consumption and time. But there are models with a separate firebox for the bed.
The design of modern stoves with a stove bench is usually laconic; “stoves” have disappeared - this is required by the design of the stove for maximum reliability and heating efficiency. And there is nowhere to “insert” them into such a low bed. There is no woodshed under the grain place, for obvious reasons. And in general, the modern design of stoves, especially double-bell stoves, allows you to save space. And when the oven is small, it’s difficult to come up with any kind of “architecture”. Moreover, all this can worsen its design reliability qualities.
Modern stoves with a hob often have a summer valve, and stoves with a stove bench also have a heating control valve. But does this valve always work and can it help us with the main problems of such furnaces?
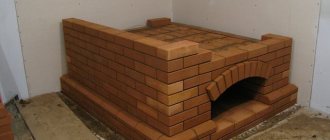
A step-by-step guide to building a Russian stove
1) We use refractory fireclay bricks. To achieve correct ligation (brick seams), we cut each brick by ¾ and install three such bricks in the corners of the masonry so that they exactly adjoin each other.
2) We are building the walls of the future guardianship.
3) In this row we use four ¾ bricks.
4) We build row number 4 from solid bricks. We break off the corners of those bricks that will be located at the base of the oven. These bricks will become the supports (heels) of the arch. We install a wooden form for laying the arch, then we lay the arch. We bevel the bricks, for accuracy using a thread stretched from the center of the formwork to the upper edge of the brick.
5) In this row, 20 bricks need to be beveled at an angle. This angle is necessary for the construction of the arch of the oven.
6) We make the walls on the sides one brick thick. We lay out the front and rear walls in two layers thick. We insert wooden semicircular formwork between the side walls. Using this form we lay out the roof of the oven. In the future, the formwork will need to be removed, so it must be collapsible.
Let's start laying the vault. We make the gaps between the bricks the same and fill them with mortar. For strength, you can insert a small piece of brick into the gaps.
7-8) We carry out construction, strictly observing dressing. We use plumb lines to check the verticality of the edges. In the eighth row we make the base for the cold stove.
9) We build a stove, a row of solid fireclay, on the corners of 1/2 and 3/4 parts.
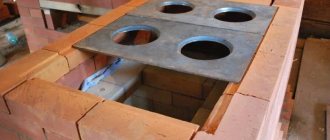
10) We line up a row, pour a layer of fine sand between the walls.
11) We make a continuous masonry-slab on top of the sand backfill.
12) We are building for stoves and hearths. The fireclays that form under the stoves do not need to be fastened with cement. We fill the space (cracks) between them with sand. In the left corner of the hearth we make a furnace - a recess for hot coals.
13) We build the walls of the cooking chamber and the walls of the hearth. For the mouth of the furnace, we install a metal perforated arc between the furnace and the hearth. We insert a ductile iron or copper wire into the perforation, which is then embedded in the mortar between the brickwork.
14-16) We build rows of crucible and hearth.
17) We lay the supports for the roof of the furnace - 8 beveled fireclays. We strengthen wooden formwork on them. We lay out an arch of ½ bricks.
18) We build an arch.
19-22) Lay out continuous rows (we are building a roof on which the bed
). In front of 22, we fill up the sand next to it. We leave an open opening above the pole.
23) We build up the walls. We make a hole on the right for easy cleaning of the stove from ash.
24-26) We close the over-pipe. We leave an opening for the chimney and views.
27-28) Install the half-door opposite the view.
29-30) We are still building the walls of the overpipe.
31) We make a number of additional bricks (3 pcs).
32) We overlap the overpipe and attach the valve to the right.
33) We are building a chimney. All rows are the same, six bricks each. We make a brick overlap near the ceiling.
After construction, we let the stove dry, check the draft and carry out external finishing.
No matter how bad the stove is, it is better with a stove bench.
Firstly, the list of disadvantages of a stove with a stove bench is by no means exhaustive.
Secondly, it, of course, can be taken into account and corrected. You need to keep all this in mind... or give up on it. After all, nothing compares to the warmth and comfort of a bed covered with a blanket and pillows.
The bed is like a magnet that brings together family and guests. It is better to provide a couple more armchairs and a coffee table next to it - mainly for tea. Or fit it into the interior in some other way - as one of the main gathering places, in addition to the places in front of the firebox with a glass door or fireplace. It is from such little things that the life and happiness of a family and children are built. Cozy moments with loved ones can be remembered for years, as often happens. They cannot be overestimated.
Cracks in the oven are generally difficult to completely remove; they appear like “hairs” when heated and disappear when cooled. Some stove makers fundamentally make only double-wall stoves - such stoves have completely fireclay interiors. Fully. Also, the stove bench is not connected to the main stove - only the fireclay core inside is single.
There are many advantages to such ovens, which can be discussed in another article. But, in my opinion, there are two main disadvantages:
- Labor-intensive and expensive masonry;
- They take a long time to get into “regime” - warming up.
I myself live in a house with a complex “Russian heater” - a stove with a stove and an oven. In addition, I made it a combination - with a couch and with a fireplace. I, like no one else, know all its disadvantages and would not trade either the bed or the fireplace for any other stove. Although I would be happy to correct some errors. And I do this, but not for myself, but for my readers and stove customers.
Technology for building a Swedish brick oven
Laying a Swedish stove with your own hands has a number of features that must certainly be taken into account in the work. It is immediately necessary to mention the need not only for waterproofing, but also for thermal insulation of its foundation, otherwise during operation the stove will heat the floor.
Balsat cardboard can be used here, and when laying it in three layers, the foil sheet should be in the middle.
Can you lay out the stove and stove bench yourself or do you need to contact a specialist?
You can lay out the stove with a stove bench yourself, just like any other stove. Of course, without knowledge, procedures or design, experience in construction (preferably masonry), it will be difficult to adapt to this business.
You can also contact a stove maker. But stove makers are different. There are such stove makers that it would be better for you to take on the masonry yourself, especially if you are concerned about the issue of saving money. Then the option of self-masonry is even more relevant. But it’s still better to turn to specialists - at least for advice. And we will always be happy to help you!
Leave comments on the article, rate it 5 stars and share with friends on social networks if the article was useful to you.
Dimensions and drawings of the Swedish stove
After the foundation, they proceed to work on the base of the future furnace, laying out its first and second rows. To provide a kind of protrusion-pedestal, they are laid out exclusively with expanded seams, within 13 mm.
There is no need to make them too wide either. When laying a Swedish stove, experts advise rinsing each brick in clean water for several seconds. This simple manipulation will increase adhesion by getting rid of dust on the surface of the material.
Furnace finishing
In the process of finishing the structure, you can use any materials. The most common options are:
- whitewash;
Stove with whitewash and stucco
Whitewashed stove with stove
- decorative rock;
Stove trimmed with decorative stone
Finishing a stove with large gypsum stone
- tile;
Swede tiled
- combination of different materials.
Swede made of combined materials
If you are making a stove from new beautiful brick, then you can leave everything like that.
Swedish brick
Swede with dark brick
Stove with oven
Swede with light brick
Swede in a residential building
How to choose the location of the furnace?
It is very important to decide on the choice of place where the Russian stove will be installed. If its location is in a wooden room, be sure to make the distance between the walls of the stove and the house approximately 20 cm
It is best to protect wooden walls for safety using non-combustible material, such as asbestos boards. The created gap will allow for an inspection of the furnace walls, which is done before the onset of the heating season.
If the stove is installed in an opening between two rooms, then it is lined with brickwork, at least 20 cm thick. A gasket of asbestos sheet is made between the masonry and the wooden wall.
https://youtube.com/watch?v=ksIJIivKRlw
Safety precautions
To cook in a Russian oven and not start a fire or get burned, it is enough to know how to properly heat the oven and follow the rules for cooking in an oven.
How to light a Russian stove:
- It is necessary to stack the firewood in the firebox as closely as possible to each other; add firewood after the first batch has burned out.
- During kindling, the damper must be closed, the stove damper slightly open, and the ventilation damper closed.
- Do not forget to provide access to oxygen in the stove - to do this, just stir the firewood with a poker.
- During combustion, the ash door should be open approximately 7 cm.
How to cook in a Russian oven:
The stove must be heated well and the wood must be allowed to burn out; only coals without open fire and well-heated walls should remain. The first courses are prepared in cast iron pots or ceramic pots without handles. Since the food in the oven simmers and does not boil, pour a little water into the container, no more than one quarter. All dishes except bread can be cooked together
The bread is cooked separately with the door closed until baked. When cooking in the oven, it is important to use oven mitts, towels or gloves to avoid burning your hands. It is better to place and remove dishes with a special wooden shovel or grip.
Schemes of brick mini-ovens
Small ovens occupy a small area; the dimensions of their bases range from 50 to 70 centimeters in width and up to 65–100 cm in length. The height of the heating structure is from 1.5 to 2.3 meters. A cooking floor, an oven, and a water heating tank are built into the oven. Stove makers have also developed devices intended only for heating a home.
Small heating structure
This is the simplest heating structure. We will analyze the model in the following sizes:
- base width - 51 cm;
- base length (depth) - 89 cm;
- height - 238 cm.
The mini-stove is installed in the middle of the kitchen or against the wall. The optimal heating area is 20-35 meters. Interior partitions are erected around the stove, which allows heating both the kitchen and the adjacent room.
Inside the device are:
- combustion chamber;
- blower;
- smoke channels leading into the chimney.
The combustion door of the mini-stove (cast iron or glass) is selected depending on the aesthetic preferences of the home owners. A door made of heat-resistant glass, through which you can see how the wood is burning, gives the structure a resemblance to a fireplace. Two smoke valves are installed in the middle and upper parts of the furnace. There is one door for cleaning the channels. To build this model of the device you will need:
- 260 pieces of ceramic bricks;
- 130 pieces of fireclay bricks;
- grate (40x23 cm);
- combustion (30x20 cm) and blower (20x14 cm) doors;
- 2 doors for cleaning holes (20x40 cm);
- metal pre-furnace sheet (50x70 cm);
- two sheets of roofing material measuring 60x100 mm;
- sand and clay (or ready-made clay-sand mixture for masonry), clay-fireclay mixture.
Reference. Masonry mortar increases the volume of the device by the thickness of the joints.
The base and top of the mini-oven are laid with ceramic bricks on a clay-sand mortar. The firebox is made of fireclay bricks on a clay-fireclay mixture.
Three and a half bricks fit on the long side of the base, and 2 standard bricks 25 cm long on the short side. The masonry consists of 35 rows in height.
Small heating and cooking stove
This is a mini-oven model for heating and cooking - a convenient and very compact structure. The optimal area for a heated room at sub-zero temperatures is 20-25 square meters.
The device has the following dimensions:
- base length (depth) - 64 cm;
- base width - 51 cm;
- height - 215 cm.
The structure is being erected in the kitchen. The device includes:
- blower;
- combustion chamber;
- smoke channels leading into the chimney;
- cooking floor;
- niche for the oven.
The cast iron cooking floor has a hole that is closed with a disk and a circle. Solid flooring is also available for sale. In the niche for the oven chamber there is a metal oven or a hot water tank with a tap. If the niche is left free, it is used for drying things. To build a stove you will need:
- 222 pieces of ceramic bricks;
- grate (40x25 cm);
- firebox door (20x20 cm);
- door for the blower (14x14 cm);
- cooking floor (35x38 cm);
- metal oven or hot water tank;
- iron pre-furnace sheet (50x70 cm);
- two doors for cleaning holes (20x14 cm);
- two valves;
- a piece of flat slate;
- steel corner;
- clay, sand or ready-made clay-sand mixture for masonry.
Pechka is a fairy-tale character
Despite its centuries-old history, the Russian stove has successfully survived to this day. It can be seen both in villages and small towns, and in our museum.
Another stove in our museum
The stove with a stove bench has become a worthy character in Russian epics and fairy tales. Emelya rides it. She saves children in a fairy tale about geese and swans. Baba Yaga loves to roast her captives by placing them on a shovel and putting them in the oven. Ilya Muromets has been lying on the stove for thirty and three years.
Our grandmothers, grandfathers, and great-grandfathers could not imagine life without a stove.
Come to our museum and see all the exhibits for yourself. You can view the program for visiting the museum here.
How do you know when the oven is ready for use?
You can only use a completely dry stove. If your stove's valves are dry, your oven is dry. You can check it another way: put crumpled newspapers in the cleaner for a few days. If after this they are dry, then the oven has dried well.
A wet Swede cannot be used
If you start using a poorly dried structure, it will begin to collapse after the first fire.
Important! Even if your oven is well dried, you cannot immediately use it at full power for the first 3-4 days.
To ensure the stove lasts as long as possible, heat it daily. The first firebox at the beginning of the heating season should be lightweight.
Newspapers will help check the dryness of the stove
We make the foundation
Before you start building a heavy structure, you need to pour its foundation. But if you make a stove in an already finished house, then you will create the foundation for it right there. It is important to ensure that the base of the house does not come into contact with the stove. The depth of its foundation depends on how large the stove is: the larger the structure, the deeper the foundation needs to be made.
Foundation
Creating a pillow
Before pouring the foundation, it is important to carry out preparatory work. First of all, you need to put markings. Afterwards, you can proceed to digging a pit of the required depth. When you have thoroughly compacted its bottom, add slightly damp sand there and compact it again. The thickness of the compacted sand ball should be 10-20 centimeters. Now fill everything with crushed stone to a height of 15 centimeters. It also needs to be compacted.
We create formwork
Before pouring the solution, you need to build and install the formwork. Any wooden slats are suitable for creating side walls. If there are any gaps, cover them with plastic and secure them with a stapler. The formwork must be higher than the soil and reach the foundation. It can be done right along the edge of the pit.
Fill the solution
When the formwork is installed, fill the foundation with mortar. For it you will need coarse gravel, cement and sand.
Coarse gravel
The minimum fill height is 15 centimeters. When the first layer has been poured, place reinforcing bars vertically in it - this will connect this layer to the concrete mixture.
Fill in the lightweight solution
Fill the reinforcement sheets with lighter concrete, the layer of which should reach the ground. When everything is done, level this mixture and wait until it hardens a little. After this, cover it with steel reinforcing mesh and fill it with concrete to the thickness of the formwork. Level the poured screed and leave to dry for 27-30 days.
Creating a waterproofing surface
When the screed has dried, remove the formwork. Cover the base with a layer of waterproofing made from glued roofing felt balls. When everything is ready, start laying the stove walls.
Preparation of the solution
For masonry, a normal type of clay mortar is required, which has good ductility and does not crack. A thin solution is not suitable, as it crumbles a lot, while a fat solution cracks when it dries.
The composition of the masonry clay mortar will be as follows:
- fatty clay, very carefully sifted - 3 parts;
- river sand, also sifted, pre-calcined, - 3-5 parts;
- clean water for mixing - 1 part.
After mixing, you need to get a thick, viscous, greasy solution, but it should not be soft and flowing.
Various methods are used for preparation, the most optimal is soaking the clay and then adding water. When calculating the volume of mortar, it must be taken into account that when laying 50 bricks with a joint thickness of no more than 3-5 mm, approximately 20 liters of mortar are used, but experts recommend increasing this amount by 15%. The proportions of the clay mixture are 1 part sand to 2 parts clay.
When, when kneading, the consistency of the solution becomes similar to sour cream, it can be used for work. If traces of water appear on the surface of the mixture, a small amount of sand must be added. To increase strength, you can use regular salt at the rate of 100-250 grams of salt per bucket of the mixture. When laying a chimney, cement must be added to the solution at the rate of 750 grams per bucket of mixture.