Almost every modern city apartment has the opportunity to expand the living space by using additional balcony or loggia space. To do this, you will need to carry out work to insulate cold glazing, as well as walls, floors and ceilings. It will be useful for anyone who is faced with the need to solve this problem to learn about the technologies, methods, stages, and materials that will be required for this.
Insulating the balcony expands the living space in a city apartment
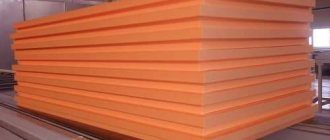
Polystyrene foam and mineral wool
Two technologies are used for preparing cold and glazed rooms in the apartment:
- Balcony insulation with mineral wool.
- Using foam plastic (penoplex) for the same purpose.
Both approaches pursue one goal - creating a thermally insulating and hermetically sealed shell on the loggia or balcony, which, like the walls of a thermos, prevents heat loss. To achieve this, several related problems are solved:
- Installation of vapor barrier.
- Protection from atmospheric moisture.
- Ensuring the durability of the protective layer.
- Maximum saving of usable area.
- Finishing.
Similar goals and objectives determine the similarity of their technical solutions.
↑ Leveling the bars
This procedure takes a lot of time for novice builders. Leveling bars is not a difficult task if you have a modern laser level. How it's done?
- Mark a point in any convenient corner at eye level. Focusing on it, we will set the horizon line. If you have a laser level, the problem is solved instantly: using a special attachment to this point, we hang a device that will show the horizontal points in all corners.
- If there is no laser level, the problem can be solved in a proven old-fashioned way. For this method you will need a clear hose, plain water and an assistant. We fill the hose with water, but not to the very end. Let us recall the well-known law of physics, which states that water in communicating vessels remains at the same level.
- Place one end of the water-filled hose at the previously marked point. An assistant takes the other end and places it in the opposite corner to a point selected by eye. When the water level at the first end of the hose coincides with the initially selected point, boldly mark in the opposite corner the point that coincides with the water level at the second end of the hose.
- In the same way we mark the next two points of opposite corners. A slight error may occur if there are air bubbles in the hose, but this can be easily eliminated. We proceed as follows: insert one end of the hose into a bottle of water, and draw in air from the other end. The homemade hydraulic level will fill with water.
- Why do you need to set lags by level? The fact is that the floor surface is not always perfectly flat, so you need to recreate it yourself. We will take the marks placed at all corners of the balcony as the initial horizontal level.
- Next, mark the highest point with a pencil and mark the thickness of the joist up from it (for example, 50 mm). We measure the distance from the last resulting point to the horizon point marked in the corner. We mark the resulting distance down from each point at the corners. Let's connect all the dots.
- We nail the logs with dowels along the entire resulting perimeter.
The problem of choice: what is better to insulate a balcony or loggia, with polystyrene foam or mineral wool?
Mineral wool - universal insulation
*
In terms of costs and labor costs, both methods have insignificant differences that can be neglected. The difference will be noticeable only after achieving the result. Thermal insulation made on the basis of foam plastic will completely block the access of air. If the balcony is on the sunny side, then with the windows and doors closed, in clear weather it will turn into a hot greenhouse and stale air and condensation will accumulate there all the time. The stuffy room will have to be ventilated periodically. Mineral wool ensures minimal “breathing” of the internal space, therefore, with proper installation of insulation based on it, the microclimate in the room will be more favorable.
Laying infrared film flooring on the balcony
Before you begin laying the heated floor on the balcony, you need to ensure that it is easy to connect to the power supply. Therefore, you need to drill a hole in the wall in advance through which the wires will be fed.
It is important to carefully close this gap in the future, preventing freezing of a small area in the next room. Once the preparatory work is completed, the following work is carried out:
- The old coating is removed, the screed is leveled, and the seams are closed with cement mortar.
- The surface is leveled.
- Heat-reflecting rolled material is laid.
- Film sheets are cut and prepared for laying.
- The sheets are stacked and additionally secured with masking tape to the bottom layer: this will prevent them from moving in the future.
- The thermostat is installed and the wires are connected (according to the instructions included with the kit).
- The junction points of the wires are insulated.
Subsequently, finishing is carried out with tiles and laminate. Such insulation of a concrete floor on a balcony with your own hands also allows for laying carpet or fluffy carpet. The advantage of this method is the efficiency of heating the room and low energy consumption when the heated floor is turned on periodically. Constant heating can become too costly and unprofitable.
Advantages and disadvantages
Despite all the advantages of modern foam-based insulation, professionals still advise using mineral wool to insulate balconies. This is due to the following advantages of this material:
- Better isolates the room from street noise.
- Does not require a perfectly smooth surface of the walls that need to be insulated.
- Combines with breathable materials such as wood. Therefore, an open balcony can be lined with clapboard before installing it.
- Resistant to high temperatures and does not burn when in contact with an open flame.
- When installed correctly, it reduces the likelihood of random cold bridges to a minimum.
- Provides weak convection and prevents long-term accumulation of stale air.
Mineral wool also has disadvantages compared to penoplex and similar foam-based materials:
- Thermal insulation properties are 10-15% less. Therefore, for similar indicators it will be necessary to install a slightly thicker layer of material, which negatively affects the reduction of usable space.
- The total mass of the thermal insulation coating is 2 times greater.
- The installation process is more demanding in terms of experience and skills.
- The installation technology requires an additional operation of installing a vapor barrier film.
- The material is a source of dust harmful to breathing, so to work with it it becomes necessary to use a respirator.
- More stringent technological requirements, since their violation can lead to irreversible loss of thermal insulation properties and the entry of harmful dust into the living space.
Finishing
After completing the thermal insulation of the loggia, it is worth thinking about finishing work, which also affects the degree of thermal insulation in the room. When all layers are laid and sealed, the metal hangers must be returned to their original position, and then the aluminum profiles must be attached to them.
It is convenient to attach almost any of the materials available on the modern construction market to these profiles. Wooden, cork and metal slatted panels, PVC structures, siding and many other options are perfect as finishing materials for loggia walls.
Moisture-resistant drywall has proven itself quite well. The advantages of this material are its lightweight structure, which “breathes” well. Drywall is very affordable in terms of price, and it is also easy to process, paint, fix, and stick wallpaper on its surface.
At first, insulating a loggia may seem like a rather complicated and time-consuming process. However, if you decide to try, you will quickly realize that there are no particular difficulties here. All operations are quickly mastered and do not require special construction skills.
The balcony can also be turned into a comfortable and useful room. For example, equip it with an office, a workshop, a small sports corner or a comfortable relaxation room.
Features of work when insulating balconies
Insulation of a balcony or loggia with mineral wool - a step-by-step process
*
All work on mineral wool insulation can be divided into several stages:
- Insulation of side walls, floor and ceiling.
- Installation of flooring.
- Replacement of cold glazing (if any) with warm one.
- Final decorative finishing.
Before carrying out work, it is necessary to immediately resolve the issue with warm glazing. The fact is that now balconies and loggias in new buildings in most cases have cold glazing. On the upper floors, most often there is a complete finishing of the façade with aluminum profiles. On the lower floors such structures are installed at half the height of the balcony.
How to insulate aluminum windows with partial or full glazing on a balcony?
Insulation of aluminum windows on a balcony
The most cost-effective way to insulate an aluminum balcony in a new building is to install multi-layer plastic double-glazed windows on the existing profile. If the aluminum structure is installed from floor to ceiling, then, in order to save money, instead of the bottom row of double-glazed windows, facade panels are installed, which are insulated from the inside in the same way as the side walls and ceiling - with mineral wool or polystyrene foam. Pasting a cold single-layer structure with penofol alone will not be sufficient both to retain heat and to provide good insulation from street noise. The junctions of new multilayer double-glazed windows with the aluminum profile are filled with silicone sealant and vilatherm.
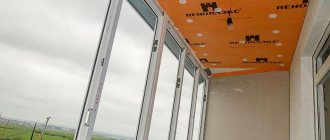
Features of insulation of aluminum windows
Insulation of aluminum profile
*
After installing the warm frames, all junctions and cracks are treated with polyurethane foam:
- The sealing process is carried out especially carefully in the area where the aluminum structure adjoins the wall, floor and ceiling.
- For additional protection of these areas, plastic or metal strips are installed.
- Before foaming, the gaps between the profile and the wall can be filled with Vilatherm.
- On the outside, a vapor barrier reinforced tape is glued to the treated joints, one of the layers of which is aluminum foil.
- If the lower part of the aluminum structure is covered with sheets of glass magnesite, then it can be covered with a stenophon or similar means. It is well held with double-sided tape and provides a high level of heat and sound insulation.
- The inner surface of the aluminum profile is covered with wide strips of vilaform, on which the ceiling profile is installed as clamps.
- When installing clamps, flashings and Vilaform tapes, it is necessary to take into account the distance that the insulation of the walls, floor and ceiling will occupy.
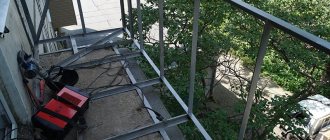
How to properly install a heated floor system
At first glance, installation of such systems requires a certain skill. But experts say that you can install this active system yourself even in large rooms, so there shouldn’t be any problems with a balcony.
Step-by-step instructions for insulating a balcony with an electric heated floor:
- Preparing the floor. If there is serious damage to the concrete base, then it will have to be completely replaced - greasing, covering the holes and cracks with sand-cement mortar will not be enough, the surface under the heated floor system should be as smooth as possible. If everything is fine with the concrete base, then it is enough to get rid of old finishing materials and debris.
- We fasten the insulating boards. They are sold complete with a heated floor system; you will need to purchase special glue for them; you can use special fastening “umbrellas”. A metal mesh is laid on top of the insulating boards, which is necessary for laying the main cable system.
- We lay the cable. First, the mounting tape is attached to the metal mesh using self-tapping screws, only after that the heating cable is laid. The distance between the cable fasteners (this is done using mounting tape) should be about 100 mm.
- We connect automation. We are talking about a thermostat and a temperature sensor, which must be installed strictly according to the instructions that are included in each set of active floor heating systems.
- We pour the concrete screed. The thickness of such a fill should not exceed 5 cm, but it is better to make it thin (3 cm) - the heat transfer will be much higher.
Please note: the hardening time of the concrete screed must be maintained absolutely completely, only after this it will be possible to connect the heated floor system and enjoy comfort in the room. There is another option for electric heated floors - special heating mats
They are laid on the base using a self-adhesive base, which simplifies the work. Another advantage of such a “thin” heated floor is that there is no need to make a concrete screed, and this automatically reduces the load on the base of the balcony and reduces financial investments in repair work
There is another option for electric heated floors - special heating mats. They are laid on the base using a self-adhesive base, which simplifies the work. Another advantage of such a “thin” heated floor is that there is no need to make a concrete screed, and this automatically reduces the load on the base of the balcony and reduces financial investments in repair work.
Insulating the floor on a balcony is a fairly simple job that can be completed by one person with a minimum set of knowledge and skills in the construction industry. But then you can enjoy a comfortable temperature in the room, retire there from a noisy family, or grow your favorite plants.
Insulation with mineral wool yourself
Calculation of the material before carrying out work on insulating the balcony
Read on the topic - insulation with penofol. How to fasten, lay and glue.
Before starting work, you need to calculate the amount of material:
- Wooden beam 60 cm. Its quantity depends on how many layers the protective layer is planned to be made.
- To lay a layer 10 cm thick, it is recommended to use 5 cm thick cotton slabs and form a second layer from them, where the blocks are located perpendicular to the direction of laying the first layer.
- Glue for gluing protective blocks and vapor barrier film are purchased based on the total area of the insulated surface.
*
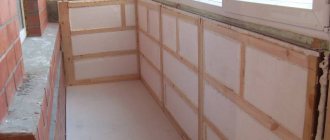
Preparation for installation of mineral wool slabs
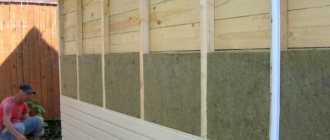
Installation of sheathing for laying mineral wool Mineral
wool slabs cover the floor, side walls, ceiling and parapet (if any). Blocks of insulating material are placed inside the wooden sheathing. Its installation has the following features:
- The thickness of the wooden beam is 50-60 mm.
- The vertical or horizontal arrangement of the timber is determined by the design and shape of the decorative finishing panels and the method of their installation.
- Wooden elements are attached using self-tapping screws and dowels to concrete or a brick wall.
- The gaps between the frame elements for the mineral wool blocks should be 1-2 cm smaller than the size of these blocks for a tighter fit.
- With a two-layer method of laying thermal insulation, the frame beams of the second layer are laid perpendicular to the sheathing of the first layer.
Mineral wool adhesive
The use of a special cement-based adhesive allows you to completely block the movement of air between the insulated surface and the insulation. Full gluing of the two-layer protection, when the blocks are laid perpendicular to each other, allows you to create a dense monolithic barrier without random cold bridges. Additional fasteners for blocks can be fungi - dowel nails with wide washers.
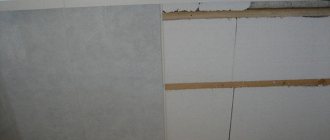
Vapor barrier
Installing a vapor barrier when insulating a balcony with mineral wool.
A roll of vapor barrier material is unrolled along the insulated surface on top of a layer of stone wool. The material is attached using a furniture stapler to the wooden frame elements. The butt overlap must be at least 10 cm. The joints are additionally sealed with double-sided tape. The junctions of the vapor barrier film to the ceiling, walls, floor and window profile are covered with sealing, moisture-proof tape.
Installation of counter beam
The counter beam is used to fix the decorative trim panels. Before installation, double-sided tape is applied to its surface, which should be adjacent to the vapor barrier coating. Fixation is carried out using self-tapping screws to the sheathing elements located behind the vapor barrier layer.
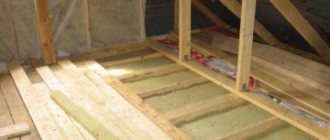
Insulation on the floor
Insulating the floor with mineral wool on a loggia
To install the frame under the floor insulation, a wider beam of 50X100 mm is used. It is recommended to make the step between the lags the same as that used when installing wall and ceiling cladding. For slabs with a width of 60 cm, it is necessary to take a step of 58-59 cm for a tighter fit. The flooring can also be done in 2 layers. For installing 100 mm thick mineral wool insulation. It is allowed to place 2 layers of 50 mm each with mutually perpendicular arrangement of blocks. Before installing plywood or fiberboard, a vapor barrier film is applied to the thermal insulation layer and attached using staplers. All joints of the vapor barrier material are overlapped and glued using double-sided tape.
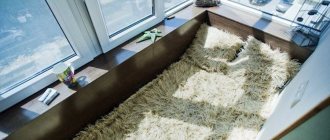
Finishing the floor
Plywood sheets or boards are laid on the frame joists, covered with a vapor barrier film, and secured with self-tapping screws. It is recommended to make the flooring two-layer, when the elements of the second layer are laid across the elements of the first. Only after this will the linoleum, laminate or parquet laid on top last a long time.
Internal cladding of walls, ceilings and parapets
The choice of decorative panels for finishing an insulated balcony is very wide:
- Drywall.
- Siding.
- Lining.
- Decorative plastic panels.
If the insulation and vapor barrier layer were installed correctly, then no facing coating will suffer from temperature changes, moisture penetration, or ice. The interior of the insulated balcony becomes completely residential, and it can be used in this capacity all year round, which increases the total living space of the apartment.
Interior finishing of insulated glazing
Metal clamps on an aluminum profile covering a layer of vilaform or other insulation are covered with plastic decorative panels with the desired shades, or for painting. Multilayer double-glazed windows become full-fledged apartment windows, so the balcony doors do not need to be closed.
Common mistakes
In this scheme, the insulation structure approximately corresponds to that used when installing a warm roof. Most often, home-made workers make the same mistake - they lay mineral wool without waterproofing the outer surface. In this example, the walls perform the functions of a water barrier. In addition, there must be a gap between the vapor barrier and the decorative cladding to ensure normal escape of still warm air, but supersaturated with water vapor, from the surface of the vapor barrier membrane. Otherwise, condensation will appear, and the lining will become damp and swell with moisture.
Types of mineral wool and their features
*
Completely insulating a balcony with mineral wool does not always help make a new room warm and cozy. Stone or basalt wool is better suited for this purpose for interior decoration. Its fibers are created from molten rocks and are held together with a special synthetic composition that does not emit harmful substances in dangerous quantities. The thermal insulation properties of this material are the highest, compared to cheaper options - glass wool and slag wool.
Is it possible to use glass wool to insulate a balcony? Despite the low cost of this product, insulation based on it will not be able to make a new room completely residential. Even a thick layer will still let cold air in, and glass dust will definitely get into the atmosphere.
Interior wall decoration
The technology for insulating balcony walls, done by yourself, depends on the design of the parapet and the heat-insulating material used. It is better to sheathe a metal frame, externally finished with plastic or corrugated sheeting, with 2 layers of thermal insulation so that the second row of insulation covers all metal racks that act as cold bridges. Moreover, on the outside, between the cladding and the insulation, a windproof film should be laid.
When insulating a balcony with mineral wool, it is necessary to use not an ordinary film, but a diffusion membrane as a wind barrier. It will let out the moisture that arises in the thickness of the cotton wool, but will not allow it to get wet from precipitation or fog on the street. For polystyrene foam and expanded polystyrene, the use of a membrane is not necessary; ordinary film will do.
To attach the mineral wool, you will need to assemble with your own hands an additional wooden frame from beams, the width of which is equal to the thickness of the insulation. The pitch between the bars is selected according to the width of the material, the latter is placed between them at random. At the last stage, the thermal insulation layer is covered with a vapor barrier film, after which the frame is covered with clapboard or plasterboard.
Available technology
Finishing a loggia with clapboard after insulation with mineral wool.
Transforming a balcony or loggia into a full-fledged living room using mineral wool insulation does not require special skills and is done with ordinary household tools:
- Hammer drill.
- Screwdriver.
- Bulgarian.
- Hacksaw for wood and metal.
- Pliers and side cutters.
- A set of screwdrivers, a furniture stapler and a stationery knife.
For accurate work you will need a tape measure and a level. To protect against harmful dust, you can use not only a professional respirator, but also an ordinary cotton-gauze bandage. It is best to work with mineralized wool while wearing construction gloves. After its blocks come into contact with open areas of the skin, it is enough to wash off all traces of it with soap in time to avoid allergies and skin itching.
Advice from professionals
Important information about wool insulation:
- It is not allowed to have gaps through which heat will escape. It will not be possible to achieve high-quality thermal insulation;
- thermal insulation allows you to save thermal energy inside the room, but not create it. It is recommended to regularly open the door from the apartment or place a heating device on the loggia;
- thermal insulation allows you to turn a loggia and balcony into an additional small room - a full-fledged living space. Depending on their size, it is possible to design a workplace or a comfortable relaxation area with soft armchairs and a hanging table. Morning coffee with a view of the metropolis will make a great start to a new day;
- the resulting space can be turned into a beautiful botanical garden. In winter, this will make you feel like summer. Plunge into the green kingdom;
- For additional fixation of the slabs, it is allowed to use special clamps - butterflies.
Mineral fiber-based wool as thermal insulation allows you to turn the loggia into a real living space, comfortable for living. In the new room you can arrange a place for relaxation, a study and even a winter garden. The main thing is to decide on the wishes of the owners.
Inattention to detail
Any little thing that is not thought through in advance can reduce the work done to zero. Therefore, keep in mind and do not forget:
- Do not use gypsum putty to seal seams when insulating.
- The gaps between the floor slabs and the glazing plane must be filled before insulation begins.
- Even before glazing, consider the height of the handles on the casement windows.
- The width and design of window sill boards (if they are installed) should be thought out right away.
- The feasibility and quantity of installed mosquito nets are thought out in advance.
- If wood elements are used for insulation, they must be treated to protect them from moisture and rot.
If you managed to avoid all of the above mistakes, then you took the insulation of the loggia as collected and seriously as possible. In this case, you got what you wanted with the highest possible quality, and the result of your improvement efforts will delight you and your loved ones for a long time.
Why is thermal insulation necessary?
When thinking about the functionality of a balcony room, you need to understand that finishing work will clearly not be enough to turn it into a full-fledged room. Even high-quality glazing will not save the situation. It is necessary to close the space from the street, but this is very little. Temperature changes will leave no chance for new design and will make staying on the balcony as uncomfortable as possible.
Therefore, the first thing to do after glazing is effective thermal insulation. It will be required for all surfaces: ceiling, walls and floor. This is the only way to prevent heat leakage and, accordingly, make the heating devices operate more efficiently.
If the room will not be heated, the use of insulating materials will significantly smooth out temperature changes and make its use more comfortable.
Instagram balkony_vkazani
The latter option is especially relevant for areas with warm winters, where sub-zero temperatures are rare. But in any case, high-quality thermal insulation will be necessary.