The advantages of water heated floors are undeniable. Compared to the electric option, the pipeline through which the coolant circulates does not increase the level of electromagnetic radiation that is harmful to the human body. Water heating significantly saves energy consumption, especially if the pipeline is connected to a gas or solid fuel boiler. Water heated floors can be used separately or together with radiators connected to the same heating boiler.
Heat distribution plates for water heated floors
Considering that arranging this heating method with your own hands does not always require pouring a concrete screed, it can be considered an ideal option for a private home. In this case, the concrete screed is replaced by heat distribution plates. What does the concept of “heat distribution plate” mean, what is it made of, and what is the principle of its operation?
Features of Heat Distribution Plate
The plates accumulate heat and transfer it evenly to the floor covering.
The energy carrier in underfloor heating pipes does not need to be heated to high temperatures, compared to radiators, thanks to the use of heat-reflecting plates. Aluminum or steel elements have a simple structure and have no restrictions on their use.
Products from different manufacturers differ in configuration, but the general structure remains the same:
- an omega-shaped gutter runs from beginning to end and serves to install a water pipe;
- protruding stripes on the flying parts provide rigidity and compensate for thermal expansion.
Thermally conductive elements are laid in the floor structure so that the grooves coincide. During installation, no hacksaw or metal scissors are used, since the plates have convenient notches. The metal is broken off along the marks to the required length and placed in the design position.
The plate is divided into sections:
- 4 pieces of 115 mm each;
- 2 pieces of 135 mm;
- 1 part 270 mm.
If you lay the plates on a wooden base, most of the heat will remain in the room.
It is possible to install thermal plates directly into the screed, but the heat will go down to heat up the concrete. A polystyrene backing with the foil layer facing down is placed on the surface before laying the system.
Heat exchangers work effectively if mounted on an insulating material, such as extruded polystyrene foam or polystyrene foam. This limits the transfer of energy to the floor and heats up the upper floor covering. Expanded polystyrene boards are used grades FT 20/45 or FT 20/45L, the density of the foam must be at least 30 kg/m3. Grooves are cut into the insulation using a gutter knife.
Features of the heated floor system
To understand how a metal heat distribution plate improves the efficiency of a heated floor, you need to understand some of the features of a classic low-temperature water heating system.
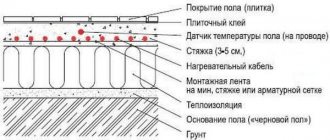
A warm floor consists of a network of heating pipes laid on a layer of thermal insulation, through which a coolant, such as water, circulates and embedded in a concrete screed.
Unlike radiator heating systems, the underfloor heating fluid does not need to be heated to high temperatures. The system is calculated in such a way that in a living room the temperature on the surface of the heated floor does not exceed 28-29 °C. At the same time, a person subjectively perceives the radiant heat coming from a heated floor as more comfortable. As a result, the temperature in the room can be lowered and made not 20, but 18 °C, and reducing the temperature by just 1 °C can reduce the average annual energy consumption by approximately 6-12%.
Those. the consumer receives a double benefit - an efficient and at the same time economical heating system. It is not surprising that every year the number of people wanting to install warm floors in their country houses is increasing. But, with all the advantages of the system, it has a number of disadvantages, primarily related to the design and installation features.
We have already said above that underfloor heating pipes are located in a concrete screed, which has a large mass.
As a result, owners of houses with wooden floors, here we include frame frames, houses made of SIP panels, timber houses (we do not consider the USHP slab foundation and floors on the ground), are forced to abandon warm floors, because its weight simply cannot be supported by the load-bearing floor beams.
This group includes country residents who would like to reconstruct, without major alterations, old houses, the floors of which are also not designed for increased load from concrete screed. The third group includes cottage owners who plan to install a concrete heated floor, but would like to increase its efficiency and level of comfort.
Note that the classic installation scheme for heated floors involves “wet work”. This also imposes a number of restrictions, for example, if concreting is to be done in winter at subzero temperatures. In addition, after pouring a concrete screed, it is necessary to give it time to gain the necessary strength. This increases the time required for construction and finishing work and, accordingly, leads to an increase in the estimate.
olegus79FORUMHOUSE user
I'm going to install heated floors in my new house. I don’t want to embed pipes into a concrete screed. I was thinking about how to make a warm floor that quickly reaches operating mode according to the principle: I came home from work, turned it on, and it quickly warmed up.
All these problems can be solved if you install a warm floor based on metal thermoplates, making the so-called. light “dry” heated floors, or monolith heat distribution plates into a concrete screed.
Purpose of plates
Metal thermoplate is used if it is not possible to make a traditional screed (buildings with wooden floors, walls made of foam blocks, etc.). Sometimes the height of the ceilings does not allow raising the base to the thickness of the heated floor. The delivery date of the object affects the choice of screed or dry installation method. Concrete gains strength within 28 days, and the system with thermoplates is ready for use after laying the finishing layer.
Heat-reflecting structures are an alternative to a water floor on a cement-sand base. The lightness of the design allows the elements to be used on any floor, since the load increases slightly.
The water pipes are tightly wrapped around the metal in the groove and heat the element. Aluminum and steel belong to the group of effective heat conductors, so they transfer energy to the floor covering. Convection in the form of streams and jets is completely absent, the surface is heated evenly. Heat is transferred more efficiently if the side parts of the thermal plate fit tightly to the base and top layer.
Materials for production
Based on the base material, plates for warm water floors are made of steel and aluminum.
Features of steel frames for the contour
Steel heat-distributing products are treated with special anti-corrosion agents in the form of powder mixtures, since the material is not highly resistant to rust. The natural structure of the alloy does not provide for long-term operation. Profile steel substrates with gutters for laying the water circuit are not subject to mechanical stress, and the products are actively being introduced into underfloor heating systems, regardless of the type of floor covering.
Features of aluminum plates for water floor contour
Aluminum heat distribution plate models are used more often than steel counterparts. Aluminum substrates with reflective properties are of great interest to consumers. The use of modules with similar characteristics helps to increase the heat transfer effect. To enhance resistance to corrosion, the surface of aluminum products is carefully treated with special solutions.
Specifications
Dimensions of the heat distribution plate for plastic pipes with a width of 16 mm
To calculate the required amount of material, 4 - 6 plates are taken per square area. There are no rotating parts in the product range. This is due to the fact that heat transfer in these sections is negligible, and the price of the corner element will significantly increase the cost of the system. The pipes are laid out along a “snake” or “snail” contour.
Indicators of plates for heated floors:
- length element size 1 m;
- width – 130 or 110 mm;
- the groove is made for a pipe with a diameter of 16 mm;
- one product weighs 500 g.
The total weight of a heated floor with a coating is reduced by 5-7 times compared to the option on a concrete base. System power is from 50 to 200 W/m2, the figure varies depending on the type of floor finishing and pipe installation pitch (at least 125 mm). Heat-reflecting elements transmit up to 94 - 95% of heat.
Heat distribution plates: what are they and what are they made of?
The heat distribution plate is a regular metal profile element. When laid, it plays the role of a substrate for the heating circuit. It has a special Ω-shaped groove into which the underfloor heating pipeline is laid. In addition to the groove, the plates are equipped with stiffening ribs that increase their mechanical strength.
By fixing the heating pipeline, these plates simultaneously perform another very important task. Thanks to them, there is a uniform dispersion of hot flows in the volume of the heated room.
Heat distribution plates are made of steel or aluminum. The last option is the most common. This is due to the following factors:
- often more efficient heat distribution;
- ease of installation;
- greater protection against corrosion.
However, aluminum is inferior to steel in terms of mechanical strength. It is easier to deform. For this reason, aluminum plates are used where the base is completely stable. And aluminum is most often laid on polystyrene boards.
You can read about the installation procedure for a conventional water heated floor here
Advantages and disadvantages
A heated floor without a screed is installed and heats up faster.
Installing a floor using a dry method has advantages over traditional pipe laying using a wet method. The high thermal conductivity of the metal allows the surface to be heated in a short time.
Positive aspects of using thermoplates:
- the number of plates and the weight of the structure can be easily calculated independently, since the pitch and mass of the plates are known;
- the system is simply installed with your own hands after drawing up a pipe layout plan;
- the load on parts of the floor is reduced compared to wet options;
- The size of the room in height is insignificantly reduced.
The disadvantage is that after the boiler is turned off, the metal plates cool down immediately, but the concrete retains heat for some time. The cost of thermoelements is high, but with the wet method additional materials are also purchased and the labor intensity of the work increases.
Lightweight wooden system
This system uses wood products as a support layer. For example: planed edged board, laminated chipboard/chipboard, chipboard/chipboard, moisture-resistant plywood, MDF, etc. Materials with a thickness of at least 20 mm and a moisture content of no more than 10% should be used.
Depending on the pitch of the pipe for the heated floor (or the width of the aluminum plates), the wooden slabs must be cut into strips 130 mm wide (for a pipe pitch of 150 mm), 180 mm (for a pipe pitch of 200 mm) or 280 mm (for a pipe pitch of 300 mm). These are the elements of the support layer. The support layer can be laid either directly on the joists or on a rough wooden floor (laying directly on the joists will give a “saving” of 2 cm in the height of the underfloor heating floor).
There are some requirements for lags. If the finishing floor covering is parquet, laminate, linoleum or carpet, then the distance between the joists is sufficient to make 600 mm. If the floor is tiled, then the logs must be laid at least every 300 mm. Thermal insulation must be laid between the joists. As a rule, this is mineral wool (maybe basalt wool or polystyrene) covered with a vapor barrier layer on the bottom. If the height allows, you can lay a subfloor on top of the joists. The requirements for it are strict. It must be absolutely level (with a height difference of no more than 2mm), clean and motionless. Polyethylene film 200 microns is used as a vapor barrier.
A damper tape must be laid around the entire perimeter of the room.
Then the support rails are placed. If directly on the joists, then across the joists; if on the subfloor, then across the boards. The layout of the support rails is carried out strictly according to the drawings. First, from the drawings, the route for laying the heating pipes is transferred to the floor. Then the pipe line is lined on both sides with support slats so that the spread (gap for the pipe) between the slats is exactly 20 mm. Where the pipe turns, the support rails must be rounded. The slats must be securely attached to the base using self-tapping screws.
Next, thermal distribution metal plates are mounted in the spaces between the support rails. Their layout must be carried out strictly according to the design documentation. The plate is a heat removal and heat distribution element and has a special omega-shaped groove, thanks to which the plate fits tightly to the heating pipe and heat transfer is carried out most efficiently. For uniform heating of the entire floor surface, at least 80% of the area must be covered with heat distribution plates.
The heating pipe fits into the omega-shaped grooves of the thermal distribution plates and does not require any additional fixation. Initially, at the design stage, it is advisable to use the meander method of laying heating pipes (snake). Unlike “snail” installation, “snake” will simplify the installation process and save consumables.
After laying the pipes, the entire floor surface must be covered with 100-200 micron polyethylene film and laid with 10 mm thick GVLV sheets. GVL sheets are fixed to the floor using self-tapping screws. This is a leveling, load-bearing and thermal distribution layer, which is the basis for finishing the floor.
When choosing a topcoat, consider the following. Solid wood, parquet and parquet flooring must be certified for use with heated floors. If you decide to cover the floor with ceramic tiles, then you need to put an additional layer of gypsum plasterboard and glue it to the bottom layer using PVA.
Compared to polystyrene “light” flooring, the wooden system has a number of advantages: environmental friendliness, strength (support slats reinforce the floor structure) and minimal thickness (35 mm). One of the disadvantages is the complexity of installation.
Features of flat installation of a water circuit
A polystyrene backing is placed under the floor covering on top of the plates.
The system is mounted on a wooden or polystyrene base with grooves for placing the convex grooves of the thermoplates. Laminate, carpet, parquet or tiles are laid over a moisture-proofing layer. For waterproofing, polyethylene with a density of 200 microns is used.
The strips are laid out with an overlap of 10–15 cm and secured with tape to each other; the perimeter is formed with damper tape, which is adhesive to the polyethylene and the wall. If a room with increased vapor generation, for example a bathroom, an additional layer of vapor barrier is installed or a material with combined protection against moisture and steam is selected.
Isolation is performed 2 times:
- according to the floor area before laying the insulation;
- on the surface of an installed system of pipes and plates.
There are solid plates on sale without grooves for pipes, in which case the grooves are made independently. Plywood and a piece of pipe with a diameter of 16 mm are used. A groove is made in the sheet, the plate is placed on the plywood, and the groove on the metal element is pressed through the pipe. The edges of the thermal plate are leveled using improvised means.
Instead of cellular insulation, you can lay plates between wooden blocks
The procedure for assembling a heated floor:
- the coating is cleared of debris and leveled with putty or self-leveling mixture;
- the waterproofing layer is laid out;
- Thermal insulation mats are laid;
- grooves are made and heat distribution plates are installed;
- water pipes are laid;
- Thermal insulation is laid between the grooves.
The second layer of waterproofing is installed after checking the functionality of the system. The final finishing of the floor is being done.
LIGHTWEIGHT "dry" SYSTEM
Main advantages of the system:
- Fast warm-up and low inertia
- Minor loads on the floor: 20-30 kg per 1 sq.m.
- Minimum height from 20 mm
- No dirty work with screed
- Ready for use immediately after installation
The system’s quick response to changes in liquid temperature will allow for savings in the off-season and summer; the lightness of the system allows its use in wooden and high-rise buildings.
The small thickness of the entire layer and the absence of work with screed allows installation in a ready-made house or apartment. After installation, the system can be used immediately, while the heated floor screed must be kept for 28 days. The most common type of water-heated floors is and remains the traditional “wet” concrete system. It is attractive for its low cost and high performance. But in some cases it is not possible to install a concrete system. First of all, we are talking about houses with wooden floors. With a screed thickness of 50 mm, the total weight of the concrete system is 250-300 kg/m2. Naturally, only floors made of concrete slabs with a load-bearing capacity of over 500-600 kg/m2, but not wooden floors, can withstand such a weight. In this case, a “light” (by weight), “dry” (by installation technology), wooden or polystyrene (by materials used) system is used. The support layer of the lightweight system is sheets of molded polystyrene boards or strips of wood (or chipboard). Metal heat distribution plates with grooves for laying heating pipes made of polyethylene are laid on this base. The structure is completed by a load-bearing layer of gypsum fiber board sheets.
Advantages:
• Lightness. Load up to 30 kg/m². Suitable for all types of floors. • Subtlety. The thickness of the “pie” is from 35 to 60 mm • Speed. There is no wet process, which implies hardening of the screed within 28 days • No labor costs associated with pouring the concrete screed. • Use in temporary premises, as the system is easy to assemble and disassemble.
These advantages of “dry” water heated floor systems over traditional concrete systems make them preferable:
• during reconstruction, when a new floor covering is laid on top of the old one, • when the height of the room is limited, • when installation times are critical, • when the installation site is difficult to reach to deliver concrete there, • in high-rise new buildings, where there are restrictions on loads on the floors, • and, as mentioned earlier, for houses with wooden floors.
But “dry” systems also have disadvantages.
The most important thing is the price. It is determined by the high cost of metal heat distribution plates and the higher cost of installation, since laying a “dry” heated floor system requires certain skills.
But We have eliminated this drawback! Since September 2015, you can purchase inexpensive heat distribution plates for heated floors made of galvanized steel 0.5 mm
There are two types of “dry” heated floors. Wooden and polystyrene.
Features of wooden water heated floors
Warm floor pie using basalt insulation and heat distribution plates
This type is installed in a wooden house or dwelling with a beamed floor made of natural material. The dry method involves a rack or modular installation system. The first type is made using boards or bars, and the second uses ready-made fiberboard blocks with ready-made grooves.
The support layer, 20 mm thick, is made of wood whose moisture content is no more than 6-10%. Hardwood boards should be 80 mm wide and up to 1200 mm long.
Composition of a wood heated floor structure:
- base with a layer of waterproofing;
- boards, modules or bars laid out according to plan;
- pipe routing using plates;
- insulation from steam and humidity;
- gypsum fiber sheet 10 mm thick;
- flooring.
The boards can be laid in a continuous layer, but you will have to make a groove in each of them for the protrusion of the thermal plate. This method is labor-intensive and expensive, since the wood is processed on a machine and there are not always conditions at home.
Another option is that the boards are laid out with a gap that matches the width and length of the convex groove of the plate. The base area for the heated floor is leveled horizontally so as not to disrupt the energy flow.
Do-it-yourself plate installation
You can install a warm water floor in various ways. The most popular options for laying out coolant pipes are:
- snake;
- double snake;
- spiral.
The choice of layout scheme directly depends on the area of the room.
The snake layout is considered the easiest and most cost-effective. However, when laying pipes in this way, the floor will warm up unevenly, since the further the water flows through the pipe, the colder it will become. It is rational to use this type only in small rooms so that the water does not have time to cool.
Spiral installation of water-heated floors is designed for larger rooms, as it requires a large amount of free space.
When installing heat distribution plates for the floor, everything unnecessary is removed from the room. A plan is drawn on the prepared site. It is safer to use a solid pipe. The joints may begin to leak water over time, and the floor covering will have to be removed to fix this.
When laying pipes, it is necessary to take into account the planned arrangement of furniture. It is not recommended to place pipes under massive objects. Otherwise, you won't be able to make the change. Carpets should not be placed on top of a heated floor, as they will lead to overheating of the system and contribute to its failure. The distance between the pipes is also very important. If you place them too far away, the floor will not heat up evenly. Too close a location will lead to irrational pipe consumption.
Dry installation of water floors (wooden system)
There are two ways to install a warm water floor on a wooden base:
- Modular. It is considered more convenient. First of all, wooden logs are installed on the floor. The distance between them is covered with layers of heat and waterproofing. Wooden slabs are laid on the resulting structure. Be sure to leave a gap of about 2 cm near the walls to compensate for thermal expansion. Using special clamps, the plates are connected to each other. Next, the thermal distribution plates are fixed and the base material is laid. Rolls are placed on top, used as a substrate and the floor covering is laid.
- Rack and pinion. With this method, slats are installed on the floor, leaving space for laying pipes. The plates are laid on top and installation is performed.
Both methods of installing thermal distribution plates for dry water heated floors have the same efficiency. The first option is installed much faster. The second requires less financial costs. When using final finishing, pipes up to 1 cm thick are recommended to be coated with soundproofing material beforehand. If ceramic tiles are to be laid on the floor, then apply a layer of putty, strengthen the serpyanka and lay the tiles on top of it.
Ceramics are usually used for bathrooms and kitchens. In other rooms, it is more rational to use parquet, laminate and other floor coverings that will add comfort and beauty to the room.
Criteria for selecting a heat distribution plate
The effectiveness of a heated floor depends on the underlying insulation and the finishing coating.
The choice of products consists of studying the technical characteristics and parameters. It is believed that the high thermal conductivity of the metal affects the efficiency of the system. But the degree of heating of the floor depends not only on the material of the plate. High heat capacity has a bad effect on control equipment, since the heating rate will be high.
Heat transfer is affected by:
- layout system and pipe material – plastic ones release energy longer than metal ones;
- type of lower insulation and compliance with the technology of its installation;
- type of finishing floor covering - ceramics, laminate, heats up faster than linoleum-based or carpet.
The cracks in the floor are rubbed down so that steam does not penetrate the plates - this leads to corrosion. It
is an erroneous assumption that the plates are in a heated state and do not corrode. During the operation of the house, household vapors penetrate through the finishing coatings onto the base and structure of the water floor. Condensation in a heated state is more destructive.
Pay attention to the presence of an anti-corrosion layer on the surface of the heat-reflecting plate - then you don’t have to install a layer of waterproofing when laying the system. The seller provides a quality certificate from the manufacturer to confirm the reliability of the product.
The choice is influenced by the functionality of the room. When laying on polyurethane foam in the kitchen and bath, steel plates with an anti-corrosion layer are suitable. If the base is a concrete floor slab, copper or aluminum products will work better.
Thermoplates: design nuances and purpose
The heat distribution substrate for the heated floor circuit is a profiled metal module. The device is used exclusively for laying the system dry, without pouring concrete. Manufacturers offer plate frames in different configurations and sizes. The profile has a U-shaped channel along its entire length; this niche is intended for laying the contour. Stiffening ribs that run parallel to the U-shaped ditch provide structural strength. The functionality is also designed to compensate for thermal expansion that occurs during the operation of heating equipment.
What does a heated floor plate look like?
During operation of the system, the heat distribution plates for water heated floors are heated under the influence of the temperature of the coolant. Then, using a metal profile, the energy is evenly transferred to the finishing coating.
Scope of use
The pipe system with heat distribution elements is suitable for new and reconstructed buildings. The plates are quickly installed and last a long time. Thermal distribution structures do not create problems in buildings with weakened foundations, since they add little weight to the ceiling.
Dirt and dust from the use of concrete screed materials are eliminated and labor costs for installing heated floors are reduced, so dry installation is used in working offices, retail areas, workshops and residential buildings. To install a floor in one room, you do not need to close your company or organization.
Lightweight polystyrene system
The polystyrene system can be used in absolutely all types of houses. On concrete and wooden floors and directly on old floor coverings during renovation. The main thing is that the base for the heated floor is smooth and clean.
The procedure for laying a “dry” polystyrene heated floor is as follows:
• 200 micron polyethylene film is laid out on a clean, flat surface of the subfloor. An overlap of 10 cm is made at the joints and the joint is taped. • A damper tape is installed around the perimeter of the room • Sheets of profiled polystyrene foam are laid on the floor. • Heat-distributing metal plates are laid between the “bosses” of the heat-insulating boards. More precisely, simultaneous laying of both the plates and heating pipes of the heated floor takes place, since the installer can lay the plates and pipes in any direction, “in place,” fortunately, the profiled polystyrene foam allows this to be done. • In places of bends, where the pipe comes out of the metal plates and lies directly on the polystyrene foam, it is advisable to lay pieces of plastic film between the pipe and the plate to avoid squeaks and other noises during further operation of the system. • The entire laid system is again covered with polyethylene film 100-200 microns. • To create a hard, even surface on a soft layer of polystyrene foam, necessary for laying the final coating, two gypsum fiber sheets (GVL) each 10 mm thick are laid on top of steel plates with heating pipes, glued with PVA glue and fastened with self-tapping screws. GVL sheets also provide a more uniform distribution of the load over the floor surface.
As an alternative to profile polystyrene boards, you can use any sheet construction foam. Sheets of foam plastic are laid tightly over the entire area of the room, then markings for laying heated floor pipes are applied to it. Using a special thermal knife, a groove (groove) is cut out of the foam into which heat distribution plates and a pipe are mounted. This technology is more labor-intensive, but with good density (35-40 kg/m3) of foam, the load-bearing capacity of the floor is higher than when using slabs.
