Pipe layout classification
To achieve maximum efficiency of the coolant in the radiator, you should carefully approach the installation.
There are several types of heating system wiring, differing in design and number of pipes involved. Classification of heating system wiring:
- plinth
- single-pipe;
- two-pipe;
- collector
There are also four options for mounting circuits:
- Hidden. In this case, the pipes are recessed into grooves in the wall or screed.
- Open. The pipes are placed outside, this option is less labor-intensive.
- Vertical.
- Horizontal.
Natural and forced flow of water in the pipeline is possible.
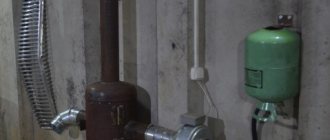
- Open. In this case, the expansion tank comes into contact with the environment. Because of this, you need to constantly monitor the water level in the middle.
- Closed. In this design, constant internal pressure is usually established. The expansion tank includes a rubber bulb with a metal casing. In this case, the liquid does not come into contact with the external environment.
What to do when permission is received
If everything was done correctly and you managed to get a positive response, the next step will be to purchase equipment and conclude an agreement with an organization that will install autonomous heating.
When, finally, the re-equipment is completed, and all the work on installing the new system has been carried out, all that remains is to go through several more city organizations and receive an acceptance certificate. This will be the end of the official registration of the installation of individual heating.
If there are no financial restrictions, you can save yourself from visiting offices and, for a separate fee, entrust the preparation of all approvals and documents to the design service.
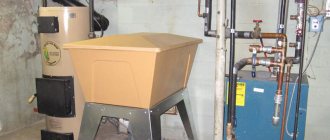
The following video discusses the operating features of the most popular heater model - a gas boiler.
Accounting and control
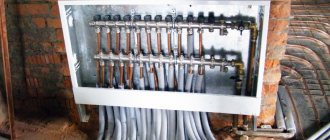
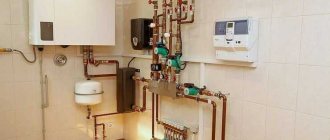
The sampling and metering unit consists of a shut-off valve, a coarse filter, a water meter and a check valve. Assembled as shown in the picture. Each device indicates the direction of water flow for it; it must be observed during assembly.
Water supply sampling and metering unit assembled
The unit is assembled with waterproofing of the connections using FUM tape and is also connected to the riser, having first shut off the water; Before supplying water, you must remember to close the shut-off valve. This is the only operation, and a short-term one, that requires turning off the water supply to the neighbors on the riser.
Separate meter units are needed for cold and hot water. It is highly desirable that the counters and valve handles be highlighted in color. Meter readings must be clearly readable without any additional operations (removing the hatch, etc.), so it is often necessary to pre-assemble part of a solid pipeline, sometimes in a rather bizarre configuration, to connect the metering devices to the riser. In addition to pipes and a soldering iron, for this you will need transition couplings from plastic to metal MPV - an internal threaded coupling. The plastic is connected to the metering units using MRN - external threaded couplings.
Meters are sold sealed, but this does not mean that you can immediately call the water utility and pay for water according to consumption. The factory seal is there (the Russian land is rich in craftsmen) so that no one can get into the meter and twist or file anything there. The factory seal must be protected; Without it, the meter is considered unusable, as well as without a certificate for it.
To install water meters, you need to notify the water utility and call its inspector. You can use water before he arrives; the inspector does not need zero readings; he will record the initial ones and seal the meter and filter drain with his seal. Payment for water according to consumption will be made after registration of metering devices.
GMS, aquastop, filter
Although the design of the HMS is non-separable and does not allow water to be stolen with its help, and this device is not subject to sealing, connecting the HMS to the meter is unacceptable: the meter’s turbine can become clogged with sludge. The HMS with a bulb filter is connected after the metering devices; filter - immediately after the GMS. Aquastop can be connected immediately after the filter, but if it is electrodynamic, the magnetic field of the HMS can cause its false operation, but there is no point in placing the aquastop far from the riser: it does not react to a breakthrough before it.
Single-pipe schemes
The easiest way to calculate and assemble a heating system is with a single-pipe piping scheme for the coolant. The heated water in it sequentially passes from the boiler through all the radiators in the house, starting with the first and ending with the last in the chain. At the same time, each subsequent radiator receives less and less heat.
Installing a pipeline according to this scheme and connecting it to the boiler with your own hands, even if you have minimal skills, can be completed in two to three days. Plus, the costs of creating a water heating system in a house for single-pipe wiring are minimal compared to other options.
Few fittings, fittings and pipes are required here. Savings on materials are significant
And it doesn’t matter whether laminated timber or brick is chosen for the construction of the cottage. If the home is well insulated, then even a simple one-pipe system for heating it will be more than enough
To mitigate the shortcomings, a circulation pump has to be built into a single-pipe system. But these are additional costs and potential equipment breakdowns. Plus, if there are any problems in any section of the pipe, heating of the entire cottage stops.
Single-pipe horizontal
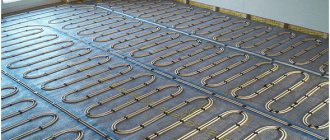
If a private house is small and one-story, then a single-pipe heating system is best done in a horizontal design. To do this, a ring of one pipe is laid in the rooms around the perimeter of the cottage, which is connected to the inlet and outlet of the boiler. Radiators cut into the pipeline under the windows.
Single-pipe horizontal design - ideal for small spaces
The batteries are connected here using a bottom or cross connection. In the first case, heat losses will be at the level of 12–13%, and in the second they are reduced to 1–2%. It is the cross installation method that should be preferred. Moreover, the coolant supply to the radiator should be done from above, and the outlet from below. So the heat transfer from it will be maximum, and losses will be minimal.
Single-pipe vertical distribution
For a two-story cottage, a single-pipe vertical heating system is more suitable. In it, the pipe from the water heating equipment goes up to the attic or second floor, and from there it goes back down to the boiler room. In this case, the batteries are also connected in series one after the other, but with a side connection. The pipeline for the coolant is usually laid in the form of a single ring, first along the second and then along the first floor, in such a heating distribution in a low-rise building.
Single-pipe vertical design - saving on materials
But an example with vertical branches from a common horizontal pipe at the top is also possible. That is, first a circular circuit is made from the boiler up, along the second floor, down and along the first floor back to the water heater. And between the horizontal sections, vertical risers are laid with radiators connected to them.
The coldest battery in such a heating system for a private house will again be the last one in the chain - at the bottom of the boiler. In this case, there will be an excess of heat on the upper floor. It is necessary to somehow limit the volume of heat transfer at the top and increase it at the bottom. To do this, it is recommended to install bypass jumpers with control valves on the radiators.
Leningradka
Both schemes described above have one common disadvantage - the temperature of the water in the last radiator turns out to be very low, it gives off very little heat to the room. To compensate for this cooling, it is recommended to improve the single-pipe horizontal heating option for a private house by installing bypasses at the bottom of the battery.
Leningradka - improved single-pipe system
This wiring was called “Leningradka”. In it, the radiator is connected from above to a pipeline running along the floor. Plus, taps are placed on the outlets to the batteries, which can be used to regulate the volume of incoming coolant. All this contributes to a more even distribution of energy across individual rooms in the house.
About HMS
HMS (hydromagnetic system, magnetic anti-scale apparatus) has nothing to do with “living” and “dead” water and other esoteric wonders. The principle of its operation is simple: an insert with strong magnets is mounted into the pipe; The pipe material doesn't matter.
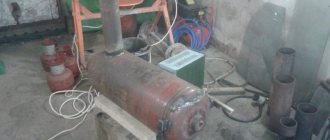
Household hydromagnetic systems
Water is a conductor of electricity, and it moves and flows in the pipe. An electromotive force, EMF, is induced in a conductor moving in a magnetic field. In the lumen of the HMS, it is only a few volts or fractions of a volt, depending on the flow speed, but this is enough so that the impurities contained in the water (they are either in the form of ions or their molecules are polarized) do not settle on the walls of the pipes, but stick together and form a thin the suspension, which at the heating unit will precipitate in the settling tank, and the sludge will be removed.
There is nothing to be afraid of when using HMS: electrically neutral and therefore the most persistent components of impurities form a thin dense layer of sediment on the inner surface of the pipe, its properties reminiscent of corundum. After a growth of approximately 20-60 μm, the layering stops: surface polarization increases and pushes the next “candidates” back into suspension.
HMS has long been widely and successfully used in industry; most often to prepare water for purification and filtration. In recent years, household HMSs have appeared on sale for installation on water supply and heating pipes. At home, HMS provides, in addition to heating reliability and savings, another important advantage: a warm floor in a system with HMS almost never requires a bulkhead, and an additional circulation pump is most often not needed for it.
HMS should be installed on the supply pipe at the very beginning of the system, before wiring. If there are several risers, then for each riser. The HMS does not break down, does not require maintenance, and its validity period is unlimited.
Metal-plastic pipes
Metal-plastic is considered one of the most common materials, however, it has a number of disadvantages that distinguish it from polypropylene:
- Installing heating pipes in an apartment made of such material will require quite a lot of expense.
- The process of replacing pipes can only be carried out with special tools such as a pipe cutter, a flaring press and a pipe bender.
- Considering the thinness of the material itself, there is a large outflow of thermal energy.
- Leaks may occur in places where metal-plastic is attached to other materials.
- Low impact resistance, as well as the impossibility of prolonged exposure to sunlight.
However, metal-plastic heating pipes in an apartment also have a number of advantages, which explains such widespread use:
- Possibility of savings through the use of inexpensive elements to connect the entire heating system.
- Good flexibility of the material, due to which the length of heating lines can be reduced as much as possible.
- Thanks to the special design of connectors for such pipes, inexpensive seals can be purchased.
Cast iron radiators
Heating appliances made of cast iron have a long service life and fairly high heat transfer. In addition, a very important feature of cast iron batteries is their inertia - cast iron takes a very long time to gain heat, so it takes a lot of time to warm up the system, but if the coolant supply is stopped, the accumulated heat will flow into the apartment for several hours.
A noticeable disadvantage of this type of battery is its heavy weight. This factor, firstly, significantly complicates transportation, and secondly, it places special demands on installation technology. You won’t be able to install cast iron radiators yourself, and they can only be mounted on solid walls that can withstand high loads, since the weight of a cast iron radiator is considerable..
The internal volume of cast iron batteries is quite large, so heating them requires a large amount of coolant. From this we can conclude that using such radiators in combination with an electric boiler is extremely unprofitable. For centralized and gas heating, cast iron heating devices are ideally suited.
Pipe selection
In order to correctly install the water supply system in your apartment with your own hands, it is recommended to use either metal-plastic pipes or purely plastic ones.
As for the use of steel or copper options, it is better to avoid them, because working with them requires not only skill, but also additional traumatic tools for cutting, welding and bending.
However, they remain the best option for creating a water supply system. No deposits appear on their walls during use, and the fairly low thermal conductivity makes it possible to use such pipes to provide hot water supply.
Of the variety of plastic pipes, polypropylene pipes are considered the best in terms of price/quality ratio. To solder polypropylene pipes, a special “soldering iron” is used, which is very easy to learn how to use.
How to heat an apartment with an air conditioner
Most modern split systems are capable of not only cooling the air in summer, but also heating it in winter. An air conditioner will do an excellent job of heating an apartment or house, but the average electricity consumption is 1-1.5 kW per hour. Such consumption is rational if the equipment is not used constantly, but as an additional source of heat when necessary.
Installation of a polypropylene heating system
Preparation for installation
At the preparatory stage, the following work needs to be done:
- Draw up a heating project. Designing a heating system is a complex task that not everyone can do. Based on the calculations, the type of heating system, heating boiler, heating devices, additional equipment and pipeline fittings are selected. An integral part of the project is a specification of materials indicating the length and diameter of pipes, types and number of fittings
- Purchase materials and tools
- Install a homemade heating boiler. radiators and additional equipment
- In the instructions for the soldering iron or reference literature, find out the welding and cooling time of the pipes used, and perform test soldering
- Bring pipes and fittings indoors to allow them to reach room temperature
Pipe laying methods
Pipes can be laid in open and hidden ways.
In the first case, they are attached to the walls on metal or plastic brackets.
In the second, they are laid in grooves (grooves) made in the walls or behind finishing materials (plasterboard, plastic, etc.).
Open installation is less labor intensive and provides access to the pipes for repairs. When laid hidden, the pipes do not spoil the interiors of the rooms, but if necessary, they are difficult to access.
Installation of heating pipes
Work must be carried out at temperatures above +5 degrees. Degrease the soldering iron nozzles, heat the soldering iron to 260 degrees.
Installation is carried out in the following sequence:
- The pipes are cut into pieces of the required length using special scissors or a roller pipe cutter.
- If the foil is located close to the outer surface of the pipe and interferes with soldering, it is removed with a shaver
- The cutter removes burrs and chamfers
- Soldering areas are degreased with alcohol
- Soldering, especially for people without experience, is best done together
- The pipe section and fitting are placed on the soldering iron nozzles, kept for the required time, removed, connected without twisting and fixed for the time required for cooling
- The connected pipes are attached to the walls with clips every 50 - 70 cm
- Individual parts of the pipeline are connected on site using a portable soldering iron
- Sections of the heating system are purged with a pressure testing pump. to make sure there are no plugs (seals), and the finished system is tested with water for the absence of leaks
When installing pipes, adhere to the following rules:
- The design slopes of the pipes are observed (0.02 - 0.06 from the boiler to the last radiator for a straight pipe and the same slope from the last radiator to the boiler for a reverse pipe)
- The return pipe is laid above the inlet pipe of the heating boiler
- To avoid overheating, polypropylene pipes are connected to the boiler through a piece of metal pipe and laid away from heating devices
- Heating appliances are connected to pipes using quick-release connections - “American”
- Pipes are laid in such a way as to reduce the likelihood of mechanical damage and exclude direct sunlight
- The pipes are connected to each other using couplings or “pipe into socket”; in the latter case, the socket is made by expanding one of the ends of the pipe
- Pipes thicker than 40 mm are soldered joint to joint
In order to comply with safety regulations, installation should be carried out in a ventilated area; when working with a soldering iron, hands should be protected with gloves.
It is worth noting that in most cases, private houses are heated with gas. because natural gas is the most affordable and economical fuel for a private home if there is a gas pipeline near the village.
Also, in addition to heating, a private house must have a sewerage system. Read about the features of its arrangement here.
And of course, ventilation is an integral part of a private home. How to properly make a ventilation system is described in this article. Please note that if it is done carelessly, then the rapid appearance of fungus and mold is possible; breathing in their spores is highly not recommended.
Since prices for installation work often exceed the cost of materials, installing polypropylene heating on your own allows you to save significantly.
Experienced specialists will complete this work in one day, but beginners should take their time and carefully follow the recommendations. The result will not be long in coming - in a few days you will have at your disposal an efficient heating system that requires almost no maintenance.
Legal nuances of the issue
You can’t just change central heating to an autonomous system. First, you will need to notify the local authorities of your desire in writing and wait for a response from them. Whether it will be positive is unknown. The administration may refer to Art. 190 Federal Law and refuse the tenant’s request.
In court, such a verdict is recognized as unfounded, based on government decree No. 307 of April 16, 2012 , which examines in detail the procedure for connecting heat supply systems. This document describes in detail which local sources of thermal energy are allowed and which are prohibited for installation in apartment buildings.
If a modern boiler is selected for installation and meets the requirements for equipment for installing a home heating system, there is no reason to refuse the installation to the resident.
Documents for obtaining permission
To correctly abandon centralized heating and switch to autonomous heating, you will have to collect a package of documents.
It includes:
- statement about the desired reconstruction of the heating system;
- title documents for ownership of the apartment where it is planned to install new equipment;
- technical passport clearly describing the parameters and layout of the premises (original or notarized copy);
- project for renovating an apartment to accommodate modified heating communications;
- written consent of all residents registered in the apartment;
- expert opinion of the department for the protection of monuments on the admissibility of work on the reconstruction of the premises.
Based on these papers, the authorities issue permission to disconnect the client from city communications.
The process of registration of autonomous heating
To order technical conditions for the installation of individual gas heating, written permission to disconnect the apartment from central communications is sent to the local gas distribution company.
Within 10 days, specialists study the technical feasibility of installing the equipment and give the go-ahead (or refusal) for the actual installation of the system.
Refusal to install a gas boiler due to lack of “technical capability” is allowed only in those areas where there are no gas networks and bottled gas is not available for purchase
When the documents are received, the owners purchase a certified heating boiler and contact the design bureau to prepare an equipment installation diagram, taking into account all technical conditions, safety rules and features of a particular room.
At the same time, the heat supply organization is making a project for correctly disconnecting housing from centralized communications. The basis for the procedure is a letter from the HOA confirming the authorities’ permission to transfer the apartment to an autonomous heating system.
Having all the necessary documentation in hand, property owners go to the fire department and there they receive a certificate confirming the fire safety of the developed project.
The general scheme for transferring an apartment from centralized to autonomous heating is the same everywhere. However, in different areas, due to regional characteristics, additional certificates and documents may be required. You can find out their full list by contacting your local administration.
Then the papers are submitted for approval, and the local administration reviews the application within 45 days, and then allows or prohibits the conversion of the premises for autonomous heating. The reason for refusal is Art. 27 LCD (not a complete package of documents provided). This decision can be appealed in court or, adding the necessary certificates, you can reapply for approval.
Another serious reason is the inability to install a chimney or ventilation system that meets certain requirements.
Floor insulation for hidden wiring
Removing heating pipes out of sight is tempting from an aesthetic point of view. To prevent hidden heating wiring from subsequently causing the righteous anger of heating engineers with accompanying sanctions, it is advisable to prepare the floor accordingly. If the decorative flooring is laid on joists and additional floor insulation is not required, then the pipes are simply laid between the joists, and removable access hatches are installed above their connections.
Otherwise, the pipes must be laid in the floor. Methods for floor insulation are described in the corresponding article, and for this case we can recommend the following:
- We lay pipes.
- We form an additional warm screed from foam concrete. We fence the pipe connections until the concrete hardens with boards according to the required dimensions (see at the end).
- We lay 12-18 mm plywood flooring directly over the warm screed, gluing the joints with liquid nails or assembly adhesive. We cut out openings in the plywood above the pipe joints.
- We restore the finished flooring. We cut out the hatches for access to the pipes larger than the openings in the plywood - they will simply be removed.
The second method is somewhat more expensive, but it is easier to work with and provides access to the pipes along their entire length. To do this, we use foam concrete or aerated concrete slabs with cement-sand mortar as a warm screed. The rest is the same.
Infrared heater for an apartment or house
If you decide to purchase mobile heat, this is the best choice. The average consumption of an infrared heater is 1 kW per hour, but this is more advanced equipment than oil heaters and is equipped with timers and a temperature controller. Appliances are produced in beautiful designs - this could be the type of painting or fireplace, which are installed on the floor or hung on the wall. An infrared heater will do an excellent job of raising the temperature in the apartment, but such devices are on average designed for 18-20 square meters. meters, so one element is not enough to organize stationary heating.
Laying methods
This procedure can be carried out in several ways:
- closed;
- open.
It is worth noting that the closed method is not only characterized by increased labor intensity, but also makes it possible to save space in the room. This is very relevant when it comes to small bathrooms.
At the same time, we can immediately note the main disadvantages of the closed method:
- inability to conduct a preventive inspection of pipes to examine their condition;
- the need to break down walls in order to carry out repairs in the event of a leak and, as a result, the need for further repairs.
As for the open method, its only drawback is the reduction of free space in the room, as well as changes in its appearance.
But the advantages include:
- low labor intensity of installation, which has a positive effect on the speed of its implementation;
- the ability to see a leak in time and eliminate it;
- ease of repairs on any site;
- the ability to improve the system while using it.
Steel panel batteries
Heating appliances made of steel are, perhaps, the optimal combination of price and quality. The efficiency of steel radiators is quite high, the service life is quite long, and the price is not so high that it can be considered unjustified. In addition, it is also worth noting the relatively light weight of such devices and, as a result, simple installation.
A characteristic disadvantage of standard steel appliances is their susceptibility to corrosion, which can significantly shorten the life of radiators in the heating system. In order for devices to work properly, they need high-quality and regular maintenance. In addition, to prevent corrosive effects, you should try not to drain the coolant for a period longer than a week - moisture combined with air can seriously damage the internal parts of the radiators.
Installation diagrams for a heating system in a private house
In practice, two types of systems are used - diagrams (or types of pipe layout), namely:
- single-pipe;
- two-pipe.
Each of them has its own advantages, disadvantages and is used in different cases.
Single pipe system
This type of wiring is cheaper and simpler. The system is built in the form of a ring - all batteries are connected in series with each other, and hot water moves from one radiator to another, then goes back into the boiler.
As can be seen in the figure, all batteries are connected in series, and the coolant passes through each of them.
This heating scheme is very economical in its implementation, it is easy to install and design. But it has one significant drawback. It is so significant that many refuse such wiring and prefer the more expensive and complex one - two-pipe. The problem is that as the coolant moves, it will gradually cool down. Until the last battery, the water will flow slightly warm. If you increase the boiler power, the first radiator will heat the air too much. This uneven heat distribution forces us to abandon a simple and cheap single-pipe system.
You can try to get out of a difficult situation by increasing the number of sections of the last radiator, but this is not always effective. This suggests the conclusion that single-pipe wiring can be used in the case when the number of batteries connected in series is no more than three.
Some people get out of the situation in the following way: they connect a pump to the boiler, thereby forcing the water to move forcibly. The liquid does not have time to cool and passes through all the radiators, almost without losing temperature. But even in this case, you will face some inconveniences:
- the pump costs money, which means the costs of installing the system increase;
- electricity consumption increases as the pump runs on electricity;
- if the electricity is turned off, there will be no pressure in the system, which means there will be no heat.
Conclusion. A single-pipe system is effective only for small houses with 1-2 rooms, where a small number of radiators are used. Despite its simplicity and reliability, it does not justify itself in country houses, where it is necessary to install more than three radiators in the entire living area.
Two-pipe system
Hot water is supplied through one pipeline, and cooled water through another. This ensures uniform heat distribution across all batteries.
Such heating distribution in a private house will be much more efficient and better than a single-pipe one. Although it is more expensive to make and more difficult to install, it allows you to distribute heat evenly across all batteries, which will help create comfortable conditions. Unlike the single-pipe system, in this installation a pipe with hot water is supplied under each radiator, and the cooled liquid is discharged through the return line into the boiler. Since the coolant is supplied to all batteries at once, the latter heat up equally.
This system is not much more complicated than the first; you will have to buy more materials, since pipes will have to be connected to each radiator.
A two-pipe system can operate according to two schemes:
- collector;
- ray.
The beam wiring option is older. In this option, the supply pipe is installed at the top of the house, after which pipes are laid out for each battery. Thanks to this design, the circuit received the name - beam.
The first scheme works as follows: in the attic it is necessary to install a collector (a special device consisting of many pipes), which distributes the coolant through the heating pipes. In the same place you need to install shut-off valves that will cut off the circuits. This design is quite convenient; it facilitates the repair of the entire line and even an individual radiator. Although the scheme is reliable, it has one significant drawback - complex installation with a large number of materials (shut-off valves, pipes, sensors, control devices). The collector layout of heating pipes is similar to the radial one, but more complex and efficient.
Unlike a one-pipe system, a two-pipe system does not require additional forced circulation of coolant. It shows high efficiency even without a pump.
How to heat an apartment using a fan heater
It can quickly raise the temperature in the room, but consumes as much electricity as an oil heater. It works on the principle of a convector, only the air is taken in not from below, but through the back wall. The fan heater can be installed on a shelf or on the floor, and can also be hung in any place where it is most needed.