Solid fuel boilers for the home help create fairly comfortable heating, and can help the heating system cope with increased demands. They have enough advantages, but require maintenance from time to time, and always with care for fire safety purposes.
In this article we will look into this question that often arises among owners, why the heating boiler smokes and what to do in such cases. Often, the problem lies in the chimney pipe.
You can find out the price and buy heating equipment and related products from us. Write, call and come to one of the stores in your city. Delivery throughout the Russian Federation and CIS countries.
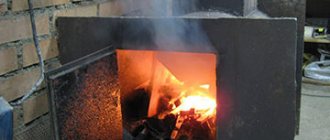
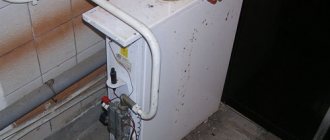
Smoke from the boiler into the room
Why does reverse draft appear and how to eliminate it?
It is recommended to install the boiler in such a way that the vent and smoker are located on one side.
Failure to comply with the rule in a small building is infrequent, but there may be no consequences. In a high-rise building in windy weather, this can cause a pressure difference. Violation of the norm in this case leads to the appearance of reverse thrust. Often a previously unsmoked boiler lets out clouds of smoke into the room at the moment of lighting after it has completely cooled down. For normal exhaust gas removal, it is necessary that the boiler room be warmer than outside. Violation of this rule leads to a natural result - the draft will not be restored until the heating equipment warms up. You can restore normal air circulation using a simple technique - light the paper, after placing it closer to the chimney. In this case, the ash pan is left open and the firebox door is tightly closed. Attempts are repeated until smoke appears from the chimney, indicating the restoration of normal draft. After such a signal, you can safely start the heating boiler without fear that it will start to smoke.
Solid fuel boilers for the home help create fairly comfortable heating, and can help the heating system cope with increased demands. They have enough advantages, but require maintenance from time to time, and always with care for fire safety purposes.
In this article we will look into this question that often arises among owners, why the heating boiler smokes and what to do in such cases. Often, the problem lies in the chimney pipe.
You can find out the price and buy heating equipment and related products from us. Write, call and come to one of the stores in your city. Delivery throughout the Russian Federation and CIS countries.
Smoke from the boiler into the room
Installing a plastic window sill with your own hands
Have you decided to install a plastic window sill yourself? Perfect solution! This is a simple task that will require:
- tools. The better they are, the easier it is to install. You cannot do without a saw to shorten the window sill according to size, a screwdriver, a mounting bit, a spatula (the list of necessary tools may vary depending on the installation method);
- 3-4 hours. Knowing the subtleties and nuances of the installation process, you can complete the installation even faster.
There are several ways to install a PVC window sill:
- fastening the window sill with a special compound. The old method is practically not used, since more modern methods have appeared;
- using self-tapping screws. Holes are drilled in the frame into which self-tapping screws are screwed. The joint is treated with sealant, after which the window sill is tightened with self-tapping screws.
- using metal spring brackets. They are screwed to the profile with self-tapping screws, and the product is installed in the resulting groove.
- using special pads. Self-tapping screws or staples are installed under the window sill until it is securely fastened.
If smoke comes into the room from a gas boiler
A wall-mounted or floor-standing boiler and AOGV can smoke for two main reasons: a malfunction of the chimney or poor gas quality.
First of all, it is necessary to inspect the chimney and carry out the following work:
The presence of traction is checked. This can be done either with a special measuring device, or by holding a lit match. The flame should deviate noticeably towards the boiler. If this does not happen, it means that the chimney for some reason does not pull smoke out.
View the pipe using a mirror and a flashlight. If necessary, remove snow and foreign objects. If you cannot do this yourself, call a chimney sweep. If you heat with damp wood, you need to clean out the accumulated tar from time to time. Replace the chimney with a suitable type and diameter for this model. For example, the Lemax Premium device requires a chimney with a diameter of 200 mm. Increase the length of the pipe; in your house, its end should end above the ridge of the roof. Insulate the outside with glass wool. Inspect the chimney for cracks
Pay special attention to connecting seams. Remove right angles when turning and make transitions smooth.
In the room where the gas boiler is located, a window must be open to allow air to enter. This is especially true during the cold season in high-rise buildings, where a layer of cold air may prevent combustion products from escaping.
If you heat with a gas boiler and use cylinders rather than a centralized gas pipeline, it is important to purchase high-quality liquefied gas from trusted manufacturers. The Ross Lux model allows you to do this.
Installing a PVC window sill with your own hands: subtleties and nuances of installation
It’s no secret that a window without a window sill looks at least ridiculous - at least some kind of decorative “platform” under the window should be present. Today, you can decorate the bottom of a window opening in three ways: tiling it with decorative stone tiles, or installing a wooden or plastic window sill. The latter, or rather its installation, will be discussed in this article, in which, together with the website stroisovety.org, we will study in detail the question of how to install a PVC window sill with your own hands. We will pay special attention to the subtleties and nuances of this process.
Installing a PVC window sill with your own hands photo
Installing a PVC window sill with your own hands: preparing the window opening
In construction and repair work, preparatory work cannot be done anywhere, including when installing a PVC window sill. Almost everything is standard here - we clean the lower part of the window opening from construction debris remaining after dismantling the old window sill or window, carefully prime the surface and leave it to dry.
Dismantling an old window sill photo
In addition to the standard procedures associated with cleaning the window sill installation site, other preparations also need to be made. Or rather, not preparation, but control - if you want to prevent drafts from under the window sill, then you should check the quality of the foaming of the window frame and, if necessary, eliminate all shortcomings. This nuance in the work especially needs to be taken into account in the case of installing a plastic window sill, which is not associated with a complete replacement of the window unit.
In addition, if the slopes in the opening are already ready, it is necessary to trim their bottom so that the window sill “goes” under them. This can be done in different ways - but in all cases you need to understand that the less you injure the slope, the easier the procedure for restoring it will be later. That's it at this stage. Now you can begin to directly prepare the window sill itself.
Preparatory work before installing the window sill photo
Preparing a plastic window sill for installation
This stage is also not particularly difficult - all that needs to be done here is to trim it correctly and adjust it to length. Plastic is easily cut with almost any sawing tool - you can use a hacksaw, a grinder, a circular saw, or a metal blade. The best option for cutting PVC window sills is an electric jigsaw.
The task of adjusting the window sill is to cut it correctly in length - this must be done in such a way that it fits freely into place and at the same time its edges do not peek out from under the slopes.
How to install a plastic window sill photo
How to install a plastic window sill: installation features
When all the preparations have been completed, the new window sill has been trimmed and the bottom of the window opening has been cleaned, you can begin the actual installation. This process looks like this:
- Installation of a plastic window sill begins with the installation process. To begin with, it must be inserted into place and positioned so that none of its edges peeks out from under the slopes - the window sill must be inserted under the window frame.
Installing a plastic window sill with your own hands photo
- The next step is to wedge the window sill between the window opening and the window frame. For this purpose, as a rule, wooden wedges are used - they are installed at the edges of the window sill and in the middle. When installing them, you need to ensure that there is no gap between the window frame and the window sill.
- When you are done with fastening the far edge of the PVC window sill, you should work on its front edge. Between it and the window opening you also need to install linings that will ensure an even horizontal level. The entire process of installing a plastic window sill with your own hands must be constantly monitored at the building level.
The role of the building level in the installation of a PVC window sill
- The final stage in deciding how to properly install a window sill is reliable fastening. As a rule, it is simply glued using mounting foam, which is pumped into the space between the window opening and the window sill. Everything is simple here - thoroughly shake a container with polyurethane sealant heated in warm water, screw a tube onto it and, inserting it as deep as possible under the window sill, blow the entire space with foam.
How to properly install a window sill with your own hands photo
There is one nuance here - it’s no secret that when foam hardens, it greatly increases in volume, and during the expansion process it creates considerable pressure, which can lift the window sill up. To prevent this from happening, you need to put some kind of weight on the windowsill, for example, about five or six bricks. But first, in order not to damage the window sill, it is better to cover it with something.
It will be possible to remove the load in 12–14 hours - although manufacturers indicate that complete polymerization of polyurethane sealant occurs within 6 hours, it is better to wait a little longer. By and large, the hardening time of the foam depends on its volume - the more you inflate it under the window sill, the longer it will harden.
Installation of PVC window sill: final work
Well, in conclusion, a couple of practical tips about installing a window sill.
- Firstly, before gluing the window sill, its back surface and the base of the bottom of the window opening must be thoroughly moistened with water. The fact is that the polymerization process of polyurethane foam occurs faster at high humidity. In addition, it adheres better to a wet surface. You can moisten the space under the windowsill using a spray bottle, which is used to care for flowers or to moisten clothes when ironing.
- Secondly, do not pump too much foam under the windowsill - it won’t make it any better. The space must not be filled completely - it is better to make gaps between the stripes. This way you will save on sealant and prevent the window sill from lifting upward.
This is how you install a PVC window sill with your own hands. Whether it is difficult or easy, judge for yourself, and also decide what is best for you to do - call a specialist or try to do everything yourself.
Causes of reverse thrust
Backdraft is one of the possible reasons why the boiler smokes when the door is opened. It has already been discussed above. If combustible products are not removed through the chimney, but go into the living room, it is worth analyzing the cause of this situation and urgently starting to troubleshoot. As a rule, in this case, the exhaust gas sensor built into units of all modern brands also reacts.
However, the solid fuel boiler smokes profusely when the door is opened and dirty the window on the door. The reason is usually the same. All gases circulate from an area with high pressure to an area with lower pressure. Natural draft appears when the chimney is brought to the optimal height.
You can check whether reverse draft is present by holding a lit match to the chimney pipe. In the case of natural draft, the fire will be deflected towards the boiler, but if there is a reverse draft - away from the boiler.
The most common cause of backdraft is weather. A gust of wind penetrates the chimney and does not allow harmful waste to escape. The same goes for when the outside air temperature drops. Sometimes you should simply wait until the pipe becomes warmer and the natural circulation of combustion products improves.
It is also possible that the design and type of chimney pipe are not selected correctly. There may be damage. For unhindered smoke removal, the pipe should have as few turns as possible. The diameter and types of the chimney are selected for each boiler based on its type and power parameters.
Miscalculations during laying a stove well - what to do now?
In some cases, smoke enters the house the moment the firebox door is opened. When the door is closed, carbon monoxide is evacuated as usual. In this case, the reason lies in the inexperience of the stove master.
When the door is opened, smoke occurs if the entrance to the well is located too low and the shortest path for heated air with carbon monoxide runs precisely towards the doorway of the firebox.
For any responsible person, when the stove in the house smokes, what to do is the main and primary question. The problem can be solved if you build a wall inside the firebox, the upper edge of which will be several centimeters higher than the upper edge of the door.
Thus, hot air with carbon monoxide will move to the well opening even when the firebox door is open.
Results
In the article, we looked at the most likely causes of smoke inside the house, as well as what ways you can deal with it. It is noteworthy that in most cases the work is not difficult and can be done independently.
This equipment is not too difficult to maintain.
However, due to the specifics of its work, it requires some attention during operation. Further in the article we will look at ways to eliminate the most common problems and the reasons for their occurrence.
What to do if the boiler “cries”
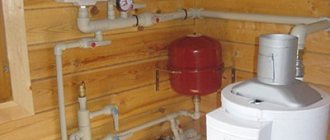
Condensate begins to flow out of the boiler when the return temperature is too low. This problem requires elimination, since such a problem reduces the service life of the boiler. Soot and soot accumulate inside the equipment. To avoid such a situation for boilers using pellets and wood, it is necessary to ensure that the temperature of the coolant in the return line is not lower than 55 degrees.
In this case, 60-65 g can be considered the best option. In order to ensure such operating conditions, a Laddomat device or three-way mixing valves should be used.
Causes of overheating of solid fuel boilers and ways to eliminate this problem
A solid fuel boiler can overheat mainly in two cases:
If the premises of the house consume less heat than the boiler itself generates. The features of this equipment are such that precise power adjustment is simply impossible. As a result, the coolant heats up until it begins to boil and release excess steam through a special valve; Approximately the same situation occurs when the circulation pump stops functioning for some reason. In this case, boiling occurs as a result of the fact that heat removal from the boiler ceases.
How to protect equipment from overheating? Experts advise using a special storage tank for this purpose, as well as a UPS (uninterruptible power supply).
The latter is necessary, first of all, to ensure the stability of the pump; the first is intended to collect excess heat. In order to protect the boiler from overheating, it is worth using WATTS STS-20 and REGULUS TSV valves.
Other common problems
Very often, owners of solid fuel boilers are also forced to solve the following problems:
Smokes. The reason is poor draft in the pipe. Most likely, the air heating of a private house will simply need to be cleaned of soot; High fuel consumption. The problem usually lies either in the incorrect connection of the boiler (incorrectly selected power), or in the use of low-quality fuel or poor insulation of the room; Water is flowing from the chimney. In this case, the latter should be insulated; The burner in the pellet boiler becomes clogged. To avoid this, you should use only high quality granules from certified suppliers.
Smoke prevention
Diagnostics of any furnace are carried out in the warm season, when it is possible to slowly eliminate any problems that have arisen.
List of events:
- timely cleaning of the chimney and stove elements from dirt and soot,
- checking the fastenings of the windproof cap,
- checking the tightness of the door and joints of the oven elements,
- ventilation and heating in the summer to prevent condensation from accumulating in the pipes.
Preventive maintenance of the potbelly stove will reduce the number of repairs, ensure its uninterrupted operation and safety of use. Previous articleHow and with what to light a potbelly stove? Next article How to increase the efficiency of a potbelly stove without the help of a specialist and serious financial investments What else to read
- How to increase draft in a chimney with your own hands
- How and with what to light a potbelly stove?
Click to cancel reply.
Name
your message
Categories
- Stoves Heating Stoves
- Cooking ovens
- Camping stoves
- Stove for a summer residence
- Bath stove
- Sauna stove
- Garage oven
- Industrial ovens
- Making a furnace
- Furnace projects
- Furnace firebox
- Calculators and calculations
- Boilers
Recent Entries
- Design and principle of operation of electric arc furnaces
- Design and principle of operation of tube furnaces
- Classification of vacuum furnaces
- Making a Swedish oven with a fireplace with your own hands
- How to make a Swedish stove with an oven and a stove with your own hands?
The hottest discussions How to cook delicious flatbreads in a tandoor - a simple and quick recipe Igor: the walls of the tandoor are not warmed up enough. The cakes fall off the too-hot walls. No salt ... Misha Methods for calculating the diameter of a chimney for a wood-burning stove Vitaly, hello! Can you calculate for me the correctness of the chimney laying?...Svetlana Fedorovna Professor Butakov’s stove “Engineer” operating principle and main characteristics Oleg: Hello! Oven "Professor Butakov Engineer" with a cast iron door. The glass cracked. All attempts...Victoria
- Furnaces
- Fireplaces
- Boilers
- Brands
All information materials presented on greendom74.ru are for reference, informational and educational purposes only and cannot fully convey reliable information. All rights reserved. Copying is prohibited. About stoves and fireplaces in 2022. Ask a question to an expert
We will publish information soon.
If the gas boiler smokes
In addition to errors associated with improper installation of equipment, the quality of the fuel plays an important role in the operation of the unit. This issue is especially relevant when using liquefied gas from a cylinder.
After the combustion of clean fuel, a small amount of dry soot remains. Flakes of this substance accumulated in the pipe can be easily eliminated. It is enough to tap the chimney from the outside and remove the crumbling soot through the technical window.
After the combustion of gas with a large number of impurities, greasy soot adheres to the walls of the chimney, gradually narrowing the lumen. This substance is quite difficult to clean off. A regular pipe brush may be useless. In such a situation, it would be best to disassemble the smoker and clean its components separately.
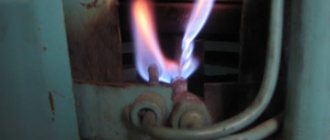
Quite often, a gas boiler smokes due to improper adjustment of the flame intensity. If the user, in violation of all instructions, turns on the burner of a cold boiler at full power, then the appearance of smoke will be a natural result. The problem can be avoided by gradually increasing the combustion temperature after kindling.
The appearance of smoke due to incorrectly selected chimney dimensions
Another fairly popular cause of smoke is the incorrectly selected height of the chimney pipe, and this error usually occurs during the installation of all equipment
When installing a chimney in a garage or other building, it is important that its outer part, which is located on the street, has the necessary and sufficient height
If the proportions are chosen incorrectly, then very often smoke comes out of the stove, which comes out when the door is opened, and the reason lies precisely in the chimney. If this error is detected, it is necessary to urgently correct it, for which purpose the structure is built up through the use of additional sections of pipe.
What to do when a solid fuel boiler smokes - a real example
The reasons for the smoking of a solid fuel boiler can be different. Often, when such a situation arises, unit owners immediately search for information on the Internet, analyze websites and forums to find real reviews and comments, how to determine the cause of the problems and fix them. Here is one such example.
One of the forum members complained that after installing a solid fuel boiler of the Dragon TA brand with a classic stainless steel chimney, after two years of unquestioning operation, the unit began to smoke. Combustion products began to come out of the chimney inside the boiler room, from all the doors during the firebox.
Kindling was carried out with various types of firewood: spruce, birch, aspen. Dry, wet, and frozen firewood was used... The boiler functioned perfectly for two years, and then the situation changed. The owner is sure that weather conditions have nothing to do with it. Ventilation works great.
The actions of the boiler owner were as follows:
- He dismantled the chimney pipe and cleaned it.
- I rewound all the connections of the structure with aluminum tape.
- Cleaned out the entire boiler.
- The chimney was insulated with 10 cm ROCKWOOL stone wool.
The solid fuel boiler was still smoking inside the boiler room, but the chimney stopped. The owner did not understand what was wrong and why the boiler was smoking.
After much deliberation and communication with people who had encountered a similar problem, we were able to establish the reason, which was as follows.
The owner heated the boiler for two years with dry chopped aspen and birch logs. In the real cold season, the weather arrived already in October, so we ran out of dry firewood, and a carload of raw birch firewood was purchased.
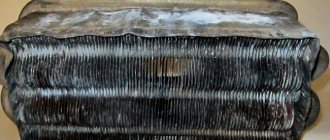
When using dried firewood, dry soot accumulated in the chimney pipe, which could be removed simply by tapping the vertical part of the chimney with a stick. And everything is clean and tidy. Damp birch logs covered the walls of the boiler and chimney pipe with tar.
The owner carried out all the necessary cleaning procedures for the boiler. Removed the tar. And that's it - the problem disappeared.
A solid fuel heating boiler is a good means of heating. But remember that it also requires periodic maintenance and compliance with safety rules.
The boiler is smoking: causes and solutions
Conclusion
The most common reasons for stoves smoking in the house are poor draft and soot-covered structure inside. Moreover, if the system begins to become overgrown with “fluffy” soot, then it needs to be cleaned urgently, as it can catch fire, which is a fire hazard.
If you promptly check the chimney for soot fouling and clean it when blockages are detected, then smoke in the room will rarely occur or will not occur at all. It is also necessary to constantly check the entire structure to identify various damages, cracks, breaks, and so on - they are also a common cause of smoke.
What problems arise when operating solid fuel boilers?
1. When loading fuel into the boiler, smoke comes out into the room - The main reason for boiler smoke is insufficient draft in the chimney, lack of supply air for combustion. Check the condition of the chimney. And most importantly, consult with engineers about the height and diameter of the chimney.
2. Resin adheres to the internal walls of the solid fuel boiler - Raise the operating temperature of the boiler to at least 75 degrees, clean the boiler, install a three-way mixing valve to control the temperature of the water entering the boiler to at least 61 °. Use quality fuel!
3. Periodically, water appears under the solid fuel boiler - this is condensation. This process occurs when the boiler return temperature is below 51°; to solve this problem, it is necessary to increase the boiler temperature to 75° and install a three-way mixing valve to maintain a stable return temperature of at least 55°.
4. Black smoke is coming from the chimney - There is not enough supply air for combustion, or low-quality solid fuel is used.
5. The fuel in the boiler does not burn - The chimney draft is weak. The chimney needs cleaning or the cross-sectional height of the solid fuel boiler chimney needs to be increased. Study the boiler instructions and adjust the regulators.
6. The boiler often clogs - Increase the boiler temperature, use higher quality fuel. There is not enough air flow or draft in the chimney.
7. Wood burns normally, but coal does not burn - The size of the chimney does not correspond to the power of the boiler.
8. When heating water in the heating system, the pressure rises greatly - The expansion (compensation) tank is damaged or has insufficient volume.
9. Which safety group should be set for a solid fuel boiler - The safety group must comply with the manufacturer’s requirements specified in the instructions for the boiler.
10. The solid fuel boiler cannot raise the temperature in the heating system – Raw fuel with insufficient caloric content is used, replace the fuel with a higher calorific one. For example, briquettes or coal. You need to use more or less dry fuel.
The main problems with solid fuel boilers arise from improper installation and selection of the chimney for the boiler. Also, the operating temperature of a solid fuel boiler plays an important role, as well as the temperature of the heating return line (the water that enters the boiler) must be at least 55°. When purchasing a boiler, analyze the fuel market, consult with specialists on boiler installation plans
Also, it is worth paying great attention to the type of boiler and the types of fuels on which the solid fuel boiler can operate
There are four main types of solid fuel boilers - universal boilers, wood boilers, pellet boilers, and combination boilers. These boilers differ greatly in terms of comfort and quality of operation using one or another type of solid fuel.
A lot depends on whether you are ready to use solid fuel in heating your premises, since it will take a lot of effort and time when using manual fuel loading, so you should immediately decide whether you need a boiler with manual loading or automatic.
And don’t forget to call and consult - this will give answers to many questions, and it will also show the level of engineers who offer you quite specific equipment!
How to install window sills on plastic windows
The installation of plastic windows will not be completely completed without the final finishing: installation of the window sill and slopes. Typically, the installation of these parts of the window structure is carried out by the specialists who installed the window. But if this item is not included in the list of services provided by the company, then you can do it yourself. It is not difficult to install the product yourself, but it is recommended that you first read the instructions on how to properly install the window sill.
Selection of window sill
Depending on the overall interior design, products from various materials are used to decorate the space under the windows (after replacing old windows with PVC construction):
- wooden;
- polyvinyl chloride;
- stone.
But plastic windows are best combined with PVC window sills and slopes. This material is characterized by durability, excellent moisture resistance, high temperature resistance, environmental friendliness and non-biodegradability.
Plastic blanks are presented in specialized stores in a wide range, so you can always choose the appropriate option. The standard length of window sills is from 1.5 to 3 m. The width can be from 15 to 60 cm.
White products are most in demand, but you can choose a PVC window sill of any other color, since the polymer can easily be painted throughout the entire mass at the production stage. In addition, it is easy to choose a workpiece with a surface that imitates the color and texture of wood or stone. This will result in a beautiful decorative design of the window opening at minimal cost, since plastic has a low price.
Materials and tools
To install a plastic window sill yourself, you need to prepare all the necessary materials and tools in advance. The installation result largely depends on their quality, so the choice of tools should be taken seriously.
To work you will need:
- PVC window sill blank;
- roulette;
- pencil;
- a jigsaw or an angle grinder (if you don’t have a power tool, you can use a hand saw for metal with fine teeth);
- perforator;
- level;
- wooden blocks for lining;
- polyurethane foam and a gun for applying it;
- construction or stationery knife;
- silicone sealant.
Preparatory stage
At the preparation stage, it is necessary to take accurate measurements. The length of the window sill must exceed the width of the window opening by 6–10 cm, so that the side parts of the product can be inserted into specially prepared grooves in the slopes.
To determine the width of the PVC window sill, you need to measure the distance from the window frame to the edge of the wall and add an additional 7–9 cm. In this case, 2 cm will be required to install the workpiece in the groove under the window profile, and the protrusion will be 5–7 cm. This the optimal size of the protrusion, which allows not to disturb the air convection in the room. An excessively protruding window sill will prevent warm air from the radiator from rising upward, which will lead to condensation or ice appearing on the windows. But sometimes the installation of a plastic product is carried out flush, that is, without a protrusion, but flush with the wall.
The workpiece is cut to the required length using a jigsaw or other tool. It is important to be careful when working and not to exceed the pressure to avoid chips or scratches on the product.
Window sill installation
Window sill installation can be carried out in the following ways:
- fixation using polyurethane foam;
- attachment with special brackets (this option is used when the width of the PVC window sill exceeds its length);
- fastening with spring clips.
When the installation is done by hand, preference is usually given to the first method, as the fastest, simplest, but quite reliable. This does not require special skills, just knowing how to use the tools. Even a non-professional can do this job. In order to correctly install the window sill, it is recommended that you additionally familiarize yourself with the photo and video instructions.
You need to install a PVC window sill when the window profile is already installed and well fixed. First, you need to determine how much the edge of the window sill will be recessed into the slopes and use a hammer drill to prepare the corresponding grooves. Then you should eliminate the unevenness, clean the surface under the window from construction debris and dirt, and also dust it with water.
The workpiece, cut to the required size, is inserted into the groove under the window frame to a depth of 2 cm. The edges should fit into the prepared grooves in the slopes, which should later be puttied. Under the plastic structure you need to place a lining of wooden blocks, placing them at a distance of 40 cm from each other. Evenness in the horizontal plane is controlled using a level. In this case, it is necessary to make a slope from the window by 3 degrees so that water from condensation or watering indoor plants does not accumulate on the windowsill and does not get into the joints.
Then the space between the pads is filled with polyurethane foam and a PVC window sill is glued onto it. It is necessary to ensure that there is no excess amount of foam, since when it hardens it expands and can deform the plastic product. Before the foam hardens completely (for about a day), you need to place a load on the windowsill; for this you can use cylinders or cans of water. If there are gaps at the joints, they are filled with silicone sealant.
When the plastic window sill is completely installed, it is necessary to check that the installation is correct and that there are no deviations in level. After 24 hours, you can remove the load, cut off the excess polyurethane foam with a construction knife and remove the protective film.
Installing a PVC window sill under a plastic window is not too difficult, so you can easily do it yourself without involving professionals. In order to take into account all the subtleties of installation and avoid mistakes, watch the video, which explains in detail all the nuances and features of this matter.
Why the boiler smokes reasons
Let's figure out why the boiler smokes and what are the main possible reasons for this phenomenon. Most likely the problem is in the chimney.
Here is a list of supposed malfunctions in this unit leading to poor traction:
- The chimney pipe is clogged. In winter, it could get snowy or freeze. Also, a foreign object could get there from above or soot could gradually accumulate. All this can be the reason why there is no traction.
- When burning wood that is not sufficiently dried, tar accumulates, which greatly narrows the diameter of the pipe and increases the thickness of its walls, preventing it from warming up sufficiently.
- The diameter or type of chimney does not match the power of the model.
- Insufficient height at which the pipe ends. In this case, the pressure difference will not be enough to produce natural traction.
- Crack or leaking joints in the chimney. Too sudden changes in direction and turns of the pipe, where plugs of cold air form.
A sudden change in weather may also be the cause. During the cold season, the craving is stronger than at high temperatures. When there are strong gusts, the wind blows from above into the pipe.
Unsuitable or poor quality fuel also causes smoke. For example, gas with a large number of impurities, wet firewood, foam or other synthetic materials entering the solid fuel boiler
You should also pay attention to the degree of opening of the gate
Smoke comes into the room if air does not enter the boiler room when the boiler is operating. For safety reasons, there must be an air supply from the same side of the house as the chimney. Otherwise, strong wind can lead to a pressure drop and the formation of smoke inside the room.
A clogged boiler or a reduced flow area of the grate can also cause smoke. The device also smokes at the very beginning during kindling, due to the fact that the chimney pipe has not yet heated up.
Replacing a window sill for a plastic window
Almost all plastic PVC windows installed indoors are equipped with window sills. Even if there is already a wooden or concrete window on the window, it is usually removed and then replaced with a new plastic one. The exception is the window on the balcony, which can be installed without it if this is not provided for in advance. In all other cases, this element is an integral part of the window structure. The installation itself is not particularly difficult, but if you have never done this kind of work before, you need to pay attention to several nuances of its implementation.
In what cases may it be necessary to replace a window sill mounted together with a window? You will have to install a new one if you damaged the old one beyond repair: you stood on it and it cracked, you drilled through it or severely scratched the surface. Or maybe you are not satisfied with its current width: too wide takes up a lot of space, too narrow does not allow you to place indoor flowers on it.
You can, of course, invite specialists to do this work. But you will save a lot if you do this work yourself, especially since it is very simple.
Dismantling is an important step
First you will have to dismantle the old window sill. It can be removed without difficulty, unless it is attached to any other elements. If there is a casing made of plastic or other material attached to it, then you must first remove this casing.
If the replacement is made on the balcony, then it is often sewn up not only from the bottom, but also from the sides. In this case, significant work remains. The window sill is freed from all trim and then removed. If it is screwed to metal elements, then you need to unscrew all the fasteners from below. If it is attached with polyurethane foam, then simply “blow it up” from its place.
In the case where the plastic window sill lies on an old concrete stop, you will need to trim the mounting foam with a knife with a long blade.
Installing a new window sill indoors
- Measure the desired length and width. At the same time, take into account its penetration a few centimeters into the wall, as well as 2 cm under the window profile. If work is carried out with a balcony block when glazing a balcony or loggia on a turnkey basis, then the protruding edge should not interfere with the opening of the balcony door.
- Cut off the excess parts with a hacksaw, jigsaw or grinder. In the place where the wall will approach, make an additional cutout.
- Try the cut piece in place. If somewhere it doesn’t fit, cut it some more.
- After final fitting, install the window sill in its permanent place. Use polyurethane foam as fastening.
- Check the horizontal installation using a building level. If there is no level somewhere, add support elements. This must be done immediately, while the foam has not yet hardened.
- To avoid undermining by the hardening foam, place several cans of water or a toolbox on it. Leave this load until the next day.
- Measure, cut and install plastic end caps.
Installing a window sill on a balcony with your own hands
There is a significant difference in installing a window sill in a room and when glazing a balcony. In this case, it is longer and is attached to the metal frame of the balcony. The procedure will be as follows:
- Cut the workpiece to the required length and width.
- On the top bar of the metal corner, which is the basis of the frame, drill several holes in increments of about 50 cm. They are necessary for fastening to the frame.
- Try the cut piece in place. The workpiece must be tightly inserted under the window frame. If gaps are visible between the frame and the window sill, additional wooden shims will be required.
- Since the frame is usually located slightly below the level of the window (after all, it stands on the window profile), it is necessary to prepare wooden linings with a thickness of 0.5 to 3 cm. They can be easily sawn from a regular wooden block 4-5 cm wide.
- Fastening should be done with self-tapping screws of the required length - usually 2-4 cm. The self-tapping screws must pass through wooden pads in order to hold them in permanent places. Please note that the thickness of the window sill is only 2 cm, so it is easy to accidentally pierce it with a self-tapping screw, ruining the appearance.
- Restore the cladding removed from the balcony, if necessary.
Troubleshooting solid fuel models
Solid fuel boilers may have the same causes of smoke associated with the chimney as gas appliances described above. When burning, it is necessary to use well-dried raw materials. It should be stored in well-suited places with low humidity. Do not use synthetic materials as fuel.
Wood-burning boilers such as Buderus Logano SW, Stropuva S and Zhitomir D should be heated only with dry wood. To be able to use different types of fuel, you need to purchase combined devices such as KST or Dymok. You can experiment with the degree of opening of the gate in air-heating models, such as. If smoke appears, make the chimney opening larger.
Ensure air flow into the boiler room. For safety reasons, the window must be open constantly while the boiler is operating during the heating season. The device operating on solid fuel must be cleaned regularly. This is especially true if it is coal or diesel, running on exhaust, since these types of fuel clog the burner especially quickly.
Troubleshooting
All possible answers to the question “Why?” described above. And now the second question: “What to do?” if a solid fuel heating boiler smokes?
For kindling, you need to choose only dried logs, which should be stored under special covered sheds so that minimal moisture gets on the fuel. There is no need to use artificial materials as fuel.
Heating devices such as Buderus Logano SW, Stropuva S and Zhitomir D are heated only with dried wood. If you want to use different types of fuel, you should think about purchasing universal units, for example, KST or Dymok.
You can test the degree of gate opening in air-heated versions, such as Siberia. If smoke appears, the chimney opening should be made larger.
It is necessary to ensure the flow of air masses to the boiler. According to safety rules, the window must be open all the time while the boiler is operating during the heating season. A solid fuel boiler needs to be cleaned from time to time.
Shed for firewood made of profile pipe and polycarbonate
Causes of boiler smoking
Some signs help determine what to look for first when smoke and soot appear in the room. Conventionally, the causes of smoke can be divided into 4 groups:
- A clogged chimney pipe is one of the most common problems. This could be either a foreign object that has entered from outside, or the result of using low-quality fuel.
- The discrepancy between the chimney and the boiler power or the height of the building is less common and is detected almost immediately, during the first fires. In a situation where at first everything was fine, and then it began to smoke, this reason should not be considered.
- Damage to the chimney is the least likely case. But if the boiler is smoking at the beginning of a new heating season, then inspecting the pipe should be one of the first tasks.
- Weather conditions affect natural draft in only two cases: low chimney height and incorrect location of the fresh air inflow point.
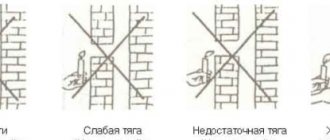
The smoker must be raised above the roof ridge. The diameter of the pipe is selected in strict accordance with the power of the boiler: a small cross-section simply cannot cope with the removal of smoke from a serious firebox. You should also avoid right angles in places where the pipe changes direction - this impedes air circulation, which does not have the best effect on traction. A visual inspection allows you to identify these shortcomings and eliminate them.
Soot removal accessories
People often wonder: why does a Russian stove smoke? Are the possible causes remediable? When smoke appears from this massive object (as well as from any other “queen of fire”), first check the draft. It is unacceptable for it to be bad or absent. The ventilation effect formed due to the temperature difference between the outside and inside the pipe is something without which there is and cannot be a single “white” stove. “Black” is pipeless, the oldest, they say it is more hygienic, fungi die in it, but it is unlikely that a modern person is ready to wash or live in a “grimy” smoke-filled room.
Over time, the smoke exhaust tunnel walls become covered with a layer of soot. It is believed that even a build-up of just three millimeters significantly reduces the heat transfer of the furnace. There are devices for removing soot. You can borrow it from your neighbors or make it yourself. Option 1: take a nylon washcloth made of thick thread, place it with a weight-stone in an old string bag (strong mesh), pass a rope through the handles. And for cleaning!
Presence of cracks
It's no secret that over the years the stove becomes covered with a network of cracks and cracks.
Especially at the junction of clay and metal elements, for example, around a slab. Wells can also crack at the seams. The cracks could remain in the place where a knockout brick is inserted for cleaning, or the vent and firebox doors have become loose over time.
Also, atmospheric phenomena sometimes destroy the outer part of the pipe on the roof.
It is possible and necessary to deal with cracks, because air is sucked in, its natural flow is disrupted, and at the slightest disturbance in draft for other reasons, smoke finds its way out, even with the door closed!
The cracks are sealed with clay mortar, similar to the one on which the stove is made. Deep cracks are widened using a knife or similar tool to allow the mortar to penetrate deeper between the bricks. Then the gap is moistened with water and sealed well. Small cracks can be whitened.
Goods, services
15.04 05:45
Questions about products and services, complaints and reviews
Gentlemen! help, I have a Buderus solid fuel boiler, it worked fine for a month, then it began to puff, I asked whoever I asked, no one knows!
Continue topic
If you want, let's meet on the spot and figure it out. I have the same boiler and the same problems arise.
Insulate the pipe and you will be happy, at least until you grow
It's just time to clean it
look at the pipe. length and condensate. wrap the pipe.
There can be a lot of reasons - if there is forced ventilation - something with the motor or fan... With the smoke pipe itself, its outlet... with the casing of the working area of the boiler (depressurization somewhere)... Are the grates okay? lack of air flow due to them, including... Is there soot in the pipe? Check in order - starting with the grate and further along the smoke path... By the way, soot depends on the coal... it can burn very quickly if the pipe diameter is small..., look at the outlet from the boiler at the narrowing...
the pipe is 160 in diameter, insulated, I opened the hatch on the pipe and it was clean, the grates were also normal, I clean the boiler every week. (Added after 5 minutes)
it begins to puff after 2-3 hours of operation, when it is in operating mode, i.e. muffled, I tried opening the tertiary air windows, it does not puff, but it starts to burn strongly, because of this, an increase in temperature and pressure!
It puffs for 3 reasons (that I know of): 1. The boiler was not cleaned enough. (there is an adjustable damper in the transition pipe from the boiler to the chimney - it needs to be cleaned and the transition itself, chambers 2 and 3 were not cleaned enough, it is also advisable to clean the exhaust pipe itself with a long wire, there may be pieces of soot on the walls) 2. The coal is very fine (I tried one small thing - almost dust and sand, it burns, but it puffs, so I interfere with the middle pieces) 3. The boiler has completely suffocated - there is not enough air. (but this is rare, a lower flap of 3-4 mm is quite enough)
Load more
Preventive measures
It is necessary to clean not only the chimney pipe from the formation of plaque, but also other parts of the potbelly stove. Thus, you should pay attention to the following parts of the design:
- Layers of soot also form in the ash drawer, ash pan and space under the oven, which can cause the potbelly stove to smoke.
Important: If you notice the formation of smoke when you open the door, you should pay attention to what the weather is like outside: if this only happens during windy times, simply installing a windproof deflector cap will help.
- It would be a good idea to check the structure for flaws and cracks that could have formed due to improper assembly of the stove. Correcting these shortcomings will help to properly direct the smoke draft.
- Sometimes the stove smokes because the door does not fit tightly enough. In this case, either the element is replaced or the surface of the potbelly stove is leveled.
Only high-quality raw materials should be used as fuel and not replaced with sawdust and straw.
Alternative heating for a cottage or private house
Heat pumps or solar collectors are most often used as alternative sources of thermal energy. The latter can also be a source of electricity. The cost of such equipment at the moment is astronomical and only owners of large, very large residential properties, where such investments will pay off in the foreseeable future, can afford them. In developed countries, governments actively subsidize the use of such equipment. Well, in the former USSR, the use of heat pumps and solar collectors turns out to be much more expensive than gas, coal and even electricity.
How to check the quality of smoke exhaust?
Checking the draft in the chimney is necessary to prepare for activities before cleaning. Testing is carried out in several ways:
- using an anemometer. Professional specialists work with high-precision devices. To know how to check the draft in a chimney, it is recommended to study the instructions for the anemometer;
- by setting the paper on fire. The sheet is brought to the chimney grate - a high-quality arrangement of the hood helps to attract the flames upward. If there is no draft, the flame will remain in place;
- visual method. A dark red light indicates insufficient hood power. The quality of the pipeline’s functionality is determined by an almost white flame.
Another option for identifying breakdowns is by smelling smoke.
A strong aroma from the stove is a sign of clogged flue ducts.