The Ariston water heater is represented by a fairly wide range of plumbing fixtures and corresponding standard model lines.
- traditional boilers;
- floor boilers;
- condensing boilers;
- floor boilers;
- boilers with indirect heating;
- gas instantaneous water heaters;
- water heaters equipped with heat pumps;
- gas storage water heaters;
- electric water heaters with storage function.
Each device is equipped with heating elements, control devices and additional accessories.
Why are Ariston water heaters created?
Household water heating appliances that run on electricity are most often used during hot water outages. As a rule, compact models are purchased. When professionally installed, the water heater provides warm water for daily household needs: washing, cleaning or showering.
In private sectors, larger volume gas and electric heaters with storage are used with all communications. In this case, household appliances from the famous Italian company are used all year round.
This is interesting: The most common types of measuring instruments
Useful tips
Connecting a water heater yourself
Be sure to take into account the advice of professionals:
- Determine in advance the number of places to which water will be distributed from the boiler.
- Before starting work, purchase all the missing materials so that during the process you do not have to urgently run to the store for individual parts.
- Be sure to follow the instructions for your model.
- All water connections must be carefully sealed.
- If it is not possible to install a protective drain into the sewer, place a protective pan under the device.
- If you do not provide tap water, the storage heater can be supplied from a separate container. It is mounted at a height of about 5 meters from the top of the device.
- Do not forget about preventive procedures - be sure to change the magnesium anode at least once a year.
- If you are leaving for a long time, drain the water from the heater after unplugging it.
- Until the tank is completely filled with water, you cannot turn it on and set the heating mode.
- Do not operate the device while electricity is connected to it.
- Use only those parts that are compatible with your model and recommended by the manufacturer.
Let's consider the main advantages and disadvantages of storage water heaters.
The procedure for turning on a storage water heater in an apartment
When hot water is turned off, it becomes necessary to find an alternative, and here modern technology comes to the rescue. In order not to be left without the benefits of civilization to which we are accustomed, we will have to buy and install a storage water heater.
Quite often I have to turn it on in the summer, but not because it is some kind of complicated procedure, but because it doesn’t have to be done often, and therefore people forget the sequence of actions, and therefore I decided to write an article on this topic .
Turning on the storage boiler does not require any professional knowledge, but a certain sequence must be followed, since the structure of these devices, regardless of the model (Ariston, combustion, Termex, Electrolux), is the same for all, the order of activation is the same for all .
I’ll make a reservation right away, I’m telling you how to turn on a water heater with the correct standard connection diagram.
How to determine where the cold water inlet and hot water outlet are:
According to the standard, if you look at the boiler, the cold water inlet is on the right and the hot water outlet is on the left, and also the cold is marked in blue and the hot in red.
- First, turn off the hot water supply tap to the apartment, even if there is a check valve, since they tend to break, then open the same water on the mixer. It must be opened in order to bleed air if the water heater is empty.
- Open the hot tap of the boiler outlet.
- Open the cold supply tap to the device and wait for the air to escape from the mixer you opened and liquid to flow.
- When the water has flowed, close and plug in the boiler, and after a couple of hours you can use it.
That's the whole process, for greater clarity, watch this video, and I think you won't have any problems. You can turn off the device in the reverse order, but whether you need to drain the water from it is up to you.
Good luck to you!!!
Sequencing
It’s worth mentioning right away that the startup sequence below is correct for both flow-through and storage heaters . A couple of nuances - in the case of the first type, you do not have to wait for the tank to be filled with water and close the tap at the 2nd point.
- You should start by turning off the hot water supply , which comes from the city supply system. If you skip this step, the water heated by the boiler will go into the common riser, despite the check valve.
- Open the hot water tap . We wait until the remaining liquid drains from the pipes. Close the tap.
- Two pipes go to the bottom of the boiler. One, marked with a blue ring, is underwater, the other, with a red marker, serves to supply hot water to the pipes .
- Open the valve on the underwater pipe . Water begins to flow into the device’s storage tank.
- Next, unscrew the second valve on the boiler . Allowing the water to escape into the pipes.
- Open hot water on the mixer . We wait until the air leaves the system and a steady stream of water flows. We turn off the water.
- We connect the heater to the electrical network and set the desired temperature.
In a house where there is no hot water supply, the first step must be skipped. Subsequent switching on of the heater will follow the same pattern. The only difference is in point 6. Then not air, but stagnant water will begin to come out of the heater tank.
Heating mode selection
Set the heating mode. The main thing in this matter is to set the water temperature that is comfortable for the user . However, here are a few tips, the implementation of which will significantly extend the service life of the device. This will save you money on future repairs.
- Set the temperature to 30–40 degrees as little as possible . Under such conditions, bacteria will quickly develop inside the storage tank. This will result in an unpleasant musty odor. The walls will become covered with fungus, which is difficult to remove.
- Optimal operating mode, 55–60 degrees . In this temperature range, less scale will form on the heating element. The risk of mold will be reduced. It is comfortable for human skin.
- Once a week the boiler must be set to 90 degrees . Wait a couple of hours and return to the previous mode. This is done to completely destroy bacteria in the storage tank.
- Some devices have an economical operating mode. In this case, the heater does not consume less electricity. The settings will be set as in point 2 and we are talking about reducing the risk of breakdown.
- In the case of a flow-type heater, the temperature is also adjusted by water pressure.
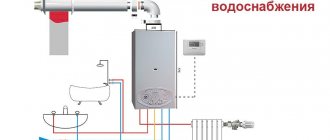
How to connect an Ariston water heater
To connect the Ariston boiler correctly, you must follow the manufacturer's instructions.
First, the water heater is mounted on a wall or supporting surface and the outlet (cold water) is provided from the water pipe. It is most beneficial to install the device as close as possible to the source of water supply - this allows you to minimize heat loss.
If there is a collector in the system, a separate cold water supply pipe is transferred to the installation site of the water heater. If there is no collector, the nearest section of the water pipe is cut, and a standard tee is installed at the cut site.
The method of installing the tee depends on the material from which the pipes are made. Plastic fasteners are fastened using a special soldering iron, and metal ones are fastened with threads.
A ball valve is installed in a separate section of the water supply system, designed to shut off the cold water supply.
Wiring diagram for an Ariston electric storage water heater.
To connect the water heater to the water supply:
- Pay attention to the hot and cold water pipes - it is important not to confuse them. A check valve is installed on the cold side; it can be included in the standard kit. Hot water is connected using a pipe. First, a cold water pipe is installed, then a hot one.
- A special tape is wound onto the threads as a sealant and sealant; this is recommended by the manufacturer.
- A tee is installed on the cold water pipe, at the bottom of which there is a relief valve. A tap is attached to the side to completely drain the water from the tank in case of an emergency, possibly due to abnormal pressure or heating. A shut-off valve and adapter are installed at a short distance under the tee. The next step is connecting to the water supply.
- Connection to hot water is also made by installing a shut-off valve.
- When connecting different metals, adapters should be used.
Connection to the electrical network is carried out as follows:
- A separate circuit breaker (RCD) is installed in the distribution panel; it is connected to the central automatic fuse. A three-core cable is pulled from a separate RCD to the boiler, which is placed in an external cable channel (or a special groove is punched into the wall).
- It is recommended to install a 16 A fuse as a switch, since the socket and plug are subject to heat and moisture. In addition, the cost of waterproof electrical equipment is higher than the cost of a machine. The “switch” is closed in a compact cabinet with a removable panel.
- A separate RCD and the “switch” are connected by wire.
- A three-wire wire is connected to the heating element; for this, the bottom panel is removed from the water heater.
- Then the output of the machine is connected to the boiler.
- At the next stage, the ground, phase and zero lines are wired to the corresponding connectors.
Diagram for connecting an Ariston water heater to the electrical network.
Before turning on the device, you must make sure that there are no leaks and that the flange is in the correct position (strictly in the middle). Then fill the tank with cold water and open the hot water tap to release the air. After bleeding the air, the valve is closed and a test operation is performed.
More detailed advice and instructions for operation and installation can be obtained from the KVANTA+ company in Tyumen.
Under what conditions should the device not be installed?
Electrical appliances, in particular an electric water heater, must be installed in conditions that correspond to those specified in the instruction manual.
The following are stated in the instructions for Ariston boilers as unacceptable factors for installation:
- frost - this is associated with the risk of freezing water in the tank and pipes;
- sunlight - do not expose the electric heater to direct sunlight;
- power outages - the voltage in the network to which the device is connected must be stable;
- vapors, dust or gas - the water heater must not be installed in a room with a high concentration of dust and toxic or acidic gases/vapors in the air;
- dampness - it is not recommended to install the device in conditions of constant dampness and in long-term unventilated rooms (this item depends on the degree of moisture resistance of the selected water heater model).
Possible faults
When buying an Ariston water heater, you need to know which parts are the most vulnerable.
The first is a thermostat, sensor devices, heating elements, and switches. But insulating gaskets and valves are also very often repaired. If you handle the water heater carelessly, the integrity of the tank may be compromised. And it can only be repaired by a service center. To determine problems with a water heater, you need to understand whether there are changes in its operation. This may be a strong hiss during operation. And also often the period of water heating increases significantly. A sign of a breakdown may also be the fact that the device turns on and off more frequently or the lights flash frequently.
In order not to contact the service center in the event of a minor breakdown, you can do the repair yourself. This is not so difficult to do. First you need to turn off the power to both the device and the entire room. Then you need to drain the water. This is done using a hose that has a diameter slightly smaller than the hole designed to discharge the liquid. The flush hose should be placed directly into the toilet. Next, the cold water supply is shut off. Then you need to disconnect the hose from the cold water valve.
This hose needs to be connected to the tap and also lowered into the toilet. Next, disassemble the water heater and remove the heating element, the fastening of which is located on a nut with a plate or washer. Having pulled out the heating element, you need to very carefully examine those places where there is scale. Where it is available, it is necessary to clean it, but very carefully so as not to damage the tank. After the scale has been removed, the tank must be rinsed with clean water. If the heating element is in working condition, it can be cleaned in the same way. After this, in reverse order, all hoses and spare parts of the water heater must be installed in place.
Water heating
Depending on the volume of the tank, the first heating time will differ. To heat 30 liters of water to 65 degrees, it will take about an hour, 50 liters two hours, and 80 liters three hours. Also, the time depends on the heat of the incoming water and the power of the device. In winter, the water comes in cold and it will take longer to warm up.
Boilers with more powerful heating elements spend less time and more electricity on primary heating. For example, Ariston Platinum SI 80 H with a volume of 80 liters and a 1.5 kW heating element heats water from 20 to 65 degrees in 3 hours and 6 minutes.
A volume of 30 liters is enough for two people, fifty liters is enough for a family of 3 people. An eighty-liter model should be enough for 4-5 people living in the room where the water heater is installed. Also, consumption largely depends on the habits and purposes of using hot water.
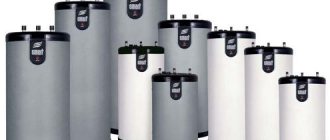
The lineup
Flat boiler Ariston
The range of water heaters is quite huge and is constantly being updated. They are very compact, although they have a large displacement. For a family of four, an 80-liter capacity is ideal.
Square tanks with mechanical controls are very common. The only drawback is the unimproved fastening mechanism.
There are also models with a maximum capacity of 100 liters. Such units are capable of providing industrial shower rooms. The insulating layer of such models is made of polyurethane foam.
The Ariston range of water heaters can have both an advanced electronics system and a simple control mechanism. The warranty on bulk tanks is given on average for seven years. For additional fastening of boilers, special metal frames are made.
Models and displacement
Model line:
- VELIS INOX.
Original characteristics:
- stainless steel elements, including tanks;
- the characteristic difference is universal (simple) installation;
- flat shape;
- Ariston water heater is available in 30, 50, 80 and 100 liters;
- there is a protection system on the power cord;
- fuse against starting with an empty container;
- additional equipment is equipped with protection against freezing or overheating;
- branded heating elements are made of high quality copper;
- load distribution function due to flasks and two heating elements of 1 and 1.5 kW;
- maximum power 2.5 kW.
- ABS VLS INOX QH
Externally similar to VELIS INOX, but has differences:
- Ariston water heater for 30, 50, 80 and 100 liters;
- improved design solutions;
- equipped with electronics for fast heating, antibacterial water purification (ECO), temperature measurement;
- The water is processed in two tanks; for rooms with a large area, an Ariston water heater of this model with a capacity of 100 liters is recommended.
- VELIS QH
Has external similarities with ABS VLS INOX QH and VELIS INOX.
Model differences:
- super-fast heating;
- ease of design and use;
- LCD – display;
- soft touch function (automatic saving);
- the water is heated in several stages;
- internal tanks are covered with steel;
- three heating elements (heating elements);
- Ariston water heater for 30, 50, 80 and 100 liters.
- ABC VELIS PW
Original characteristics:
- Ariston heaters for 30, 50, 80 and 100 liters;
- safety shutdown (ABS0);
- bacterial protection (ECO);
- the internal tank is covered with the latest AG+ technology;
- special welding method during the assembly process;
- two heating elements;
- heating in two containers.
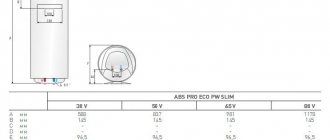
- PRO ECO INOX PW V SLIM
Original characteristics:
- Ariston heaters for 30, 50, 65 and 80 liters;
- water-pressure function;
- stainless steel;
- SLIM model, diameter only 353 millimeters;
- internal tank with special antibacterial coating;
- installed at points with cold water pressure, any pressure level is suitable;
- low power (up to 1.5 kW).
- ABS PRO ECO INOX PW
Original characteristics:
- Ariston heaters for 50, 80 and 100 liters;
- narrow cylindrical shape;
- simple installation;
- electronic control;
- external and internal parts made of stainless steel;
- testing at 16 atmospheres;
- 7 year warranty.
- ABS PRO R INOX
Original characteristics:
- mechanical thermostat;
- Ariston heaters for 30, 50, 80 and 100 liters;
- an anode with a magnesium composition is installed to protect against corrosion and scale concentration;
- external heating control;
- protection against water drops;
- waterproof;
- one of the most economical models.
- ABS PRO ECO PW SLIM
Original characteristics:
- Ariston heaters for 30, 50, 65 and 80 liters;
- narrow forms of water heater;
- economical energy consumption, the tank of the model was tested for strength under pressure of 16 atmospheres, a good margin of safety;
- equipped with all protection systems.
- ABS PRO ECO PW
Original characteristics:
- Ariston heaters for 50, 80, 100, 120, 150 liters;
- suitable for a kitchen sink, a full-fledged house or cottage;
- equipped with all protective security systems;
- additional heating element.
- ABS PRO R SLIM
Original characteristics:
- the convenient shape of the cylinder allows you to mount the heater in any corner of the room;
- Ariston heaters for 30, 50, 65 and 80 liters;
- “folk”, budget water heater suitable in size;
- diameter 35 centimeters;
- fast heating;
- presence of a safety valve;
- all water protection systems, switching on without water;
- the price for an Ariston water heater of this model of 80 liters is only 8800 rubles.
- Ariston ABS VLS PW 50
Original characteristics:
- instant heating;
- practicality;
- compactness;
- affordable;
- possibility of horizontal and vertical hanging;
This is interesting: When and in what way should you start using an electric heated floor after its installation
Call a professional or install it yourself?
Many people believe that it is better to entrust all work in which a person has little knowledge to a specialist. After all, it guarantees that your boiler will work for a very long time and will not fail due to the fact that it was installed incorrectly.
But there are also people who do everything in their home themselves, because they do it conscientiously, and not like a master. Just imagine, you were given the opportunity to assemble a computer for yourself completely free of charge, and naturally you will assemble it from the best parts. Now imagine that you do this every day, and collect it for people unknown to you, will you do everything as carefully as the first time for yourself? It’s unlikely, because you’ll just know that it will work and the person will be happy. So here, you can entrust the installation of the boiler to a stranger who will make it work, or you can do it yourself and be sure that if there is any breakdown, you can also fix it yourself, and not contact the experts every month, who can easily help you. you can become one in a matter of hours.
The boiler documentation contains instructions for installing it, so if you follow them, you can do everything yourself, and then be in a good mood that you have achieved it yourself. We figured it out ourselves, solved the problem ourselves, saved money, and most importantly, gained knowledge in this rather demanding area.
And so let’s count the advantages of installing the boiler yourself:
- You will learn something new and in the future you will be able to apply it, as in subsequent malfunctions, and even to the point of installing a boiler for your friends.
- You will save money, and not only the money you would have spent on installation, but also on subsequent visits to the specialist. Believe me, over the entire period there will be quite a large sum for which you can buy 5 more of the same boilers.
But be careful, not all boilers can be installed by yourself; some require a visit from a professional, for example, gas water heaters. Since this is no longer a completely simple matter. But almost everyone can figure out how to handle an electric water heater.
Checking for correct operation
It’s great if the water heater is connected to a separate machine. If problems arise in its operation, this will not affect the power supply to other appliances in the house.
If after starting the heater the circuit breaker is knocked out, you can turn it on again. If the situation repeats itself, then there is a serious problem. The unit must be de-energized and a technician must be called.
Here are a few more details that need to be checked after putting the boiler into operation:
- Inspect the hot water pipe to see if there is a leak. The fact is that a water heater can create more pressure than in risers. And if the gaskets are already worn out somewhere, but withstood the load from the central water supply, now they can give up.
- Make sure that the light indicating the supply of voltage to the heating element comes on.
- Take readings of how many degrees the meter shows at the very beginning of operation of the device, and then look at the temperature again after 20 minutes. If the data has increased, the heating element has successfully survived the rest period and is heating properly.
Due to their compact size and ease of use, instantaneous water heaters are in great demand. But you need to correctly assess your capabilities before deciding to install such a device yourself, because this process requires compliance with a number of rules. How to connect an instantaneous water heater: installation tips. read carefully.
You may be interested in the following information: how to drain water from a water heater and when it is necessary, read here.
Answers from experts
Fursov Yuri:
It’s quite possible that the tena’s shell is broken
Zaretskii Kostya:
A leak. Check the integrity of the heating element - drain the water, unscrew it and visually inspect it. If there are obvious cracks, replacement will solve everything. If the heating element is intact and in good working order, and the magnesium cathode is also still in good condition, then this is more complicated. If you have electrical measuring instruments, you can see the presence of leakage current if you know how to use them. No - consult with knowledgeable people.
BASIL:
How much is this a lot? the water heater has an indication when the heating element is turned on and heating, if you drain the water every half hour, it will continue to heat until the temperature you set is reached, the boiler alone cannot take more than 1.5 kW, and the meter runs well, no matter how much according to you, it’s a lot, 500-1000-2000 kW, you didn’t write, but if it works constantly, I think it alone will burn at least 150-200 kW, plus other appliances in the house at least 100-150 kW
Alexei:
So you heat 65 liters of water with a power of 2500W all day long, which you do not consume, it heats up, cools down and heats up again. And you use 15 liters from a can. 50 liters work on heat loss, the efficiency is 20-25%.
It is logical for you to buy a heater of the same volume as how much hot water you consume during periods of intensive water withdrawal.
For example, 30 liters or even 10. For example, with a programmable “memory function for daily consumption by time of day.” The heater will prepare water for you in the morning, at lunch and for dinner. the rest of the time it is disabled.
Small load with sinks. Leave the large 65 for the shower and turn it on separately.
You can buy a small one from Ariston, 20 liters with two cans of 10 and two alternately switched on tena 2500 for each can. Boiling water in half an hour.
Programmable with memory now from 8 and above.
Well, of course, the calculation is only correct if the equipment is in good working order. RCD performance.
Mr.Androws:
Water heater: .vensys /catalog/detail.php?ID=2535 off - enabled.
Nikolai Kros:
So what's the problem? Plug it in and that's it. Judging by the button and regulator, everything is turned on. on- will turn on; off-turns off. Why is the water shut off? Does it even have water at all? If you turned it on without water, the heating element could burn out.
Free wind:
What's so complicated? We supply cold water to the valve with the valve, from the other valve it goes to the apartment system of the mountains. water, while the inlet valve should naturally be closed (you’re not going to supply hot water to the whole house?)….))))))))))))))))))
Characteristics and types
The flexible hose for connecting plumbing is a hose of different lengths made of non-toxic synthetic rubber. Thanks to the elasticity and softness of the material, it easily takes the desired position and allows installation in hard-to-reach places. To protect the flexible hose, there is an upper reinforcing layer in the form of a braid, which is made from the following materials:
- Aluminum. Such models can withstand no more than +80 °C and retain functionality for 3 years. At high humidity, aluminum braiding is prone to rust.
- Of stainless steel. Thanks to this reinforcing layer, the service life of the flexible water line is at least 10 years, and the maximum temperature of the transported medium is +95 °C.
- Nylon. This braid is used for the manufacture of reinforced models that can withstand temperatures up to +110 °C and are designed for intensive use for 15 years.
The fasteners used are nut-nut and nut-fitting pairs, which are made of brass or stainless steel. Devices with different permissible temperatures differ in the color of the braid. Blue ones are used to connect to a pipeline with cold water, and red ones for hot water.
When choosing a water line, you need to pay attention to its elasticity, reliability of fasteners and purpose. It is also mandatory to have a certificate that prevents the rubber from releasing toxic components during operation.
Connection to the water supply system
Do-it-yourself storage water heater installation step-by-step guide technical standards
Hoses and other connection elements used to connect to the water supply must withstand a temperature of at least 80°C and the design pressure.
Table for determining the volume of a water heater.
Avoid directly joining two different metals, such as steel (in water pipes) and copper. Use a dielectric adapter.
Connect the water supply to the boiler through shut-off valves and then through flexible wiring. The cold water inlet pipe is marked with a blue mark. A valve must be mounted on it to relieve excess pressure in the system.
You can also install a tee valve with a drain valve attached to it in front of the shut-off valve. When carrying out repairs or maintenance, this will make it possible to quickly drain the water from the boiler. Seal the places of threaded connections with tow or FUM tape. Attach a flexible line to the outlet pipe that directs the heated water. After connecting, open the water and check the system for leaks, then connect to the power supply.
- Connect the power supply wires of the Ariston water heater to the screw terminals of the thermostat.
- When connecting, observe the phases - L, A or P1 - phase wire, N, B or P2 - neutral.
- Connect the ground wire to the clamp on the water heater body.
- Connect the test lamp terminals to the contacts.
- Press the thermostat button.
- Close the lid.
- Before connecting to the network, check that the boiler is filled with water.
The electrical wire must be hidden in a corrugated material made of non-flammable material or in the wall. Installation of the boiler requires grounding, which cannot be done to metal objects or pipes: for example, water supply, sewerage, etc.
When does the water heater turn off?
The reasons why you need to turn off the water heater can be different: from saving energy to carrying out the necessary preventive maintenance, and therefore the duration of the shutdown varies from several hours to several months.
How to turn off a water heater when hot water is supplied
The most common reason why boilers are installed is the lack of hot water supply. If at the moment there is no longer a need for the boiler and you need to turn it off before the next emergency, then the action plan will be as follows:
- turning off the device on the control panel;
- disconnecting from the socket;
- complete emptying of the tank from liquid;
- shutting off the valves that supply cold and hot water to the tank;
- turning on the hot water tap on the riser.
How to turn off the boiler at night
If you take a shower in the morning or use hot water for other purposes, you will have to wake up in advance to turn on the boiler, since the process of heating the water takes time. On average, it takes about 2 hours for the liquid to heat up and be at the required temperature. If there is no need for hot water in the morning, turning off the tank at night will save energy.
Disabling methods depend on the type of control:
- mechanical requires switching the regulator to the “Off” mode and disconnecting it from the network;
- The electronic one turns off after pressing the special “Off” button; you can set timers on it that will put the boiler into sleep mode at night, and turn on and heat the water when you wake up.
How to turn off a water heater for a long time
The most important thing when turning off the heater for a long period is to get rid of the liquid in the tank, since if you leave the liquid inside, oxidation, scale formation, bacterial growth can occur and, as a result, a shortening of the life of the device. Before connecting the boiler after a long period of inactivity, treat it with special anti-corrosion agents.
Before connecting the boiler after a long period of inactivity, treat it with special anti-corrosion agents.
If you are not confident that you will be able to disable the system yourself, then entrust this task to professionals. Be sure to observe safety requirements, especially when draining water and disconnecting the device from the power supply.
Ignition of the water heating device
Depending on the model of the geyser, you can light it in three ways:
- manually - using a piezoelectric element or matches (relevant for older speaker models);
- electric ignition (from batteries or from a 220 V network);
- from a hydraulic turbine.
Manual ignition of the column is possible using matchesif we are talking about an old-style model.
Before turning on such an Ariston gas water heater, you need to perform the following steps:
- Open the water supply tap connected to the device.
- Turn the main valve to allow fuel to flow to the igniter.
- Light the wick with matches.
- Turn on the gas regulator.
This ignition method is not absolutely safe. Therefore, it is necessary to follow all safety rules and keep children away from the device.
In order to light the water heater manually, open the water supply and main gas valves, then light the wick
The manual version using piezo ignition is more convenient. Simply press a button to light the wick in the combustion chamber. Water heaters with piezo ignition do not need to be turned off completely - when the water is turned off, only the wick will burn. Disadvantage of this method: increased gas consumption.
Devices with automatic ignition are the safest and most convenient to use. The latest models of water heating equipment are equipped with this option.
Detailed instructions for turning on an Ariston brand column with automatic ignition:
- Make sure the cold water inlet valve to the water heater is open.
- Make sure the gas valve is also open.
- Check that the batteries are installed correctly (1.5 V LR20).
- Turn the adjustment knob between the minimum and maximum positions.
To turn off the gas water heater, simply close the hot water tap. If you want to completely turn off the gas water heater, you first need to turn the handle (on the control panel) to the OFF position all the way. Then turn off the gas valve on the pipeline.
After complete removal of water, close the water valve on the water supply in front of the gas water heater.
Gas water heaters with automatic switching are considered the simplest and most comfortable to use. In order to light the column, just check whether the batteries are inserted correctly and turn the knob between the “minimum” and “maximum” marks.
Features of gas connections
When connecting gas stoves, water heaters and other types of equipment, flexible hoses are also used. Unlike water models, they are yellow and are not tested for environmental safety. For fixation, end steel or aluminum reinforcement is used. There are the following types of devices for connecting gas appliances:
- PVC hoses reinforced with polyester thread;
- made of synthetic rubber with stainless steel braid;
- bellows, made in the form of a corrugated stainless steel tube.
The Santekhkomplekt holding offers engineering equipment, fittings, plumbing fixtures and devices for connecting them to communications. The assortment is represented by products and materials from well-known foreign and domestic manufacturers. Discounts apply for bulk purchases, and product quality is confirmed by standard certificates. For information support and assistance, each client is assigned a personal manager. The ability to arrange delivery within Moscow and to other regions of the Russian Federation allows you to quickly receive the purchased goods without unnecessary hassle.
Drainage is a drainage and drainage measure to remove excess groundwater.
If water does not leave the site for a long time, the soil becomes gleyed, if shrubs and trees quickly disappear (get wet), you need to urgently take action and drain the site.
Connection to the water supply system
The drain hole for this type of heater, regardless of the model, is usually located at the bottom. First, you should assemble and install a so-called security group. This is a set of valves and fittings designed to prevent various emergency situations that may arise during operation of the device.
An adapter is installed at the top, which is often called “American”. Next, screw on the bronze tee. A check valve is attached to its lower part, which prevents water from flowing back into the plumbing system. Another tee is connected to the side branch of the tee.
The diagram shows in detail the connection of a storage water heater: hot and cold water risers, water taps (1 and 2); shut-off valves (3 and 4); check valve (5); drain valve (6)
A 6 bar safety valve is attached to it to provide the ability to automatically reduce the pressure inside the container if it has reached a critical level.
A special compression fitting for the water pipe is attached to the same tee. If there is excess pressure, it will drain some of the water from the storage tank into the sewer system.
Storage water heater safety group diagram. This set of devices prevents dangerous emptying of the device’s container and removes excess water if the pressure inside exceeds the norm
After installing the device, be sure to make sure that the pressure valve hole remains open, otherwise the device simply will not work.
All threaded connections should be sealed and sealed. Experts recommend allowing the sealant to dry for at least four hours.
The photo clearly shows and labels the elements of the storage water heater safety group
When installing the device, it is important to strictly follow the sequence of their connections
. To connect the device to the cold water riser, you can use steel, copper, plastic or metal-plastic pipes
When doing the installation yourself, they are most often used, since soldering them is relatively easy.
To connect the device to the cold water riser, you can use steel, copper, plastic or metal-plastic pipes. When doing the installation yourself, they are most often used, since soldering them is relatively easy.
Some use flexible hoses for these purposes, but this solution does not justify itself. As practice has shown, such elements wear out quickly.
The individual elements of the storage water heater safety group are connected using threads. In accordance with the standards, these places should be sealed and treated with sealant
It is clear that before inserting pipes, hot and cold water entering the apartment should be turned off. A shut-off valve should be installed between the cold water riser and the heater so that, if necessary, you can turn off the water flowing to the device. All connections are carefully sealed.
Now you need to install another pipe that will connect the heater to the hot water supply system in the apartment. In this area you will need another shut-off valve: between the hot water riser and the heater.
This tap must always be turned off so that the heated water from the boiler does not enter the common hot riser of the house. Again, you need to ensure that all connections are sealed and sealed.
The shut-off valve for cold water between the heating device and the risers must be installed in such a way that, when closed, it does not impede the flow of water to other consumers, cutting off only the heater.
And the connection to the hot water supply system must be made in such a way that, if necessary, the supply of hot water from the common riser to the system in the apartment can be restored.
At this point, the connection to the water supply system can be considered complete. Some experts at this stage recommend performing a preliminary check: fill the container with water, then drain it and see if there is a leak. This check can only be done after the sealant has completely dried on all connections.
Rules for using the device
You can use the storage type device immediately after the first start. To do this, you need to turn it on and select the operating mode. Throughout operation you will have to follow some rules. They will help increase the service life of the boiler.
- Before turning on, check the presence of water in the tank. This will prevent the heating elements from failing.
- It is recommended to install a filter on the pipe supplying water to the boiler. It will protect against dirt and reduce water hardness.
- During the year, descale the drive at least once.
- Periodically monitor the performance of the protective anode, change if necessary.
Read how to choose pipes for water supply in a private house.
PVC pipes and fittings for water supply are the key to quality water in the house, read about the benefits.
Flow-type devices require compliance with several other rules.
- Check the water pressure before turning on the power. A weak stream will not allow the device to function normally.
- If the temperature is uncomfortable, adjust it using the buttons on the body or by rotating the mixer tap.
- If the heater is installed in a bathroom, provide splash protection.
- Hot water is no longer needed - be sure to turn off the device.
Both devices are not recommended for installation in rooms where temperatures may drop below zero. This will cause the water inside the device to freeze and cause it to break.
Equipment reliability depends not only on product quality. Also important: correct installation, switching on and use of equipment. Compliance with the recommendations given in the article will significantly increase the uninterrupted operation of the boiler.
Instructions for starting the boiler for the first time
The boiler is installed.
The installation work was carried out by specialists or the owner, it does not matter. In any case, you need to check the operation of the system
To do this, following the given tips, you need to start the heater for the first time.
We start by checking the correct connection of the systems that are responsible for heating the water. Fidelity, reliability of connection of phase and neutral wires, presence of grounding. The functionality of the circuit breaker should also be checked. To do this, use a device - a tester or a special electrician's screwdriver. Next comes the search for leaks in the system. It would be useful to control the connection of underwater pipes. Presence and diagnostics of check valve operation. Running water into the boiler
Attention, the correct sequence of actions for the first and subsequent starts of the system will be described in the next section. Repeated search for water leaks in pipe installation areas. Diagnostics of heater operation. Turn on the device by pressing the power button. Fixing the initial temperature sensor readings. Recheck after 15 minutes
An increase in indicators indicates the correct connection of the heating elements.
Study the recommendations on how to connect the boiler to the water supply, follow safety rules.
Read how to make an indirect heating boiler with your own hands.
How to drain water from a boiler: tips, recommendations, step-by-step instructions in our article.
What are the consequences of excess moisture in the soil?
You can see the results of this phenomenon yourself - trees and shrubs die. Why is this happening?
- the oxygen content in the soil decreases and the carbon dioxide content increases, which leads to disruption of air exchange processes, water regime and nutritional regime in the soil;
- oxygen starvation of the root-forming layer occurs, which leads to the death of plant roots;
- the supply of macro and microelements by plants (nitrogen, phosphorus, potassium, etc.) is disrupted, because excess water washes out mobile forms of elements from the soil, and they become unavailable for absorption;
- intensive breakdown of proteins occurs and, accordingly, the processes of decay are activated.
Plants can tell you at what level groundwater lies
Take a close look at the flora of your area. The species inhabiting it will tell you at what depth the groundwater layers are located:
- perched water - it is best to dig a reservoir in this place;
- at a depth of up to 0.5 m - marigold, horsetails, varieties of sedges grow - bladderwrack, holly, foxtail, Langsdorff's reed;
- at a depth of 0.5 m to 1 m - meadowsweet, canary grass, ;
- from 1 m to 1.5 m – favorable conditions for meadow fescue, bluegrass, mouse peas, rank;
- from 1.5 m - wheatgrass, clover, wormwood, plantain.
What is important to know when planning site drainage
Each group of plants has its own moisture needs:
- with a groundwater depth of 0.5 to 1 m, vegetables and annual flowers can grow in high beds;
- depth of water layer up to 1.5 m is well tolerated by vegetables, grains, annuals and perennials (flowers), ornamental and fruit shrubs, trees on a dwarf rootstock;
- if the groundwater is more than 2 m deep, fruit trees can be grown;
- The optimal depth of groundwater for agriculture is from 3.5 m.
Options for deep engineering tuning
An effective way to increase engine power is to install turbocharging, which allows you to increase engine power by 50% or more. In this case, in addition to the turbine itself, a new injection system, a reinforced crankshaft and pistons are installed, and other necessary work is also carried out. It should be said that despite the complexity of such an increase in engine power, installing a turbine is popular, which is explained by the excellent efficiency of such tuning.
Boring the cylinders and installing a new crankshaft. This is one of the engineering tuning options, in which the cylinders are bored, with the installation of new pistons and a reinforced crankshaft. In fact, with such operation, the physical volume of the engine increases, which has a positive effect on its power and torque. If we talk about the disadvantages of this method of increasing power, we note the increased fuel consumption, high cost and complexity of such tuning. In the future, you also need to be careful about engine maintenance, the service life of which will be significantly lower than that of a standard engine.
Installing a modified camshaft will allow you to adjust the valve timing, which increases engine power, without any other profound change in the design of the power unit. The only drawback of this method of increasing the power of a power unit is the need to use gasoline with a high octane number, since otherwise detonation occurs, which can lead to a significant deterioration in engine performance.
You can increase the power of your car by using gasoline with a high octane number. This is a quick and simple tuning method, which at the same time will require a corresponding reconfiguration of the injection system, and the pressure in a running engine increases significantly, which negatively affects its reliability indicators. Simply pouring 95 or 98 gasoline into a gas tank without any additional reconfiguration of the fuel system is not recommended.
Installing a zero resistance filter. This is a fairly simple and effective way to increase engine power by about 10 horsepower. Due to its special design, such a filter improves the supply of the air mixture, reducing fuel resistance at the inlet. The increase in power in this case will not be too large, but this is a cheap method that does not require contacting special workshops.
Installation of a direct-flow exhaust system. By replacing the standard exhaust system with a direct-flow one, you can get about a 15% increase in power. In addition to directly improving the dynamic characteristics, you will be able to get a pleasant roar from the engine, and the car itself will be more responsive and faster. Just remember that you need to install a direct-flow exhaust system that fits your car model. All such work should be performed exclusively by a professional.
Use of exhaust pipes with increased diameter. Such work will optimize the movement of exhaust gases; as a result, the engine becomes approximately 5% more powerful. It is only necessary that all elements of such a modernized exhaust system be selected exclusively by a specialist.
Installation of new pistons and connecting rods. By reducing the mechanical losses of the internal combustion engine, you can get a small increase in the power of the power unit. Typically, such work is carried out in conjunction with other tuning, which allows for the maximum possible increase in engine power.
Conclusion
Today there are many different ways to increase the power of a car engine. You can choose either a relatively simple chip tuning, in which the control system is reconfigured or additional units are used that control the operation of the engine, or a complete engine overhaul, with the installation of a turbine, a new injection system, crankshaft, connecting rods and pistons. In each specific case, the choice of one or another tuning technology will invariably be up to the car owner. Just remember that such work must be performed by a professional, which guarantees subsequent trouble-free operation of the car engine.
19.12.2017
Prevention measures
To prevent damage to the heating element, you need to:
- disassemble the boiler and inspect the anode and heating element at least once every 6-9 months;
- At each maintenance, rinse the tank from dirt and scale;
- when replacing the heating element, also change the “sacrificial” element;
- avoid mechanical methods of cleaning the tube, especially with a knife and other sharp objects;
- tighten the nuts and bolts firmly, but without jerking, so as not to damage the threaded connections.
To slow down the formation of scale, you need to heat the water no higher than +60...+65°C. Once every 2-3 weeks, you can set the regulator to maximum mode to disinfect the tank.
We carry out dismantling
Every owner of Ariston water heaters should know that when replacing the thermostat, relay and safety valve, dismantling the tank is not required. Draining the water and completely disassembling the boiler is carried out only during maintenance work and when replacing a burnt-out heating element.
Disassembly of the product is divided into standard stages:
- Disconnect the water heater from the home electrical network.
- Drain the water from the tank.
- Remove the flanges and gain access to the inside of the water heater.
Before disassembling the product, you need to make sure that it is disconnected from the network: if the heater is powered by a separate line, then you need to turn off the circuit breaker, but if it’s just through a cord, then simply pull out the plug from the socket.
Some readers may wonder: why emphasize these points so often? But statistics say that during home repairs or when replacing burnt out parts, very often craftsmen who neglect safety precautions receive electrical injuries of varying severity.
Only after turning off the power can you begin dismantling the Ariston boiler with your own hands:
unscrew the cover, which is secured with screws; before starting dismantling, take a photo of the location so as not to confuse anything during assembly; disconnect the three-wire cable, the first two wires - phase and neutral were connected to the thermostat, so you can carefully remove it.
All electrical work has been successfully completed, and you can begin draining the water from the tank.
Removing water
If the initial installation of the water heater was carried out by a service technician, then he had to install a special tee with a drain tap and screw a fitting into it. Quite a convenient device - the user easily connects the hose, as shown in the photo, and drains the water into the bathroom. In the absence of a special device, water is removed by connecting a hose directly to the nozzle of the product.
Draining the water can take several minutes if the heater capacity is up to 50 liters, and when you have an 80-liter Ariston, the wait will last up to 30 minutes or more.
Hose with fitting
Opening access inside
All modifications of products under the Ariston brand have an oval flange on which heaters, a magnesium anode and a tube with a thermostat inside are installed. An elastic rubber gasket is placed on the flange body from below to ensure tightness. The flange is secured with a U-shaped strip, which is secured with a nut.
We unscrew the nut, carefully push the flange in, turn it and pull it out. Next, the failed parts are replaced and the surfaces are cleaned of salt and lime deposits.
Remove excess debris at the bottom of the tank, visually inspect the rubber seal, if everything is in order, then do not change it - it is very expensive, and it is very difficult to get a new one. Dismantling and subsequent assembly can be done independently by any user without special training. We attach this video to help:
The operation statistics of similar heaters allows us to conclude: regular inspections of the wear of the magnesium anode, cleaning of the heating elements, and preventive maintenance of the internal coating of the tank must be done regularly and by doing this you will significantly extend the service life of the product.
Mandatory Precautions
Any purchased equipment comes with instructions for proper operation of the gas water heater. The principle of operation of most of them is identical to that stated above, but here the red line should be highlighted by mandatory compliance with safety precautions.
- It is necessary to carry out preventive cleaning of the gas water heater in order to avoid disruption of the efficiency of its operation (you can read how to do this in the document that comes with the gas water heater - instructions).
- It is important to check the condition of the chimney ducts - this will help avoid blockages.
- If the device fails, you should immediately contact the gas service. Trying to fix the problem yourself is prohibited.
The activation of the unit is shown in more detail in the video:
It is enough to understand once how to light the device to ensure comfortable and instant heating of running water. And then you can simply enjoy the operation of this convenient heater.