Using a gas water heater is one of the best options for heating water in a house when there is no centralized water supply or the ability to obtain hot water. The technology is very useful and independent of public utilities. It provides residents with uninterrupted hot water. However, these devices also fail for unknown reasons.
Undoubtedly, problems with such equipment should be resolved by gas service employees with special permission, because this is a requirement of safe operation rules. But there are some problems that you can easily fix yourself. Today we will look at one of the common ones, which is associated with a leaking gas water heater. Let's talk about what to do if a gas water heater is leaking, how to identify the cause of the breakdown and what actions can be taken. We will also analyze the features of breakdowns that are inherent in various brands of gas water heaters.
Why is the geyser leaking - what to do
If there is no maintenance, after 4-5 years of operation, you may suddenly encounter water starting to drip from your instantaneous gas water heater. Leaks occur for several reasons.
Some problems are easy to fix yourself. Others require skilled maintenance. If the owner is faced with the fact that his gas water heater is leaking, there are several important points to consider:
- Is it possible to use a faulty water heater?
what causes the leak;
- methods for eliminating leaks and increased condensation formation.
Regardless of how intensely water drips from the boiler, it is necessary to determine the cause of the leak and eliminate it immediately.
Leak prevention
To prevent a leak from catching you by surprise, it is necessary to carry out preventive maintenance of the device at least once a year, inspect it for rust, sediment accumulation, etc. It is advisable to change all rubber seals every two years.
For better insulation, it is recommended to use special sealants and sealing elements.
Most of the reasons that cause a gas water heater to leak can be eliminated yourself. To extend the service life of the water heater, do not neglect the manufacturer’s recommendations; you should periodically inspect the device and replace worn parts.
Is it possible to use the column if it leaks?
Only serviceable, operational gas-consuming equipment is allowed for operation. It is prohibited to use a gas water heater if it is dripping. There are several consequences of turning on a faulty water heater:
there is a high probability of the burner flooding with water from the heat exchanger, which leads to an explosion and gas poisoning (if the combustion control function is missing or faulty in the column);
If the leak was caused by a malfunction of the water unit, the automatic gas water heater simply will not start. The block is connected to the ignition system and gas valve. A leak indicates a malfunction of the gearbox and often after a short period of time leads to complete failure of the water heater.
Gas is flowing. column JUNKERS WR-13
The water fittings (aka water unit, also known as hydraulic fittings) at the JUNKERS WR-13 gas water heater are leaking. I first searched the entire Internet and found almost no information. Is it even possible to remove the water fittings? I would be grateful for any information.
Everything is possible. What information on this column are you interested in? Here you have the device and spare parts, and everything is at your fingertips
» >
The only time it happened to me was that it started dripping after supplying water to the boiler, the reason was that one of the connections with the gasket was not tightened. I tightened it and everything was fine. Although it’s a small thing, it’s unpleasant, but the boiler is still more expensive than the Chupa-chup. Model Junkers ZWB 24-28
You have a boiler, and the vehicle is asking about the water heater.
There is a difference, of course, but not a fundamental one. If it drips from the connections, then everything can be tightened and sealed
Technical reasons for column leakage
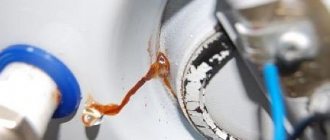
There are two main failures that lead to leaks. The malfunction is determined by the method of exclusion. The breakdown is indicated by the localization of the appearance of liquid. So, if water flows from below, most likely the malfunction is associated with a failure of the gearbox. When condensation appears, the breakdown is associated with the heat exchanger.
Below is a description of common problems:
- The malfunction of the water unit is a gearbox, a simple control device that sends a signal to open the gas valve and to the ignition unit. Inside, the “frog” is a hollow structure divided in half by a membrane. When water is supplied to the reducer, pressure is applied to the diaphragm, which in turn leads to the movement of the rod connected to the gas valve. The membrane fails due to prolonged pressure and mechanical stress. Signs of a breakthrough:
- water drips from the safety valve of the gas water heater - the membrane blocks the access of liquid, but the barrier disappears after damage or wear of the gasket;
- the water unit is leaking - another clear sign of failure of the membrane or rod seal. Initially, only a few drops of water are released during operation. Over time, the flow in the frog becomes more intense.
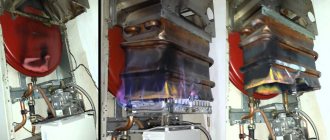
Corrosion or hole in the heat exchanger (radiator) - the steel or copper tubes of the coil are subject to constant thermal stress. As a result of direct exposure to fire, microcracks form on the metal surface. Burnout of the tubes occurs. The first sign of failure is the accumulation of condensation on the body and internal components of the water heater. In places of leakage, copper changes color to poisonous green.
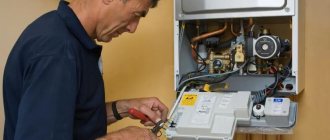
To eliminate a leak, you must determine its root cause. For this purpose, remove the boiler casing and carry out a visual inspection. Work begins after determining the location and intensity of the leak. Before servicing, turn off the gas and water supplies.
Methods for eliminating leaks
First of all, inspect the equipment to find the location of the leak. Then proceed with the repair.
Heat exchanger problem
Before starting any work, turn off the water supply and turn off the gas. Inspect the speaker radiator: if the case is damaged or cracked, green spots may form on the surface. This is because the moisture does not have time to dry out. Most often, fistulas form from the outside, so you do not have to dismantle the part.
If no damage is found on the outside, then you will have to remove the radiator. This is a labor-intensive process, since you will have to disassemble the entire column. In such cases, it is better to call a specialist.
- soldering iron;
- solder;
- fine sandpaper;
- degreasing agent.
- Drain the radiator. To do this, open the hot water valve, unscrew the cold water nuts. To completely remove moisture from the coil, you can use a vacuum cleaner. Otherwise you will not be able to reach the temperature required for soldering.
- Remove the casing and inspect the products. All detected damage and cracks must be cleaned with sandpaper. After complete removal of plaque, wipe the cleaned areas with a degreasing solution, then wipe dry.
- Heat the damaged area with a soldering iron. Sprinkle rosin or an aspirin tablet on top. After heating the area to 160 degrees, solder the tin. If it beads up, it means you haven't heated the surface properly. For successful further operation, the surf must be at least 2 mm.
- Treat all areas with a green coating in this way.
Keep in mind that such repairs are temporary. The welded areas are vulnerable and may soon begin to leak. Therefore, it is recommended to completely replace the element.
Malfunction of the water unit (gearbox)
If a leak is detected in the Electrolux, Oasis, Orion, Neva gas water column in the area of the water unit, it means that the rod seal is faulty. The entire element will have to be replaced. Do this:
- Close the gas and water valves.
- Remove the top casing; you may have to unscrew the screws.
- Disconnect the water unit from the radiator. Unscrew the fasteners that secure it to the back wall.
- Unscrew the knot and remove the membrane.
- Use a wrench to unscrew the rod and install the working part.
Wear of threads and connections
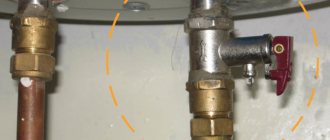
Damage and deformation of connecting nodes is not uncommon. To determine the specific cause, you need to inspect all connections. The left pipe leading to the body supplies hot water, the right one transports fuel. Most often, droplets of moisture form on the water pipe - condensation.
This is normal, repairs are not needed in this case. But if you notice a heavy leak, then:
- Block the incoming flow from the water supply.
- Disassemble suspicious connections and inspect.
Most often, rubber gaskets leak. Therefore, prepare spare parts in advance.
- Remove the deformed gasket, clean the threads from scale and dirt, and wipe dry.
- Install a new element (preferably made of silicone, they are more durable).
- Reassemble the parts in reverse order.
- If the nut rotates during installation, install a new part of the same size.
Pipeline damage
In water heaters from Vector, Ariston and other brands, not only connections and gaskets can wear out. The leak may be in the pipeline itself. For immediate repairs, you can use the heat exchanger method - solder.
You will need the same tools: soldering iron with solder, fine-grained sandpaper, degreaser. Now you need to drain all the liquid from the pipe and dry it. Clean the broken area with sandpaper and degrease. Solder the damage with a soldering iron.
We remind you that such repairs will not last long. It is used as a temporary measure. After which it is better to replace the faulty parts.
Users noted that finding replacement piping parts is not easy. Manufacturers do not produce spare parts, so some use standard corrugated hoses.
Do not forget: a geyser is a high-risk device. Amateurs are better off not taking risks and contacting a service center. In other cases, adhere to safety precautions.
How to fix a leak in a column
First, identify the source of the leak. This can be done quite simply by visual inspection. The casing is attached with latches or fixed with bolts. If water drips from the geyser only when you turn it on, you will need to start heating the water for a few seconds. After identifying the location of the breakdown, they begin to eliminate the leak:
- Threaded and other connections - leaks are eliminated by changing all the gaskets and re-packing the connection. To improve sealing, special silicone compounds (sealants) are used. If a hose leaks, it must be replaced; it cannot be repaired. The average service life of gaskets is 2-4 years. You can prevent leakage by carrying out regular maintenance of the water heater, with the replacement of all sealing rubber bands.
Conclusions and useful video on the topic
Often the problem of geyser heat exchanger leakage is eliminated by soldering tubes. However, not everyone will have the necessary tools and materials in their home. There is an alternative way to solve the problem - without soldering. How to do this, see the following video:
Fixing a leak in a water heater of any brand is not a complicated procedure - all the work can be done independently, having a standard set of tools in the house. To do this, it is not necessary to have special skills and knowledge, but simply use the instructions given above and do not forget about the safety rules when using gas equipment.
And if during the process of carrying out repairs with your own hands you discover a gas leak, you should immediately call the gas specialists.
Would you like to tell us about your own experience of eliminating a gas water heater leak? Or do you have your own opinion about the advisability of independently searching for the cause of the leak and further repairs on your own? Express your opinion, share your experience, participate in discussions - the comment form is located below.
Condensate in a gas water heater - what to do
In this case, the problem is more serious. Most likely there is a leak in the heater. Occurs under the influence of small microcracks. Initially, perspiration appears on the body and internal parts of the speaker. Subsequently, condensation begins to drip from the gas water heater.
A heater (radiator, coil or heat exchanger) consists of pipes with fins. When exposed to direct fire, the metal will burn out over time. Thinning pipe walls lead to leaks and condensation. The malfunction must be corrected immediately. Replacing the radiator or soldering the damaged area will help get rid of condensation.
Soldering is performed in the following way:
- the liquid from the heat exchanger is drained;
remove all dirt and scale from the surface;
soldering is performed with a soldering iron heated to 180°C and a power of at least 100 W;
Condensation in a gas column can form due to every microcrack and deformation. Soldering is used to treat each damaged area.
It happens that condensation forms only on the cold water pipe, and the problem usually arises in new turbocharged boilers. While the water heater is under warranty, it should be replaced immediately. There should be no condensation in a working column.
Source
Options for eliminating leaks
Heat exchanger
What to do if the radiator in the gas water heater leaks? First you need to disconnect the device from the power supply, turn off the gas and water. Then carefully inspect the heat exchanger. Leaks often appear as rusty or greenish spots. This happens because the moisture in these places does not have time to dry out. Basically, holes are formed on external elements, which facilitates the repair process. If the leak points are in a hard-to-reach area, you will have to remove the radiator. Then it is better to call a specialist.
If there are leaks in the heat exchanger, it is recommended to replace this element with a new one. But some decide to repair the part in the following way:
- drain the radiator - open the hot water valve and unscrew the cold water nuts, and suck out the remaining moisture with a vacuum cleaner;
- found holes and cracks are rubbed with sandpaper so that no rust remains;
- the cleaned areas are treated with a degreaser and wiped dry;
- take a soldering iron and use it to heat the damaged area, sprinkle rosin or an aspirin tablet on top;
- heating the metal to 160°C, solder the tin; if it forms droplets, then the surface is not heated enough.
The thickness of the tin layer should not be less than 2 mm. Please note that soldering the holes will only give temporary results. After a few months, the leak will make itself known again. Therefore, it is necessary to purchase a new heat exchanger as soon as possible.
Water node
It happens that a leak occurs in the water unit. This usually indicates that the stem seal is faulty. To replace a damaged element, you will have to remove and disassemble the water unit (“frog”). This is done as follows:
- disconnect the water unit from the wall of the gas column;
- unscrew the part and remove the membrane;
- Use a wrench to remove the rod and replace it with a serviceable part.
You should also pay attention to the condition of the membrane. If it has lost elasticity or become deformed, it must be replaced.
Worn threads or connections
In most cases, leaks occur precisely at the junctions of water pipes and gas water heater pipes. A leak should not be confused with condensation, which often forms on the pipe supplying heated water. This is a normal process and there is no need to try to fix anything. If this is indeed a leak, then perform the following actions:
- block water supply;
- disassemble the leak site;
- in most cases, leakage occurs due to loss of elasticity of the gaskets - then it is necessary to prepare spare elements;
- the old gasket is removed, the threads are thoroughly wiped from scale and dirt, then dried;
- install a new gasket (it is advisable to give preference to a silicone element);
- the parts are assembled in reverse order.
Pipeline damage
In rare cases, leaks occur in water pipes. As a temporary measure, you can solder the damaged area in the same way as repairing a heat exchanger. To do this, you should prepare: sandpaper, a soldering iron and a degreaser. The sequence of actions is as follows:
- All liquid is drained from the pipe and dried.
- The leak site is cleaned with sandpaper and degreased.
- Damage is sealed with a soldering iron using tin.
It should be remembered that such a pipe will not last long, so it is necessary to quickly replace it with a new one.
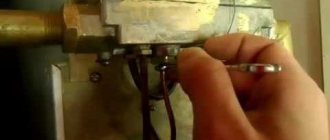
Drops of moisture on the water unit of a gas water heater. Condensation or leak? Let's check.
Today we’ll look at a case where, for no apparent reason, water leaks through the microswitch of an automatic gas water heater. And so let’s go...
Main reasons.
And so. There are only two main reasons for the appearance of water droplets on the microswitch. 1) You are raising the operating temperature of the device too much. 2)Water is leaking from the water supply system.
If you increase the operating temperature, condensation appears on the metal parts under the column casing. This occurs because the air temperature under the casing becomes high, and the metal parts of the water unit, on the contrary, become very cool due to the flow of water inside them. The process of condensed moisture inside the geyser occurs constantly, but during normal operation of the device, it does not have time to accumulate and quickly evaporate. And at high temperatures, the process of moisture formation occurs too actively. The water does not have time to evaporate and the impression of a leak is created.
All you need is to turn down the gas supply, wipe the wet area with a napkin and observe a little. If within a couple of minutes of operation of the device you do not see dampness, then everything is fine. But if a drop appears again and begins to grow and fall, then this is already a problem .
This means that somewhere the water unit has lost its tightness. And it can no longer contain the pressure of water flowing through the system. And the most problematic places are the membrane and the rod.
Let's go in order. What causes the membrane to fail? There are several reasons. The most common is from hard water. Deposits of minerals dissolved in water appear on the membrane and over time a crack appears through which excess water oozes out. It can also fail simply due to old age and due to manufacturing defects. This can only be treated by replacement.
No, the rod itself remains relatively intact, but the nut inside which it runs suffers.
And not even the nut itself, but the oil seal inside it. This happens because over time a composition appears on the rod. The surface of the rod ceases to be smooth and moving inside the nut and sliding along the oil seal, it simply tears the latter. Again, it can only be treated by replacing the rod and nuts together.
When to call a professional
If you notice such problems, it is better to contact the service. But before that you need to make sure that it is broken:
- The draft, overheating and flame sensors are constantly triggered.
- The column is clogged.
Often the pipe responsible for the gas supply becomes clogged. How to clean it:
- Remove the temperature control knob.
- Remove the cover of the device.
- There are clamps on top of the pipe. Unfasten them.
- Remove the pipe, clean it, and wash it under the tap.
- Dry and reinstall the part.
- Test the operation of the equipment. While holding down the power control, press the piezo ignition button. Hold for 10 seconds.
If all else fails, it is better to contact a technician to replace the sensors. Many reasons for the damping of the Junkers heater can be eliminated with your own hands. If you connect the device correctly and keep it clean and in good working order, such problems will not arise.
Why is a safety valve on a boiler needed?
The valve element releases excess liquid automatically, and stops the removal of water under conditions of normalization of operating pressure.
Externally, the safety valve device is represented by a brass-plated body. The internal part includes a pair of springs and locking elements.
The starting spring mechanism is located in the inner part of the flow channel. Possessing the function of a check valve, such an element prevents water from flowing back into the pipeline supply system.
When the water pressure increases, the spring device moves away, which ensures the unhindered flow of water into the storage tank. After the tank is completely filled and when the pressure indicators are equalized on both sides, the shut-off device closes the hole, which prevents the backflow of water flow into the main pipeline system.
Safety valve on the water supply to the boiler
The second spring mechanism is located on the outlet part of the device, and the function of such an element is represented by water discharge under conditions of increasing pressure.
In such a situation, the pressure arising in the pipeline is able to overcome the stiffness of the spring, which causes its compression and the opening of the hole for water flow by the shut-off element.
Safety valve installed on the boiler
The use of a safety valve device protects the storage tank from rupture, prevents the reflux of hot water from hot water equipment into the water supply system, smoothes out pressure drops, and ensures the discharge of excess water at critical levels of pressure and temperature conditions. Among other things, the valve drains water during the maintenance and repair of the boiler.
Types of threaded connections used in instantaneous water heaters
The following types of fittings can be used in internal cold or hot water supply lines:
- sweeps;
- threaded;
- compression;
- crimping
Sgony
- this is one of the old types of threaded connections used for laying cold, hot water or gas pipelines.
In fact, these are two threaded pipes connected to each other by a coupling with a lock nut. Sgon
Sgon
These types of joints can still be found in old houses. In instantaneous water heaters they are definitely not present, but they may be in front of the column. To seal threaded fittings in squeegees, flax tow or a special synthetic tape is used. It is on the slopes that water begins to drip.
Tips: Before unscrewing the threaded connections, drain the water by first turning off the water tap on the water supply when entering the apartment.
Squeegee assembly
Squeegee assembly
Their difference from other fittings is that one end of the fitting is welded to the pipe.
Threaded fittings
can definitely be encountered when disassembling an instantaneous water heater. These are standard connecting elements for pipelines. To ensure tightness, a special tape or linen tow is wound onto the threads. The coupling then tightens the connection and ensures a tight seal. The advantage of such a connection is its low cost and simplicity. However, novice craftsmen are unlikely to be able to make a high-quality seal the first time.
American
American
Unlike threaded connections, the one called “American coupling” is better and more convenient to install. Here the role of seal is played by a rubber, paronite or propylene gasket. In order to repair an American one, you need to replace the old worn gasket with a new one and tighten the union nut.
Compression fittings
can be used when switching from polyethylene pipes to metal ones. In the geyser itself, exclusively metal pipes are used.
Compression fittings
Compression fittings
Compression fittings can be used to supply water to a gas water heater when switching from metal-plastic pipes to metal ones.
If water drips on the fitting, it must be disassembled, the gasket or sealant replaced and reconnected. Water leaks on a threaded connection can be dealt with using an adjustable wrench.
Is it dripping or flowing?
If water drips from the check valve device during the heating of the boiler equipment, then this situation indicates the normal functioning of the device and the operation of the protective group in normal mode.
During operation of a water heating device, the safety valve must discharge excess liquid if there is an increase in water pressure on the walls of the storage tank as a result of thermal expansion of the liquid. The consequence of water discharge is a noticeable decrease in water pressure inside the tank with heating elements.
Installation diagram of a safety valve for a boiler
To monitor the process of removing excess water, it is necessary to install a regular transparent reinforced plastic pipe on the outlet fitting, the outlet of which is mounted on the sewer system.
The water should not flow in a stream, and the release of droplets should stop immediately after cooling.
If water drips constantly, the problem may be a malfunction of the safety valve device or the liquid is drained due to a worn rubber or silicone seal..
I thought there was an epilogue, but figs!
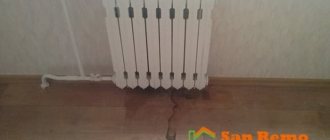
The column works, does not leak, hangs in the same place:
Money spent:
- Radiator removal: 700 rub.
- Soldering: 400 rub.
- Radiator installation: 700 rub.
- Maintenance (cleaning): 1700 rub.
Total: 3500 rub.
PS And the column, despite cleaning, only works in the extreme right position of the regulator.
Water dripping at night
It is very important to distinguish between natural water discharge and failure of components. When the water heating equipment is connected to the electrical network, and in the absence of its operation, a small amount of it should flow through the fitting part of the valve device, including at night.
When the appliance operates in an average load mode, including regular washing of dishes and cooking, water flows out of the valve device periodically, in a volume slightly higher than the usual amount. Constant leakage, including at night, may indicate device failure.
The main reason for dripping water at night is that the fitting or the inside of the fitting is clogged with scale or debris. The spring mechanism that opens the valve is not able to close it at the right time, so water flows out even when the water heating equipment is turned off. An equally common cause of water leakage at night is too high pressure in the water supply system. In order to check the working water pressure, it is measured in the main water supply.
Unit design
Before you decide why the gas water heater does not ignite and what are the causes of this malfunction, it is necessary to study the design and operating principle of this unit. Currently, there are two types of devices that differ from each other both in design and operating principle. They are divided into the following types:
- With an open combustion chamber (atmospheric) - in these devices, air for fuel combustion is supplied naturally through a special intake. The most famous models: Termet AquaHeat, Dion, Zanussi, Neva Comfort, Ariston, etc.
- Turbocharged or with a closed combustion chamber - in these devices the air is supplied using a fan. Popular brands: Lemax Alpha Turbo, Selena SWH 20 SE3, Ariston NEXT EVO SFT 11, etc.
From this video we learn about some reasons for the malfunction of geysers:
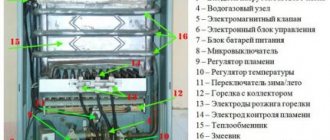
In addition, the water heaters produced differ in the method of igniting the gas burner. Gas can ignite from a piezoelectric device, an ignition electrode from batteries, or automatically from a hydrogenerator or electrical network . The main elements of gas burners are:
- frame;
- gas burner with ignition device;
- heat exchanger;
- combustion control valve;
- water equipment with safety valve;
- ignition device;
- adapter for connecting the chimney;
- pipes for connection to the water supply system.
Periodically check all elements of the gas water heater to ensure they are in good working order.
In addition, a draft sensor is installed in the water heater system to control the output of combustion products. A flame presence sensor is located in the combustion zone. Both elements are connected to each other by one control circuit.
This diagram describes the design of an atmospheric gas column. There are some differences in forced draft water heaters. In their design, the burner is modulating or stepped, which changes the combustion intensity automatically.
The air is supplied by a fan, the operation of which is regulated by a controller. Ignition and combustion of gas occurs when the cold water tap is opened. The combustion process is maintained automatically under the control of a temperature sensor.
How much water should the valve drain?
A small amount of water should be dripped from the valve device. The total volume of liquid removed directly depends on the pressure level in the water supply system, as well as the temperature regime used for heating and the volume of the water heating equipment tank. On average, the amount of water released can be about 1.5-3.0% per day.
There are several ways to drain water from a water heater. For detailed instructions, see our website.
Read all about the pros and cons of hygienic showers for toilets here.
You will find options for finishing a bathroom with plastic panels in this topic.
Stage 1. Call serviceman 1
The column was purchased at the Izot store in Nizhny Novgorod. The store works only with one authorized service center, CityGaz. I called them (tel. 434-44-28) and ordered a technician the next day.
The next day a boy came, removed the casing from the column and said: “Remove the radiator - 700 rubles. Put it back - 700 rub. And the radiator itself needs to be soldered. We don’t do this, so we need to go to the area of Kuzbasskaya Street, to Gorgaz. I don’t know their addresses, I don’t know their phone numbers. Search for yourself." This is the service.
For 700 rub. In about 5 minutes the boy disassembled the column, took out the radiator, threw all the parts anywhere and dumped them, saying: “As soon as you solder it, call and call again.”:
Radiator:
Small items specially laid out for the photo shoot:
What to do?
There may be several reasons for excessive water pouring out through the fitting of the valve device, and the solution to the problem can vary greatly in complexity and implementation technology:
- if an element loses its protective qualities due to wear, including spring stretching and cracking of the poppet device, the fittings are replaced;
- if the valve breaks down as a result of water hammer with a sharp increase in pressure in the water supply system, it is also advisable to replace the element with a new one with similar indicators;
- if the fitting or the internal part of the system is clogged with debris and scale, it is advisable to clean it, partially or completely replace it;
- if the leak is caused by initially incorrect installation of the protective unit, then it is necessary to carry out diagnostics of the safety valves, including measuring the relief pressure using a pressure gauge, followed by replacing the valve if necessary;
- if excessive leakage of water and incorrect operation of the fittings of the water heating device are caused by non-compliance with installation requirements, then the protective unit should be moved to the correct location.
After the correct relocation of the protective fittings or complete replacement of the safety assembly has been carried out, the excess flow of water should stop. The opposite effect is observed when the nominal pressure level declared by the manufacturer does not correspond to real indicators.
No less often, the cause of leakage is an incorrectly selected or too high temperature mode for heating water, as well as excess water pressure inside the system, so the purchased water heating equipment must fully comply with all requirements.
Correctly installed boiler
It is very important to remember that the operation of water heating equipment without accessories such as a safety valve device is strictly prohibited. When installing an alternative hot water supply system in conditions of excess pressure in the main water supply, a special reducer must be installed at the inlet, capable of regulating such parameters.
Do you want to save money on boiler installation? How to connect a water heater to the water supply in an apartment - you will find a connection diagram in the article.
We will consider types of plastic panels for the bathroom and repair options in this material.
A prerequisite for comfortable and safe operation of water heating equipment equipped with a safety valve device is the supply of a flexible transparent hose to the drainage hole, the second end of which is discharged into the sewer system or a container specially installed to collect the released water.
Stage 2. Soldering the radiator
I spent the next morning searching for the exact address of Gorgaz on Kuzbasskaya. I surfed the entire Internet and called a lot on different phone numbers in the city. I also called CityGaz, thinking maybe they would tell me the address of the place where they sent me. But no, they say: “Take the gas payment receipt, find the contact number there, call and find out.” I took it. Found. I called. Busy. I called again. Busy... So 2 hours passed. Busy. So no one picked up the phone. Then I found on the Internet that this is an office that counts money for gas, and, as I understand it, has little to do with Gorgaz.
Ivan Tsarevich drove for a long time, or for a short time... I finally found an office that soldered radiators. It’s called “Nizhegorodoblgaz” and is located at: st. Aksakova, 38. Telephone number of the radiator room (the place where the soldering is done): 259-59-20. But the place is hellish, you can come there, but leaving is a problem. There is nothing to do there without a car. Here it is on the map:
View on a larger map
We go through the gate. First we go to the guards' booth. In the photo, the window is just the guards, the door is immediately behind the gate, on the right:
There they signed me up and gave me a pass. Like this:
We leave the guards, turn right, and go into the first door of the same building:
This is the “Radiator Room”:
Inside there is a large room, and in the far left corner there is a special stand on which two hefty guys are soldering radiators with gas burners. On the table in a bag - this is just my radiator waiting for soldering. But to the right of the scales (not visible in the photo) there is a bathtub with a bunch of hanging hoses. There the finished radiators are pressurized:
In general, the atmosphere there is enchanting. For some reason I immediately remembered the scene in the bathhouse from Red Heat:
Video of soldering my radiator. Mine is soldered by the guy on the left:
By the way, after the radiator was unscrewed, I still could not find the leak. And I kept thinking whether the shareholders would be able to find it themselves or not. But everything turned out much simpler. The solder uncle silently took the radiator, took it to his workplace, set it up, cleaned it, and began soldering. Apparently all Junkers flow in one place.
Here's the result:
With this receipt we leave the knowledge and go right to the next door. We go up to the second floor. There is a cash register there. Follow the signs to the right:
I took the repaired radiator home. The next day I called a repairman from Citygas to assemble the column.
External cleaning of the heat exchanger
To better clean the radiator from contaminants, you need to remove it from the column.
Important! Before starting cleaning work, it is imperative to shut off the gas and water supply valves.
The sequence of actions is as follows:
- close the gas and water supply;
- remove the protective cover;
- open the hot water tap closest to the column;
- place a container under the radiator inlet to drain water;
- unscrew the supply pipe from the heat exchanger and drain the water;
- Unscrew the radiator union nuts and remove it.
You may have to additionally disassemble other parts and elements of the column that do not allow you to remove the heat exchanger. Their number and purpose depend on the design of the unit. It is necessary to carefully and consistently disconnect them, remembering all your actions.
Place the removed heat exchanger in a container and treat the radiator fins with carbon remover or other effective detergent.
Clean with a brush and foam sponge. After this, rinse with a strong stream of water. It is best, of course, to treat the radiator with a mini high-pressure washer, if you have one, or you can get it somewhere for a while. This type of washing can very quickly and efficiently destroy the carbon layer.