The heating battery is leaking, what to do, how to fix the leak in a short time
Contents: 1. The heating battery is leaking - what to do 2. How to fix the leak 3. Cement-plaster bandage to eliminate the leaking heating battery 4. Moisture-resistant glue, the heating battery is dripping 5. Using a clamp and rubber as a means to eliminate a radiator leak 6. Hermetic seal to eliminate leaks 7. Use of welding Sooner or later everything fails. But when the heating battery leaks, many people don’t know what to do. But almost everyone has to face this problem. In order to avoid damage to your own and your neighbors’ property, you must adhere to a certain procedure. In addition, during the heating season, hot water flows in the radiators, which can burn you. Therefore, everyone should know what to do if the heating battery is leaking.
Air conditioner thermostatic valve
Downcast
. Why are you afraid of them (utility workers)? You pay them money every month, right? So don’t ask for your money, but DEMAND! Don’t humiliate yourself and don’t ask - take the paper and write an Application addressed to the head of the housing office (or whatever it’s called in your area). Complain - that you called his employee, he came, did nothing, i.e. refused to perform his DUTIES. And that if “tomorrow” you flood your neighbors, then during the debriefing you will in all instances blame him – the boss – for the inaction that led to it. ".
Message from Novosel
as an option, they will first require you to pay the receipt, they have a price list
You are contradicting yourself.
If they are “obliged”, what is the payment?
A leak in a heating radiator is, although unpleasant, a fairly common failure that residents of houses or apartments encounter sooner or later. The main reason for leaks is, of course, aging of pipes and metal corrosion. Sometimes a leak appears due to improper installation of connections or due to excessive mechanical stress on the heating system.
Sometimes the reason may be the choice of the wrong materials (for example, if a silicone gasket is placed in a pipe connection, it will deform over time, which is why a leak will appear).
Unfortunately, many ordinary people believe that to eliminate the problem it is enough to simply place a basin under the dripping pipe. The result is always the same - a burst pipe, water on the floor, angry neighbors downstairs.
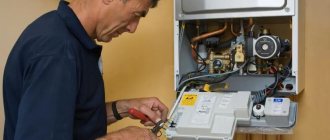
If your radiator leaks, call a specialist immediately!
However, there are times when you have to fix the breakdown yourself. What to do in this case?
First, you will have to turn off the heating and release all the water from the pipes. If you live in a multi-story building, the valves will be located in the basement. Be sure to put a sign on them indicating that repairs are underway, otherwise anyone can go down to the basement and fill the system. In this case, streams of dirty hot water will flow into your apartment.
The heating battery is leaking - what to do?
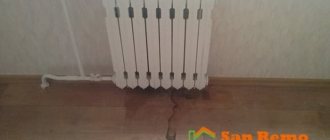
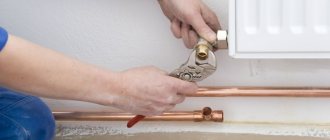
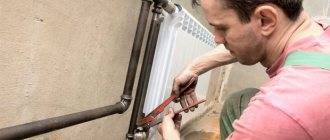
The first thing to do if the radiator is leaking, as in the photo, is to turn off the water. But if the leak is serious, then it is urgent to call an emergency team - plumbers have all the necessary tools and materials to eliminate the problem if the battery leaks. If boiling water is pouring out of the radiator in all directions, then you need to throw something thick over it - for example, a blanket. This is not a way to get rid of a leak, but at least you will be able to approach it without fear of injury. Next, if possible, you need to turn off the water. It’s good if there is a tap or valve in the apartment itself - this will allow you to quickly turn off the water supply and save your property. But what if there is no such valve and the radiator is leaking - what to do? Then you need to turn on the coolant supply valve to the heating system, which is located on the main pipe near its entrance to the basement. If the leak is minor, then you can try to fix it yourself (for more details: “How to fix a leaking heating pipe if it is leaking”).
Installation procedure
The easiest way to install a flanged ball valve is a very popular design. To install such a faucet, you must:
- Choose a suitable location.
- Wrap the threads of the tap with a sealant, for example, FUM tape.
- Screw on the tap.
- Check connections for leaks.
When figuring out how to properly install a tap on a battery, you should take into account a number of nuances that will help you perform these operations correctly. For example, if the faucet is embedded into an already finished system, you should cut out a small part of the pipe and cut a suitable thread, if one is missing. You can see more useful information on installation in the video:
Of course, before starting work you will need to remove the coolant from the heating system. Owners of private houses with individual heating will not have any problems, but apartment residents will have to coordinate this event with the management company.
The ball valve is installed in the area between the battery and the bypass - a special jumper that ensures coolant circulation in the system, even when the valve is closed
The tap is installed in front of the battery and behind the jumper that connects the “input” and “output” of the coolant, so that when the flow is blocked, the coolant does not stop circulating through the system. If such a jumper (professionals call it a bypass) is missing, this problem must be solved when installing the tap on the radiator. When installing a faucet, you should consider two points:
- There must be no obstruction to the adjustment knob when set to any position.
- The user should have free access to the tap.
Before purchasing a faucet, of course, you should make sure that the diameter of the faucet and the pipe on which it will be installed match each other. It is also worth clarifying the type of thread. For a flanged valve, these elements can be configured as follows:
- both threads are internal;
- both threads are external;
- combination of internal and external threads on different sides.
Flange valves have a special marking in the form of an arrow, which indicates the direction of flow of the working medium, i.e. coolant. Do not neglect these instructions when installing the faucet.
To avoid leaks, FUM tape or other suitable sealant should be used correctly. In the case when the tap is installed on a pipe with an open thread (it is clear that the tap flange will have a closed thread), the seal is wound clockwise. In this case, the master is positioned facing the pipe opening. If the open thread is on the flange, the seal is also wound clockwise, but facing the tap, and not the pipe.
When the FUM tape is wound correctly and in sufficient quantity, noticeable efforts will be required to screw the thread. Upon completion of the work, part of the seal may protrude slightly at the joint; this is a completely normal situation, characteristic of good sealing. If the tap turns easily, too thin a layer of sealant was used. In this case, you should wind a little more FUM tape, and then screw the tap tightly to the pipe. Following these simple rules will help you install the faucet correctly and ensure a sufficiently high seal.
At the end of the work, it is necessary to check the connection by filling the system with water, preferably at high pressure. Neglecting this rule can lead to flooding of the room due to improper sealing of connections. Most often, residents of apartment buildings suffer from the consequences of unscrupulous work, since filling the heating system with water before the start of the heating season is usually carried out without warning on a weekday.
How to fix a leak
There are several options for solving the problem, using:
- self-tapping bolt;
- rubber pad with wire or clamp;
- cement-plaster bandage;
- fabric impregnated with heat- and water-resistant glue;
- special sealant;
- welding
The easiest way to fix a small leak in a cast iron radiator is to fix a self-tapping bolt in the hole. It must be remembered that all these methods of eliminating leaks are only a temporary measure - it is advisable to replace old radiators with new products as soon as possible.
Cement-plaster dressing to eliminate leakage of the heating radiator
Before fixing a leak in the heating battery, you need to prepare the required materials and tools:
- cement;
- alabaster (plaster);
- container with water;
- salt;
- medical bandage
To eliminate the leak, a bandage is applied to the damaged area.
The procedure after turning off the water is as follows:
- dilute cement in a container with water to the consistency of thick sour cream;
- cut the bandage into strips 25-30 centimeters long;
- thoroughly soak the bandage with the cement mixture;
- wrap strips around the damaged area.
The process is repeated until a durable bandage is obtained. If it was not possible to turn off the water, then instead of cement you need to use alabaster, which dries much faster. Then a cement bandage is applied to the plaster cast. If the heating battery leaks at the threaded connection, you can use salt:
- wet strips of cloth or bandage in water;
- roll the material thoroughly in salt;
- wrap the leak area.
The gap will close as a result of the salt dissolving in the water. A cement bandage is applied on top.
Installation
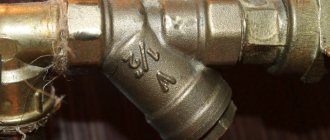
In heating systems of residential buildings, where pipes of small diameters are mainly used, taps are installed on radiators using threaded connections. The most convenient type of connection is recognized as colloquially called “American”. The fitting part is equipped with one or two union nuts, each of which covers the connecting shank and can rotate freely around it. The nut is screwed onto the pipe, pressing the tap against it, while the end of the pipe rests against the gasket installed inside the tap. Installation of fittings on an “American” connection is simpler than on a coupling connection, and the valve can be located quite close to the wall.
American crane.
In order to disassemble the connection, it is enough to unscrew the nut on one side. This allows, for example, to dismantle heating radiators for repairs or access to a section of the wall located behind them without disconnecting the entire riser. Replacing faucets on an American model, as well as installation, requires minimal effort. Most “American” ones have a hexagon shape; their installation on batteries is done using a regular wrench. But in some models the nut is equipped with two protrusions, for which a special key is provided. The first option is undoubtedly more convenient, since wrenches are used quite often in the household, and therefore are always at hand.
When installing the valve for the heating radiator for the first time, all threaded connections are assembled without sealing. In this way, they find out whether the parts fit together well and how freely they move. Knowing this, you can determine the amount of sealing material that will be needed for a given threaded connection. A lack of seal will lead to a leak, but its excess is even more undesirable: while tightening, the nut may burst, the only way out in this case is to replace the entire part.
Using a clamp and rubber as a means to eliminate radiator leaks
If the damage is located at the junction of the main pipe and the radiator, then the leak can be removed for a while using wire and a rubber band (car clamp). A piece of rubber is wrapped around the damaged area and secured with wire.
If you cannot find a special remedy for eliminating radiator leaks, then you can simply cut pieces of rubber from a bicycle inner tube - the strips should be 30-35 centimeters long and 4-5 centimeters wide. Using a clamp, you can stop the leak for a while. For this reason, it doesn’t hurt to have a few clamps in stock at home - their price is low.
Methods for sealing connections
If the thread profile does not have a sharp edge, FUM tape can be used as a sealant. However, this modern material has not caught on among experienced specialists; they consider flax to be the most reliable sealant. A thin strand of this material, collected into a bundle, is wound around the pipe, starting from its end. The winding direction should be opposite to the thread direction. The flax should fill the thread to its full depth, and each new turn should partially overlap the previous one. The seal will be more reliable if the thread is equipped with a notch that prevents the flax winding from turning. Before installation, the threads of the part should be coated with UniPak packaging paste or similar.
Installation on polypropylene pipes using adapter couplings.
If the heating system is made of polypropylene pipes, then metal ball valves on the heating radiators are installed using adapter couplings. All threaded connections in this case are sealed according to the method described above.
Mayevsky taps are often equipped with a gasket made of rubber or other material, so they do not need to seal the FUM with tape or tow.
When the installation or replacement of all shut-off and control valves has been completed, it is necessary to perform a test run of the system. This will make it possible to check the tightness of all connections and the functioning of the valves under operating conditions. In this case, it is important to make sure that the system is completely de-aerated and the working medium circulates normally in it. A small amount of sealing material should be added to threaded connections that are found to be leaking.
Hermetic seal to eliminate leaks
As for how to fix a heating radiator leak, if there is minor damage, you can use a powder or polymer-based sealant. They can be found in hardware stores.
Such a composition polymerizes upon contact with air, and as a result of hardening, a strong filling is formed, which gives time for significant repairs. Some sealants are two-component polymer compounds, and harden as a result of mixing their two components. Other products harden as a result of a chemical reaction with air. Using sealants designed specifically to fix leaks, you can solve the problem in a matter of minutes.
Welding Application
If you have certain skills and a welding machine, you can simply weld the leak. This is the best way to solve the problem, but it is not suitable for all radiators - only for steel appliances. If the battery is leaking, what should you do? The first thing you need to do is stop the water supply to the heating device. It’s good if the leak occurred in the summer, but much more often they happen during the heating season. Since you can simply scald yourself with hot water, you must first turn off the coolant supply.
In case of serious damage, it is necessary to call an emergency team - experienced plumbers will be able to quickly solve the problem. If the leak is small, then it can be eliminated using improvised means. But you need to remember that any method of eliminating a leak will only help temporarily restore the operation of the heating device, so it is recommended to change it in the near future.
One way to fix a battery leak is shown in the video:
DIY repair
Not all cases require the help of an emergency team. Sometimes even a home handyman can cope with the situation. In order to seal the resulting leak, use known methods.
How to fix a leak between two sections
It can sometimes be very difficult to determine where exactly the moisture is oozing from, since the water floods a large area. You have to wipe away the liquid, trying to find a fistula or crack. Once this has been done, the shut-off valves are closed. But residual pressure still remains. To bleed it, open the Mayevsky valve located at the end of the heating device.
After making sure that the water has stopped leaking, proceed with the repair:
- The surface of the damaged area is thoroughly cleaned with a wire brush or coarse sandpaper to remove dirt, rust, and paint.
- After this, epoxy mastic is applied, consisting of two components: a hardener and a thinner, which are mixed immediately before use. You can use “cold welding”. It comes in the form of a “sausage” or in a set of two tubes, the contents of which are thoroughly mixed before application. The “sausage” must be kneaded thoroughly, since it consists of two parts: the hardener is located inside the filler. When kneading, the two components are mixed together, forming a homogeneous mass. To prevent the composition from sticking to your hands, it is pre-wetted under the tap.
- After installing the seal, it should dry well. Only then is it possible to open the shut-off valves to restore the flow of coolant. Do not cover a crack under pressure.
There is another way - the “old-fashioned” one. If the leakage is dripping, pour a couple of pinches of ordinary table salt onto a rag. A rag is wrapped around the damaged area. Salt must come into contact with it. After a few days the rag will be dry.
Cold welding prices
cold welding
Battery crack
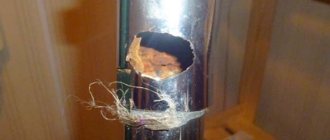
This malfunction is rare, but a hairline crack in one of the sections can cause the heating radiator to leak.
The problem is solved in the same way as when eliminating a leak between adjacent battery cells:
- The highway is blocked.
- The pressure is released.
- The damaged area is cleaned and covered with a repair compound. Epoxy for metal is preferable as it dries in 3-5 minutes. Before application, take the required amount of epoxy resin. A few drops of hardener are added to it. The composition is thoroughly mixed and applied to the crack or fistula. “Cold welding” will take 2-3 hours to set.
If a fistula is found on the section, plug it in the following way:
- After the supply of the working medium is stopped, the fistula is drilled out with a drill with a diameter of 2-3 mm.
- A wooden wedge plug is made and driven into the hole. Moisture causes the plug to swell and seal the fistula.
Leak at the connection between the radiator and the pipe
The cause of this malfunction lies in a rusted thread or a leak in the seal. In any case, the nut or coupling will have to be unscrewed using an open-end (gas) wrench. But before this, it is necessary to shut off the supply of the working medium and relieve the pressure using the Mayevsky tap.
Then proceed like this:
- After disassembling the connection, clean the thread from the sealing material and inspect it carefully. If necessary, correct the threads with a die. It is better to take a new nut or coupling. Use flax, preferably tarred, as a sealing material. If it is without resin, you will need Unipak paste or FUM tape made from fluoroplastic. The thickness of the material, which stretches well, is only a few microns, so it perfectly fills all leaks in threaded connections.
- Wrap several turns of flax tightly around the thread, spread the paste on top of it, and screw it into place. You can wind several turns of FUM on flax. Then the flax will not be cut off by the thread when twisted. The seal will be reliable and durable.
- Restore the coolant supply and make sure the connection is tight.
Pipe is leaking
In this case, the cause of the leak is either a fistula or a broken weld. In both situations, the most common way to fix the problem is to install a clamp with a rubber gasket, which is cut from an old bicycle inner tube or other available materials.
It is better to use automotive clamps. They are very comfortable.
Rubber is wrapped around the damaged area and compressed with one or more clamps, depending on the size of the damage.
Instead of rubber, a cement-plaster cast is successfully used. Cement is mixed with gypsum (for faster drying of the solution) in equal proportions. Water is added to the mixture. The solution is thoroughly mixed until a homogeneous mass is obtained. The consistency should be like thick sour cream.
The bandage is soaked, then soaked in the prepared solution and wrapped in several layers over the damaged area. The bandage should be allowed to dry, and only then open the tap on the supply pipe.
Instead of cement-gypsum mortar, it is allowed to use moisture-resistant glue with which the bandage is impregnated. The well-known “Moment” or another adhesive composition on a moisture-resistant basis will do.
Kinds
Let's start with definitions. There are taps and mixers in the bathroom and not in the kitchen. Taps only supply water; mixers also allow you to regulate its temperature by mixing two streams - cold and hot water. In this article we will talk specifically about taps and how to repair them. Faucet repair is very similar, but has its own characteristics. By the way, you can read about the repair of single-lever faucets.
There are several types of taps for the bathroom or kitchen:
- valve;
- single-lever (also called cartridge or flag).
Cranes - flag and valve
Their devices are different, so the repair, even with the same damage, is significantly different. Therefore, we will consider each type separately.
Do-it-yourself valve repair
Valve taps can be called classics of water supply. And, although they are gradually being replaced by new designs, there are still plenty of them. Their internal structure has not changed over the decades. Only the design has changed - it has become more diverse and sophisticated. Today you can find both the most ordinary models and very exotic ones.
Structure of valve taps
Water taps of this type are still used today, as they are simple and reliable, serving not for years, but for decades. If all the “filling” is of proper quality, all that can fail during this time is the gaskets. Replacing them is the main way to repair a valve.
Replacing the rubber gasket
If the faucet in the kitchen or bathroom continues to drip when the valve is completely closed, most likely the reason is that the gasket on the valve has lost its elasticity (see photo in the next paragraph). It no longer presses tightly against the saddle, which is why water continues to flow and sometimes the faucet not only drips, but even flows. To repair the faucet in this case, replace the gasket. To do this, you will need a wrench, or better yet, an adjustable wrench and a set of spacers.
Before fixing a dripping faucet, turn off the water supply (you can completely, you can only in this thread, if possible). Next, it’s a good idea to make sure that the water is turned off. The water doesn't flow - we're starting repairs. You will need a wrench or wrench. They will need to unscrew the head housing (the top part of the housing).
It is better to work with an adjustable wrench. To avoid damaging the surface during the operation, wrap it with a soft cloth and then apply the key. Unscrew the head and remove the valve. Now you can replace the gasket or install a new valve. You pry off the old one with something sharp - you can use a screwdriver with a flat blade, you can use an awl, etc.
When choosing a gasket, please note that its edges should be beveled at approximately 45°, otherwise the water supply will make noise during operation. If you don’t have one like this in your arsenal, you can trim the edge with something sharp - a knife or scissors.
Replacing the gasket in a faucet in pictures
If there is no suitable gasket, it can be cut from a sheet of dense rubber (porous is not suitable). The thickness of the rubber sheet or gasket is 3.5 mm, the inner diameter is slightly less than the diameter of the rod, the outer one should not protrude. Don't forget about the 45° beveled edges.
Having installed the gasket, put the valve in place and tighten the head. New models do not require winding on the thread. Moreover, winding is contraindicated - it can cause a crack in the body. If an old tap from the times of the USSR is being repaired, tow is placed on the threads, lubricated with packaging paste, and then tightened. After this, you can turn on the water little by little.
Sometimes the opposite story happens with this gasket on the valve - water does not flow or barely oozes out. In this case, the gasket came off the stem and blocked the flow of water. First, you can try opening/closing the tap a couple of times, and if that doesn’t help, you need to repeat the operation described above, that is, repair the tap by replacing the gasket. Just remember to remove the old one stuck to the saddle.
Water seeps out from under the stem
If water drips from under the valve, the seals are most likely worn out. There are two ways to repair a faucet with a leaking stem. To begin with, you can try to tighten the head housing more strongly. They do this again with an adjustable wrench. It is not advisable to use pliers, as they leave marks. Tighten the head as much as possible (just don't overdo it).
Valve valve structure
If the threads are tightened as much as possible and water continues to ooze out, the gaskets on the oil seal must be replaced. To do this, first tighten the tap to the limit, then remove the tap head again, pry it with something sharp and remove both rubber rings, replacing them with new ones.
The water does not shut off
If the gasket is changed, but the water does not shut off, when the tap is rotated, the thread breaks, the rod needs to be changed - the thread on it has worn off. There are two options here - replace the stem itself or the entire valve head.
There may be a hole in the saddle
If the threads are not worn, the gasket is new, but the valve is leaking, inspect the seat. There may be a hole in it. It forms gradually - it is washed away by water supplied at high pressure. If the gasket is not pressed tightly in some place, a sink will form in this place. Sometimes water completely undermines the entire circumference, forming sharp edges that quickly damage the gasket. The hole and sharp edge must be removed. Take a regular screwdriver and run it along the edge to dull the sharp edge. The same operation can be done using a natfil or a piece of fine-grain sandpaper. The main thing is to achieve a smooth (as much as possible) and non-sharp edge.
Preparation and necessary tools
The first rule of any plumbing repair is to turn off the water supply. Valves can usually be found in the toilet; the levers simply need to be turned 90 degrees. If the equipment has not been used for a long time, the valves may become blocked. It doesn't take any heroic effort to turn them. This way, you can simply rip off the tap and then instead of one problem you will have to solve two. Valves should be developed carefully, gradually increasing the effort and adding lubricant drop by drop.
Only after the water supply is securely shut off can repair work begin. First you need to prepare the necessary tools so that they are at hand:
- adjustable wrench;
- flat screwdriver;
- crosshead screwdriver
- wrench, etc.
Usually this simple set is quite enough. Auxiliary elements will not interfere, for example, pieces of rubber or leather for making new gaskets, fluoroplastic sealing tape, which replaces liners, rags, sponges, detergent to remove dirt accumulated inside the mixer, etc.
Advice. To prevent an accidentally dropped tool from damaging the sink or bathtub, it doesn’t hurt to put something soft underneath: a rag, a piece of foam rubber or other material suitable as a shock absorber.
The reasons why a faucet is leaking can be very different. For a traditional two-valve faucet, the most pressing problem is the wear of the gasket or liner, which needs to be replaced. If a ball (or hinge) valve, which is designed fundamentally differently, is leaking, completely different actions will be needed.
How to fix a faucet with a cartridge
Most often, faucets with one lever are installed in the bathroom or kitchen. They are also called flag or single-lever. A special device, a cartridge, is responsible for opening/closing the water in it, which is why they are also called cartridge ones.
Cartridge tap
There are two plates with holes inside the cartridge. The lower one is fixed rigidly, and the upper one is movable. A rod is attached to it, and it, in turn, is attached to the handle. By turning the handle, we move the rod, and it moves the movable plate, which opens/closes the water and changes its pressure.
If there are problems with such a faucet, it can only be repaired by replacing the cartridge. The main problem with them is that they start to leak - water oozes or drips from under the handle. To repair a leaking or dripping cartridge faucet, you need to replace the cartridge. The only way.
Replacing the cartridge
The first step is to turn off the water, then remove the handle. To do this, first remove the colored plug - it covers the screw. After unscrewing the screw, pull the handle up, separating it from the stem. After the handle is removed, unscrew the pressure ring - it holds the cartridge. Now all that remains is to take it out.
Then, along with the cartridge, you need to go to the store or market and buy exactly the same one. The new one must match in size, the holes in its lower part must have the same shape and location. Basically, you need to find an exact copy.
How to disassemble a faucet with a cartridge
Assembly occurs in reverse order:
- place the cartridge (strictly vertically, twisting it a little around its axis so that the protrusions in the body fit into the recesses on the cartridge),
- tighten the clamping nut;
- install the handle;
- screw in the fixing screw;
- insert the plug.
An initial check can be done after the pressure ring has been installed. You can turn on the water and check if the tap is now flowing.
If the water flow becomes too weak
Most modern faucets are equipped with a mesh on the spout that traps solid particles that may be contained in the water supply. If the stream of water gradually becomes less elastic, and the pressure on other taps does not change, the reason is that this very mesh is clogged. In this case, you can fix the faucet in a couple of minutes.
Need to clean the mesh
Unscrew the nut with the mesh, which is located at the end of the spout. Rinse it, clean out clogged holes (you can use a needle or an old toothbrush). Place the cleaned mesh in place.
Let's look at the types of faults and how to fix them
Leak in area without thread
The main reason for its appearance is a poor-quality weld - under the influence of temperature it is destroyed first.
Diagram for eliminating a leak with a rubber band
In this case, you won't have to dump risers and deal with disgruntled neighbors. You will need a clamp to eliminate leaks: put it on the pipe so that the gasket is adjacent to the leak, and carefully tighten it with bolts. If there are streaks of paint at the leak site, carefully clean them off with a knife (this may cause the leak to become slightly worse).
An aluminum clamp is also suitable for this case: you need to place a thick rubber gasket under it and tighten it with a screwdriver.
Thread leakage from under the locknut
Occurs due to a violation of the tightness due to mechanical impact (someone sat or stood on the pipe).
The first step is to turn off the heating and reset the risers. Next, you need to unscrew the locknut, clean the threads and inspect it. If there are no fistulas, rewind the nut with flax, paint or any other sealant (clockwise) and safely tighten it back.
If, when you turn on the heating, your pipe flows again, you will have to remove the lock nut again, and with it the radiator cap. When dismantling the upper liner, the radiator should not be completely removed.
Remove all the paint, use a special die to thread the pipe and cut an additional 5-6 threads. Then tighten the plug and locknut and connect the line to the radiator. The leak will be fixed.
Radiator fin leaking
You can fix the leak using cold welding
The main reason is the thin walls of the radiators. Due to corrosive processes, fistulas appear in them sooner or later. Of course, it is best to completely replace the plate, but if this is not possible, cold welding will come to the rescue.
To repair, you will have to drop the risers. Clean the area of the fistula from paint and rust, degrease (you will need gasoline or acetone for this) and then apply cold welding. The instructions for it are on the package, read carefully. Apply the weld so that it covers the area 3-4 cm around the fistula.
Leak between sections
In this case, you will have to completely remove the radiator (after draining all the water from the heating system). You need to measure the distance between the nearest end of the radiator and the leak, and then run a radiator wrench into it to engage the problem nipple and tighten it. Don't be afraid to use force - you won't break it. After tightening, reinstall the radiator and start the heating system.
Radiator sections that are not pressed tightly
As you can see, there is nothing complicated in eliminating a leak in the radiator, but you must follow a clear procedure and be extremely careful. Do not delay radiator repair under any circumstances! And, of course, it is best to call the appropriate service: it will help not only fix the problem, but also prevent it in the future.