Important: if you want to use this constructive method, before starting work, you need to decide on the size, shape, method of operation, heat transfer and other equally important characteristics of the heating installation and only then choose one of the most suitable options. To date, the number of models presented by Kuznetsov exceeds 150.
Fireplaces of Kuznetsov stoves have their own distinctive features and are divided into:
- Fireplace. In appearance and functionality they resemble standard fireplaces. Used as a decorative element or a source of additional secondary heating;
- Cooking. They include not only a heating function, but also other, no less useful functions, such as: hob, oven. All these features make it possible to prepare food using such a unit;
- Heating installations. They are used exclusively for heating premises. Depending on their overall dimensions, location and power, they are capable of heating a house of a certain area;
- Greeley. Installed on the streets, outdoors or under a canopy. The units are necessary for cooking and operate exclusively on solid fuel;
- Complex installations. They include the most complete set of functions and can combine several elements at once. Such stoves have the largest overall dimensions, are distinguished by their high power and are mainly installed in rooms with a large area.
Important: using detailed drawings and diagrams developed by Kuznetsov, you can assemble any stove or fireplace with your own hands.
What are the advantages and features?
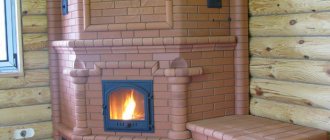
A fireplace stove, the arrangement of which is selected individually in each specific case and can be made by a stove designer from scratch, has its own exceptional features and advantages, which can be found in more detail below:
- A stove, the masonry of which is made according to a well-designed order by a professional in his field, will become a decoration of any interior and an advantageous addition to it. Such a unit will not take up much space and, depending on its original purpose, can be installed both to heat one room or the whole house. The stove, which contains a stove, is also intended not only for heating, but also for cooking. In this case, the total heat generated is used for cooking;
- A brick stove for a dacha running on solid fuel is very convenient and economical in terms of fuel consumption. One bookmark can last up to 9 hours of continuous operation of the unit at full power. The stove does not require liquid fuels such as gas and electricity to operate;
- Fireplace stoves can have low power and be used as an auxiliary heating source or have a purely decorative function.
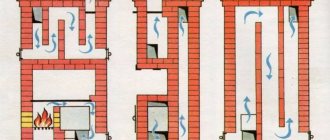
There are two main operating modes for the operation of the fireplace stove:
- If you close the damper completely, the smoke masses will be released almost immediately onto the street. In this case, the heating unit will not heat up too much and heat the room;
- Also, smoke masses can move through branches and bends provided by smoke channels. If you block only specific ones, heat and air will be retained and thereby heating the firebox and portal, transferring heat into the room itself.
A furnace, the foundation for which will allow it to achieve the necessary stability and minimal subsidence, is built for almost all brick structures, since the brick has a large total mass.
There are several varieties of bricks for the stove. For the main frame, it can be the simplest and most cost-effective. However, the firebox, its interior and the chimney are lined only with stove or fireclay bricks, which can withstand intense heat.
Device classification
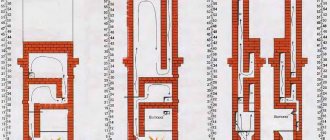
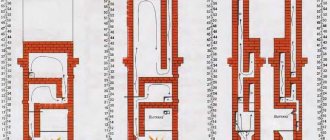
Masonry, as a result of which the fireplace stove acquires a certain functionality and shape, is carried out only according to a special scheme or order on which the features of each row are displayed.
A brick stove for a home may fall into a certain category. Based on this, you can build it yourself:
- Kuznetsov fireplace stove;
- Dutch oven;
- Bake a Swedish oven;
- Fink;
- Bell structure;
- The unit according to Masyutin's order.
Kuznetsov, whose stove today has several modifications, can have different dimensions and functionality. It can consist of either one or two fireboxes. Especially popular today is the laying of brick ovens with a chamber for baking bread, an oven and a hob. It should be noted that the massiveness of such structures fully justifies itself, since they are ways to replace several devices at once in the kitchen and in the house.
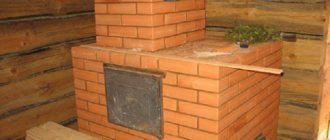
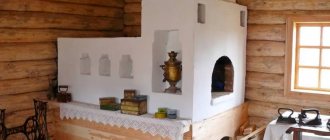
a stove with a stove bench is also one of the popular and frequently erected structures today. You can not only relax on a bed, but also dry meat, fish, vegetables, berries and fruits. Also, having a sun lounger provides more warmth in the house. If necessary, the compartment with the stove bench can be covered with a special damper and thus, at the moment of lighting the stove, this area simply will not heat up.
Moldavian stove with a stove bench in order
Like Show list of ratings
Regarding the pipes, I’m asking whether it’s possible to lay heating pipes under the firebox for passive circulation without a boiler, or is the stove still capable of heating such a country house, there are no plans for doors on the second floor, will your stove be heated by Moldovan or Biotlon? thanks in advance for your answer. Igor. Our winters in Togliatti are sometimes cold
Like Show list of ratings
Hello, regarding the pipes under the firebox, I can’t say how it will work. In terms of the area of the house, if I correctly calculated the first floor is 30 meters and the second 51 Moldovans will not be able to completely heat the biathlon, but it must be placed in a partition so that the back wall opens onto the kitchen, and somehow organize the movement of warm air from the first floor to the second using adjustable blinds on the floor for example. But a biathlon stove is more suitable for permanent residence; if you make a stove at the dacha, it is better to choose a Moldavian stove but increase its size by 30-40%, due to the length or width or both of the firebox.
Like Show list of ratings
Thank you for your attention, I basically lay out the wall in the kitchen like this, with a window so that there is access to the bread maker from the back side
Construction and preparation of materials
The stove, the order of which allows you to assemble a high-quality structure, is the basis and frame for such a heating unit. At the first stage, you need to decide on the room for installing the stove and select or implement the most suitable project for yourself, taking into account all the features of the house and your personal wishes and preferences.
Next, the amount of materials and accessories needed to assemble the fireplace stove is calculated. Also, to assemble the stove we will need certain materials and tools. So, we need to get:
- Fire brick and boiler;
- Clay and mantel;
- Door, grate and smoke damper.
Since brick fireplace stoves have a large total mass, they will require the construction of an additional foundation. At the first stage, the formwork part is formed and a foundation pit is dug, the size and depth of which depends on the dimensions of the heating structure itself.
After assembling the formwork part, the bottom of the pit is filled with reinforcing bars, after which the whole thing is fixed with a concrete-based solution. Before complete drying, the surface of the foundation is covered with plastic film. This will allow the top layer to remain smooth, even and not crack.
After the top layer has completely hardened, we continue to form additional support for our fireplace. To do this, we lay another formwork on top and again form another layer for the foundation using concrete mortar and rubble stones.
Moldavian stove with a stove bench in order
another's computer
View topic 58
Moldavian
Like Show list of ratings
Like Show list of ratings
Hello, dad saw your video on YouTube and wanted to download it. I came across your group, I was able to download the file, but how can I read it? Or maybe I can ask you for a video, it’s convenient for dad =/ or a printed text from the production, with images.
Like Show list of ratings
Hello, the file can be opened with sketchup from version 7. I have never seen anything more convenient than this video and the YouTube service; I can hardly do it better.
Layout diagram with examples
A fireplace stove made of stone may have specific differences and features. The design can be corner, wall, island. The firebox and hearth can be open or closed at your discretion. It should be noted that an open firebox is less safe from a fire point of view.
Also, the heating structure may have certain dimensions and shape of the portal, firebox, based on which the order will be very different from the rest. The quantity and type of materials, fittings and cladding are also determined and calculated strictly individually.
The easiest to design and assemble in a house or country house are brick heating stoves, which do not have other functions and features. More difficult to build with your own hands are heating units complemented by a bread chamber, a stove bench, an oven or a stove.
Next, we will present to you the simplest, traditional design of a brick stove-fireplace with a minimum of functions and small dimensions. This option is suitable for placement and construction in small rooms:
- At the first stage of assembling the stove, it is necessary to lay out the base of the fireplace with bricks. To do this, lay out the first two rows. Next, on the third row we lay out the blower, smoke duct and cleaning door;
- On the fourth and fifth rows it is necessary to form a cleaning channel;
- Now let's start laying out the combustion chamber. This is done from the sixth to the ninth row. To assemble the firebox, we will use fireclay bricks, which can withstand the strong heat typical for this area. We install the grate on the last row;
- The combustion compartment is fully formed from the tenth to the twelfth row, and on the thirteenth and fourteenth the door and arch are formed. The fifteenth row is characterized by leveling the arch of the fireplace. From the seventeenth to eighteenth row, the combustion chamber is completely covered;
- The shutter for the channel on the left is formed on the nineteenth layer. The walls and chimney are formed and formed up to the twenty-seventh row inclusive. In order for such a massive and heavy device to be strong enough and stable enough, a special plate must be mounted on the twenty-seventh row. It will become a reliable support for your brick stove-fireplace;
- In order to complete the laying of a wood-burning solid fuel heating unit, it is necessary to form an overlapping part, which is formed from the twenty-eighth to the thirtieth row inclusive.
This visual arrangement is not a universal guide to action and may not be suitable for your specific home or premises. The finished fireplace, assembled according to this scheme, has simple functionality and only a heating function. If you want to assemble an outdoor barbecue with a barbecue or a home fireplace with a stove and oven with your own hands, the order for them will change greatly and become more complicated. This is why it is necessary to entrust all design and masonry work only to a professional stove maker.
To complete it, the fireplace stove is equipped with all the necessary auxiliary elements, such as: ash chamber, grate, grates, door (for closed fireboxes). You can complement the fireplace stove not only with a hob, barbecue, grill, barbecue, oven, but also with a mantelpiece, countertops, work area or washbasin.
To give the brick surface a unique and inimitable style, you can cover it. For these purposes, give preference only to high-quality, durable, environmentally friendly, heat-resistant and non-melting materials and compositions.
Among the budget options for facing a fireplace you can consider: artificial stone, porcelain stoneware, decorative plaster, paint. More expensive options for finishing a brick stove-fireplace include: natural stone (marble, granite, sandstone), tiles.
This video explains step by step how to lay a brick stove-fireplace with a power of 7 kW:
Do-it-yourself stove-fireplace
A novice stove maker always wants to build some outlandish stove. Preferably simple. And also beautiful and effective. It is a pity that there are not so many orders of such constructions.
Among them, a fireplace stove with a bread chamber stands out, operating according to a scheme popular in Scandinavian countries. The scheme is not without drawbacks, but has a high degree of universalism. There is a massive universal heating stove, a decorative fireplace, and a chamber for baking bread. Simple design, multifunctionality, relative compactness. A good option for a country house, capable of heating an area of approximately 25-30 square meters.
We offer a procedure that allows you to assemble the stove yourself, having only minimal stove craft skills. A simple basic skill in working with clay and brick is sufficient for the performer. The rest is simple.
Materials for constructing a fireplace stove with a bread chamber:
- 1 - Kiln brick - approximately 1100 pcs. If you use fireclay bricks, you will need approximately 150 units. (The quantity of bricks is given without taking into account the costs of the foundation and chimney).
- 2 - Knitting wire
- 3 - Cleaning doors - 3 pieces
- 4 — Blower firebox with air adjustment
- 5 - Fireplace door for firebox 500x500 mm
- 6 – Basalt cord – 2 sets
- 7 – Pipe valve into brick – 3 pieces
- 8 - Grate with a working area of one or two bricks
The order of laying the stove-fireplace
Do-it-yourself masonry is not as complicated as it might seem at first glance. Just don't be afraid. And pay close attention to the order. Then it will be simple.
We lay out the first row based on the oven body with an area of 4x5 bricks and add an allowance for the plinth. Although you can do without it. But it’s somehow more elegant with him.
The second row is already laying out the finishing perimeter of the oven:
We form internal channels. On the third row we install channel cleaners and a blower door. They are attached to wire and clay mortar, without a basalt cord:
In the fourth row we select the height of the doors:
In the fifth row we close the doors and install a grate. If the height of the room allows, it is advisable to make another row of masonry - a more massive floor will result. When using fireclay bricks, it’s time to start laying them. We make it only for use. We continue to build external walls and channel partitions with ceramic bricks:
Row 6 - form a tray for firewood. You can do without bevelling the hearth, as in the picture, but the firebox will work better this way. We separate the channels. Small channels are descending. The big ones are ascending. We apply an oblique dressing. You can do it without it, but it’s safer with it. If, for reasons of simplification, you begin to use oblique dressing rarely, then it should always be oriented to the outer side, as in the figure. Without connecting to the walls of the firebox. The grate is as close as possible to the combustion door. If you sink it deeper, towards the rear wall of the firebox, smoking is possible - air turbulence will block the exit from the firebox to the smoke channels.
7th row. The combustion door is installed. It is installed on a seal - a basalt cord impregnated with clay mortar.
Rows 14-15. A place is being prepared for the beam lintel. Many people prefer to make bevels for it directly on the spot, choosing a brick with a grinder. You can file it in advance. The first option is more accurate. The second one is less dusty and dirty.
The door cover is made as thick as a brick. Cannot be placed on anchors. Only a beam or arch (if the fire door has an arch). It is advisable to insert wire into the masonry joints:
16th row. We begin to form a bread chamber. We overlap without iron, with a simplified wedge overlap:
17th row. We extend it for the bread chamber. We monitor the bandaging of the slot ceiling:
18th row. We install the bread chamber door. We place it, like the furnace, on a basalt cord:
19 row. We continue the bread chamber. We open the passage of gases from the bread chamber into the descending channels:
20 row. We bring the entrance to the descending channels to a height of two bricks.
21-22 row. We block the descending channels and form heels under the vaulted ceiling of the bread chamber.
23 row. We install the roof of the bread chamber. We leave the fireplace channel and close it with a valve with a long handle.
Attentively! The valve will get very hot during the process! That's why we put it on asbestos or basalt!
The vault will have to be cut at the top to level the masonry. Or lay out another row - if the size of the room allows.
24 row. We bandage the roof of the bread chamber. If there is free height in the room, you can lay out another row. The minimum is shown here:
25-27 row. We form a cap over the bread chamber. The columns under the ceiling are placed based on the location of the chimney - its location is not strictly regulated, it can be installed at any point in the stove ceiling - you need to start from the most convenient passage of the roof. Simply put: we look at the beams. Cleaning is carried out immediately - the installation point is chosen again along the pipe - preferably as close to it as possible. Not shown in the figure:
We place two valves in the pipe, one above the other. Such duplication is necessary to form an air gap - as in double glazing. Better heat retention.
To revive the masonry in the process, you can use brick releases to make shelves on the body of the stove. Just don’t get carried away with their construction - elements protruding from the massif interfere with convection along the body of the stove:
Everything will look something like this:
When lighting for the first time, always open the valve that closes the channel from the bread chamber to the pipe. Many stove makers call it “direct stroke”. This manipulation will warm up the pipe. Subsequently, the combustion is carried out in the usual manner. When operating in furnace mode, this valve is always closed. If we use it as a fireplace, then it is always open.