You can connect heating radiators to each other in different ways, the main thing is to follow the technology. Pre-calculate the power of heating devices. If it is carried out incorrectly, the air temperature in the room will be lower than necessary. Errors in calculations are associated with taking into account only the area of the room and ignoring current heat losses. Since it is not possible to attach new sections to all radiators, and the work is carried out strictly according to a single scheme, a number of points need to be considered separately. The main stages of connection are preparation, assembly and crimping. System testing allows you to evaluate the quality of work and correct possible errors.
Types of heating systems
Modern methods of connecting a heating radiator are extremely important nuances in matters of providing home heat. In construction practice, the two most common types of heating systems are single-pipe and two-pipe. It is precisely what type of heating you have in your home that determines the scheme by which the radiator will be integrated.
By the way, even if you do not connect the battery yourself, but with the help of professionals from a specialized company, you should still be aware of what kind of heating system was installed for you. For clarity, let's consider each of these types in more detail.
Single pipe heating
This type works on the principle of supplying water to a modern radiator, usually integrated in an apartment in a high-rise building, that is, in a high-rise building. This heating battery connection is considered the most accessible and simplest type.
But this system also has its drawbacks: taking into account such seemingly simple installation work, a single-pipe system does not imply the possibility of independently regulating the supplied heat. That is, this type of heating does not provide any additional devices that can provide the homeowner with such a service. In view of this, heat transfer in the apartment is supplied in accordance with the initially established design level.
Two-pipe heating
The operation of this system is based on the movement of hot coolant through the first pipe, while through the second pipe in the opposite direction - the already cooled liquid is removed. In this type of heat supply, there is a parallel method of connecting heating devices.
A characteristic feature of a two-pipe system is the methodical uniformity of heating of all its components. Plus, the owner of such heating has the opportunity to independently regulate the heat in the apartment using a specific valve mounted near the radiator itself.
Advice
Pay attention to the document regulating the standards for the correct connection of heating radiators. Its name: SNiP 3.05.01-85
Fittings set
Now let's find out what the set of fittings for radiators will be like in both cases.
Connection on slops
For a classic side connection in an apartment building, the radiator is equipped with the following set:
| Fitting | Quantity |
| Radiator plug blind left | 1 |
| Flushing valve with left-hand thread | 1 |
| Pass-through radiator plug right | 2 |
| Lock-nut | 2 |
On the upper floors of houses with lower filling, the equipment is supplemented with a Mayevsky tap, which is installed in the upper blind plug bored out for it. The dimensions of fittings for radiators are determined by the diameter of the connections; as a rule, it corresponds to DN20 (3/4 inch). Slings (long threads) are usually cut directly onto the liner.
Helpful: The best threaded fittings for cast iron radiators are traditionally made from the same cast iron. Radiator plugs for cast iron radiators made of steel or brass, in general, cannot be found on sale; locknuts made of brass are too fragile, and steel locknuts stick tightly to the steel rod over time and cannot be disassembled.
Cast iron locknuts manufactured in accordance with GOST 8961-75.
Connection on American
In this case, the only fittings for connecting heating radiators are the American ones themselves, two of them. One of their threads is screwed into the radiator passage plug, the second into the coupling or element of the shut-off and control valves.
To connect the valve to the radiator plug, American female threads with male-to-male threads are used.
When installing heating yourself, it is useful to know a few subtleties.
- If there are a large number of radiator sections, it is preferable not to connect from the side, but diagonally or from bottom to bottom. In this case, to connect to the fitting you will need one pass-through plug with a right-hand thread and one with a left-hand thread.
- The diameter of the threads in the plugs of aluminum and bimetallic radiators in most cases is 1/2 inch (DN15). However, when the number of sections is more than 10, it is advisable to use liners of size DN20.
- American ones are often equipped with the already mentioned elements of shut-off and control valves. Valves and throttles combined with fittings are more compact than two products separately, and their price is often lower than the total cost of the fitting and valve.
Choke with an American.
Methods for connecting heating radiators
Heating radiators are mounted on the wall, or, occasionally, on the floor. There are several ways to connect them.
The methods themselves are divided according to the side of the pipe connection (side, bottom) and according to the scheme for connecting several radiators at the same time (parallel, serial, cross).
The choice of a specific option is made based on several conditions:
Let's look at connection methods in more detail.
Lateral
This option is the simplest and most common, since most radiator models have side pipe outlets. This is how it is calculated by the manufacturer.
The side connection is also convenient because unscrewing the nuts from the side is much more convenient than from below under the device body.
In addition to the bottom connection, there are wall-mounted radiators with top connection. The top side is usually clearly visible, so the connection will be visible and such a scheme is rarely used by manufacturers. The technological connection with it does not differ from the options with a bottom or side arrangement.
Lower
Bottom pipe connections are most often used when they are laid hidden under plaster. It must be taken into account that pipes with coolant, when laid even in non-combustible walls, require good thermal insulation.
Coolant temperatures up to 90 C do not pose a fire hazard. Thermal insulation is constructed so that only the radiator is heated, and not the wall from the inside. With properly designed thermal insulation, the efficiency of the heating system does not decrease.
Parallel
Powerful sections are connected in parallel. The advantage of this method is that the radiators are well separated from each other.
They can be replaced, repaired, turned off, and the operation of the entire heating network is not disrupted. The option is often used in private homes and autonomous heating systems.
Sequential
The sequential scheme is beneficial when low-power radiators are installed and there are a large number of them in one common heating system.
In a sequential circuit, maximum savings in connecting pipelines are achieved. That is why it can often be seen in centralized networks, while the two-pipe parallel circuit is practically never found there.
Cross
By cross we mean a combined connection scheme with parallel and serial connections.
This option is suitable when you need to use radiator models of different power. Many centralized heating systems are assembled using a cross pattern.
Repair of aluminum batteries
During operation of the heating device, it may leak. Its heat transfer may also deteriorate. In any case, aluminum heating radiators will need to be repaired. As a rule, deterioration in heat transfer is observed when scale is deposited on the internal walls. To carry out repair work, the battery must be removed.
To do this, do the following:
- Stop the circulation of coolant in the heating circuit and relieve pressure.
- When carrying out repairs during the heating season, you need to wait until the surface of the battery has completely cooled.
- Then remove the couplings on the supply and return pipelines. After this, the battery can be disconnected from the circuit.
- The radiator is tilted over a basin and the remaining coolant is drained from it.
- After this, the battery is placed on a flat horizontal surface with its front side facing you. The unit can now be repaired.
Radiator cleaning
Craftsmen who deal with heating systems have special devices for cleaning the radiator, but it is very difficult to get them, so you can clean the battery yourself at home as follows:
- Transfer the unit to the bathroom. Place a rag or a wooden pallet on its bottom to avoid scratching the plumbing. Water is poured into the collectors on one side from a hose. Then the device is shaken and the dirty water is drained from the other side, after removing the plugs.
- Cleaning using a special chemical agent is much more effective. To do this, liquid to remove dirt and rust or citric acid is poured into the device with plugs in place. The battery is left for several hours.
- After this time, the body of the unit is knocked with a rubber hammer. At this moment, large deposits are well separated from the walls. After this, the inside of the pipes is washed with water.
Attention! It is prohibited to use alkaline compounds to clean an aluminum radiator. Various acidic agents are best suited for these purposes.
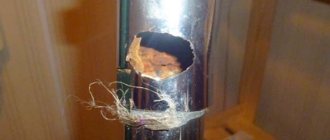
Repairing leaks
If an aluminum radiator leaks in your home, you will learn what to do in our article. Most often, the cause of leaks lies in the wear of sealing gaskets and the appearance of fistulas in areas damaged by corrosion. Replacing the gasket is, in principle, very simple, and holes are eliminated using epoxy glue. Before sealing the hole, this area is well cleaned of plaque and paint.
Then the cleaned and prepared area is greased with epoxy glue. A piece of fiberglass is placed on top. Then this area is sealed with another larger piece of fiberglass. For additional sealing, a metal clamp is attached to the problem area.
If the damage is significant, then glue will not help; you need to use more radical methods of eliminating the leak. For this, cold or argon welding is used; aluminum solder is also suitable. But it is worth remembering that any method of eliminating a leak allows you to solve the problem only for a while. After this, the device must be completely replaced in the near future.
How to add sections
After you have experimentally determined that the reason for the cool temperature in the house is not a clogged radiator, you should find a store near your home (so that you don’t have to travel far away and thereby waste your time) that sells heating equipment. You need to buy the same sections that your radiator is equipped with - made of cast iron, aluminum, or bimetallic.
It should not happen that you select inappropriate sections - because of such an error, you simply will not be able to add them, that is, the money spent will be thrown away, so be careful. The procedure for increasing sections is carried out in the same sequence of actions for all types of heating radiators.
To join sections, you need a connecting nut - nipple
Let's proceed directly to increasing the number of sections. The first step is to unscrew the fitting using a radiator wrench on the side to which you plan to add one or more elements. After you have unscrewed the fitting, a nipple (connecting nut) is placed in the area where the sections join. The following important feature must be taken into account: the threads at different ends of the nipple are different, and in order to correctly install new sections you must follow the following rules:
- The right side of the nipple should be directed towards the direction where the connection to the new element will be made;
- Accordingly, the left one is towards the already present sections of the heating radiator.
In order to prevent further leakage of the battery, you should put intersection gaskets on the nipple (they can be rubber, paranitic, or gel)
At the same time, they must be put on carefully and carefully - this will guarantee that the gasket will be positioned as evenly as possible, without unwanted distortions. Next you need to tighten the thread
This action should also be carried out without sudden movements, in a leisurely rhythm, and carefully. If you want to build a high-quality heating radiator, then there can be no rush.
To prevent leakage, an intersection gasket is required
Damage to metal threads is extremely undesirable - this may result in not the most harmless problems, the solution of which will require you to additionally spend your own time and financial resources.
The enlarged radiator must be placed back on the bracket and the connection to the central heating pipe restored. To do this, you need to arm yourself with a wrench of the appropriate diameter and tow, which is necessary for wrapping the pipe threads when screwing the radiator.
It’s not difficult to add sections to a heating radiator; you don’t need to work in a team of heating installers for 10 years. But this process cannot be done without a serious approach, the availability of basic tools and the removal of your personal time. However, you can resort to the second option for solving the problem of insufficient heating of the room - becoming a client of a company providing such services, whose employees will do everything themselves, quickly and efficiently.
We connect radiators to different water circulation systems
The heating fluid, which is usually ordinary water, circulates in the system in two ways - forced or natural.
Forced operation of the coolant is carried out thanks to a water pump pushing water through the pipe. Of course, such a pumping device is an element of the overall heating scheme. Installation of such a unit is either carried out directly next to the heating equipment - a boiler, for example, or is initially included in its “original” package. You will find out how to choose a heating radiator for your apartment in a separate article.
1. Single-pipe series natural circulation heating system 2. Two-pipe parallel natural circulation heating system
Another system, which has natural circulation, is very effective and efficient in places where power surges most often occur. In the indicated scheme of such circulation there is no pumping device, but there is a place for a non-volatile boiler. The movement of liquid through the system is carried out due to the displacement of a cooled coolant by a hot stream of water.
Factors to consider when implementing radiator connections:
- specifics of the laid heating main;
- its length and so on.
Cleaning a cast iron radiator when a blockage is detected
You need to remove the battery, wash it and put it back in place. The work is carried out with an assistant, since the weight of the product is quite large. The procedure should be carried out in the summer, when the coolant does not circulate through the system. To remove internal blockages, you need to dissolve soda ash in hot water, then pour the solution into the battery and shake the device a little. The main thing is to close the plugs on both sides so that the liquid does not leak out.
Leave the battery for 1.5-2 hours with the soda solution inside, then tap the radiator with a hammer or stick, but not too hard, so rust and impurities will fall off the inner walls. Now all that remains is to open the plugs, insert a hose into one of the holes and rinse the inside of the radiator with good water pressure. After washing, the battery is installed in place.
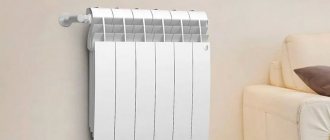
How to properly connect heating radiators to each other
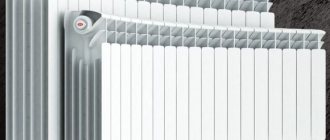
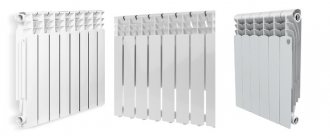
Many homeowners are not happy with the heating efficiency of their apartment. This issue becomes especially acute during severe cold weather. Sometimes poor heating is associated with a worn-out radiator. In this case, the heating structure is replaced with more efficient and powerful equipment. Today, ceramic radiators, bimetallic and aluminum radiators are available for sale. But cast iron models remain the most reliable and durable. If the battery is in excellent condition, it is not advisable to change it. In this case, you can add sections to the radiator. This article is devoted to how to increase the heating battery.
Advantages and disadvantages of cast iron radiators
Masters give batteries a considerable number of advantages:
On a note! Cast iron batteries rarely leak. Leakage occurs only when the pressure in the system increases or when the joints are poorly sealed. If the batteries have been standing for a long time, the coolant has not been changed, then due to natural clogging, the small gap closes itself.
Disadvantages include:
On a note! In order for the room to warm up faster, there should be 7-10 sections in the battery.
How to connect the battery
Without understanding how to connect heating batteries, without knowing the operating principle of the heating system, you will not be able to properly expand the radiator.
Preparatory work
The first step is to carry out preparatory work. This includes removing the radiator. It is necessary to remove the sections that are planned to be built up.
The battery must be cleaned, rust, dust and dirt removed.
You should inspect the threaded hole that connected the structure to the pipe. There may be growths here. They must be removed using sandpaper. Otherwise, the intersection gasket will not be installed airtight. And this can lead to the heating system leaking.
Attaching sections
Next, the sections are joined.
The connected sections are placed tightly against the battery. They make a gasket. Using a radiator wrench, measure the distance to the nipple. The nipple is inserted into the battery to the marked length. Use a pipe wrench to turn the radiator wrench. Then the nipple is wrapped into two opposite sections. Make 3 turns with the radiator wrench. Similar actions are performed with the lower part of the battery. Next, paronite gaskets and side plugs are taken and installed in the battery. In this case, a pipe wrench is used. The main thing is to tighten it very tightly to create a reliable, airtight structure. The section is attached to the radiator. The remaining sections are connected in a similar manner.
Mounting the radiator to the wall
After all additional sections are attached, the radiator is mounted to the wall. To do this, install hooks at the level of the battery location. The structure is being hung. All joints are fixed using fittings. Tighten with a wrench. All joints are treated with sealant. Recently, special adhesive tapes for pipes have appeared on sale.
Test work
The resulting structure is inserted into the pipe at one end and into the battery at the other. The connections are tightened tightly with a wrench. When installation of the fitting is completed, waterproofing is carried out.
After the assembly of the heating batteries is completed, the system is inspected for defects. If everything is in order, a test run of the coolant is carried out. The first time the water is released under reduced pressure. This allows you to detect where the connection is poor and leaking. If leaks are detected, the water is turned off and work begins to eliminate the problem. The second time the coolant is started under normal pressure.
After you have succeeded in connecting the heating battery, you need to let the radiator run for several hours. And after this time, check the condition of pipes, fittings, batteries.
Materials and tools for attaching an additional section
Before connecting a heating device, you need to calculate the number of sections required to effectively heat the rooms. In order to correctly and efficiently solve the problem of how to connect an aluminum radiator, you need to prepare the following tools and materials for work:
- Two keys: pipe and radiator.
- Nipples for heating system.
- Side plugs.
- Intersectional seal.
- Paronite gasket.
- Sheets of sandpaper.
Radiator connection diagrams
How well the radiators will heat depends on how the coolant is supplied to them. There are more and less effective options.
Radiators with bottom connection
All heating radiators have two types of connection - side and bottom. There can be no discrepancies with the bottom connection. There are only two pipes - inlet and outlet. Accordingly, coolant is supplied to the radiator on one side and removed from the other.
Bottom connection of heating radiators for single-pipe and two-pipe heating systems
Specifically, where to connect the supply and where the return is connected is written in the installation instructions, which must be available.
Heating radiators with side connection
With a lateral connection, there are many more options: here the supply and return pipelines can be connected into two pipes, respectively, there are four options.
Option #1. Diagonal connection
This connection of heating radiators is considered the most effective, it is taken as a standard and this is how manufacturers test their heating devices and the data in the thermal power passport for such a connection. All other connection types transfer heat less efficiently.
Diagonal diagram for connecting heating radiators with a two-pipe and one-pipe system
This is because when the batteries are connected diagonally, the hot coolant is supplied to the upper inlet on one side, passes through the entire radiator and exits from the opposite, lower side.
Option #2. Unilateral
As the name implies, pipelines are connected on one side - supply from above, return from below. This option is convenient when the riser runs on the side of the heating device, which often happens in apartments, because this type of connection usually predominates. When the coolant is supplied from below, this scheme is used infrequently - it is not very convenient to position the pipes.
Lateral connection for two-pipe and one-pipe systems
With this connection of radiators, the heating efficiency is only slightly lower - by 2%. But this is only if there are few sections in the radiators - no more than 10. With a longer battery, its farthest edge will not heat up well or will remain cold at all. In panel radiators, to solve the problem, flow extenders are installed - tubes that bring the coolant a little further than the middle. The same devices can be installed in aluminum or bimetallic radiators, thereby improving heat transfer.
Option #3. Bottom or saddle connection
Of all the options, saddle connections for heating radiators are the least effective. Losses are approximately 12-14%. But this option is the most inconspicuous - pipes are usually laid on the floor or under it, and this method is the most optimal from an aesthetic point of view. And so that losses do not affect the temperature in the room, you can take a radiator a little more powerful than required.
Saddle connection of heating radiators
In systems with natural circulation, this type of connection should not be made, but if there is a pump, it works well. In some cases, it’s not even worse than the side one. It’s just that at a certain speed of movement of the coolant, vortex flows arise, the entire surface heats up, and heat transfer increases. These phenomena have not yet been fully studied, therefore it is not yet possible to predict the behavior of the coolant.
Preparing cast iron batteries for installation
Before fixing the radiators, you need to prepare the wall. The installation area must be solid; if the walls are finished with plasterboard or other cladding on the frame, you should either dismantle the sheathing or prepare a strong support.
Advice! To avoid the risk of wall collapse, it is better to buy a strong plank or stand for wooden structures, and for brick walls, prepare a niche and buy long brackets.
Attaching heating radiators to the wall begins with determining the installation area.
The easiest way is to take as a basis the requirements for the placement of units in relation to the window sill, walls and floor:
Preparation for installation involves leveling the wall, including repairing chips and potholes. After this, treat the panel with liquid glass and protect it with a heat-reflecting foil screen. This measure will reduce heat loss to a minimum.
After preparation, the necessary fasteners and components that are needed to install and put the batteries into operation are purchased.
Advice! Installation of cast iron heating radiators is carried out with an inclination towards the coolant flow. This way you can avoid airing the heating line.
Technique for connecting sections of cast iron batteries
Do-it-yourself assembly of cast iron heating radiators is carried out using a special 5/4-inch wrench for already used radiators and 1-inch for new ones. You will also need a footer.
There is nothing complicated about joining the sections:
On a note! For a strong connection, 3-4 full turns of the key are enough.
Materials and tools for performing work
To complete the work, you will need the entire set of consumables for installing radiators and some additional materials:
On a note! If a Mayevsky tap is already installed on the battery in the apartment, then shut-off valves are not needed.
Supporting materials include:
Mounting the radiator to the wall
First, you need to drill holes in the wall, into which you then insert the dowel caps and screw the brackets into the caps. If there is no plastic cap, you can get by with a wooden plug into which you screw a dowel with a bracket. The clamps are placed strictly horizontally; the easiest way is to take measurements in advance and mark the installation areas with dots.
Advice! If the wall is uneven, then the easiest way is to install radiators on screw-in hooks. Such clamps allow you to adjust the distance from the wall to the battery.
The lower brackets should be installed like this - set 1-1.5 cm down from the lower battery collector, this will simplify the hanging process. You can attach the battery to the wall, mark the boundaries of the collector, and the places where the brackets are screwed in. Then remove the battery, screw in the clamps, and place the radiator on the wall.
Advice! Before hanging the batteries, you need to check the tightness of all brackets. If the fasteners allow free movement, it is better to twist the hooks, otherwise the clamp will sooner or later become loose from the weight of the radiator with coolant, and the battery will collapse.
Rules for tying cast iron radiators
There are several types of harness - one-sided, diagonal, saddle. The connection is carried out according to the manufacturer’s recommendations, which recommends outlets for connecting the direct and reverse liquid flow pipelines.
Pros and cons of connecting batteries in series
Pros of serial connection:
- low cost of consumables;
- All types of radiators can be used;
- if necessary, pipeline;
- heating devices cover the entire perimeter of the room;
- easy installation;
- small amount of consumable material.
Minuses:
- complex process design;
- high heat loss coefficient: due to the characteristic elongation of such a line, the coolant cools towards the end;
- in the absence of a circulation pump, stagnation of the liquid moving through the radiators occurs and a decrease in the efficiency of the system as a whole;
- in the absence of thermostats on batteries, there is a lack of control over the heat supply.
Instructions for adding heating radiator sections
Often, residents of houses and apartments are faced with one very serious problem - despite the systematic supply of coolant at the required temperature, there is a lack of heat in the house, and staying in it causes some discomfort. To solve this problem, you will need to increase the heating radiator. What does this kind of work involve? The essence of this procedure is to add sections to the radiator, thereby achieving a comfortable temperature in the home.
Sections before the radiator are added if you need to heat a large room
First, you will need to find a key for radiators; you must have one - if for some reason you cannot find it, then you need to borrow it from a friend or neighbor for temporary use, or go to the store to buy a new one. So, with this key you must remove the radiator, depriving it of connections to the heating system. Next, we take it to the bath and direct water into it.
Without a special key, adding sections will be impossible
There are a large number of cases where apartment residents complained about the insufficiently comfortable air temperature in their home, and the reason for this was a simple clogged radiator, which did not allow it to work “at full capacity.” But if you send water to the radiator, and it passes through its channels without obstacles and comes out clean, without having a cloudy appearance, then the matter is not that the heating device is clogged. Help in this case can only be provided by adding sections, which, by and large, is nothing complicated or difficult if you approach this task responsibly.
Armature
What fittings can be used in radiator piping?
| Fittings kit | Functions |
| Two ball valves | They make it possible to completely shut off the device for repair, replacement, or during a long thaw. |
| Ball valve and throttle | In addition to stopping, it is possible to manually adjust the heat output |
| Two chokes | Allows for basic balancing of two-pipe heating and subsequent adjustment of heat transfer |
| Throttle and thermal head | Makes room temperature adjustment fully automatic |
An important point: there must be a bypass in front of the throttling and shut-off devices in any heating system. Otherwise, valves and chokes will regulate the flow of the entire circuit.
The jumper in the photo allows the coolant to circulate in the riser when the valves are closed.
General information about heating systems
It is important to initially decide how to connect heating radiators to each other. In the language of specialists, you should decide which method of piping heating devices to use
For all types of heating systems, two methods of laying pipelines are used:
Two options: double-sided and one-sided arrangement of the heating pipeline
Single-pipe scheme
Systems in which hot water is transported as a coolant through one line are less efficient for the following reasons:
A useful formula for those who are just planning to “warm up”
- They practically do not allow you to regulate the heating of a separate device;
- As you move away from the coolant source, its temperature gradually drops and the last radiator in the chain may turn out to be barely warm, or even completely cold;
- In the event of an emergency on any part of the network, the heating must be completely turned off.
For your information! The only advantage of this type of heating pipe layout compared to two-pipe is its low price.
Such single-pipe heating systems are used mainly in high-rise buildings with a centralized supply of heat to consumers.
Two-pipe scheme
In the private sector, to create autonomous (loop-circuited to one consumer) heating systems, a two-pipe radiator piping scheme is most often used:
- One of the pipes supplying coolant to the device;
- The other is for the reverse movement to the source of heating of the coolant (boiler).
A simple two-pipe system looks like this
All batteries in the system are connected in parallel, so that the two lines operate completely separately and are connected only at the end radiator.
The two-pipe radiator connection scheme provides the following advantages:
- The ability to regulate the heating of each device in the circuit, which ensures the creation of the most comfortable conditions in various rooms;
- Regardless of the distance between the boiler and the battery, each of the devices heats up equally;
- If repairs or replacement are necessary in any part of the system, it does not require a complete shutdown.
Now we’ll talk about how to properly connect a heating radiator with your own hands.
Tying with polypropylene pipes - implementation principle
Recently, polypropylene pipes have become increasingly popular. Of course, the correct connection of heating radiators and piping can be done with any other pipes, but most professionals still recommend choosing these.
For piping, it is most rational to use polypropylene corner ball valves - they are much easier to install, and their cost is relatively low.
Tying with polypropylene pipes is carried out as follows:
- a coupling with a union nut is inserted into the multiflex, connecting to any output;
- Pipes are fixed to the wall using pre-attached brackets. It is important that they do not touch the wall, but are 2-3 cm from its surface.
The advantage of polypropylene pipes is that they can be laid in the wall itself, and the edge of the pipe required for piping is brought out in close proximity to the radiator. A variety of fasteners can be used to secure batteries. Most often, professionals use a pin connection for this purpose that is fixed to the wall surface. If you want to hang radiators, use regular brackets for this. A small clarification - panel batteries are (mostly) sold complete with fasteners. But for sectional radiators, the mount must be purchased separately
We already practically know how to properly connect a heating radiator. The taps are connected as follows:
- initially the crane must be disassembled;
- a fitting with a union nut is screwed into the radiator;
- Using a special wrench, tighten the nut.
To properly perform such a simple, and at the same time, quite important action, you will need to use a special wrench - without it you will not be able to tighten the “American” properly.
In addition to this key, during installation and piping of radiators, as well as during how to connect two heating batteries, you will also need:
- seals;
- a set of keys;
- tow;
- thread paste;
- threads for carving.
Tools and materials for installing heating radiators
Preparatory actions
Before starting the process, a detailed design of the heating system for each specific room is calculated.
Then one of the serial connection options is selected: horizontal or vertical, based on the characteristics of the living space and personal preferences.
Then, focusing on the selected type of circuit, you need to decide on the coolant. For vertical connections, it is better to use antifreeze diluted in water, and for horizontal connections, use plain water.
How to connect two heating radiators, diagram
- Initially, with a series connection, the location of the heating boiler is determined. It is usually located in the basement on a special fire platform. The expansion tank is firmly fixed above it.
Attention! The height of the expansion tank relative to the boiler must be at least three meters
At the same time, proper adjustment of the chimney is thought out: the draft should be sufficient, and the smoke itself should go outside without remaining inside the room. Afterwards the main pipeline is connected
It is important to avoid bends when laying. There is a pipe running along the perimeter of the entire house, parallel to which all the batteries run.
Photo 2. Diagram of serial connection of batteries in a one-pipe system with a boiler and circulation pump.
- Radiators are placed under window openings.
- Such a circuit should be closed on the heating boiler.
Attention! It is recommended to place a filter in front of the boiler to clean the coolant from any impurities
- It is also necessary to provide an element through which the system will be filled with water and drained.
- In a series connection scheme, you can add taps and thermostats to each battery.
With vertical piping, a circulation pump is included in the circuit for forced circulation of the coolant, and with horizontal piping, a slope of the supply pipe is created, and a Mayevsky valve is mounted in front of each radiator to remove excess air from the system.
What taps should be installed on heating radiators?
Various designs of taps are placed in front of heating radiators. They serve to solve several problems:
- Mayevsky valve - to remove air;
- a regular tap - to adjust the amount of circulating coolant;
- The tap can be used to completely shut off the water during repairs.
The use of plastic pipe allows the installation of simple rotary taps. In an autonomous heating system made of metal pipes, it is better to use threaded valves that do not cause water hammer when closing.
In private autonomous heating systems, taps are placed at the entrances to the premises, in front of vertical sections and in other places. Their presence turns out to be very convenient when carrying out repairs of individual sections of the network.
Sgons and Americans
What it is
Let's start with a short excursion into history.
Quite recently, by historical standards - some twenty to twenty-five years ago - only three types of heating devices were massively sold and used in our country:
- Convectors, which were a coil made of a steel pipe with steel plates pressed onto it to increase heat transfer.
Domestic design, meaningless and merciless.
Let us clarify: optionally, their design could include a decorative screen and blinds to regulate heat transfer.
- Plate radiators are two stamped steel plates welded around the perimeter. The coolant moved through a labyrinth of grooves between them.
- Cast iron sectional radiators. They, it seems, do not need any introduction, since they are now installed in most apartments.
There were only two methods of fastening:
- Welding . They were welded to the convector connections exclusively: their mechanical strength and service life, at least not inferior to the service life of the risers and connections, did not require dismantling for repair or replacement.
- Sgony . The coupling (in the case of a convector or plate-type device) or the radiator plug (in the case of a sectional radiator) was driven along the long thread on the connection, simultaneously screwing onto the thread of the device or screwing into it. The connection was then sealed with a wound locknut.
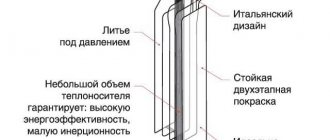
The first aluminum radiators were mounted the old fashioned way - on saddles. However, after a few years, simple fittings - American ones, which included detachable connections with a union nut and a rubber seal - became widespread. Their main advantage was the simple and quick dismantling of the device: an operation that previously took up to half an hour now took no more than a minute and did not require much effort.
The aluminum heating device is connected with modern fittings.
Help: a cast iron radiator cap from a new radiator can be unscrewed with a gas wrench number 2. To deal with an old stuck cap, you have to lengthen it with a lever or use a wrench number 4. In this case, the cap often does not unscrew, but is literally torn in half, losing the thread .
Does the American woman have any disadvantages? In essence, there is only one drawback: the strength of the connection is limited by the quality of the rubber seal and the tightness of its pressure. With high pressure in the circuit (for example, during water hammer), it is the seal and the relatively thin American union nut that turn out to be the weak link.
Recommendations
The conclusions that the author made for himself will certainly be challenged by many other experts; however, they are quite unambiguous.
- In central heating systems with a high probability of exceeding the standard pressure, it is better to use the usual threaded fittings.
The cast-iron radiator in the central heating system is connected via leads.
- It is advisable to use American ones in autonomous systems.
Radiator integration location
Whether you have a serial connection of heating batteries or a more complicated parallel connection, in any case, remember that heat supply is not the only function of these units. An additional bonus of such devices is that radiators provide good protection from the “cold” intrusion of winds and drafts.
Serial and parallel connection of heating radiators
Therefore, it is not surprising that it is under the window sills that these life-saving devices find their home. Heating radiators can provide an excellent thermal curtain, especially in the localization of window openings.
Advice. Do not mount two radiators close to each other - this is fraught with loss of expensive heat: the density of the hot air flow will decrease significantly, which will entail a sharp drop in the efficiency of the heat supply itself.
Before using a specific type of connection, draw up a schematic plan on which you clearly and visually indicate the locations of the devices, and make correct calculations of the installation distance.
Radiators are positioned correctly in the following cases:
- devices are located at a distance of 100 mm from the bottom line of the window sill;
- distance to floor – 120 mm;
- distance to walls – 20 mm.
Connection steps
The operating technology depends on the selected set of fittings and pipe material. If pipes are laid along the surface of the walls in a room, then the best option is classic metal pipes.
If heating lines are laid in advance under the plaster, or in specially designed channels, then a more modern option can be used. For example, polypropylene heat-resistant pipes.
Work with steel pipes is carried out with a standard plumbing tool kit. Plastic pipes and fittings require specialized crimping tools. They are not needed for all fittings. Many systems have a threaded crimp system.
Conclusion
The work process itself does not take much time, you do not need any special skills or expensive equipment, you can purchase all the necessary tools at any hardware store. And don’t forget, the connection will serve you for a long time and without hassle only if you used high-quality materials in your work and followed all the rules for installing the heating system.
We are talking about exactly what is indicated in this figure.
In the video presented in this article you will find additional information on this topic.
Types of heating systems
The amount of heat that the heating radiator will emit depends not least on the type of heating system and the selected type of connection. To choose the best option, you must first understand what kind of heating systems there are and how they differ.
Monotube
A single-pipe heating system is the most economical option in terms of installation costs. Therefore, this type of wiring is preferred in multi-storey buildings, although in private buildings such a system is far from uncommon. With this scheme, the radiators are connected to the main line in series and the coolant first passes through one heating outlet, then enters the input of the second, and so on. The output of the last radiator is connected to the input of the heating boiler or to the riser in high-rise buildings.
Example of a one-pipe system
The disadvantage of this wiring method is the impossibility of adjusting the heat transfer of radiators. By installing a regulator on any of the radiators, you will regulate the rest of the system. The second significant drawback is the different coolant temperatures on different radiators. Those that are closer to the boiler heat up very well, those that are further away become increasingly colder. This is a consequence of the serial connection of heating radiators.
Two-pipe wiring
A two-pipe heating system is distinguished by the fact that it has two pipelines - supply and return. Each radiator is connected to both, that is, it turns out that all radiators are connected to the system in parallel. This is good because the coolant of the same temperature enters the input of each of them. The second positive point is that you can install a thermostat on each of the radiators and use it to change the amount of heat it emits.
The disadvantage of such a system is that the number of pipes when laying out the system is almost twice as large. But the system can be easily balanced.
Two-pipe connection diagram
This version of the system is more expensive than a single-pipe connection, but has a number of advantages. In a two-pipe distribution, the return pipeline from each radiator goes into a separate closed circuit, and the coolant is pumped separately. The cooled liquid flows through the return circuit into the heating boiler. Allows you to heat complex rooms using a single boiler.
Installation takes place in several stages. A boiler connected to an expansion tank is installed in the designated location. Then a coolant wire circuit is drawn through each battery. At the end, a return line is installed, closed to the heating boiler.
The downside is the high consumption of material, which increases the cost of the heating system and the complexity of installation, which requires the mandatory involvement of specialists.
Installation principles of this type
The general architecture of the system consists of two closed pipeline loops. One of them carries the heated coolant, the second plays the role of return. There are several possible options for inserting contours.
Dead-end system
In this option, both circuits of the highways are multidirectional, and the batteries have the same number of segments. To shut off, the valve of the first radiator must be tightened as much as possible.
Spider radiator connection diagram
Let’s figuratively imagine a boiler from which we take a pipeline and bring it somewhere to the center of the house. Usually such a system is called a spider. We lower the risers and collect them, sending it all to the return line. We connect radiators to the pipes. The coolant rises up according to its natural physical laws. That is, the hot coolant goes up, and on the second pipe in the middle it leaves and falls down. It passes through the radiator, cools and enters the return line.
Please note that the lower pipes are sloped. This is the only problem, that you need to do slopes
But it is precisely in today’s time that many are again switching to these old systems, as problems with energy resources begin. For example, the electricity is often turned off, and the pump will not work. The system will just stop. But such a system works for you all the time. The boiler can be any: gas, coal, diesel and even electric. This whole system will work.
This system is very cumbersome. It must be practically brought out onto the roof and into the attic. Therefore, not everyone can master it.
Installation
Sgony
Here are instructions for connecting a cast-iron battery to squeegees.
- We push the locknuts and the passage plug onto the long threads of the liner until they stop.
- We hang the radiator by inserting the liner threads into the first section by 1-3 centimeters.
Please note: the heating device is hung strictly horizontally, level. When tilted towards the liner, air will collect in it.
- We wind the plug along the thread with a bunch of plumbing flax with paint or silicone pipe sealant.
- We wrap it into the radiator until it stops with moderate force.
- We drive the locknut to the plug, leaving a gap of 5 - 10 mm between them.
- We wind a bunch of flax into the remaining gap along the thread (again with paint or sealant).
- Tighten the locknut.