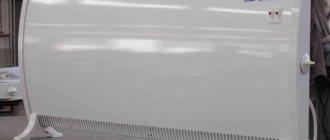
A thermocouple is a control and measuring module installed in gas boilers that acts as a protective element for emergency shutting off of the gas supply valve when the fire goes out. Its operation does not depend on the supply of electricity, that is, this module is completely autonomous. It is also actively used in industry for accurate temperature measurement in aggressive environments. And thermocouples are now installed everywhere in smartphones and computers. It is with their help that the device monitors the heating of components located on motherboards.
Why is a thermocouple needed in a gas boiler?
A thermocouple is installed on a gas boiler to provide additional protection against possible gas leaks when the fire dies out. Sometimes it is also called a “fire control sensor”. As soon as the temperature inside the combustion chamber decreases, the gas supply valve is automatically closed and blocked. As a rule, you cannot even open the valve manually until the sensor cools down.
Read more: Why is the gas boiler humming?
Temperature sensors. Classification
There are several main types of thermocouples. They are distinguished by the material they are made of. The main materials used for temperature sensors are metals - noble and base. It was their combination that became the basis of the classification. Here are the most common types of thermoelectric elements
:
- Type K: Chromel and alumel. Temperature range (long term): from 0°C to +1100°C;
- Type J: Iron and constantan. Temperature range (long term): from 0°C to +700°C;
- Type N: Nicrosil and nisil. Temperature range (long term): from 0°C to +1100°C;
- Type R: Platinum-rhodium (13% Rh) and platinum. Temperature range (long term): from 0°C to +1600°C;
- Type S: Platinum rhodium (10% Rh) and platinum. Temperature range (long term): from 0°C to +1600°C;
- Type B: Platinorhodium (30% Rh) and platinumrhodium (6% Rh). Temperature range (long term): from +200°С to +1700°С;
- Type T: Copper and constantan. Temperature range (long term): from -185°C to +300°C;
- Type E: Chromel and constantan. Temperature range (long term): from -50°С to +800°С;
Of course, each type of thermocouple is used for different purposes. Expensive thermocouples are used in science and industry, while simpler and cheaper ones are ideal for domestic use - in gas boilers or stoves.
How does a thermocouple work in a gas boiler?
The operating principle is based on such a physical phenomenon as electromotive force (EMF, discovered by Thomas Seebeck back in 1821). Basic provisions of the phenomenon:
- in a closed circuit, an electric current arises between two contacting conductors made of different materials;
- The higher the temperature difference at the point of contact (adhesions), the higher the voltage of the generated current.
That is, the operating principle of the installed gas boiler thermocouple is as follows:
- when there is no fire inside the combustion chamber, the sensor generates a certain voltage;
- When a fire is ignited inside the combustion chamber, the temperature rises, a large temperature difference occurs at the point of contact of the conductors, due to which an electric current is generated.
Did you know how a thermocouple works before?
Of course I knew
28.57%
No. Live and learn
71.43%
Voted: 7
The current generated when the sensor heats up is sufficient to hold the gas supply solenoid valve in the open position. But as soon as the fire goes out, the voltage drops, the valve automatically closes.
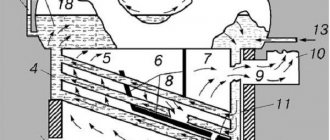
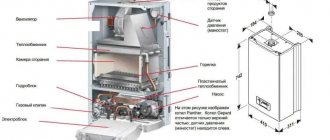
The general design of thermocouples installed in gas boilers is as follows:
- thermoelectrode with a junction of two conductors;
- extension contact (located inside the capillary tube, it also acts as a negative contact);
- positive contact (the locking dielectric washer is screwed onto it);
- fixing washer (dielectric that does not allow current to pass through).
The main advantage of this module is that in order for it to work together with the solenoid valve, it is not necessary to install a control unit or microprocessor. That is, the entire system works autonomously; there is no need to connect it to electricity. The average voltage generated by the module installed in gas boilers: from 15 to 60 mV.
We recommend reading on our website: Why a gas boiler does not reach the set temperature.
Purpose
The thermocouple serves to shut off the gas and prevent possible leaks. The device is based on the conversion of thermal energy into current and serves as a key component of emergency control systems.
The device is made of heat-resistant metals, because it must withstand high temperatures. The thermocouple controls the actuator - an automatically activated shut-off valve that shuts off the flow of fuel into the gas boiler. The process is fully automated.
In addition, the heaters are equipped with protective circuits that close the valve if the thermocouple breaks down.
Diagnostics, repair and replacement
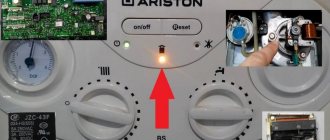
An initial check of the thermocouple is performed even without disassembling the gas boiler. The most common “symptom” is the extinguishing of the fire after releasing the ignition button, even when the boiler has already warmed up quite hot from the inside. If the fire goes out, it means the valve is not being held open. That is, the thermocouple does not generate enough voltage to open it.
Also read with this article: The main reasons why a gas boiler does not turn on.
The thermocouple is also checked by visual inspection. The presence of burns, holes or hollows is a clear sign of a malfunction.
How to test a thermocouple for functionality
To confirm the “diagnosis” you should check the thermocouple with a multimeter. How to remove the module is precisely indicated in the technical documentation for the boiler.
As a rule, this requires:
- unscrew the fixing nut near the solenoid valve;
- remove the sensor from the groove, disconnect the terminals (if provided);
- heat the sensor in any convenient way (it is recommended to use a candle, but heat it so that the module body is completely enveloped by the flame);
- measure the voltage (apply one probe to the sensor body, the second to the output contact).
Expert's word!
Martyanov Pavel
Specialist in the field of gas equipment maintenance, 20 years of experience
Ask a Question
When checking the serviceability of a thermocouple with a multimeter, install one probe on the thermocouple body, the other on the lead end. The voltage should gradually increase and be at least 15 mV (in this case, the gas valve is in the open position and the wick does not go out).
As a rule, the operating voltage of the thermocouple after thorough warming up is 0.015 - 0.06 V. If the current is less than 15 mV, then this clearly indicates a malfunction of the sensor and requires its repair or replacement.
But to check the tester’s performance through a “dialer”, as is recommended on numerous forums, is not the best option. It is quite possible that due to overheating or oxide, the junction has “broken” and the conductor has shorted to the body. That is, there is actually an open circuit, but the multimeter will not show it.
Advantages and disadvantages
It would seem, why install an additional device in a gas boiler if there is already a heat sensor on the heat exchanger. As soon as the temperature of the copper walls and water rises by ten degrees, the automation will understand that gas fuel combustion occurs as normal. But it's not that simple.
Positive aspects of using a temperature sensor at a junction of two metals
The first and most important advantage of a thermocouple is its simple design and extreme reliability of the device. If the burner of a gas boiler is regularly maintained and adjusted, the combustion sensor can last 20-25 years.
Another plus is the slight inertia of the device. The thermocouple is activated within 20-25 seconds from the moment the flame appears or disappears. There have been attempts to simplify the design of a gas boiler and transfer the functions of the combustion front temperature sensor to a temperature sensor. But it turned out that the heating or cooling time of the sensor spiral is an order of magnitude longer than that of a thermocouple. Accordingly, a dangerously large amount of gas and air manages to accumulate in a gas boiler; the firebox could simply explode.
Disadvantages of using a thermocouple
There are few negative sides. The durability of the sensor depends on the quality of the gas, the completeness of fuel combustion and the intensity of soot deposition on the surface of the junction. If the gas is contaminated with volatile metal carbonyls and vapors of heavy petroleum products, then the head of the junction becomes covered with a whitish or carbon coating.
Other disadvantages:
The thermocouple cannot be overhauled or restored. Therefore, if it fails, there is no other way out but to change the thermocouple in the gas boiler. And preferably the same model.
The part is subject to short circuiting. The causes are unknown, but it is believed to be due to condensation building up inside the copper tube.
Advantages and disadvantages of using thermocouples
There are 2 key advantages of such modules:
- low cost of production;
- autonomous work.
Additional advantages of thermocouples installed in the boiler:
- can also act as a temperature sensor;
- wide range of operating temperatures (with a tungsten conductor they can work at temperatures above 2000 degrees);
- accurate measurement indicators;
- easy installation and replacement.
The only drawback: if the soldering is done poorly, the thermocouple fails quite quickly. And this happens even when soldering conductors in the factory. A visually unnoticeable microcrack will lead to the formation of oxide, and subsequently burnout. This is an additional reason why repairing a burnt-out module at home is impractical.
Read more on the website: Rating of the cheapest and most economical gas boilers for a private home (apartment)
Which device to choose for measurement
To perform thermocouple testing, the simplest multimeter, which is usually available in the arsenal of a home craftsman, is suitable. If you need to buy a new one, it is better to take a model capable of solving many problems, including measuring temperatures.
You also need to pay attention to the fact that the multimeter, in addition to standard measurements of voltage, resistance and conductivity of electrical circuits, has the following functions:
- “HOLD” – function of fixing measurement results on the display;
- “REL” is a function that performs a measurement relative to a base value;
- ●))) - function for testing electrical circuits with an audible signal.
Important! The multimeter must be safe to use. Data on its electrical safety are indicated in the manufacturer's instructions and applied to the device body. To test a thermocouple, CAT II / III class instruments are sufficient, corresponding to electrical safety for in-house distribution networks and local power networks.
You can also check the thermocouple with an avometer - this is a device of a combined operating principle. Mainly measures constant current, resistance and voltage characteristics. In essence, the name “avometer” is collected from the names of 3 devices that are traditionally used to measure the noted parameters: ammeter, voltmeter, ohmmeter.
DIY thermocouple repair
In 95% of cases, thermocouple repair is not practical or possible. Exceptions are the following situations:
- The cause of the malfunction is the presence of carbon or soot in the working area (where the solder is located). You can remove it with alcohol or other solvents. But grinding or treating with sandpaper is not worth it.
- Oxidized contacts at the junction with the terminals. They can be removed by careful sanding using “zero” sandpaper. Sometimes treating with alcohol helps.
If there is a visible burn or dent on the thermocouple, then the only repair option is to replace the sensor with a known good one.
We recommend reading on our website: The procedure for replacing an old boiler with a new one
But what you definitely shouldn’t do is fix the ignition button to force the gas supply valve to open. This is sometimes done when the temperature sensor module is faulty, and it is not possible to replace it right now. You need to understand that this carries a potential risk for everyone who is in the room where the boiler is installed. Indeed, if it fades (for example, due to blowing in from the chimney), the gas supply will not be automatically shut off.
Possible malfunctions and methods for eliminating them
Despite the fact that the design of the temperature sensor is simple and does not contain complex, breakable elements, the thermocouple can also be the reason for regular shutdowns of the gas burner.
The check begins with a boiler startup test. If the gas supply is blocked a few seconds after starting the automation, then the first thing to do is short-circuit the contacts on the pressure switch. The traction sensor is located in the automation control circuit, like the temperature sensor, so it must be excluded at the time of testing.
Lack of reliable contact
Often the burner is blocked for simple reasons. For example, the fitting nut has become unscrewed, or the surface of the contact pad has become dirty. You need to unscrew the fitting, wipe the threads and contact pad with alcohol, check the condition of the insulating gasket and screw the fitting nut back on.
Contamination or oxidation of the junction surface
The junction temperature is always 100-150 ℃ lower than that of the flame front. Therefore, during operation, the surface becomes overgrown with plaque, due to which the accuracy of the thermocouple is significantly reduced. Organic dirt is washed off with white spirit and acetone, everything else is removed with a brush with bronze bristles.
Burnout
Identified by the presence of microscopic cavities and areas of burnt metal. Sometimes damage can be determined by placing a copper tube in water and blowing hard. Air bubbles will appear. In this case, the thermocouple in the gas boiler must be replaced with a new one.
Make sure that the thread markings on the replacement fitting match those of the old thermocouple.
Incorrect position
When servicing the burner, it is necessary to remove the side lining, thermal insulation, spark plug and thermocouple. Often the situation ends with the sleeve being installed below the level of the igniter. Accordingly, the amount of heat leading to the junction decreases significantly, and the response time of the thermocouple increases multiple.
Therefore, before disassembling the gas burner, it will be useful to take a couple of photos with your phone camera. Such a safety net will help place the ignition elements in the correct position.
The thermocouple for a gas boiler has been and remains the main element of the safety system. If it fails, it is better to replace it with an analogue, without experimenting with models from gas stoves, ovens or speakers.
How to check the thermocouple of a boiler, stove, column: video.
Share your experience, whether you had to repair a thermocouple or replace it with sensors from other models of gas boilers. How successful was this replacement? Save the article to bookmarks and share with friends on social networks.
Differences from temperature sensor
In automatic gas boilers, in addition to a thermocouple, a temperature sensor can also be installed - it allows you to reduce the intensity of the flame when the user-specified temperature is reached.
Visually they are similar, so they can be confused. Main differences:
- the base of the temperature sensor is a massive cylindrical siphon in the shape of a sealed copper flask;
- the temperature sensor has a thinner capillary tube;
- the temperature sensor is installed near the water radiator (since it measures the temperature of the coolant, not the flame in the combustion chamber);
- The temperature sensor is connected to the automation valve.
Thermocouple Temperature sensor
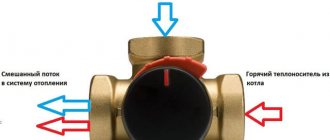
The operating principle of a temperature sensor is also different. Inside the flask is a special liquid, which expands when heated, transmitting pressure to the automation, which, in turn, regulates the position of the valve.
We recommend the article: How to choose the right uninterruptible power supply
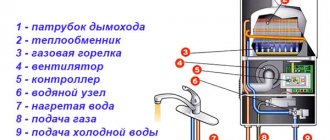
Design and operating diagram of the converter
The device of a gas boiler thermocouple is simple. The elementary design of the unit includes two contacting conductors. The main thing here is the difference between the metals of the conductors: the material should always be dissimilar. The physical principle of operation is based on this difference.
The latter uses the phenomenon of the “Seebeck effect”:
- two different metals are joined by hot soldering;
- the joint is heated with an open fire;
- As a result, an electrical potential difference occurs at the cold ends.
This difference can be measured with a voltmeter. When the circuit is closed, the device sensor will show a certain voltage.
The value is small, but it is enough to create inductance on the valve coils. If current appears at the “cold” ends, the valve will operate and turn on the fuel supply. And when the voltage drops below a certain level, the gas will shut off. This will prevent leakage and its possible catastrophic consequences.
Important: the sensitivity of the coils of modern valves allows the gas to be left open until the voltage drops to a level of 20 mV. A properly functioning thermocouple is capable of delivering a current of up to 40–50 mV.
Differences between a thermoelectric pair and a temperature sensor
Typically, a gas boiler contains not only a metal alloy sensor, but also a regular temperature sensor. It connects to an automatic valve and turns off the burner when the coolant reaches the temperature level specified by the settings. Outwardly, both nodes are very similar and to a layman’s eye they are the same; they are easy to confuse. But there are differences:
- the heat sensor is a copper flask sealed at the end;
- connects to the boiler automation system with a thin capillary tube - thinner than the thermocouple conductor;
- the flask is placed in a special immersion sleeve or mounted under the boiler casing, near the water jacket. It does not come into contact with the igniter;
- the temperature meter has a different mounting nut or is not disconnected from the control circuit at all.
In addition, the operating principle of a thermocouple for a gas boiler is also different. An electrical converter exploits the potential difference, and a special liquid expands in the heating bulb of the heat sensor. Its increasing pressure is transmitted through the capillary tube and enters the automatic valve that turns off the burner. The pilot light remains lit.
Another important feature of gas control is its autonomy and electrical independence. The node does not require external power, operating entirely on the potential difference of the conductor. This provides reliable protection without connecting to the electrical network.
Components
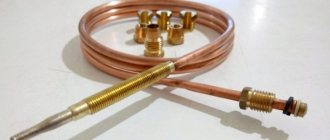
Now we know what a thermocouple is in a typical gas boiler. It's time to talk about its structure. The sensor consists of several structural elements:
- thermoelectrode for a boiler made of dissimilar metals/alloys connected by hot soldering. It is placed next to the main burner on a special mounting plate. This is what the block looks like using an example of a floor heater;
- extension cord, also known as negative contact. This is a conductor enclosed in a copper tube. The tube protects the electrical circuit from possible interference from other electrical appliances in the 220 V network. The pair is sensitive to even small surges due to the small minimum voltage;
- positive terminal. It is inserted into the gas valve socket on the dielectric washer and fixed on the nut.
Metals
For thermocouples, alloys of non-ferrous and ferrous metals with constant characteristics of the ratio of voltage to operating temperatures are used. Each range corresponds to a specific alloy in the boiler protective assembly.
Today there are three main types of elements made:
- E. Constant and chromel plates are used for its production. A similar thermocouple for a heating boiler serves in the range of 0-600 degrees Celsius and is very reliable. Type E nodes are marked with the letters ТХКн;
- J. Chromel is replaced by iron, otherwise this type is similar to E. The characteristics and functionality are also largely identical, and due to the inexpensive iron, the cost of the device is lower. These pairs are marked with the abbreviation TZHK and operate in the range from -100 to +1200 degrees, which is higher than the previous one;
- K. These are the most popular thermocouples on the market; they are designated by the letters TKA (TXA). Type K is made of chromel and aluminum, the operating range is even wider - from -200 to 1350 degrees. TKA vapors are extremely sensitive to even small temperature fluctuations, but this comes at the cost of increased dependence on the environment. When operating in conditions of high carbon dioxide levels, the K-thermocouple quickly fails.
In addition to those listed, there are other types of converters. Each range requires a thermocouple in a gas boiler made of the appropriate metals.
| Type | Alloy | Marking according to Russian standards | Operating temperatures, °C |
| N | Nisil-nichrosil | TNN | -200–1300 |
| R | Platinum-platinumrhodium | Chamber of Commerce and Industry13 | 0–1700 |
| S | Platinorhodium-platinum | TPP10 | 0–1700 |
| B | Platinorhodium-platinumrhodium | TPR | 100–1800 |
| T | Constantan copper | TMKn | -200–400 |
| U | Copper-nickel-copper | -20–500 | |
| L | Chromel – Copel | THC | -200–850 |
In gas stoves, boilers and heating columns, chromel-aluminum thermocouples of the TXA brand, chromel-copel TZhK and constantan-iron J thermocouples are often used. Sensors with noble alloys are mainly intended for high-temperature conditions of industrial production cycles.
Let's find out how a thermocouple works in a real device
Types of thermocouples
Thermocouples for domestic gas boilers are predominantly chromel-alumel. They are among the cheapest to produce and can withstand heating up to temperatures of about 1500 degrees (in the combustion chamber it is on average 1000 - 1200 degrees). But they are also made from other materials. The most common:
- platinum-rhodium-platinum-rhodium (TPR);
- platinum-rhodium-platinum (TPP10);
- tungsten rhenium.
Mostly such variations are used in industrial boilers. The principle of their structure and operation is similar. The only difference is the maximum permissible operating temperature (as well as the current generated).
Application
Thermocouples are used wherever temperature measurement in a process environment is required. They are used in automated control systems as temperature sensors. Thermocouple type TVR, which has an impressive thermoelectrode diameter, is indispensable where it is necessary to obtain data on very high temperatures, in particular in metallurgy.
Gas boilers, convectors, water heaters are also equipped with thermoelectric converters.
Advantages
- high measurement accuracy;
- fairly wide temperature range;
- high reliability;
- ease of maintenance;
- cheapness.
Flaws
The disadvantages of the products are the following factors:
- the influence of free junctions on instrument performance;
- limitation of the operating range by the nonlinear dependence of the thermal force on the degree of heating, which creates difficulties in the development of secondary signal converters;
- during long-term operation under conditions of temperature changes, calibration characteristics deteriorate;
- the need for individual calibration to obtain high measurement accuracy, within an error of 0.01 ºC.
Due to the fact that problems associated with shortcomings can be solved, the use of thermocouples is more than justified.
How to connect a burnt-out thermocouple of a gas boiler automation system
In theory, it is possible to solder a burnt-out module. Possible welding options:
- in a salt electric welding machine;
- using an acetylene torch;
- welding in coal or graphite powder (in a ceramic container).
But the welding current is approximately 80V 5A. This is the reading for a chromel-alumel thermocouple. That is, you can’t do without a laboratory autotransformer (aka LATR). And in addition to this, the likelihood that the seam will turn out uneven and when heating the module will not generate electricity at all is high.
The cost of a new thermocouple for a boiler is from 200 to 1500 rubles (depending on the model). The cheapest ones can actually be repaired at home if you have the right equipment for this. But expensive ones (with platinum or tungsten conductors), as a rule, cannot be repaired; they are simply replaced.
In summary, a thermocouple is a technically simple device that will protect against gas leakage in the event of a boiler extinguishing. The average service life of such a module is 5 years. Boiler manufacturers recommend that they be diagnosed at least once every 3 years.
Connection nuances and verification
The verification procedure must be performed if the boiler starts up unstable, or if the electronic ignition unit unexpectedly switches to a continuous start-stop cycle. In the latter case, claims are often made unreasonably about the contacts on the thermocouple. In reality, the compensating capacitor of the ignition unit is to blame.
Be sure to check the new thermocouple. To do this, just connect the multimeter probes to the central contact (+) and the copper tube (-). Set the measurement limit to 1 V or 0.1 V, heat the junction with a candle or gas lighter. There should be at least 18 mV on the screen.
The old thermocouple on a boiler with AOGV can be checked without dismantling the device:
- unscrew the fitting nut of the AOGV block;
- light a papillon;
- connect the probes and take readings.
This method allows you to take the most accurate data. The multimeter should show at least 25-28 mV.
Pay attention to the position of the sleeve with the junction head. It should stand vertically, and the igniter flame should flow around only the upper 3 mm of the temperature sensor. Any other options lead to overheating or underheating of the device.
Varieties
The thermocouple has a simple structure. If you have the appropriate skills, you can even make this device with your own hands at home. However, it is better to purchase an industrial device after first studying the technical characteristics, as well as the features of all types of devices.
Specialized companies produce three types of thermocouple:
- Type E - two plates are used for manufacturing: constantan and chromel. This device has improved performance. In addition, it controls the process occurring in the temperature range from -5°C to 74°C.
- Type J - instead of chromel, the device has an iron plate, which does not in any way impair the technical characteristics of the device. It has increased sensitivity to changes, and the temperature range is from -4°C to 74°C.
- Type K - these thermocouples are the most popular. They are equipped with plates made of aluminum and chromel.
The operating range varies from -20°C to 135°C, and the manufacturers managed to increase the sensitivity itself by several positions.
The service life of this device is determined by the environment of use: for example, in carbon dioxide, a chromel plate becomes covered with rust in the form of green rot, the alloy quickly deteriorates and the device loses its non-magnetic properties.
There are other types of thermocouples, however, they are not suitable for use in gas boilers for the following reasons:
- alloys contain expensive metals, so they have a high cost;
- such models are no better than types K, E or J.
Gas control repair manual
If the gas on the stove goes out, then the problem may lie not only in the thermocouple. However, most often this is precisely the problem.
The main sign of problems with gas control is that after igniting the burner and releasing the handle or button to open the “blue fuel”, the flame immediately goes out. This occurs due to the valve closing, since the thermo-EMF to keep it open is absent or insufficient.
The reasons for the noise of gas stove burners are described in detail in the article, the useful information of which is worth reading.
You should independently check, repair and replace the thermocouple in a gas stove with your own hands only when the gas is completely shut off. First you need to close the valve on the cylinder with the gas mixture or the methane pipe, and only then begin any work. Also, do not forget about turning off the power supply if the design contains volatile devices.
The thermocouple tip is located directly next to the burner and gas fire. And in the oven you can find it near the flame divider in the upper part of the oven. This tip should be free of carbon deposits, mineral deposits and any damage.
If the working tip of the thermocouple sensor is covered with scale, it must be cleaned off with sandpaper. The more carbon deposits, the less heat reaches the thermocouple, and the less it accordingly creates an EMF. The resulting millivolts may simply not be enough to open the solenoid valve.
How to check before replacing?
The thermocouple usually has one tip for installation near the fire. But there are also options with two or three temperature control tips. They are usually used in ovens, but it all depends on the specific model of the stove.
Thermocouples with several working tips have a peculiarity - if only one of them is not heated or fails, the solenoid valve will be closed. Therefore, in order to accurately find the cause of the problems, such thermocouple devices will have to be checked especially carefully. Only one of the sensors may be faulty.
Another point is that the thermocouple conductors in the area up to the valve must be tensioned or dangling in the body of the plate. At the same time, their connection to the electromagnet must be rigid; a connector hanging “on my word of honor” is unacceptable here.
The devices in question are produced with lengths from 40 to 130 cm. You should choose a thermocouple gas monitoring device based on this indicator very carefully. On the one hand, the conductor wire should not be over-tensioned, and on the other hand, it should not lie on heated surfaces or dangle freely.
How to change the device?
Before replacing a damaged thermocouple in a gas stove, you should inspect the device for:
- the presence of carbon deposits on the working tip (if there is any, it must be cleaned off with sandpaper);
- no burnout of this tip (in this case, only complete replacement);
- the rigidity of the connection between the contacts of the thermocouple sensor and the valve (if necessary, tighten);
- serviceability of the thermocouple itself with the output of an EMF at a level of at least 15 mV when heating.
The device in question should only be replaced when it is definitely faulty. In many cases, to get a gas stove to work again, you can get by by cleaning the tip from carbon deposits and checking the contacts.
The working tip of the thermocouple is rigidly fixed near the burner or burner using a nut. If it cannot be unscrewed due to scale, then you should not put too much pressure on the key. This can only break the fastening. It is better to use a solvent first.
The second end of the thermocouple is attached to the solenoid valve using a threaded connector or two crimp contacts. Removing them doesn't seem difficult. The new thermocouple sensor is installed in a similar sequence - one end of it is attached near the burner, and the other to the electromagnet.