Home » Equipment » Warm floor
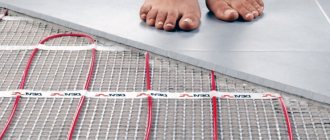
A comfortable temperature in homes these days is created by a “warm floor” system with a water or electric heating design. Its operation is controlled by a control device in combination with one or more sensors.
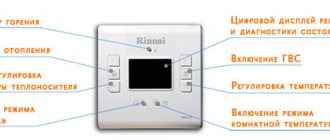
Programmable thermostat for heated floors
When heating mats are turned on or off, sensors transmit information to the thermostat for the heated floor. Thanks to the operation of the device, a preset temperature that is comfortable for others is maintained in the room.
Operating principle and main advantages of the device
The temperature regulator is connected to a temperature sensor, which is located near the heating cable. Its operating principle is to determine deviations from specified values. If they are, then the thermostat transmits a signal to increase or decrease the temperature. After a certain temperature value has been set on the thermostat, the required amount of coolant is supplied to the cable.
| Do you dream of purchasing a good knife? Then you should definitely visit the bestblades.ru knife store. Kitchen, folding, travel, multi-item, exclusive knives from famous brands - you will find all this in this store. You can also purchase accessories for knives, everything for sharpening them and much more. The widest range and fast delivery, as well as many gifts with purchase, will certainly delight you. |
The main function of the device is to maintain a set temperature by turning the heating elements on or off. The device significantly saves on electricity costs, since the system starts working only when the temperature drops below the set temperature.
When operating a heated floor system, you should remember that it is inert: for the temperature in the coating to change, some time must pass.
Temperature regulators are considered an indispensable item for heated floors due to their many advantages. Among them:
- low price, depending on the type of thermostat;
- control is carried out using several keys;
- significant savings in electrical energy;
- the device is small in size;
- high degree of reliability of the device.
How to regulate the temperature in the house - 3 ways and determining the optimal mode
The main task of maintaining temperature conditions is to create comfortable living conditions, subject to optimal use of resources. This can be achieved in several ways.
The first of them is to set the optimal degree of heating of the coolant in the underfloor heating circuits. The second is the complete cessation of its entry into it.
The easiest way is to use pipes with a maximum operating temperature of 90-95 degrees for the heating circuit. This allows you to install a circular pump with a thermostat in the system, as well as a reverse valve.
The installation location of the pump is the return pipe, and the temperature of the coolant in this place is no more than 70-80 degrees Celsius. If the heating of the coolant reaches critical values, the thermostat turns off the pump and the heating goes into standby mode.
As the floor cools, the circulation pump turns on again, supplying a new dose of hot water into the circuit pipeline. Practice shows that this method is the most effective and reliable for stable heating operation with heated floors.
The second method of adjusting the degree of heating involves the inclusion of a three-way valve or mixing valve in the system. With this approach, chilled water from the return to the hot supply is mixed through a three-way valve. That is, the maximum temperature of hot water from the boiler is reduced by adding cooled water.
If a 3-way valve is used, adjustment can be made manually or via a servo drive. The mixing valve regulates the temperature of the coolant according to a pre-entered control value.
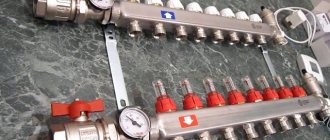
The third way to regulate the heating of the coolant in a home heating system is to use a mixing unit. Such a device can be made from the following components:
- 3-way valve;
- circulation pump;
- bypass jumper;
- thermometer;
- thermostatic head;
- maximum temperature control relay.
Considering the composition of the components used, the unit for adjusting the degree of heating in the heating system turns out to be quite expensive.
But the temperature change in it occurs very quickly, because it is produced by mixing water from the return pipe into the main coolant flow. In this case, the combustion intensity in the boiler automatically decreases.
In accordance with the established regulations, the fuel consumption mode is always optimal. The number of nodes in the combined system can be any, and each will work autonomously in accordance with the established settings.
Thus, it is possible to maintain a higher air temperature, for example, in a children's room and at the same time a lower one in the bedroom of adult members of the family. Such a unit is especially effective for controlling the temperature in the installation of water floors.
To use this method of adjustment there is only one requirement - the entire heating circuit must be arranged in accordance with European requirements. The temperature of hot water from the boiler should not exceed 67 degrees.
And now we will consider the method of adjusting the thermal and hydraulic conditions using a thermostat. It is installed in a room, and adjustment is made by setting this device to the desired temperature for that particular point. Heating is controlled by a servo drive on a specific circuit.
Watch the video
Such a device works successfully in conjunction with a homemade manifold, a three-way valve and a mixing unit. Its popularity is due to the ease of adjusting the heating mode and the relative cheapness of the device.
Types and possible functions of thermostats
There are many types of such devices. It is customary to classify them according to several characteristics, but the most understandable is the classification according to the principle of action. According to it, the following types of devices can be distinguished:
Mechanical thermostats for heated floors
They are considered the easiest to manage and affordable. All settings are set and changed manually. The main disadvantage of this type of device is the inaccuracy of temperature indicators, which may differ from real ones by 3-5°C.
Electronic thermostats for heated floors
The cost of such devices is higher, but they have greater functionality. In such devices, you can set the floor temperature to decrease or increase at a certain time of the day. If the temperature outside the window has changed, then there is no need to adjust the indicators. Control can be carried out using a remote control.
Mechanical temperature sensor
A mechanical thermostat does not have an electronic display or other components. Installing a mechanical thermostat requires a little knowledge and time, since the STP is connected to the sensor by connecting electrical wires.
A mechanical thermostat consists of a switch and a rotating temperature control axis. A switch allows you to turn off the energy supply to the heated floor without resetting the settings.
The thermoregulation mode occurs due to a metal plate made of two metals, connecting two wires to each other in a state of rest (cold plate). When heated, the plate bends, stopping the flow of current from one contact to another, thereby cooling the system.
The advantages of a mechanical thermostat include:
- Affordable price;
- Ease of use;
- Working in a room with low temperature;
- Strength, safety;
- Tolerates sudden temperature changes well;
- Long service life;
- It turns on automatically if the electricity is turned off and then back on.
Despite their simple design, mechanical thermostats are popular due to their safety, reliability and ease of use.
How to connect a heated floor to a thermostat?
Installing a thermostat, with a clear understanding of each stage, is not a complicated process, but you need to be aware of some nuances. The device should be installed at a height of approximately 80-90 cm from the floor, but if the thermostat must diagnose the temperature of the air and the floor, then it is better to place it in another place.
The installation process consists of several stages:
Preparing for work
Before you start connecting, you need to familiarize yourself with the specifics of the device. All necessary requirements are contained in the instructions. Particular attention should be paid to the section that describes the installation of the thermostat, since the process of installing the device for different systems may have some differences. Before starting the installation, be sure to turn off the electricity supply to the distribution panel.
To perform the work, prepare the following equipment:
- indicator screwdriver;
- tester;
- screws for fastening;
- level.
Connecting wires
To connect the temperature controller to the floor, you first need to run the power wires. Using an indicator screwdriver, identify the phase wire, which may be black or brown. The wire with the working zero is painted blue, the ground wire is yellow-green.
Using a tester, measure the voltage between phase and zero. The device should indicate a voltage of 220 V. There is a connection diagram on the back of the device or in the instructions. The diagram is different for different thermostats, so be sure to check this point before connecting the wires.
Next, connect the temperature sensor, which is located in a corrugated tube, to the sensor terminals. If the sensor is not inserted into it, you will need to do it yourself.
Installing the thermostat front panel
Using the screws provided, secure the front panel. Using a level, make sure the thermostat is level. After this, close the lid of the device and restore the electrical power supply. If everything is done correctly, its screen should light up. The installation of the heated floor thermostat can be considered complete, after which you can begin setting it up.
Checking correct operation
After installing the thermostat, you need to check that it is working correctly. To do this, you need to perform the following steps: first you need to set the on and off time, the temperature parameters of the device. After this, you need to run a trial daily cycle of its operation.
Notes
Since the thermostat is a complex electronic device, its installation can only be performed if you have experience in electrical installation work. Errors during installation of the temperature controller can lead to damage to the heated floor.
If you decide to install the thermostat yourself, then before carrying out work, consult an electrician who has practical experience.
Connection diagram of the thermostat to the heated floor
Expert advice
Installation of heated floors is a complex procedure that depends on several factors.
To get a reliable and durable system, experts recommend adhering to the following tips:
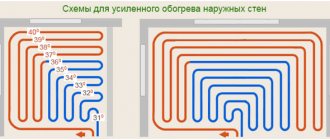
- Regardless of what kind of floor you are installing, you should avoid placing coolant under furniture and other structures vulnerable to heat. Select the correct piping or electrical cable layout.
- Be sure to calculate the power of the boiler or electrical network. This is necessary to select the technical characteristics of the heated floor.
- Use only high-quality materials. In most cases, pipes and cables are hidden under a layer of screed, so they cannot be repaired quickly. This is especially true for the pipeline, which can leak.
Connecting underfloor heating is a complex task that requires preliminary calculations and the use of special equipment. Therefore, it is better to trust it to a team of installers who guarantee long-term and reliable operation of the entire system.
For detailed instructions on installing heated floors, see the following video.
Setting the floor heating thermostat
Depending on the settings, there are two types of thermostats: non-programmable and programmable.
The first type is simpler and cheaper, great for small spaces. After turning on the device, you only need to set the required floor temperature using the buttons. The main disadvantage of non-programmable temperature controllers is the long time it takes to heat the floor. Depending on its type, heating the floor can take from 10 minutes to an hour.
Programmable thermostats are much more convenient because you can set the time for the floor to heat up. Simply put, once configured, the floor will be heated in the morning when you wake up and in the evening when you come home from work. The rest of the time it will be disabled. The main advantage of programmable controls is energy savings: every time you leave, you won’t have to think about turning off the floor heating. The cost of such thermostats, in comparison with conventional ones, is significantly higher.
To correctly set the floor heating thermostat, you need to follow the sequence of actions. Only the general diagram is described below; for some device models the sequence may be different. To configure you need:
- set the current time and date;
- It is recommended to enable the floor sensor in the settings, as this will allow you to more accurately adjust the temperature;
- in the time period settings, set the time for turning on and off the floor heating, and then set the required temperature;
- If your device has this option, then set the parameters for weekends.
Watch the video on setting up the device:
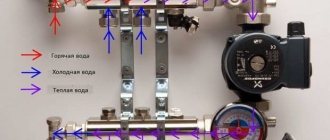
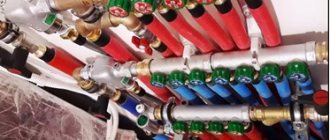
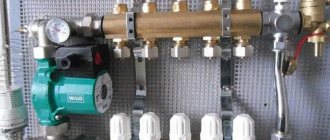
Installation diagram
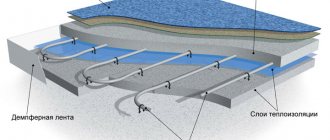
Water heated floors today are a common system for heating a home; different schemes are used for its arrangement.
Installation of underfloor heating with the installation of a three-way thermostatic valve is suitable for mixed heating systems. Radiator (water temperature 80 degrees) and underfloor heating (the liquid should not heat above 50 degrees).
The question arises - how to cool the water from 80 to 50 degrees. This is what the three-way thermostatic valve is designed for. It is attached to the supply pipe, and a circulation pump is connected behind it.
The working process is as follows:
- waste cooled coolant is supplied from the return pipe;
- in the mixing chamber it is mixed with the hot liquid to a predetermined level;
- then the water flows into the branches of the floor.
The disadvantage of this method is the inability to dose the waste water mixture, and this leads to the entry of overheated or underheated coolant into the main line. Plus - easy installation and low price of equipment.
There are two installation schemes for a water heating floor with a three-way thermostatic valve; they differ in the direction of flow:
T-shaped (symmetrical) - heated and cold coolant is supplied from the sides, water is mixed in the center of the valve body, and comes out in the middle.
L-shaped or asymmetrical - the heated liquid enters from the side, and the cooled liquid from below. Mixed water comes out from the side, opposite the hot one.
Both valves are compact and widely used in warm hydrofloors.
Is it possible to connect a heated floor without a temperature controller?
Theoretically, it is possible to use a heated floor without a thermostat. Moreover, every experienced craftsman who deals with such devices will say that using a thermostat is simply necessary. There are many reasons why you need to install this device. The most important are the following:
- A warm floor that was installed without a temperature controller simply will not provide comfort during operation. For example, if the temperature of the heated floor is too high, then with the help of a thermostat it will be possible to adjust the heating and set comfortable levels. If the temperature is too high for a long time, this will lead to failure of the heating element.
- With constant operation of the heated floor, electricity consumption increases significantly. Installing a temperature controller will save significant material resources, therefore, it will pay for itself in a short period of time. A programmable thermostat will help you save even more energy.
- The presence of a thermostat will significantly extend the life of the heated floor. This also applies to the floor covering, which, if constantly heated, will quickly become unusable.
Calibration of thermal relay W1209
What is remote control decoding
Thermal relay calibration is carried out in programming mode in menu item P4. For calibration you need to have a reference thermometer. Comparing the readings of the standard with the readings of the design, they are brought to the same values by manipulating the “+” or “-” buttons. After exiting the settings, W1209 automatically adjusts the measurement temperature over the entire range.
If you don’t have a thermometer, you can use the known values:
- Snow melting temperature – 0°C;
- The boiling point of water is 100°C.
Important! To reduce errors during the calibration process, it is necessary to use distilled water.
For domestic use, the error will be within acceptable limits when calibrated using boiled water instead of distilled water.
How to choose a thermostat for a heated floor?
Today there are a large number of temperature controllers in different price categories on the market. The choice of this device must be taken with responsibility, since a correctly selected thermostat can significantly save money.
When choosing, special attention should be paid to the type of installation of the temperature sensor, which can be:
- Remote. Such a sensor is mounted in the floor of the room between the heating elements. It is placed in a tube embedded in the floor. The floor temperature can be adjusted more accurately because the sensor will be close to the floor surface. Such thermostats are worth buying in cases where the heated floor is not planned to be used as the main source of heat.
- Built-in. This sensor measures the air temperature in the room. If a warm floor will be the main source of heat, then it is worth purchasing devices with a built-in temperature sensor.
In order to avoid denial of warranty repairs in the event of a heated floor failure, it is recommended to purchase a thermostat from the same manufacturer as the heating elements.
On average, the warranty period for a temperature controller for a heated floor system is 2 years.
Module overview
Thermostat W1209 is a programmable temperature control relay. The supplied sensor is operational in the temperature range from -50°C to +110°C. The regulator is designed to work with heating and cooling equipment with a power of up to 1 kVA.
Thermostat W1209
Technical characteristics of the w1209 thermostat:
- Controlled temperature range – -50°C – +110°C;
- Measurement accuracy in the range from 9.9°С to 99.9°С – 0.1°С, above the range – 1°С;
- Control accuracy in the range from 9.9°С to 99.9°С – 0.1°С, above the range – 1°С;
- Hysteresis setting – from 0.1°C to 30°C;
- Control current (load) = 14V – 20A, ≈220V – 10A;
- Supply voltage – 12V;
- Current consumption – 22-72 mA;
- Overall dimensions – 48x40x14 mm;
- Weight – 20 g;
- Permissible operating temperature – -10°C – +60°C.
Note! Some sellers position this device with the name xh w1209. All devices of this type are absolutely identical.
TOP 5 best thermostats
If you are still in doubt about the model of thermostat for heated floors, then we have prepared a list of the 5 best devices:
Devireg 530
The device is the best option in cases where an additional heating system is planned. The device is highly reliable because it is equipped with control in case of a break in the wire that goes to the sensor.
Priotherm PR-119
To set the desired settings, you can choose one of 6 modes. The specified parameters are saved in the settings memory. The thermostat housing is made of high quality plastic.
Danfoss ECtemp Next Plus
Thanks to the possibility of programming, energy savings are ensured. Modern design will allow Danfoss ECtemp Next Plus to fit into any interior.
SET 09
The thermostat has a large graphic display. Thanks to the daily and weekly cycle, a comfortable temperature is constantly maintained.
Electrolux Thermotronic Touch
High-quality temperature sensors allow you to adjust the temperature with an accuracy of 0.5 degrees Celsius. You can set up to 6 time modes for each day.
The thermostat cannot be considered separately from the underfloor heating system, since it ensures an optimal level of comfort and reduces material costs for electricity. A variety of types of thermostats provide many options for implementing such control. It is recommended to install the thermostat only if you have experience in electrical installation work, since its incorrect connection can damage the entire underfloor heating system.