Home page » Articles about boiler equipment. Reviews. Comparisons. Ratings.
Instructions
-25%
2193 2931 Check price
SaveSavedDeleted 0
Karkasnik 11/19/2020
4316 Views 4 comments
We tell and show how to replace the three-way valve on a Navien boiler
The article on valve replacement was prepared based on a video from the YouTube channel KARKASNIK. Video on Navien boiler repair posted on February 11. 2018
- Sequence of actions for removing a three-way valve.
- Sequence of assembly of all parts.
- Replacing a three-way valve on navien boilers video
Buy valve
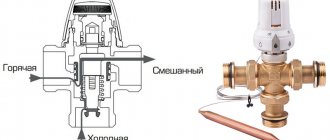
This article describes step by step the repair of the Navien Ace boiler, namely: replacing a failed three-way valve. The breakdown was discovered when the boiler was operating for heating and hot water supply. Every time a hot water tap opens, water begins to drain from the heating pipes and the pressure in the system drops to almost zero. That is, the valve has ceased to perform its functions of switching the direction of water flow.
instructions for replacing a three-way valve
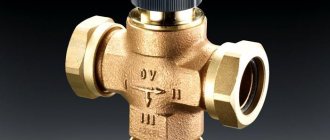
The valve has 3 holes: water supply, heating outlet and hot water outlet. Inside there is a piston that alternately switches the flow. That is, hot water is not supplied to the tap and to the heating pipes at the same time. And when the valve is faulty, it does not work, does not switch completely and the heating system turns off - the radiators are cold.
You can, of course, in extreme cases, increase the pressure forcibly. To do this, there is a small peg on the bottom panel of the boiler body [feeding tap - approx. editors].
make-up tap
screenshot of instructions
But this is extremely inconvenient, since this will have to be done constantly, every time after using a hot water tap. Therefore, the valve still needs to be replaced.
I would like to note that this “tee”, as it is called, costs 1,500 rubles. [video publication date 02/11/2018 - editor's note]. Three years ago, city gas workers were called to replace this valve, and then, together with the work, it cost 800 rubles. But it turned out that after assembling them, leaks were discovered, and I had to disassemble everything and reassemble it. I already have experience, and so far everything has worked fine, so now I will again change this valve myself.
Read on topic
- Review of navien ace boiler faults. Review for 8 years of work
Causes of pressure drop
There are many factors that explain why blood pressure drops. Among them:
- Coolant leaking from the heating system.
- Power outages for a long time.
- Problems in the operation of the expansion tank.
- Incorrect selection and operation of equipment.
When the coolant pressure decreases, the heating unit stops functioning because water does not enter the tank. If the gas pressure decreases, the system automatically turns off. To prevent such troubles, it is necessary to timely service the boiler and take measures when it is turned off.
Pressure drops when hot water is turned on
If the pressure in the heating system drops when hot water is turned on, this may be due to air leaks into the heating circuit or malfunctions in the 3-way valve. A similar problem is associated with the special structure of boilers.
When figuring out what to do if a wall-mounted boiler begins to release pressure when you open a hot water tap, it is important to understand the specifics of its operation. To successfully eliminate defects, you should seek help from a specialist.
Formation of air jams
If cracks appear anywhere in the system and depressurization occurs, this leads to coolant leakage and air suction into the circuit. As a result, air bubbles form. Their appearance is also facilitated by incorrect filling of the circuit, which leads to sudden pressure surges. To troubleshoot problems, it is enough to carry out the procedure for de-aerating the installation by installing vents.
Expansion tank defects
The reasons for the pressure drop in a gas boiler include problems with the expansion tank. There may have been a rupture in the structure or depressurization of the nipple, causing it to leak air.
On the inside of the container there are 2 compartments with a membrane partition. One part contains air masses, and the second contains coolant. As the liquid consistency warms up, it expands and increases in volume, beginning to exert great force on the membrane. Under this influence, the membrane leads to compression of the gas mixture.
If the Navien boiler has a problem, you will need to purchase a new tank and replace it. However, before purchasing, you need to make sure that the problem is related to this factor. Cases of leaking pipes, radiators or airing of the heating circuit cannot be excluded.
If the membrane is damaged, the expansion tank ceases to cope with its tasks, and the pressure level decreases. To detect this defect, just knock on the structure (the sound will become dull). And when you briefly press the nipple, water will spill.
Safety valve defect
The task of the safety valve in the Navien boiler is to protect the heating system from excess pressure. If the permissible values are exceeded, the part opens and begins to discharge excess water. The standard response threshold is 2.5 bar.
Eliminating common errors
Let's look at the common errors of Navien boilers and figure out how to fix them.
Error “02” - stop coolant circulation
The filters of the boiler or heating system often become clogged, this leads to the appearance of two unfortunate numbers of fault 02. It is also very likely that the cause of this error is the main heat exchanger clogged with scale. These troubles occur due to the high hardness of the water used to operate the device. The ubiquitous scale affects the most important parts of the device, stopping operation. To resume boiler operation, you must:
- Clean the filters in the boiler itself and the heating system.
- Remove the heat exchanger from the housing.
- Prepare an acid solution to destroy scale on the heat exchanger.
- Place the heat exchanger in a container with an acid solution.
- Wait for the chemistry to do its job.
After simple manipulations, if you have the necessary ingredients and knowledge, you can independently get rid of error “02” of the Navien gas boiler. Monitor the circulation sensor inside the boiler, wash the filters regularly to avoid unpleasant surprises.
Error "03" ignition problems
It says either a simple lack of gas or a broken gas valve. Let's look at the second option. Navien boilers are equipped with the most reliable Japanese gas valves; they are difficult to break when using the boiler perfectly and correctly. But if the mains voltage is ten to twenty volts higher than 220 volts, the coils inside the boiler will turn black and the valve may break completely. To fix this breakdown, you will have to buy a completely new valve and replace the broken part. Extreme care is required with the network voltage. Increased levels can harm more than one boiler.
Error “16” overheating of the main heat exchanger
Occurs when the boiler’s internal thermometer records a temperature of 95 degrees. This Navien boiler error may indicate several breakdowns of the boiler system. Again, the main heat exchanger is clogged with scale due to hard water from the centralized water supply, which causes the device to heat up to a high temperature. Or it could be an insulation problem with the main heat exchanger. The fact is that if you actively use the boiler for five years and do not provide proper care, it is likely that the gaskets, which should not release the heat of the heat exchanger, begin to blow out. Warm air blows directly onto the thermometer - an error occurs. To eliminate error “16” you need to clean the main heat exchanger in an acid solution and restore its insulation. But it is better to prevent this problem by regularly carrying out boiler maintenance; if possible, then using water that is safer for equipment.
Prevention of fistula formation
When purchasing a heat generator, carefully examine the quality of the soldering of the connecting seams, both on the water and on the primary heat exchanger; there should be no sagging or unevenness.
Set up the burner according to the instructions in the instructions. To avoid the appearance of fistulas, it is necessary to take timely measures in the presence of high pressure and airiness in the system. Avoid frequent refilling of the system with water; find out the cause of the pressure drop in this case and eliminate it.
Automatic air vents have not yet appeared that would not leak periodically. Which, in general, is not difficult to eliminate temporarily. Why do they leak, how to deal with it, and also why such devices are needed in heating, and how to use them correctly...
Why do you need an air vent?
Any closed pressure coolant system must have one or more air vents. At least one of them is automatic, releasing air on its own, without human intervention, as accumulation occurs.
This ensures the operability of the system and prevents airing. In an air-filled system, the coolant does not move normally, the equipment does not operate stably, noises and pops are heard - small water hammers. Equipment and pumps wear out faster.
Or the air lock will stop the movement of the coolant completely. Without a small device - an automatic air vent - the system will not work normally - airing will occur.
How to solve the problem of pressure drop
If you have never had to restore boiler equipment yourself before, you should not attempt DIY repairs. Without knowing the circuits and operating principles of the units, you can make mistakes and damage the entire system.
To repair equipment, you need to carry out a number of complex measures. First of all, it is important to determine why the pressure in the boiler drops in a double-circuit installation.
In devices with forced circulation, liquid leakage causes problems. To determine the location of the leak, it is necessary to conduct a comprehensive inspection of the connection points.
During the initial inspection, it can be difficult to find the location of the leak. If a puddle appears under the pipeline, repairs must begin as quickly as possible. Otherwise, the breakdown will lead to disastrous consequences. In most cases, repairs involve replacing old pipes that have been subjected to corrosive processes.
If there is a complex wiring, the process of finding the leak location can cause a number of difficulties. If the pressure is unstable and there is no way to find the cause of the breakdown, you will need to call a specialist who will use special instruments to quickly and effectively determine the error.
Before carrying out repairs, you need to disconnect the radiators and boiler from the system and find the damaged area. If the pipe is deformed, it should be replaced with a new one. If a leak occurs at the junction of the pipes, resealing is performed. A special tape or sealant is used as a sealing compound.
Reasons why pressure drops in a double-circuit gas boiler
Faults are difficult to detect unless you use professional equipment. Common reasons are:
- Lack of power.
- Coolant leak.
- Malfunction of the expansion tank.
- Incorrect calculation of the system , respectively, installation of inappropriate equipment.
A decrease in pressure leads to a stop in operation. This is due to a drop in the level: of liquid in the device, which cannot flow into it, or of gas, which leads to automatic shutdown. To prevent such situations, periodic maintenance is carried out, including diagnostics and repair of damaged components.
Power outage
If the boiler is powered by electricity , it can operate without it for some time. But a long absence will lead to a stop in operation, which will cause a drop in pressure in the system. The solution to the problem is to install backup power . It's expensive, but effective. Or buy a more capacious battery for the boiler.
Leak in the heating system
During operation of the circuit, the pipeline gradually becomes unusable: scale and rust accumulate. This problem can be solved by cleaning the pipes.
But leakage can also occur, for example, when a crack forms. Due to the loss of coolant, pressure decreases.
Rules of operation and timely maintenance
Experts recommend that Navien boiler owners, on the eve of operation, get acquainted not only with the device and technological parameters, but also with the matrix of self-diagnosis system codes, which the manufacturer must provide in the technical documentation.
Tips and recommendations for servicing Navien boilers:
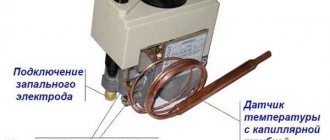
The tuning algorithm for the thermal performance of the boiler directly depends on the burner model. Installations with digital control according to a set thermal regime include a thermostat operating in a unit with a room temperature sensor. The setting is automatic and the thermometer monitors the indoor temperature
After some time, when it drops below a certain limit, the thermostat sends a signal to turn on the burner or, using a control valve, increases the gas fuel consumption. As a rule, a thermostat controls the temperature in one room, but if shut-off and control devices are installed in front of each radiator, the temperature can be controlled in all rooms. The burner device can be adjusted by turning the gas valve, which is especially important for atmospheric devices with open combustion chambers. The mode is changed in the menu on the control panel.
Algorithm for setting the operating mode of the boiler unit through the service menu:
- Open the valves on heating appliances.
- Set the desired value on the heating thermostat in the room.
- The burner will stop when the temperature rises by 5 C above the set mode.
- Press "Mode" on the LCD display. When “0” appears on the screen, enter the number “35” using the “+” and “-“ keys.
- When presented on the screen “d. 0", dial the line number using "+" and "-". The setting will be automatically negotiated.
- Return to the service menu using “Mode”.
- They control the flame in the combustion chamber and the temperature rise.
In this case, the radiators do not have time to heat up, and the functional components of the boiler quickly fail. In addition, in this mode there is an overconsumption of gas, which reduces the energy efficiency of the boiler and the overall efficiency of the heating system.
Cyclicity is suppressed in 2 ways:
- Reduce the torch of the burner device.
- They increase the load in the heating system by including an additional load in the form of installing radiators or an external tank for indirect heating of hot water supply.
Boiler manufacturer Navien studied all possible variations of unit failure and issued factory instructions for the repair and adjustment of equipment. A modern diagnostic system can independently identify errors in the operation of the device and offer the user ways to eliminate the problem.
The system is individual and depends on the unit model and installation option - wall-mounted or floor-mounted, as well as on the modification of the control unit.
It is a proven, faithful assistant even for an inexperienced user with little knowledge of technology. It is thanks to error diagnostic programs that today it is possible to quickly overcome an emergency situation and restore the temperature regime in the house.
High system pressure
Excessive pressure in the system can also cause a boiler leak. There can be many reasons for high blood pressure. The main reason may be a malfunction of the expansion tank, air locks in the system, a clogged strainer, a malfunction of the safety valve, or the make-up tap.
A malfunction of the safety valve is indicated by constantly leaking liquid from the tube. High pressure can not only cause a crack in the boiler, but also cause an explosion. Monitor the serviceability of the pressure gauge and relief valve; sometimes the valve jams due to the formation of a layer of salts on it. Wash it in citric acid.
Heating boiler safety valve
It is necessary to regularly check the correct pressure on the valve and in the expansion tank. When installing an expansion tank, it is necessary to calculate the volume of coolant. How to calculate - there is a calculation formula, and the average value is -1.5 Atm or 0.2 Atm lower than in the system. For prevention, do not forget to wash the filters at the inlet and outlet of the heating circuit; after recharging the system, it is necessary to ventilate the batteries.
Features of the Navien boiler
In these units, the problem most often lies in leaks , especially when using fluids with a high glycol content. Antifreeze is very fluid, so it penetrates into the smallest cracks. Sometimes they are not easy to detect, so it is recommended to invite a specialist who will carefully check the entire harness. Detected leaks must be corrected, then the expansion tank must be refilled and the pipes must be cleared of air.
And also the pressure decreases slightly as the coolant cools. Usually, after turning on the boiler, this problem solves itself. If the fluctuations are significant, diagnostics are required. The latter may lead to repair or replacement of equipment.
To fix it, just follow steps similar to those described above. In rare cases, if it is impossible to solve the problem, you will have to purchase and install a new heating device.
Photo 1. Wall-mounted gas boiler model Deluxe 13A, open combustion chamber, South Korea.
Types and features of manufactured structures
The company produces several types of gas boiler equipment:
- wall-mounted (models under the Atmo and Turbo Ace brands);
- floor (GA and LST series);
- condensing with NCN marking.
Wall-mounted gas boilers of the Ace series
Among the differences: design and equipment, type of installation, technical characteristics. Common to all types of Navien boilers is the presence of two heat exchangers, as well as the inclusion of parts made of stainless steel, which makes the device excellently resistant to corrosion and optimally distributes heat. The heat exchanger circuits have high performance, excellent resistance to contamination and are prone to minimal scale formation. However, under conditions of increased use, scheduled repairs and seasonal cleaning with your own hands are fundamentally necessary.
. and without construction experience
My works for 2022.
How I set up the Navien boiler, pump and blower run-out
First, the question is, why regulate the run-out of the pump and blower, well, probably so that they work less and wear out less, as I noticed, while with the experience of the boiler in winter mode, the blower spins after stopping the boiler for another 1 minute, at this time there is cold air from the street, no longer heating up in the coaxial chimney, it intensively cools the boiler heat exchanger, which is generally detrimental to its health, and unnecessary heat loss into the atmosphere, i.e.
it is possible, without damage to the boiler, to reduce the fan run-out time, about this procedure, and at the same time, about the procedure for reducing the pump run-out (relevant in summer mode, when the boiler is turned on only to heat hot water, and turns off again), in more detail and in order: DC control mode purge, (pump and fan run-on)
The procedure for installing stages on the boiler remote control display
1 Turn off the power from the boiler remote control
2 Press the “battery” and “hot water” buttons
buttons battery and hot water
3 The display will show mode P1 for setting the pump run-on in summer mode
mode P1 will be displayed
4 Press the “hot water” button to set the pump run-on in summer mode
Press hot water button
5 Press the + or – buttons, the display will show the numbers 10 or 40, when selecting number 10, the pump run-out will be 5 minutes, when number 40 = 20 minutes, select the option you need
Press the + or – buttons to select the coasting option
6 Press the “hot water” button to exit the pump overrun setting mode
Press hot water button
7 Click the + button
8 The display will show mode F1 to set the blower run-on in summer mode
The display will show F1 mode
9 Press the hot water button to set the blower run-on in summer mode
Press hot water button
10 Press the + or – buttons, the display will show numbers 1 or 2 or 4, when selecting number 1 the blower will run for 30 seconds, when number 2 = 1 minute, when number 4 = 2 minutes, select the option you need
Press the + or – buttons
11 Press the “hot water” button to exit the blower run-on setting mode
Press hot water button
12 Click the + button
13 The display will show mode P2 for setting the pump run-on in winter mode
P2 mode for setting the pump run-on in winter mode
14 Press the “hot water” button to set the pump run-on in winter mode
Press hot water button
15 Press the + or – buttons, the display will show the numbers 10 or 40, when selecting number 10, the pump run-out will be 5 minutes, when number 40 = 20 minutes, select the option you need
Press the + or – button
16 Press the “hot water” button to exit the pump overrun setting in winter mode
Press hot water button
17 Click the + button
18 The display will show mode F2 for setting the fan run-on in winter mode
F2 mode for setting the fan run-on in winter mode
19 Press the “hot water” button to set the fan run-on in winter mode
Press the "hot water" button to set the fan overrun
20 Press the + or – buttons, the display will show numbers 1 or 2 or 4, when selecting number 1 the blower will run for 30 seconds, when number 2 = 1 minute, when number 4 = 2 minutes, select the option you need
Press the + or – buttons
21 When all settings have been made, you must wait 10 seconds, or press the off button on the remote control once
Wait 10 seconds or turn off the boiler from the remote control
That's it, all settings are completed, you can use it
If anything, I have an engineering menu file for download from the Koreans with a crooked translation, but in it everything that I could tell on the pages, well, maybe a little more, there is just a mention that if the boiler remote control fails, then by shorting the remote control wires from the boiler itself, you can turn it on, but it will heat the heating system up to 80 degrees, but at least we won’t freeze until we buy a new remote control, or the repair team arrives with a spare remote control!
Here you will learn:
It is difficult to choose a suitable gas boiler due to the huge range of models for sale. Even within the same manufacturer, the number of units can be overwhelming. In order to make the choice easier, you should take a closer look at models from famous developers. For example, a Navien gas boiler, created by the Korean company of the same name, would be an excellent solution. Let's see what kind of boilers these are, what makes them remarkable and why consumers choose them.
Navien heating gas boilers are manufactured using the manufacturer’s own developments, which increase the efficiency of the equipment and its cost-effectiveness, as well as facilitating easier operation. All this helps to create equipment that is ideal for organizing autonomous heating. Let's make a list of the features and advantages of Navien gas boilers:
- Intelligent remote control – implemented in the advanced Smart Tok line;
- The presence of modulating burners ensures silent ignition, smooth temperature control in the circuit and reduced thermal load on internal components;
- Voice prompts – Navien gas boilers are equipped with voice guidance systems, which makes control even more convenient;
- Adaptation to Russian operating conditions – stable operation during gas fluctuations;
- Self-diagnosis – allows you to quickly obtain information about errors and failures.
In other words, the Korean manufacturer Navien managed to assemble decent equipment for autonomous heating systems.
The range of heating equipment includes the following models:
- Dual-circuit wall-mounted turbocharged;
- Double-circuit wall-mounted atmospheric;
- Wall-mounted double-circuit condensation;
- Floor-standing gas single-circuit;
- Floor-standing gas double-circuit.
The most popular are Navien wall-mounted gas boilers, available in a wide range of models.
Why does pressure rise in a wall-mounted boiler?
In rare cases, a situation arises when the pressure gauge readings suddenly double. This may be due to one of three factors:
- The meter is broken and shows incorrect numbers.
- The make-up tap cannot withstand the pressure and begins to drip.
- The secondary heat exchanger has failed.
The problem is more noticeable near the reset valve. If the device begins to behave unusually: throwing out some of the water along with air, most likely the pressure in the system has increased. In this case, you need to look at the pressure gauge .
To solve the problem, the Mayevsky valve on the radiator opens and the pressure is released to normal. Then they monitor the indicators for a while: if they increase, then the problem is not in the measuring device.
It is recommended to tighten the water supply valve further. If nothing has changed, you should read the instruction manual. It describes the hydraulic circuit that needs to be studied.
Source
Navien boiler drips water from valve
Faithfully, the navien boiler worked for me for seven years, heating a two-room apartment and heating water in the hot water system at two points. The apartment area is small, so the operating mode is quite gentle. But we like to include hot water.
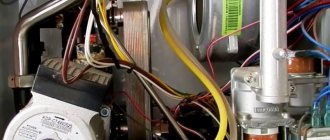
Among the malfunctions during all this time, I changed the three-way valve - the love for cleanliness and water procedures affected it. The cause of the malfunction was an electrical microswitch whose contact plate had broken. I was too lazy to tinker with a soldering iron, so the unit was replaced with a new one. The asking price is about two thousand rubles. In addition, I removed and washed the automatic air vent a couple of times. Some kind of garbage came up. But in general, I am very pleased with the performance of the device, especially considering that it was purchased at a cost half as much as its counterparts on the market.
So, during the inspection it was found that the case was full of dust and all sorts of unfortunate insects that were sucked in by the air flow from the fan. A couple of minutes of vacuum cleaner operation, wet cleaning and complete order. Opening the combustion chamber showed that on the heat exchanger in the lower part there is a coating of red sludge from combustion products, and in the upper part there is debris and oxidation as a result of exposure to condensate from combustion products.
The combustion chamber. This is actually the boiler itself. If we compare it with classic floor-standing boilers, then in terms of power it is analogous to a boiler like Don 16 or AOGV 16, which of course will not fit in a bathroom...
To clean it, I removed the combustion chamber, carefully cleaned the heat exchanger honeycombs with a brush, washed the outside with water pressure from the tap and removed oxidation using Liqui Moli carburetor cleaner. It came in handy. I also used it to clean the automatic air vent valve installed on the circulation pump housing. Inside, the heat exchanger is practically free of contamination - there is only a small yellowish coating, which could be removed with citric acid. But this time I decided to skip this procedure. I washed the gas burner with water. A lot of dust passes through this “vacuum cleaner” and some of it, of course, settles, interfering with the normal combustion process. Monitoring the air pressure in the expansion tank showed its complete absence. An attempt to restore it showed a membrane rupture. Replacement tank. Reassemble in reverse order. Be careful not to damage the gaskets. By the way, they are all in good condition and factory lubricated. Grease had to be applied to the chimney rubber bands during assembly. Filled it with water and pressed it. That's all, the device is ready for use. After turning it on, I checked it in all modes and was pleased with the result. Costs 3,500 rubles for an expansion tank. I will give advice to those who like to save money: a failed expansion tank of a wall-mounted boiler can be left alone. To compensate for the thermal expansion of the coolant, in any convenient place you can embed and connect any simple and inexpensive tank for heating systems of suitable volume.
Basic error codes and their interpretation
Let's look at what error codes may appear on the unit display:
| Error code | Fault type |
| E01-02 | Lack of coolant in the system (flow sensor malfunction) |
| E03 | No flame |
| E04 | False evidence of the presence of a flame (spark breakdown to the sensor) |
| E05 | Exhaust temperature sensor break |
| E06 | Exhaust temperature sensor short circuit |
| E07 | Broken DHW temperature sensor |
| E08 | Short circuit of DHW temperature sensor |
| E09 | Fan failure |
| E10 | Malfunction of the smoke removal system |
| E13 | Short circuit of the OM flow sensor |
| E15 | Malfunction or failure of the control board |
| E16 | Exceeding the permissible boiler heating temperature |
| E18 | Smoke sensor overheating |
| E27 | Short circuit or break in the air pressure sensor |
The appearance of most errors is accompanied by a shutdown of the boiler, which is dangerous in winter, so you should respond to them as quickly as possible.
Why did the boiler leak?
There are actually not so many reasons why the boiler leaked. First, corrosion may be the culprit. What is corrosion? It is the destruction of the metal structure under the influence of the external environment. Internal corrosion of a gas boiler is caused by the influence of oxygen in the water, external corrosion is caused by combustion products.
The next cause of leakage may be the poor quality of the metal from which the heat exchanger is made and the quality of the seams of its connections.
High pressure in the system or water hammer also cause leaks in boilers. Burnout of the heat exchanger walls also causes a leak.
In some cases, when water is dripping from your boiler and you think your boiler is leaking, it may actually be condensation from the chimney that is flowing down the chimney pipe and onto the burner. If this situation occurs frequently, a moisture collection cup should be installed in the chimney. When it drips near the circulation pump, the bolt located in its center may have become loose. Tighten the bolt.
Below we will consider each case separately in more detail and describe what to do if this happens.
What to do if the aspirated air leaks?
For the Atmo model range with an open (atmospheric) burner, the primary heat exchanger is made of copper.
The appearance of a leak is almost always associated with its destruction. Purchasing a new heat exchanger is not an easy and expensive task, so most often the issue is solved by soldering the fistula .
To carry out repairs, you should contact a technician from the service center, since this requires a qualified specialist who can dismantle the unit, find the fistula that has arisen, solder it properly, simultaneously rinse the heat exchanger and install it in place without damage.
The work is complex and requires the participation of a trained person.
Wall thickness and corrosion
Heat exchangers installed in heat generators can be made of copper, steel and cast iron. Each of them has its own pros and cons. Copper heat exchangers are corrosion resistant and durable if the boiler is used correctly. Steel heat exchangers are the most common, due to their low cost, resistant to thermal stress due to their ductility, but are more often subject to corrosion.
Heat exchanger corrosion
Cast iron is resistant to corrosion and has a long service life, although they are susceptible to temperature changes and water hammer. Most manufacturers do not use anti-corrosion coatings. But in the latest models of Ferroli gas double-circuit boilers, steel heat exchangers are covered with an anti-corrosion aluminum coating with environmentally friendly internal insulation.
On Baxi units, copper heat exchangers are coated with a special anti-corrosion compound. Protherm, Buderus and Beretta have a cast iron heat exchanger, which is coated with a special anti-corrosion compound. In addition, such a heat exchanger consists of separate sections that can be replaced if they are damaged without completely replacing the heat exchanger.
Wall-mounted boilers Rinnai, Celtic, Bosch are equipped with copper heat exchangers, Vaillant and Navien are made of stainless steel, it is believed that they are less susceptible to corrosion.
Frequent feeding of the boiler has a great influence on the formation of corrosion. Ideally, so-called “dead water”, without oxygen, should circulate in the heat generator. It is oxygen that promotes the formation of corrosion.
If you often have to recharge the heat generator, you should eliminate the reasons for the pressure drop in the unit. Oxygen corrosion forms an ulcer on the inside of the heat exchanger, which is very dangerous. Growing inward, it forms through rust and destroys the heat exchanger.
Workmanship
The strength of the boiler depends on the quality of the welded joints. If a weld seam has cavities or irregularities, sooner or later this seam may leak. The void located inside the seam is considered especially dangerous. Ideally, the seams should be X-rayed, but not all manufacturers do this.
Although heating boilers are pressure vessels and must be subject to increased manufacturing requirements, defects sometimes occur. And, as a rule, it drips from the heating boiler after the warranty expires. It is not always possible to weld the boiler inside and stop the leak.
It depends on how the heat exchanger is designed. In models where a bithermal heat exchanger is installed (the secondary and primary are in the same housing, heat exchange occurs thanks to the two-in-one design), this is problematic. But, even if you did this, as practice shows, this will not help you for long.
High system pressure
Excessive pressure in the system can also cause a boiler leak. There can be many reasons for high blood pressure. The main reason may be a malfunction of the expansion tank, air locks in the system, a clogged strainer, a malfunction of the safety valve, or the make-up tap.
A malfunction of the safety valve is indicated by constantly leaking liquid from the tube. High pressure can not only cause a crack in the boiler, but also cause an explosion. Monitor the serviceability of the pressure gauge and relief valve; sometimes the valve jams due to the formation of a layer of salts on it. Wash it in citric acid.
Heating boiler safety valve
It is necessary to regularly check the correct pressure on the valve and in the expansion tank. When installing an expansion tank, it is necessary to calculate the volume of coolant. How to calculate - there is a calculation formula, and the average value is -1.5 Atm or 0.2 Atm lower than in the system. For prevention, do not forget to wash the filters at the inlet and outlet of the heating circuit; after recharging the system, it is necessary to ventilate the batteries.
Setting up a Navien boiler
Submit your application now!
And get the best offers from trusted professionals.
- Compare prices and choose the best conditions
- Feedback only from interested specialists
- Don't waste time communicating with intermediaries
Our advantages
Free consultation by phone
Free diagnostics and call a technician
Same day home repairs
Original spare parts
Warranty up to 2 years
The relatively young Korean company Navien, specializing in the production of heating and hot water supply appliances for home use, in the shortest possible time, on a business scale, managed to achieve a leading position in the world market in its field. Founded in 1978, today the company has official representative offices in the USA, Canada and China.
The range of products presented by Navien is quite wide, but the main devices that are most popular among buyers are:
- gas boilers
- water heaters
- radiators
In addition to the excellent quality of its products, the company can responsibly declare the lowest prices, which sufficiently suits Russian consumers, in particular in the cities of Moscow and St. Petersburg.
By using the services of highly qualified specialists when ordering their services on the YouDo website, you will receive professional performance at fairly low prices for such important work as:
- dismantling the old boiler
- chimney preparation
- sewerage installation
Upon receipt of permission from special services, the Navien gas boiler will be configured.
Features of setting up gas boilersNavien
With the exception of small nuances, the process of setting up a Navien gas boiler is practically no different from installing a conventional electric boiler. However, specifically for gas boilers, the mandatory conditions are:
- obtaining permission to carry out work from gas services
- providing the premises with access to fresh air
- thorough check of the chimney
Our prices
| Visit of a specialist within the Moscow Ring Road | For free |
| Replacing a spare part/functional unit | from 1200 rub |
| Setting up a gas multiblock | from 1000 rub |
| Setting up the draft sensor | from 550 rub. |
| Cleaning, setting gaps of ionization and ignition electrodes | from 1200 rub |
| Conversion to liquefied gas | from 1800 rub |
| Checking the chimney draft (pressure/discharge) | from 300 rub. |
| Inspection of the circulation pump | from 500 rub |
| Setting the operating pressure in the expansion tank | from 500 rub |
| Cleaning of internal pipelines | from 1500 rub |
| Cleaning the built-in filters | from 500 rub |
| Cleaning the boiler body | from 750 rub |
| Cleaning the DHW heat exchanger | from 2200 rub |
| Setting up the gas throttle | from 750 rub |
| Setting the proportions of the fuel-air mixture | from 4000 rub |
| Setting the torch opening angle | from 1200 rub |
| Setting day/night modes | from 1200 rub |
| Installation of outside temperature sensor | from 3500 rub. |
| Setting the safety temperature limiter | from 750 rub |
| Setting up weather-compensated automation (per circuit) | from 1500 rub |
| Soldering a printed circuit board / automation element | from 1500 rub |
| Connecting and setting up the remote control unit | from 2200 rub |
| Balancing the hydraulic circuit | from 300 rub. |
| Burner replacement | from 1500 rub |
| Replacing the gasket/fixing the leak | from 750 rub |
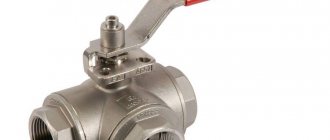
| Replacement of ball valve, check valve, valve | from 750 rub |
| Setting the limit thermostat | from 550 rub. |
| Bypass Valve Setting | from 600 rub |
| Setting up the thermal head | from 300 rub. |
| Radiator inspection | from 150 rub. |
| Inspection of the circulation pump | from 300 rub. |
| Bleeding the air lock | from 200 rub |
| Cleaning the coarse filter | from 300 rub. |
Burnt out walls
The cause of the leak may be burnout of the combustion chamber wall. Steel and cast iron burn out when carbon evaporates from their composition, so the metal in the combustion chamber becomes thicker. As a rule, burnout occurs when the height of the combustion chamber is incorrectly set, the burner power is set incorrectly, the burner is not adjusted to minimum and maximum power, or the flame is too high.
Burnout occurs when the boiler is constantly operating at maximum power; this occurs in the case of insufficient insulation of the home or when the heat generator is selected without taking into account the heated area.
When purchasing a boiler, read reviews on the Internet and give preference to reputable manufacturers. It is better to buy a heat generator with a little more power, with reliable flame modulation and entrust the settings to specialists.
Running self-test
The Navien boiler self-diagnosis system operates constantly and does not require a separate startup.
The probability of a failure of one or another node exists at any time, so the sensors send signals about the status of certain elements 24/7, never stopping.
If the sensor stops working for any reason, the corresponding error code immediately lights up on the display. This is an important function that helps maintain performance and timely troubleshooting .
How to stop a leak with your own hands
How to repair a leak - the leak repair algorithm is the same for both solid fuel boilers, such as Don, KChM, and gas boilers, for example, AOGV, Alixia 24, Ariston, Deu, Arderia, Electrolux.
- Turn off the device.
- Drain the water.
- Wait until the boiler cools down completely.
- We will describe how to remove the heat exchanger below.
- Solder and eliminate the fistula.
What does a heat exchanger look like - it is a metal or cast iron body, heated by a burner flame and transferring thermal energy to the liquid that is inside it.
To disassemble it and solder it yourself, you need to remove the front panel, protective casing and combustion chamber protection using a long screwdriver. Then disconnect the sensor wires and the pipelines suitable for the heat exchanger, try not to damage the pipes and pipes, hold them with a wrench.
Prevention of fistula formation
When purchasing a heat generator, carefully examine the quality of the soldering of the connecting seams, both on the water and on the primary heat exchanger; there should be no sagging or unevenness.
Set up the burner according to the instructions in the instructions. To avoid the appearance of fistulas, it is necessary to take timely measures in the presence of high pressure and airiness in the system. Avoid frequent refilling of the system with water; find out the cause of the pressure drop in this case and eliminate it.
Automatic air vents have not yet appeared that would not leak periodically. Which, in general, is not difficult to eliminate temporarily. Why do they leak, how to deal with it, and also why such devices are needed in heating, and how to use them correctly...
Why do you need an air vent?
Any closed pressure coolant system must have one or more air vents. At least one of them is automatic, releasing air on its own, without human intervention, as accumulation occurs.
This ensures the operability of the system and prevents airing. In an air-filled system, the coolant does not move normally, the equipment does not operate stably, noises and pops are heard - small water hammers. Equipment and pumps wear out faster.
Or the air lock will stop the movement of the coolant completely. Without a small device - an automatic air vent - the system will not work normally - airing will occur.
Where does the air in heating come from and how is it removed?
Air is dissolved in water (in the coolant) and is released when there are changes in pressure and temperature, forming bubbles that accumulate in the upper part of any system.
To remove air, it is necessary to install air vents in many characteristic places of the system, and automatic ones at the most important points where air accumulation is likely. To quickly, constantly bleed off the gas.
They also make separators - sections of pipe with a significant difference in diameter. In the area where the pressure decreases (the movement of the liquid accelerates), air bubbles are released, then they accumulate at the expansion - where they are removed by the described device.
Automatic air vent design
The device is based on a body with a float. The float is connected to a needle release valve, which is located at the very top. If the body is filled with water, the float closes the valve, and the outlet is closed. When air appears, water is displaced, the float sags, the hole opens, and air, accordingly, comes out.
The design of the automatic air vent may be different, the body is steel or bronze, the lever mechanism from the float to the needle may vary. But there is one peculiarity - always strictly vertical installation, only in this position the device works.
A corner design is also possible - the so-called. radiator automatic air bleeder, which is screwed into the end of the structure, usually instead of a radiator plug.
In what places are they located?
The safety group for non-automated heating systems (solid fuel boiler) is equipped with an automatic air vent. In automatic boilers, such a device is always provided inside.
As a rule, for a small home system, one such air valve is sufficient, which is complemented by Mayevsky taps - manual devices for bleeding air. They are installed at the end of each radiator.
Where to locate - automatic air bleed points
In branched systems, automatic air vents are installed in several places. In addition to the boiler device, the following are also installed:
On each collector, including underfloor heating.
- On high, U-shaped non-standard bends, for example, on the edge of a door.
- At the top point of the highway of each floor in a multi-story building.
Equipment of radiators with Mayevsky taps
At the end of each radiator there must be a manual valve for bleeding air. The simplest device - a manual valve - the Mayevsky tap received the greatest popularity. When the valve is unscrewed, the accumulated air is released. The coolant will flow out after the air.
Radiators are usually installed horizontally, or so that the edge with the valve is 1 cm higher. This is enough to reliably capture and remove air. In large networks, it is advisable to tilt one of the series-connected radiators a little more and equip it with a corner automatic air vent. Such a device will serve as a separator.
Why does it flow
Plaques and salt deposits gradually form on the needle valve of the air vent. The hole no longer closes tightly - water oozes out - the device leaks.
It is necessary to disassemble the device and very carefully clean the valve needle, seat, and other parts from deposits with a soft tool. If the cleaning is normal (which is not easy to achieve), then you can forget about the leak for a while, until the next accumulation. It is also important to assemble the housing without leakage; FUM tape is usually used to seal the threads, and the housing itself is tightened by hand.
How to install
There are a couple of important nuances in installing an automatic air vent. It must stand vertically, the valve hole must be straight up, otherwise it will not work. Accordingly, to install it in the main line, a tee of the corresponding thread diameter is screwed in - 1/2 inch.
Polypropylene pipelines have their own tee with metal threads soldered into place. The security group comb provides its own outlet. But the air vent is leaking, so how can you disassemble it without draining the coolant from the system?
Application of shut-off valves
The automatic air vent is a frequent maintenance device. It needs to be disassembled and cleaned to prevent leaks. But it is not at all necessary to release the coolant and reduce the pressure in the system.
It is enough to install a shut-off valve under the device. The air vent is screwed into its body, presses on the lever, the valve membrane sags and the device communicates with the system. When you need to remove it, it unscrews, and the shut-off valve closes the hole. It is recommended not to skimp and use shut-off valves.
Source
Sequence of actions for removing a three-way valve.
- To begin, unfasten the latches on the panel at the top, unscrew the two screws from the bottom and remove the cover.
cover latches
The most important inconvenience is that the valve is “hidden”; it is located in the lower corner at the back wall of the case, behind other parts. Therefore, some of them need to be removed and then put back together without mixing anything up.
cover removed
And in order not to forget where each part comes from, you can film the disassembly process or take written notes so that, if necessary, you can review and clarify all the nuances, and there are many of them.
- Turn off the boiler completely, turn off the taps and drain the liquid. We completely unscrew the black plug from the bottom of the boiler [drain plug - approx. editors]. Otherwise, we will not be able to remove the pump later.
plug on the bottom panel
You need to remove the filter by unfastening the fixing key and pulling it down. And the remaining water flows from here.
bracket/key
filter
If this is not done, then after disconnecting the pump, water will flow into the housing.
water in the housing
- We unscrew the outermost heating pipe [heating water outlet (supply) - approx. editors]. It is precisely attached to the hole of the three-way valve.
pipe
valve hole
- We remove the pump. First we disconnect the wires.
the wire
Unscrew the 4 screws on the outside of the lower part of the case.
cogs
Unscrew the nut at the place where the pipe is attached to the pump.
screw
The most important thing is not to lose the rubber gaskets, one of which falls out of the nut.
rubber bands
Next you need to pull out the metal plate at the location where the second output is attached.
bracket
It fits like a bracket into special holes and serves as a clamping clamp. Now you can freely pull out the pump.
- Open the three-way valve. To do this, unscrew the bolts from the bottom of the body, where the lower part of the valve is brought out.
bolts
Then we free it from the clamps. Using a screwdriver, each of them just needs to be pulled towards you.
Then, slightly rocking the valve itself, lift it up a little, and it comes out. Unscrewed plate with nipple [heating water outlet (supply) - approx. editors] remained in the opening of the housing. We take it out too.
valve without nipple
- All that remains is to disconnect the wire connector by simply pressing on the retaining plate. That's it - the old valve is completely removed.