Hello, my name is Gregory. Stove maker with 15 years of experience. I have lived and worked in the Moscow region all my life. Laying stoves has become not only a profession for me, but also a favorite activity. That is why I always do my work efficiently and accurately.
Furnaces, like other technical devices, such as a car, require regular maintenance and repair.
- Repair of brick, cast iron stoves, as well as fireplaces.
- Repairing cracks and replacing bricks.
- Furnace repair, door replacement.
- Restoration work to restore fireplaces, stoves, tiles, tiles
- Repairs of any complexity - quickly and efficiently. I don’t do pipe repairs separately - only in conjunction with furnace repairs!
- I will diagnose and eliminate the causes of the stove smoking.
- I also clean ducts and chimneys (equipment made in France).
- Laying stoves, installing chimneys, installing stoves made of cast iron and metal.
My advantages
- Extensive work experience ( more than 15 years ) - I am engaged only in the stove craft
- I am a member of the stove makers guild
- All work comes with 1 year WARRANTY
- Initial FREE consultation
- Discounts for repeat applications
- Prompt on-site visit
- Individual approach
Call:
+7(499)112-47-76
Gregory
General progress of capital repair work
To carry out independent repairs of brick kilns, it is necessary to carry out a general course of work, usually capital work. Among them:
- A visual inspection that reveals the reasons for the malfunction of the structure, the further progress of the repair, i.e. partial restoration of individual elements or complete replacement of its main parts.
- Elimination of everything unnecessary, for example, what was installed incorrectly (in case of a serious defect).
- Adding the necessary elements that will help the furnace operate with higher efficiency, i.e. upgrading the existing design to the extent possible.
- The need to restore or resurface brickwork by covering it with new clinker tiles.
- Cleaning the chimney on the roof and the stove pipe itself inside the house. If desired, the part of the chimney that is located in the room can be lined with porcelain stoneware to obtain a pleasant visual effect.
- Installation of useful accessories (for example, a new hob, firebox door or blower), if necessary or present when repairing the stove.
Your own summer cottage outside the city is a place where you want to come at any time of the year, including in winter. Therefore, try not to skimp on heating and repairing the housing located on it.
//www.youtube.com/watch?v=dISTLMZCMvU
EXAMPLES OF MY WORK
Reconstruction of the furnace (formerly - now)
was
became
Recovery process:
The period for reconstruction of the furnace is 7 days . Scope of work:
- dismantling the old combustion part
- dismantling of destroyed channels
- installation of channels
- installation of furnace
Cost of work (excluding material) 70,000 rubles.
The cost of finishing work with preparation (excluding material) is 30,000 rubles.
Reconstruction of the fireplace (formerly - now)
WAS
BECAME
Recovery process:
The period for reconstruction of the fireplace is 10 days.
Scope of work:
- dismantling an old fireplace
- podium installation
- installation of fireplace insert
- chimney connection
- construction of a decorative box
- Finishing work
The cost of work (excluding material) is 50,000 rubles.
The cost of turnkey work in this option (including materials) is 140,000 rubles.
Some tips
Timely maintenance of the fireplace can include all routine repairs. Therefore, correct maintenance ensures that major repairs that require stopping the fireplace can be avoided. React promptly to the slightest manifestation of questionable signs. If you don’t put off work, you will get by with minimal losses. There are many cases in practice where the smallest defects over time lead to large-scale repairs.
Check the condition of clay surfaces every two weeks. The patency of the chimney channels can be determined by looking into the pipe from the bottom up from the firebox. Don't forget about seasonal maintenance. Prolonged downtime of the fireplace can lead to partial destruction of the masonry. Therefore, when opening the winter season, make sure that there is traction and structural integrity.
Photos (before - after)
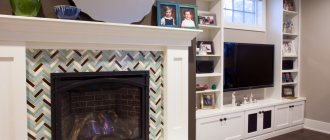
Fireplace installation
Fireplace installation - BEFORE
Fireplace installation - AFTER
Fireplace restoration
Fireplace BEFORE
Fireplace AFTER
Dutch kitchen repair: marble finishing, door installation
Repair of a Dutch oven - BEFORE Repair of a Dutch oven - AFTER
Photos of the restoration process:
Barbecue complex made of finishing bricks
Process:
Ready-made barbecue complex
The time frame for installation of the complex is 25 days.
The cost of work with the material (without the cost of the foundation of the doors and countertops) is 430,000 rubles.
The estimated cost of this turnkey complex (depending on the height of the chimney, the material of the countertop, the manufacture of doors, fire safety devices) is 600,000 rubles.
Barbecue complex made of hand-molded bricks
Process:
The cost depends on the chosen brick, since the cost of 1 piece of brick varies from 50 to 400 rubles per piece.
The cost of this complex (pizza oven with the possibility of using it as a smokehouse, barbecue part, cauldron part, countertop) is 970,000 rubles.
Complex for a gazebo. All that remains is to do the roofing work. And you get a full-fledged gazebo with a barbecue complex. Cozy, antique-style with a full range of functionality in using the barbecue complex. What else do you need for a comfortable holiday with friends!
More information and photos on barbecue complexes >>>
Procedure for repairing a brick kiln
So, last time we looked at the general algorithm of work when repairing a brick stove and stopped at repairing or replacing furnace doors. It was point 4.2. It should be noted that almost all problems with firebox doors are rarely independent and, as a rule, they are accompanied by a complex of problems: problems with the brickwork around the firebox door, destruction and cracking of bricks, chipping and destruction of seams.
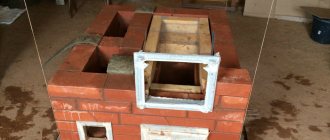
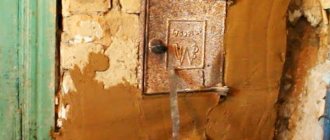
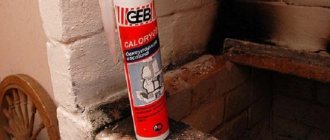
Often, these bricks are either completely or partially destroyed and also require replacement. Therefore, first, before installing a new door or replacing an old door, you will need to replace the bricks. How to do it? This depends on the door installation method you choose. There are several methods that are discussed in detail in various sources, I will only briefly describe them: the first method is classic and very common - using wire. In the photo below this wire is clearly visible, the only thing I note is that here I captured the process of dismantling the old door and partially dismantling the masonry
For the best results, I use nichrome wire - nichrome. This is steel grade X10N80. It has good ductility and heat resistance. As practice shows, such wire “stands” in furnaces for decades without any problems. In its absence, you can(?) use other steels, but I categorically do not recommend this. In my practice, repairing old stoves, I even came across fire doors attached to copper wire. The process itself: a wire with a diameter smaller (two to three times, approximately) than the thickness of the seams of your stove’s masonry is attached to the door frame. The vast majority of fire doors already have holes for attaching wire. However, if you suddenly come across a door frame without holes or find the factory layout inconvenient, this is not a problem. Cast iron is generally very easy to machine. You can drill the holes you need using regular metal drills - usually with high-speed steel tips. Don’t forget to cool the drill in the emulsion (oil) - this will make it last much longer. The obvious disadvantage of this method of installing doors and other cast iron fittings is the high labor intensity: you need to embed the tensioned wire into the masonry for a sufficient length. Each case is individual, but as a rule, this needs to be done no less than two bricks in length. And this is already a very large area of masonry for the bulkhead, considering that you will also have to replace the rows on top.
More advanced methods of installing fire doors involve the use of stainless steel sheets, either cut into special plates with a flange that will hold the door hooked to the masonry and subsequently these plates are screwed with self-tapping screws into pre-drilled holes, or onto a solid shell pre-fabricated and installed on the door frame.
In the second case, the thickness of the stainless steel sheet is less than in the case of installation on plates. For maximum reliability, it is possible to combine one of the latter methods with the first. The first method, using wire and the second using a shell, involve partial but significant dismantling of the masonry and possible preparation by sawing the bricks into pieces to the required size. This means that a door, for example with a stainless shell, is inserted into the opening of the masonry - accordingly, this is done by moving from top to bottom and you need space from above, since the four planes of the shell are already pre-bent. Do not forget to place a thermally insulating fireproof material (silica fiber or similar) between the stainless steel and the brickwork, along all contacting planes. It is needed not only to protect against high temperatures, but also to provide damping for the cyclic linear expansion of the metal when heated. There is also a method of installing the door only with self-tapping screws (or bolts), but I categorically do not accept it, assuming its extremely low reliability. Among the general recommendations, it is worth noting that you should avoid tightly installing the door into the masonry and sealing the cracks with clay-sand mortar - the fact is that the door heats up strongly and quickly, due to its high thermal conductivity, so when it expands, it can damage the brick, leading to its cracking and destruction of the masonry seams. Such gaps should not be sealed with rigid refractory, which I described in the first part of this article. In any case, when manipulating the masonry, you should be careful and remember that ligating the general mass, due to which it is supported due to the distribution of the load, is not a panacea and collapse is possible, therefore the excavation of bricks to be replaced must be carried out with caution, in some cases by installing supports and other auxiliary devices. I sometimes use a simple car jack and a few pieces of wood, but this is in the category of little tricks.
I got a little carried away by the story about plumbing and undeservedly neglected the skill of a mason. Here are some important tips and tricks:
In general, when replacing doors and other fittings, you have a relatively small amount of masonry work to do, but this makes it no less responsible. Follow all necessary and known recommendations for the selection and preparation of material. The masonry must be carried out with bandaging - that is, the vertical seams of vertically adjacent rows should not be on top of each other, here is an example in the picture.
Even a primitive or not entirely neat “lock” made of brick over the door opening is better than just masonry. And it is completely unacceptable to leave the brick hanging entirely above the opening, for example on some metal plate. Like in this image:
Helpful advice - take advantage of the opportunity!
When you carry out a partial repair of a stove, with the dismantling of its individual elements, as a rule, you have the opportunity to clean its hard-to-reach places. This opportunity must be used. So, if you remove either the door or the cooking floor, you will have access to the heat area and the space after it. Hailo is a hole in the firebox through which flue gases escape. In practice, it has been observed that in the area after the high, on horizontal surfaces, a fairly large amount of ash accumulates. It can be easily removed manually using available tools.
Replacing and installing other furnace accessories, such as blower and cleaning doors, is a much simpler operation, with the possible exception of replacing various types of valves, however, a separate article will be devoted to this very difficult issue.
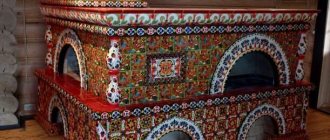
4.3. Firebox repair. One of the most vulnerable and critical places in the furnace - after all, it is there that combustion of fuel occurs and it is there that the bricks are subject to the greatest thermal loads, so it is not surprising that they are destroyed first, especially if the firebox is not lined with refractory bricks and is made of ordinary, “red” » “kiln” bricks. This is an even more complex and responsible type of repair. It’s good if you are repairing a “Swedge” (a heating and cooking stove with a cast iron flooring) and have the opportunity to easily replace old bricks with new ones. The situation is much more complicated with a heating stove (a “Dutch” stove (golanka, galanka, gulanka and other variations of the name that make my ears curl into tubes...), the firebox of which does not have a “visible end” in height and most likely rests on it some kind of structure convective system of the oven in the form of an afterburning chamber, a bread chamber and/or a smoke collector, or simply a system of channels - as most often happens. In simple terms, this is just a heating oven. Sometimes they are called - a column. Note that this oven, this “column” can be not only square in perimeter, but also rectangular. This directly depends on what kind of room this stove is heating. So, if you decide to repair the firebox, I strongly do not recommend doing this without an insurance partner. Please follow precautions and safety measures. A stove, especially when aged, can present many unpleasant surprises and the apparent strength of the outer surface of the masonry can really only be visible. In addition, fireproof masonry mortars do not always make it easy to remove bricks; many of them are sintered, turning the firebox or part of the bricks into a single whole. Therefore, not as self-promotion, but solely assuming good intentions, I would advise you to trust this type of repair to professionals, or even better, to the stove maker who built this stove for you. All this equally applies to the repair of the arch of a Russian stove, which is part of its firebox and has the highest complexity from the point of view of repair, since there the laws of ligation and load distribution work differently than in simple vertical brickwork. In simpler terms, the vault can collapse, form like a house of cards, even if a single brick or even a piece of it or the remains of a burnt brick are removed from it. In general, repairing a firebox means replacing bricks. The scale of such repairs is purely individual and depends on the quality of the source materials and the professionalism of the stove maker who built and subsequently repaired the stove. Very often, precisely on the basis of critical wear of the firebox, it is necessary to make a decision to completely dismantle the stove. But usually, everything can be repaired and restored. If the firebox was not lined, then the burnt and collapsed bricks are replaced and, if necessary, lining is made, for example, as in this photo (this is the same stove as in the first photo), or the old lining is simply changed, if it was provided.
In this case, bricks of the SHA-6 brand were used for lining. These bricks will protect the red, non-fire-resistant bricks of the furnace walls and will slightly increase the heat capacity. Unfortunately, they will also slightly reduce the volume of the firebox, but this sacrifice is forced and the negative effect from it is much less than the destruction of the load-bearing wall of the furnace. This problem can also be solved quite easily - with one or two additional logs when burning. There are other options for protecting the firebox, but I will talk about them next time, at the beginning of the next article. Stay tuned for updates on the website!
More photos of completed work:
Fireplace installation - BEFORE
Fireplace installation - AFTER
Fireplace BEFORE
Fireplace AFTER
Dutch kitchen repair, marble finishing, door installation
Dutch kitchen repair, marble finishing, door installation
Dutch kitchen repair, marble finishing, door installation
Dutch kitchen repair, marble finishing, door installation
AFTER — Repair of a Dutch oven, marble finishing, door installation AFTER — Repair of a Dutch oven, marble finishing, door installation
Installation of a barbecue complex
Installation of a barbecue complex
Types of repairs and signs of the need for repair of stove products
It often happens that even a new stove, fireplace, barbecue or barbecue complex, built by amateurs or according to instructions from the Internet, smokes, does not heat up well, crumbles, etc. Such stoves, most often, were created by the owners themselves, or by unscrupulous and inexperienced builders.
The main causes of cracks and mortar leakage from joints:
- excessively thick masonry joint (more than 3-5 mm) - a mistake inherent in masons and novice stove makers
- incorrectly selected masonry mixtures (we use only high-quality and time-tested mixtures in our work: Kostroma stove of the Makarovs' house, Plitonit - SuperKamin and heat-resistant Terracotta clay-chamotte)
- Inadequate filling of seams is a mistake inherent in masons, blunderers and novice stove makers
- failure to comply with compensation thermal gaps during the work process is a mistake inherent in masons and novice stove makers
- improper mixing of mixtures
- non-compliance with temperature conditions during work
- adding cement to speed up masonry
- natural operational burnout in the seams in the firebox
- lack of firebox lining
- incorrect product design
- local overheating
- improper operation
We recommend reading the article on the proper operation of stove products.
The main reasons for smoking of stoves, fireplaces, barbecue complexes:
- the product has not been used for a long time
- condensation in a cold chimney pipe
- draft, damp, rotten, dirty firewood
- insufficient oxygen supply for proper combustion
- “overturning” of thrust or periodically occurring reverse thrust
- the vent is clogged with ash
- overgrowing of chimney pipes and ducts with soot
- a foreign object got into the chimney pipe (for example, a bird's nest; it collapsed, a delaminated brick fell out)
- insufficient chimney pipe height
- nearby tall trees
- incorrect chimney design (including small cross-section of channels)
- Incorrect combustion door size - firebox * channel cross-section
- incorrect proportion of the sizes of the fuel chamber and the blower chamber
- depressurization of brickwork - formation of cracks due to the long service life of the product
- constructive miscalculations of the master
- lowered entrance to the “well”
- the smoke collector (smoke chamber) is incorrectly designed and constructed
- small size of heat in Russian ovens
- the proportions of the fireplace or barbecue are incorrectly selected
- the smoke collector (smoke chamber) is filled with steps
- missing or greatly reduced smoke tooth
Price list
| Service | Price |
| Minor repairs to the stove/fireplace with materials | from 9000 to 18000 rub. |
| Medium stove/fireplace repair with materials | from 18,000 to 30,000 rub. |
| Overhaul of stove/fireplace with material | from 30,000 rub. |
| Tiling (work) | from 4500 rub. / m2 |
| Furnace repair | from 9000 rub. |
| Pipe repairs - WE DO NOT DO IT SEPARATELY | from rub. |
| Installation of a damper on a chimney | from 5000 rub. |
| Installing a liner in the chimney | from 7000 rub. |
| Ventilation installation | from 5000 rub. |
| Installation of a brick chimney | from 30,000 rub. |
| Installation of a metal chimney (sandwich) | from 3000 rub. |
| Furnace finishing | from 3000 rub. m2 |
| Door installation | from 2000 rub. |
| Hob installation | from 2000 rub. |
| Departure | |
| Moscow | 1500 rub. |
| Moscow region | 2000 rub. |
| Moscow region (for the first concrete ring) | from 2000 rub. |
Call:
+7(499)112-47-76
Gregory
Causes
Every repairman knows that when troubleshooting problems, one must first eliminate the influence of provoking factors. In simple words, before repairing fireplaces, you must first find the reason for its failure.
- Negative conditions. High temperature itself can be harmful to building materials, even if they are considered fireproof. Each fireplace brick experiences pressure from the upper bricks. With all this, a high temperature is created in the firebox. Periodic cooling and heating of the fireplace destroys any material due to the fact that deformation of linear expansion constantly occurs. When different materials come into contact with each other, the fireplace elements get quite a lot of damage, due to the fact that all substances have different expansion coefficients.
- Errors in fireplace laying technology. It is necessary to understand that in existing schemes for orderly execution of brickwork, every little detail is important. Failure to comply with the technology can lead to rapid failure of the device or its initial unsuitability.
- Incorrect operation. This concept covers all maintenance work that every owner is required to carry out at a certain frequency. Lack of basic care, inappropriate fuel, and neglect of the first signs of malfunction can lead to repairs of varying complexity.
It's time to take some action
Difficulty of repair
The above-mentioned types of work are usually classified as easy and medium difficulty. As for light types, they can be entrusted to any person who knows how to handle tools, giving him a few recommendations. Simple repair work can also be called routine. They are simply necessary for the fireplace during its many years of operation.
The complexity of the repair largely depends on the type of heating system and the correctness of the initial installation. The size of the fireplace plays an important role. (See also: Decorating fireplaces with your own hands)
Medium types of repair work require familiarization and memorization of instructions. But it can also be mastered by every fireplace owner.
There is a third degree of complexity - major repairs. Here you need to contact specialists. However, if you are used to doing everything yourself, then at least consult with professionals in the repair of heating fireplace systems.
Medium renovation
Medium repair is aimed at correcting more serious problems than the current one. However, most manage to cope with it on their own. For example, to clear a blockage, you need to use a simple wire. With its help you can remove the blockage.
It is imperative to change the lower part of the heating chamber in a timely manner. To do this, you need to pre-sort the bricks. The lower part of the heating chamber is especially susceptible to wear. As a result of regular wear and tear, the fuel combustion process is incomplete. The seams of the main mass are filled with crushed stone or sand. Otherwise, gases will enter the home.
It is very important to make these types of repairs in a timely manner.
Composition of clay mortars for laying stoves
When laying stoves
From ordinary bricks,
plastic clay
, mostly red, not contaminated with random impurities.
Before use, the clay is soaked in solution and rubbed through a mesh
with
3-4 mm
.
To prepare the solution
As a rule,
mountain sand
, without foreign impurities and plant residues,
fine-grained, sifted through a sieve
with holes of
1.0-1.5 mm
.
How to prevent cracks in your cooktop
In heating and cooking stove designs, the “sore spot” is the cast iron hob. Cracks in the panel themselves do not interfere with the operation of the stove. If it is folded correctly, it has good traction and cracks do not cause any inconvenience. But - for the time being. If the design of the stove is broken or there are errors in the masonry, then carbon monoxide can leak through these cracks. And this is a big threat to the lives of people who are in the room.
As a rule, high-quality cast iron panels almost never crack. But it's better to be safe.
In order to prevent cracks from appearing on the panel, the first heating of the stove with a new hob is done carefully, warmed up slowly, without loading the entire firebox. To distribute heat evenly over the panel, pour a thick layer of sand on it, or lay out a brick
Remove the sand or remove the brick from the panel only after it has completely cooled. A uniformly loaded panel will “sit down” without distortions, which means there will be no “stress” cracks in it.
Remember the process of initially laying a fireplace
It’s very good if you initially built the fireplace with your own hands, or personally supervised the process of laying each brick. This will make it much easier to fix the problem.
When the laying process was taking place, it probably occurred to you that some part of the system might break, the masonry might crack, the chimney might become clogged, etc. There is no need to be afraid of these assumptions. It is necessary to initially analyze the potential reliability of the future structure in order to make the most effective repairs if necessary.
It’s even better when all the elements that make up the fireplace system are thoroughly known. Then the upcoming repair work will not be difficult at all. It must be said that it is difficult not to encounter the need for fireplace repair. Unless the most ideal operation of this unit will save the fireplace from early or late repairs. But, unfortunately, not everyone manages to follow the rules for proper use of a fireplace and proper care. In addition, the durability of the fireplace will also depend on the quality of its initial installation and heating systems. It is very important to pay attention to the production of fireplaces and their heating elements, to ensure their quality. (See also: DIY fireplace inserts)
Over time, problems and malfunctions will still arise. They need to be eliminated in a timely manner, which is called “hot on the heels.” And, most importantly, this is possible without even resorting to the services of specialists.
How to fix defects
If we talk about the defects that old brick stoves and fireplaces are most susceptible to in general, then we should separately note and talk about the following:
- The most common and common defect of a stove is the appearance of cracks on the bricks themselves and on the seams. In order to check how airtight such a stove is, it is necessary to preheat the stove and perform its kindling according to all the rules. When lighting, you will notice how smoke and dangerous gases seep into the room; after identifying leaks, you must completely stop lighting and ventilate the room well. After the seams are well and completely sealed, they must be rubbed and all excess removed, and then the masonry mortar should be allowed to dry completely;
- In order to carefully get rid of old seams, it is necessary to wet the old masonry mortar with water and clean them so that the depth of the holes between the bricks is about 20-30 millimeters. Now we again wet the resulting hole and fill it with a clay solution, which can be mixed with table salt in the proportion of half a kilogram per bucket of clay. Thus, each seam will have additional protection from the appearance of cracks; strengthening manipulations can also be carried out by performing facing work; for this, the brickwork is lined with ceramic tiles, porcelain stoneware, stone or any other material with a fire-resistant composition;
- If the floor covering, which is covered with sheets of metal, becomes covered with rust and corrosion, it also needs to be replaced with a new one, since in places of formation the material becomes thinner and becomes poor protection. For these purposes, asbestos sheets can be used;
- Various loosening of the structural elements of a brick stove-fireplace, such as the door, ash chamber, and hob, are also common malfunctions. In this case, it is necessary to re-treat and isolate the space that is located near the loose areas. The old masonry mortar is first removed by soaking it, after which the gaps are filled with heat-resistant glue, which is diluted with plain water, the proportion in this case will be one to one. The brickwork and the metal base must have a protective fireproof layer between them, which can be done using an asbestos or ceramic cord, and there should be no gaps left, everything must be airtight;
- If the hob is loose, you will need to heat it up, then remove it with a crowbar or an ax, all seams are cleaned, then resealed and sealed, and the tiles are installed back. In this case, compaction can be done with basalt felt.
This video tells in detail how you can restore an old brick stove with your own hands and for only 500 rubles:
How to prepare a solution for furnace work
During furnace work
The following solutions are used:
- for laying stoves and kitchen stoves
made of
ordinary red brick
- clay-sand mortar; - the same for masonry made of refractory brick
-
refractory clay with sand
; - the same for masonry made of refractory bricks
-
refractory clay with fireclay powder
; - for laying chimneys, ventilation and smoke ducts
in the walls of buildings - lime-sand or lime-cement mortar; - for laying chimneys on top of the attic floor
- lime-cement, - for laying chimneys on top of the roof
- cement mortar.
NOTE: Quantitative ratio of clay-sand mortar
, depending on the fat content of the clay, should ensure drying of the solution without a noticeable change in its volume and without cracking.
For plastering
prepare the following solution compositions to choose from:
- or 1st composition = 1 part gypsum + 2 parts lime + 1 part sand + 0.2 parts asbestos;
- or 2nd composition = 1 part clay + 2 parts lime + 2 parts sand + 0.1 part asbestos;
- or 3rd composition = 1 part clay + 2 parts sand + 0.1 part asbestos;
- or 4th composition = 1 part clay + 2 parts sand + 1 part cement + 0.1 parts asbestos;
ATTENTION! Preparation of the solution
carried out at least DAYS before the start of work.
To improve the quality of oven plaster
Asbestos fiber is added
to the solution (10% -20% of the total volume of the solution). The thickness of the plaster sheet should not exceed 15 mm.