Author: Yuriy Fedorovich Kolesnikov, thermal power engineer
The oven is rude and the source of a fair amount of confusion. The fact is that “rude” or “rude” is not an established term. In Western and, partly, in South Slavic languages, it is either simply a house heating and cooking stove, or a wood-burning stove for a summer kitchen with 150-200 bricks. Well, according to acc. When searching on the Russian Internet, Dutch, Swedish, bathhouse (!), bell-type (!!) stoves, etc. appear. You can even find statements that say that there was once an outstanding stove designer, Grub.
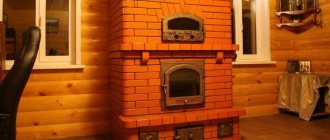
In fact, a stove with a rough, or simply rough, is a compact heating and cooking stove with a heating panel, separate from the stove according to the heat cycle, but combined technologically, i.e. they are built together (see also below). Hence the conclusion that there cannot be a bell housing - heating shields for stoves are always ducted. A do-it-yourself rough oven is easier to build than a channel furnace of equal thermal power with a single thermal cycle, requires less materials and weighs less. However, its thermal efficiency (analogous to the efficiency for furnaces) is lower. Therefore, rough houses are built in seasonally inhabited premises or small houses with good thermal insulation, where some excess fuel consumption in absolute and monetary terms does not impact the budget.
Note: a heating and cooking unit made of brick for 12 kW of heat requires up to 1200 bricks; Dutch stove of the same power without a hob - 1200-1350, Swedish - 1800-2000, Russian stove - 2500-3500 bricks.
Design and principle of operation
The rough stove has a thermal power limit of up to 22 kW, which indicates the advisability of its use in small, well-insulated rooms or in seasonally operated facilities.
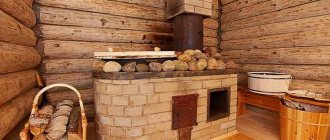
The load on the floor is from 500 kgf/m2, so it can be erected without pouring a foundation, which allows significant savings on building materials. The difference between rude stoves and other types of stoves lies in the powerful firebox and the absence of a smoke tooth in the combustion chamber, designed to retain the heated gas under the cooking surface. Thanks to this design solution, the effective simultaneous use of a stove for cooking and a panel for heating premises is possible.
The choice in favor of higher heating power is also due to the need to overcome the resistance of the smoke current in the passages of the shield. Saving fuel with increased traction will lead to significant heat loss, as well as loss of space heating efficiency.
Structurally, the furnace consists of the following elements:
- furnace, which is a chamber in which solid fuel is burned,
- ash chamber, a chamber used to collect ash, as well as to supply the firebox with the air required to support the combustion process,
- hob, which is the upper part of the combustion chamber used for cooking food,
- a shield with channels for removing gases, used to lower their temperature and warm up the room,
- chimney to remove smoke from the stove into the atmosphere.
The principle of operation of the rough is very simple:
- Fuel (coal, firewood, briquettes, etc.) is placed in the combustion chamber and ignited,
- using the ash door and damper on the chimney, the intensity of combustion is regulated by supplying a sufficient amount of air and creating optimal draft,
- As the furnace heats up, the hob also heats up,
- smoke from the furnace enters the channels, during the passage of which it transfers part of the heat to the walls and, thus, warms the room,
- After partial heat transfer, the smoke is discharged into the atmosphere through the chimney.
Where is the best place to install
Stoves are rough due to their relatively low power, it is recommended to install them in living rooms so that the shield allows them to be heated effectively, and the firebox door is located towards the corridor or other non-residential well-ventilated room. No less advantageous is the position in the middle of the room.
When choosing a location, the following requirements must be taken into account:
- the minimum distance to structures or interior items should be at least 15 cm;
- the location of the chimney is selected so that it passes between the floor beams and does not touch the wooden load-bearing elements of the roof;
- there should be enough space near the stove to place a small amount of firewood for heating;
- the room should be well ventilated in case of deterioration of draft and to increase operational safety.
The oven door should be facing the corridor
Principles of bricklaying a stove - technology for breaking bricks and laying a chimney
Laying a brick stove is a process no less important than building the house in which it will be located. And although there is nothing complicated in the design of the furnace, there are a number of features that must be taken into account.
In order to build a good stove, it is necessary to select high-quality building material - brick. It must have the correct shape, implying right angles between smooth surfaces, as well as smooth edges. The standard brick size must be maintained.
The brick must be well fired, without mechanical damage, cracks, as well as foreign impurities in the form of stones and lime. Immediately before laying, it should be moistened by immersing it in water for several minutes. In the case of refractory brick, it is only rinsed with water in order to remove dust from the surface.
The design of the furnace determines a lot, including the thickness of the walls.
Usually the latter are measured in fractions of the length of the brick, for example 1. ½. ¼. 2/4, 3/4 bricks.
To ensure the best dressing, walls one brick thick are laid out in rows, alternating a row of pokes and a row of spoons. Walls with a thickness of ¾ brick are laid in two rows: first, half a brick, and then, the second row, on an edge, which is a quarter of a brick. The walls, half a brick thick, are laid from single spoons, or from two rows of bricks laid on edge.
A wall a quarter brick thick can be obtained by laying bricks on edge. Another technique for laying walls with complete overlap of seams is that the brick is placed on its edge so that one row is 5-6 cm higher than the other. The result is a wall half a brick thick, or, as they say among professionals of this craft, 2/4 bricks.
When laying a stove, bandaging the seams is mandatory. It consists in the fact that all seams must be covered with a solid brick, covering each side adjacent to the seam with half a brick. However, sometimes a quarter-brick ligation is possible.
Before starting to lay the chimney and firebox, it is necessary to select and lay out the bricks dry. Then it must be trimmed and adjusted in such a way that all seams in each row of bricks are bandaged. If there is a drawing of the order, you can lay directly onto the mortar.
When laying stoves, you must try not to use chipped and hewn bricks. This is due to the fact that such bricks are less durable and more susceptible to the destructive effects of external factors. If there is still a need to use such a brick, it is highly undesirable to lay it with its hewn side inside the firebox or chimney. This will lead to the fact that under the influence of high temperatures, the brick, weakened by the hew, will quickly collapse and crumble.
Therefore, when laying it, it must be positioned in such a way that the hewn surface is hidden in the stove masonry. It is also worth noting that the cutting must be done very carefully so that the surface is as smooth as possible and the brick can be precisely adjusted to the location. The technology for chipping bricks is quite simple, but it requires some skill. To begin with, notches are made on the brick on all four sides, which form a chip boundary.
After this, you need to split it into pieces with one sharp, precise blow. Laying the brick begins immediately after adjustment. To do this, apply a layer of mortar no more than 5 mm thick to the surface. After this, the brick is carefully laid on top. Excess mortar that has been squeezed out of the seams between the bricks is cleaned with a trowel. Each laid row must be checked for horizontalness and squareness using a level.
Walls and corners are checked for verticality using a plumb line. Then, after checking, the next layers can be laid, while observing the bandaging of the seams. In order to block the channels inside the furnace, the brick must be placed on steel strips. Although such metal inserts are undesirable.
This is due to the fact that when heated, metal expands more than brick. Over time, this can lead to damage to the masonry. In order to avoid such consequences, the steel strips are not fixed with mortar, but are laid freely. However, the best option when constructing the walls of the furnace is to fasten the brick “into the lock.” To obtain a flat and smooth surface of the chimney walls, not only neat, high-quality masonry is necessary, but also the so-called mopping of the vertical surfaces of the walls using a wet rag.
Step-by-step construction with your own hands
The process of constructing a furnace unit involves the complete completion of several stages, including preparatory work, purchase, installation of mortar, laying itself, and so on.
It is impossible to single out any significant or unimportant parts of construction work: the high-quality implementation of each of them directly affects how the planned product will turn out.
Pouring the base
If the installation of smoke exhaust ducts is complex or the heating dimensions are large, laying the foundation is a mandatory step.
If the floors are already laid, you will have to disassemble them a little and cut out an area for the stove.
It is necessary to dig a hole under the concrete base, at least 25 cm deep. Next, fill it with a sand cushion, sprinkle it with water and compact it thoroughly, pour in medium-sized crushed stone.
Laying the foundation
Now let's start with the filling itself. The finished solution is poured so that the crushed stone is completely covered with concrete.
After this, brickwork is made until a level condition is achieved between the foundation and the floor surface, which can be checked using a building level. When the cement has thoroughly hardened, the base is covered with a layer of waterproofing, for which rolled roofing felt is excellent.
How to apply the solution
To form a solid foundation, one of three mortar options can be used.
Limestone is prepared from 1 part of dry lime, half of this volume is cement and 2.5 parts of sand.
Clay pouring involves the use of sand, simple clay and fireclay clay in proportions 4 * 1 * 1, respectively.
A standard cement mixture is prepared from parts of sand and cement in a ratio of 3 * 1.
Water is not calculated in exact volumes, since the final consistency depends on the quality of the materials used and the brand of cement. But in the end you should get a mixture whose consistency is close to thick sour cream.
Mixing the solution
If two of the three types of mortar need to be prepared immediately before use, then the clay is applied several hours, preferably 8-10, before the start of construction work. Then the composition will soften as much as possible and become quite viscous.
Brickwork with order
To build a good rough stove, you need to lay high-strength, first-class bricks. Second-class materials will not be able to withstand the expected temperature load.
It is important that the brick blocks are intact, without manufacturing defects, stains, and with a uniform color.
During the work process, it is necessary to take into account all the nuances of the stove masonry. So, before pouring the foundation, it is worth checking the digging depth. If a lot of sand or large crushed stone was used, then the row of bricks will not be level with the floor. You cannot try to increase the density of the blocks by tapping, but you need to immediately remove the excess construction mixture.
The solution is applied not only to the previous row, but also to the brick itself. Each block must be gently pressed down, slightly moving in different directions several times to strengthen the fit and release air.
Wetting the bricks will help preserve the basic properties of the mixture used. Some kiln makers directly dip each block in a bucket of water and shake off the excess.
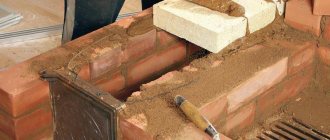
Brickwork
The first row of bricks is laid on the roofing felt laid on top of the foundation, the level position of which is checked with a building level, and the thickness of the seams is checked. The width of the space between blocks should not exceed 3 mm.
After the first row has been successfully completed, the second is laid out with the bricks offset. Depending on the pattern chosen, this may be a half, third, or quarter block shift. Thus, the seams between adjacent bricks of the previous row are closed with a brick product at the next level. At turning corners, clinker or wedge blocks can be used for a better look.
Asbestos wire is used to fasten the doors of the blower and firebox: it is wrapped around the body parts, and then inserted into a permanent position. It differs from simple wire in its fire-resistant qualities.
Next, several more rows of bricks are laid out, and in place of the doors, the blocks are tightly secured around the frame with mortar.
It is better to control each next level using a row - a metal profile or a wooden slat, which will help mark the masonry of the row and fix the top and bottom in one position. In this way, an even installation is achieved.
All that remains is to put on the top plate, which is pre-cut with a grinder to the required size. The thickness of the cooking space should be less than the masonry.
Chimney formation
Despite the fact that the construction of a chimney is the final stage of construction, one should not rush when completing it. Incorrect installation of this pipe may interfere with the normal removal of smoke. As a result, there is a risk of carbon monoxide poisoning or “black” heating.
First, chimney channels are formed. If you have absolutely no skills in handling a chimney, beginners can be offered the installation of a stainless steel pipe.
The principle of masonry is no different from the main stove, and bricks are needed with good frost resistance. Even though the smoke comes out much cooler, the temperature inside the pipe can reach 800 degrees. But the weather outside often changes and precipitation occurs, so without frost-resistant blocks a high-quality channel will not work.
There are certain requirements for the construction of a smoke exhaust structure. When using a stainless steel pipe, it is important that the wall thickness is at least 0.5 mm. The recommended parameter is 1 mm.
We form a chimney.
It is necessary to provide in advance access points for cleaning from soot and deposits. The cross section should correspond to what the thrust will be.
In total, from the stove itself you can build a chimney about 5 meters high, leaving at least 1 m above the roof.
It is necessary to make external insulation so that condensation does not form inside and the draft does not deteriorate.
Advantages and disadvantages
Brick chimneys have the following advantages:
- relative cheapness, in comparison with modern materials used for it (now popular “sandwich” panels);
- long service life, can reach up to 30 years;
- brick chimney as an architectural element is ideally combined with many roofing materials.
But due to the fact that brick still belongs to the “old-timers” of construction, it has many disadvantages in comparison with its modern analogues:
- the significant weight of the brick structure requires the creation of a reliable foundation;
- erecting a pipe takes longer than when using a “sandwich”;
- for a chimney, the ideal cross-section is round, and the brick is rectangular in shape; square structures are better made from it;
- The inside of the pipe, even after applying plaster, remains rough, which is why it quickly becomes covered with soot, which impairs traction.
Conclusion
The rough stove is an economical source of heat that creates a comfortable atmosphere. A brick stove gives the house a unique feeling of coziness and rustic identity. If anyone wants to build such a unit, anyone can just understand a little about the principles of brickwork.
If you have the appropriate skills, a chimney can also be made of brick, but you should do this with caution, building a chimney requires precision. For a small dacha, ruba is especially convenient; it will ensure uniform distribution of heat in the house and will not take up much space. The oven will also be an excellent device for cooking food.
Design safety
Violation of stove masonry technology at any stage of construction can lead to danger when using the firebox. The main mistake can be incorrect laying of the foundation.
The main signs of malfunctions that occur when the foundation is laid incorrectly:
- The roof of the firebox is destroyed.
- The doors fall out.
- Burning coal spills out.
- The brickwork is cracking right through the entire area of the stove.
- Chimneys become unusable.
It is impossible to heat the stove in this condition - there is a high risk of fire and poisoning of people from flue gases. Damage caused by an unsuitable foundation cannot be corrected. You will have to disassemble the entire stove and rebuild all the elements.
Shield options and designs
Do-it-yourself rough stoves can be erected with shields according to one of the following schemes:
- with a parallel flow of flue gases, characterized by large dimensions, high thermal efficiency and a large occupied area;
- with sequential stroke with horizontal channels;
- with consistent stroke and vertical channels;
- with a sequential stroke and long vertical channels, characterized by high thermal efficiency and heat transfer, the need to lay a separate foundation, and increased labor costs for construction.
What are products equipped with rough steel made from?
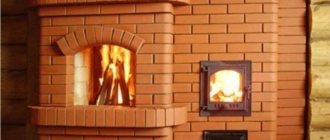
This oven has interesting parameters and features. This includes, first of all, the fact that the most popular material for creating a structure is ceramic brick, which has excellent parameters. These include excellent heat dissipation, so such equipment will provide fast and uniform heating in the house.
This material is considered very attractive, so products made from it fit perfectly into any interior. A stove made with your own hands from ceramic bricks in a rustic style is considered especially relevant. This stove is well suited to buildings made of wood.
If desired, such equipment can be additionally decorated with ceramic facing tiles, which have the same heat transfer rates as bricks made from this material. However, due to its more attractive and interesting appearance, the resulting design will fit perfectly into any interior. In this case, you can build equipment that will have the desired color and texture.
Operating rules
A rough stove can only be used for one or two seasons, or inside a small house, since it is not capable of heating large spaces. Also, its power is not enough for heating in winter.
It is necessary to regularly clean the chimney from soot and remove soot. If this is not done, the outlet will become smaller due to accumulations of combustion products, and some of the harmful gases will penetrate back into the house, which can lead to poisoning.
You should not put a lot of fuel in one stack of firewood or coal, and also do not close the door too tightly.
Technique of use
For cooking, only heat-resistant cookware is used, which when heated does not deform and does not emit harmful substances. For example, from clay, cast iron.
The bench is used for its intended purpose only when heating with wood, since coal fuel unnecessarily heats the stove.
Immediately after laying and drying the mortar, you should conduct a test heating with a small amount of fuel, for example, burn a couple of newspapers. To make sure that the smoke exhaust is working properly.
Masonry materials
Red and fireclay bricks for laying stoves
When considering the materials used in masonry work, the existing varieties of brick products are first taken into account. Before choosing a row laying scheme, be sure to clarify what size of brick the structure is designed for, which will eliminate serious mistakes
The possibility of using figured wedge-shaped blanks, often used when laying arched vaults, is also taken into account
Bricks with rounded corners or other non-standard configurations are often used for finishing facades. The furnace diagram used during operation takes into account all options for brick material, laid according to the order and the table attached to it
In addition, the following product characteristics are taken into account:
- “brand” strength of brick, which is understood as a mechanical load that the material can withstand for a long time without consequences for its structure;
- frost resistance;
- thermal conductivity;
- hygroscopicity.
The first of these parameters is indicated by the letter symbol M and a simple three-digit number indicating the permissible load in kgf/cm². To lay the functional part of the furnace, you need a brick of at least M150 grade. If the furnace structure is particularly massive, its construction will require products of the M200 or M250 brands. The frost resistance of the brick is indicated by the Latin letter F in the marking with a numerical designation next to it. The latter expresses a minimum of cycles of freezing and thawing of the brick material without losing its strength characteristics.
Hygroscopicity or the ability of a material to absorb moisture is usually expressed as a percentage of its mass.
Types of bricks
Sand-lime and ceramic bricks are suitable for the construction of a furnace according to technical parameters
Any do-it-yourself stove, assembled for the stated purposes, can only work if the source material is chosen correctly. The following types of bricks are used for its construction:
- silicate;
- ceramic;
- pressed stamps.
Silicate products attract specialists with their correct shapes, smooth surfaces and a variety of colors. In their production, well-purified quartz sand and lime additives are used. Ceramic bricks, made from special types of clay, are ideal for laying stoves and fireplaces of all kinds.
From the description of pressed varieties of brick products it follows that they are produced on the basis of discarding rocks of the calcareous group: dolomite, limestone, shell rock, marble and the like. The function of the binder here is performed by Portland cement, added at the rate of 10% of the total mass. This type is found mainly in original designs used in the manufacture of exotic dishes (barbecue, for example).
Expert opinion on a homemade heat exchanger for a heating furnace
A stove with a water circuit is filled with firewood once a day.
Professionals make several comments about installing the boiler in a heating installation:
- The effectiveness of the result of the combined system without overpayments.
- Possibility of using any type of fuel. Sawdust, coal, pallets and firewood stored in a dry place are suitable.
- A stove unit that has a water boiler does not need to be heated constantly. Fuel is added once every 12-24 hours.
- A system that implements a long-term combustion type allows for high-quality heating of the building and provision of hot water.
- If you lack welding skills and understanding of the manufacturing process, you should avoid homemade heating devices. As an exception, installation in a country house or in populated areas with power outages is considered.
- The optimal type of chimney for a stove with a boiler tank is a bell-type chimney. A heat exchanger in the form of a register made of pipes with a large cross-section is placed inside.
- In order not to spend money on copper fittings, you can work with seamless pipes. They do not crack when heated.
A homemade solid fuel unit with a water-type circuit can be used in winter. It will quickly and efficiently heat a large home and ensure uninterrupted supply of hot water. Before starting work, you need to choose a high-quality material for the heat exchanger that will not heat up from the surface of the furnace structure.
Types of tile layouts may vary
- Vertical seams match. This layout is for tiles of the same size. If rectangular tiles are installed, then the layout can be both vertical and horizontal, while you can lay out colored contrasting zones and insert panels - it looks linear and neat
- Bandaging, or displacement along vertical seams. Used in geometrically complex areas so that trimmed fragments are not noticeable
- Diagonally. Artistic and complex layout, allowing for rare designs. Very original, but you will need about 10-15% more tiles, a lot of trimming and waste
- Tiles of different sizes are laid out in checkers, carpets, highlighting fragments and contrasting zones, panels and decorative elements are possible
Creating a heating wiring diagram
You can combine a stove with a water heating boiler and connect the circuit to the heating system using two schemes.
Open system
With an open system, the expansion tank is located at the highest point - in the attic; you can include a pump in the circuit.
The coolant moves by gravity, so the installation of a circulation pump is required. It is placed on the bypass, reduces the temperature difference between the return and supply, increases the speed of water movement and the quality of heat transfer. Without electricity, the line will operate on the principle of gravity.
To organize it, you will need to increase the line and horizontal slopes in diameter. The open system is equipped with a 32 mm distribution manifold with a slope of 3 to 5 mm per linear meter. The expansion tank is located at the top; air enters it from the communications.
Closed system
The radiator network provides for forced movement of water. The thrust in this case is created by a pump. It also pumps up pressure from 1 bar for cold coolant. The membrane-type reservoir is located at the bottom. A shut-off valve is used to connect it to the main line. Safety devices (air vent, pressure gauge, drain valve) are required.
It is better to connect an autonomous boiler to a brick kiln using the gravity method.
Types of furnaces
Currently, the most popular options are heating and cooking stoves designed for space heating and cooking. The design of such a stove can have a hob or a full-fledged oven.
A heating stove, which performs only one function - heating the room, has a simpler design and is built in a shorter time. The cost of installing such a stove will be minimal.
Fireplaces are classified as a separate category of stoves. Fireplace configurations can be varied - from the simplest to the most complex design developments. As a rule, the high cost of fireplaces is due to the use of a large number of expensive finishing materials.
Readers found these materials useful:
- “Shvedka” stove - a method of arrangement with a bell-type firebox and a stove bench
- Independent construction of a Dutch oven according to diagrams and drawings
Special requirements
We repeat: the advantages are simple - compactness and the ability to build in an existing house without major construction work. But it is not so easy to place a more powerful firebox in a furnace structure of generally the same dimensions; from excessive heat load it will quickly become unusable. If special requirements are not met:
- Furnace foundation.
- Masonry mortars.
- Methods of laying the structure of the furnace.
- The choice and methods of installing stove fittings.
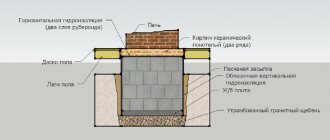
Foundation
The design of the foundation for the rough is shown in Fig. The crushed stone cushion without sand bedding is leveled to the horizon before pouring. Pouring mortar M150 – cement M300 and sand 1:2. The gap between the rubble foundation and the flooring is 30-40 mm. Don't forget to support the cut joists! Leaving their ends hanging is a common but serious mistake. The dimensions of the foundation in plan should protrude onto the contour of the furnace by at least 100-150 mm.
Construction of the furnace foundation - rough
Note: the brick bed on the foundation under the furnace is laid out with bandaging in the rows and between the rows in the same way as the first 2 rows of masonry for the furnace structure, see below.
Solutions
To fold the rough, 3 types of solutions are used, see fig. below. The bed on the foundation and the chimney are laid out on lime mortar as it combines sufficient heat and moisture resistance, but the rubble must be laid only on a completely moisture-resistant cement-sand mortar. It is highly advisable to use mountain or ravine sand with rough grains for clay mortar. Ordinary clay - purchased from the oven, guaranteed fat content and, most importantly, purity. Self-excavated clay, brought to the required fat content with sand, is of little use for coarse masonry.
Compositions of masonry mortars for coarse stoves
Masonry
For rough masonry, stove bricks and, if the order (see below) is provided for, fireclay bricks are used; red worker is of the highest quality - light red in color (fully annealed), without burn marks, distortion and swelling. Dry molded brick is absolutely unsuitable. The masonry of the structure is roughly carried out following the trail. rules:
- If you are an inexperienced stove maker, each row of masonry is first laid out dry; detected defects in cutting/chipping bricks are eliminated.
- Before laying on the mortar, each brick is soaked until the release of air bubbles stops. You can’t dump all the bricks into a barrel indiscriminately!
- A 5 mm layer of mortar is applied to the bed and the base of the brick being laid.
- The brick being laid is laid with a smooth movement, slightly tilted, and moved towards the previous one so that there are no air bubbles left in the seam.
- The brick is pressed until the seam comes together to 3 mm; You can't knock!
- Between fireclay and ordinary masonry, the initial seam is 8-10 mm; after pressing – 6 mm.
- The seam between bricks and metal embedded parts (see below) is 10 mm.
- Excess mortar squeezed out of the seam is removed with a trowel (trowel).
- The recesses in the seams found after removing excess mortar are filled with mortar by pressing without transverse movements, but not by rubbing!
Those who prefer to learn visually can watch a video tutorial on laying heating and cooking stoves below:
Video: laying a heating and cooking stove
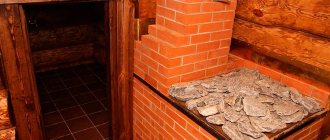
Accessories
Incorrect oven door installation
Fittings and grates for roughing require cast iron; doors and latches - with an installation skirt and holes in it for diagonal wire whiskers. Welded steel or cast iron fittings with eyes for straight lugs (laid along the corresponding furnace wall) are unsuitable in this case. However, install the doors/latches as in Fig. on the right, in the rough it is impossible; This is not according to stove rules at all. For a Dutch country house with 2.5 bricks in plan, which is heated once or twice a season, it may be fine, but not for a rough one.
It is necessary, firstly, to crimp the mustache (galvanized wire 2-3 mm) with a twist so that it does not move. Press not too tightly at first, place it at the desired angle (at least 12 mm should remain from the far end of the mustache to the inside of the masonry). Then tighten carefully and shake the door/latch slightly. Didn't leave? Good. Then, secondly, you need to tightly wrap the skirt with asbestos cord (or basalt fiber), and only now put it in place. You can also watch the following videos about installing accessories into the oven.
Video: installing the oven door
Video: grates and stove
Features of stove masonry
There are several options for masonry, the diagrams of which are usually attached to the drawings of the stoves:
- Dutch scheme;
- heating design by V. Bykov;
- stove “Stolbyanka”;
- Swedish stove design.
The most common is the Swedish one. To lay out the stove structure according to this option, you will need an ordering diagram, given in many thematic articles on the Internet. In these materials the following details of the masonry are painted step by step:
- how the roundness of the structure is maintained in individual rows;
- how the vertical overlap at the seams is organized in each of them;
- on which row are the windows for the stoves and the functional niches of the stove located;
- where the chimney outlet begins and how it is laid out and other points.
After becoming familiar with these materials, you can proceed directly to masonry work.
Nuances of brickwork
Each row is then checked with a level during installation to ensure that there are no distortions in the structure.
To obtain a smooth stove masonry along the entire perimeter with fixation of the position of the initial rows, cords are suspended from the outside, attached at several points on the floor and ceiling. Then they proceed to the step-by-step laying out of all subsequent rows, the evenness of which depends on the following factors:
- correct application of the solution to the work surface and distribution over it;
- accuracy of laying individual brick samples;
- maintaining clearance at joints and between rows.
An even simpler version of the stove
If the previous option seemed complicated to someone (although it is not), we can offer an extremely simplified heating design. You can lay out this oven with your own hands in literally an hour, even if your hands are far from being called golden.
Figure 4. The simplest version of a brick oven
The operating principle of the structure is simple. Solid fuel burns below, and settles here under the influence of its own mass. Temperature changes create a draft that carries hot air currents upward. In this case, the firewood burns almost without a residue - the smoke is minimal.
For masonry you will need only two dozen whole bricks and two halves. The stove consists of five rows. The design is so simple that there is no point in describing the order. The procedure is clearly shown in the illustration.
Figure 5. Order of the simplest brick structure Figure 6. Laying process
Figure 7. Finished mobile brick oven
For those who want an intermediate option, we can recommend a slightly more complicated option.
Figure 8. Diagram of a simple stove
Figure 9. L-shaped stove
To create this structure you will also need 20-30 bricks. This option can be completed by yourself in a couple of hours, if the skills of a mason are completely absent. A specialist will complete the construction in a matter of minutes.
Advantages of the simplest furnace designs
- very high installation speed – from a day to several minutes;
- does not require a foundation; the stove can be folded anywhere; and if you do not use a binder mixture, the stove comes out collapsible and can be easily moved;
- as fuel - everything that burns: logs, branches, cones, corn stalks, leaves, chipboard, furniture remains, etc.;
- fuel consumption is several times less than, for example, in the case of a potbelly stove;
- the simplest option - without using clay - allows you to get greater heat transfer than from a fire; therefore, such structures are a godsend for those who do not want to constantly maintain a fire while camping;
- almost complete absence of smoke - fuel burns with a minimum of waste;
- the temperature of the bricks reaches 1000 degrees – good heating and fast cooking are guaranteed.
Rules for laying the furnace vaults of an outdoor stove
When laying furnace vaults, it is necessary to block the combustion openings, fireboxes, and chambers using simple and complex shaped lintels. The ceiling in a wall is called an arch or arched lintel, and the ceiling between the walls is called a vault.
To cover large spans, an arched ceiling is used.
Vaults can be steep, flat or gentle. The semicircular arch is equal to half a circle. A gentle vault is less steep. The three-center arch is even flatter, thanks to its design, heating occurs evenly over the entire surface
This is important when baking pies. The number of bricks in the arch and rows in the vault must be odd
The middle odd brick is called a castle brick. The bricks on which the lintel or arch rests are called heels. To give them the desired shape, such bricks have to be trimmed. The space covered by any jumper is called a span. The lifting height of a vault or arch is the lifting boom.
The construction of any lintel must begin with the laying of bricks on which it will rest. They should be hewn out according to a template. Since the height of the arch or vault can be different, the angle of the heel changes. You cannot use one heel shape for all arches and vaults.
The laying of the furnace firebox begins with the preparation of circles and foot templates; for this, on a sheet of paper, cardboard or plywood, it is necessary to draw a vault of the desired shape so that an odd number of rows of masonry can fit in it.
You can easily and quickly build a vault on two boards. An axis should be drawn in the middle of the narrow board so that it intersects the wide board. At a distance of 3-5 cm from the bottom edge of the wide board, you need to draw a straight line A-B, marking the width of the firebox on it. The axis should run in the middle of the firebox, between points B and D. On the axis from line A-B, the height of the arch lifting boom should be measured upward. The resulting point can be designated by the letter D. After this, you need to select the center O in such a way that the circle passing from it, forming the arch, runs through points B, D and the upper point of the arch lifting arrow.
The rules for laying a furnace recommend using formwork for the arch, which is laid on prepared circles.
After installing and securing the formwork, a nail should be driven into the central point O, from which the circle was drawn, and strong twine should be attached to it, which is necessary for checking the rows of the vault and marking the bricks to be laid. The brick for laying the vaults must be hewn, giving it a wedge-shaped shape.
In this case, the seams have the same thickness. When using regular brick, the seams will be thinner at the bottom and thicker at the top. They must be completely filled with solution.
The heels should be trimmed and laid very carefully, since filling large voids with mortar and crushed stone can lead to settlement of the vault or arch and their destruction.
The laying of the vault should begin from the edges, from both heels at the same time, moving towards the middle of the vault or towards the castle. The bricks need to be fitted tightly, so that they almost touch each other on the side of the firebox.
The last thing to be inserted into the row of masonry of a vault or arch is a castle brick, greased on both sides with clay mortar. It is advisable to strike only with a log or a mallet, since an ordinary hammer can split the brick.
Brick laying technology
The layout of a stove for a home is quite simple.
A brick is taken, wetted in water (for better adhesion) and placed in place with a pre-applied mortar. In this case, you need to hold it with your left hand, and apply the solution with your right. In addition, a little mortar is placed on the bonded side, which is necessary for filling the seams.
The brick should be laid quickly until the moisture is absorbed into the pores.
If it was not possible to apply it in time, then the solution is removed and reapplied. After the slate is laid, it is pressed tightly and tapped on top with a hammer. This is done so that excess solution comes out, which is collected and placed in a container with the rest of the composition.
Note! Some craftsmen apply the mortar not to the masonry, but to the brick. This does not affect the quality of work and is an individual choice of each builder.
It must be remembered that when making a firebox and chimney, their inside cannot be coated with solution. This coating interferes with the normal release of smoke; when heated, everything cracks and crumbles, which leads to clogging of the chimney.
Sagging is also unacceptable, because soot will accumulate on them. Proper masonry should be smooth, with completely filled seams. Poorly filled seams create additional resistance to the passage of gases, which negatively affects traction.
Where can I put it?
The roughing unit is quite compact, which allows assembly in almost any room.
But it is advisable to build the stove inside a non-residential room to eliminate the possibility of gas poisoning or smoke.
Since the presence of a hob involves the process of cooking food, it is best to place the stove in the kitchen.
A wood-burning grill, made with your own hands from brick, with the ability to cook or fry food, is an excellent choice for a country house or dacha, where people come for a short period of time. There will be a body inside the house and there is no need to additionally install a stove or conduct gas or electricity to it.
The step-by-step process of installing the stove is shown in the following video:
Main structural elements of a stone furnace
The structure is divided into the following parts:
The body of the furnace is the main brick structure. The firebox with ash pan is the main element of the furnace structure. Typically this structure has a rectangular configuration in plan.
The main purpose of such an element is to burn fuel. The grate is a grate made of cast iron, with holes through which the ash formed during the combustion process will pass. The grate is installed between the ash chamber and the firebox. The ash chamber and the blower are located above the firebox. The main purpose of that element is to collect ash. Chimney #8212; a system of channels that connect to the firebox. Channel outlet system.
Features of the brick kiln
several conditions must be met
The air supply to the combustion chamber is ensured by an ash pan with a door located below the firebox. In turn, the exhaust gases generated during the combustion of wood are removed according to the laws of physics, when hot air from the combustion chamber rises up through the chimney pipe and goes out. At the same time, encountering obstacles on their way, hot air masses give off their heat, warming up the room. To increase efficiency, some furnace devices are equipped with a secondary chamber.
Based on the purpose for which the brick stove will be used, the complexity of its construction with your own hands depends. If a country house is used all year round and the homeowner likes to cook food with a characteristic smoky smell, then it is better to build a heating and cooking device. Moreover, such a design can have two modes - summer and winter.
In summer, the heat from fuel combustion is distributed to heat the hob and oven, if available, and is then immediately discharged outside through the chimney. In turn, in winter, before entering the exhaust gas pipe, the heated air is diverted into the upper chamber, where it gives off all its heat into the room and only then is discharged outside the house.
Laying a furnace with preferential bottom heating
Scheme of a furnace with preferential bottom heating: 1 and 3. Lower risers. 2. Lifting riser.4. Chimney.5. Cleaning.6. Smoke valves.
The following figure shows a stove that has predominantly bottom heating. Its dimensions are 115x56x231 cm. Heat transfer will be 2640 kcal per hour. Based on the smoke exhaust system, this design can be classified as a combined duct stove with bottom heating.
Flue gases will descend from the firebox, after which they will rise in a riser to the ceiling. From there, 2 parallel moves will descend to the 16th row of masonry. Then they will go into the last riser, which goes into the chimney.
This design is very rational and simple. It is capable of providing fairly good heating of the lower part and has self-regulating movement in 2 channels of the upper part, which can be considered as a cap with a nozzle.
The gas blizzard principle allows air to pass along the bottom of the hood (as shown by the dotted line) without cooling it down. This design is characterized by ease of masonry and can be located in a partition.
The fuel door and front wall open into the hallway. The device has a mounted pipe. Can be used both with wood and coal.
Schematic arrangement of shields
Heating panels can be positioned in one of four ways.
The consistent outflow of combustion products through vertical channels will require the least amount of raw materials for manufacturing. The simple arrangement of the turning sections makes it possible for a person without special skills to form the masonry on their own.
Consecutive movement through horizontal chimney channels is somewhat more complicated. Despite the general basic parameters, changing the direction of smoke movement increases the heating efficiency.
Patterns of gas movement, haze
When the channels are arranged vertically, long strokes are performed. This option combines the simplicity of laying the first type of channels, and the heating efficiency of the second. But you should stock up on more consumables and lay a high-quality foundation.
The parallel movement of smoke streams is not small in size and takes up enough space. On the other hand, this is the most heat-efficient design option for a rough stove.
The direction of outflow of gases and smoke is shown in more detail in the following video:
Brick edges and parts
Brick edges and parts
The end of the brick is called a butt, the wide flat side is called a bed, and the side surface is called a spoon. The ribs of the product are called the usenka. Masonry is carried out by placing the product on a bed, which is considered a working surface. In the only option, the elements are placed on spoons if the wall is built with ¼ brick.
Parts of stones other than full bricks are intended for making corners and turning walls and have conventional names:
- three-four (nine);
- four (quad);
- half.
The brick is divided into pieces with a pick, hitting the spoon rather than the bed, while the stone is held leaning on its edge. A small volume of incomplete factory-produced elements is ordered from the supplier.
Project selection
Structurally, a brick stove can be of several types and sizes; their choice will depend on the room and the preferences of the owner of the house. Popular stove options include:
- Kuznetsov furnace. It is characterized by high efficiency of 95% and minimal maintenance of the structure.
- Swede. This is a combined heating and cooking stove, which is of the chamber type; the oven acts as an air chamber in it.
- A DIY Russian stove will be an excellent way to heat a dacha or small house.
- Dutch. An interesting design that won’t take up much space or time to make.
- Homemade brick sauna stoves. Suitable for those who like to take a good steam bath.
Preparatory process
Having sketched out your drawing, you will confidently imagine the structure of the future furnace from the inside, and you will be able to look at the layout of the bricks. The created project will help to more realistically visualize the future structure, and therefore will be able to provide complete information about how harmoniously this stove will fit into the overall design of the room.
Before installing the stove, take care of calculating the heating of a private house.
Take a break from laying the stove by reading about the most unusual houses in the world in the article.
Materials for laying the furnace
Under no circumstances should you lay the same foundation for the walls and for the stove. Since the load on the foundation is different, this can lead to cracks and splits. In the worst case, a fire may occur.
The foundation for the furnace is laid from gravel, small brick chips or rubble stone. In size, the foundation should protrude beyond the boundaries of the stove itself by 5-7 cm along each side. The most important thing about the brick used is its correct geometric shape. In other words, all corners must be clear and even, maintaining a right angle on all sides. Each brick should be carefully checked for cracks, and it is best to use a well-burnt brick. For interior masonry, only red brick is suitable.
The brick is fastened with cement mortar. Before adding the kiln with mortar, it is recommended to lay the entire brick as it will lie already bonded without mortar. For clearer boundaries, it is advisable to use formwork - this way you can protect yourself from unevenness and distortions. The very first few rows should be laid out perfectly even and smooth. The quality of the masonry of the rest of the furnace will depend on them. After laying out the first two rows, waterproofing is carried out by laying two layers of roofing material.
The mortar for the main furnace is made from sand and clay. Only the foundation and the pipe on the outer sides are laid with cement mortar. Of course, it is better to take fatter clay and use cleaner sand.
The solution should reach the consistency of sour cream. To check whether the ratio of ingredients is correct, fashion a small ball and throw it from a height of one meter. Also, try to burn it well. If in both cases the ball remains intact and unharmed, then the proportions are correct. The density of the mortar should also differ in its plasticity, which allows you to remove excess mortar between the bricks. The level of plasticity is affected by the water content in the solution.
Choosing a location and type of foundation for the stove
Scheme of laying the foundation for the furnace
Before starting to lay the stove, pay due attention to finding a place to place it. For example, if the unit is placed in the middle of the room, it will be able to give off much more heat, warming up from all sides and evenly heating the air around
If you place the stove against the wall (and this option is used most often), cold air will constantly “walk” near the floor. Therefore, you need to make your own decision in this regard.
Preliminarily determine the installation location of the combustion door. This element must be installed so that in the future you can load fuel into the stove as conveniently and quickly as possible, without spreading debris from firewood or coal throughout the house. Usually the fire door is located on the side of the kitchen or some little-trafficked room.