Modern people find it difficult to imagine their life without boilers. In specialized retail outlets you can purchase devices from world famous companies. One of them is Ariston. Despite the reliability declared by the manufacturer, any equipment can fail for some reason. You can contact a service center or repair the Ariston water heater yourself.
You can repair this water heater yourself
The most vulnerable parts
Today, Ariston is the top three world leader in the production of equipment. The kitchens of this company are equipped with a range of household appliances - from a refrigerator to a dishwasher. In Russia, the brand gained popularity in the late nineties; its service centers can be found in all major cities.
In this video you will learn how to drain water from a water heater:
The peculiarity of electric boilers is their modern design, functionality and affordable price compared to analogues. The developers place special emphasis on the safety of their products during operation: the devices are equipped with various protections that turn off the device in the event of power surges, overheating, or lack of water supply.
Despite their reliability, water heaters are vulnerable to hard water and power failures . According to experienced experts, the weak points of Ariston water heating devices are tubular elements, magnesium anode and check valve. You can fix these simple faults yourself with a minimal set of tools. The products are characterized by a standard assembly scheme, so repair and maintenance work is not particularly difficult.
The owner must monitor the integrity of the internal coating of the tank, the processing of which uses modern materials containing glass ceramics, titanium, strengthening enamels, silver, and other high-tech additives.
Ariston water heater disassembly process:
- Disconnect the water heater from the electrical outlet.
- Drain all existing water from the tank through the drain valve, as well as the valve on the hot water connection.
- Unscrew the thermostat from the terminals, then remove it.
- Remove the heating element heater - to do this, unscrew the bracket holding it, remove the heater from the socket, and do not forget to place a bucket to drain all remaining water.
- For further and more comfortable disassembly of the boiler, remove it from its mountings and carefully lower it to the floor, placing the water heater upside down.
- Unscrew the flange and remove the gasket.
- Clean the tank from accumulated plaque - in most cases it accumulates at the bottom. This process is carried out manually, and after cleaning the container is washed.
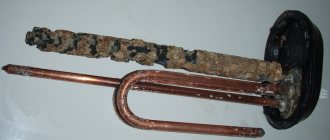
- Inspect the magnesium electrode - if it is in order, then proceed to checking the heating element. Remove scale from it, as well as rust, of course, if it is present.
- Check the integrity of the spiral using a special tester. If it turns out to be damaged, purchase a new heating element and install it while assembling the water heater.
- Inspect the gasket and, if it is dry, replace it with a new one.
- If during inspection of the flange you find any damage or notice that it is rusty, then purchase a new one from the store and then install it.
Important! Reassembling the device occurs in the reverse order. Before starting the unit, do not forget to check the strength of all fasteners and connections to avoid leaks and more serious problems.
Typical faults and preparation for repairs
Before you begin repairing an Ariston water heater, you need to understand the structure of the device, prepare the necessary tools and other devices. To eliminate mechanical damage, such as leaks, you will need:
- adjustable wrench;
- set of adapters;
- check valve
If you detect breakdowns related to the electrical part, you need to arm yourself with a multimeter. The preparatory steps include disconnecting the device from the power supply and draining the liquid from the tank.
Inside the Ariston boiler there are the following elements:
- heating element;
- A thermostat is needed to control the temperature and adjust the heating mode;
- a relay that is responsible for turning the heating element on or off;
- magnesium anode protects the tank from corrosion;
- a safety valve regulates pressure during water heating;
- The warning lights turn on when electricity is supplied, as well as when the device is heating up (such a system is present in cheaper models; expensive devices are equipped with electronics).
For repairs, you will need an adjustable wrench.
Before you begin repairs, you need to study the operating instructions for the product in detail. According to statistics, problems may occur during operation of the boiler. Typical malfunctions of an Ariston water heater:
- The water does not heat up - this means that the heating element has burned out.
- Another reason could be a thermostat failure.
- The magnesium anode has used up its life and requires replacement.
- A large amount of scale has formed on the heating elements.
The thermostat is located outside the device, so it can be replaced without additional manipulations. In all other cases, draining the water and disassembling the product is required. The volume of the water heater does not matter; the dismantling process is the same for any capacity.
How to check the serviceability of the heating element
To diagnose the heating element, you can use a tester.
A multimeter is suitable for this work. First, check the spiral. The probes of the device are applied to the terminals, and a continuity test is performed. If the tester is silent and you can’t hear a characteristic squeak, it means that the circuit has broken somewhere. It's safe to say that the heater has burned out. Then you need to measure the resistance. Models have different power, so the indicator will show 20-40 Ohms. If this does not happen, we see infinity on the display, which means we need to look for a malfunction.
Another important diagnostic operation is to determine the subject of the breakdown. To do this, we touch the body with one probe of the meter, and connect it to the terminal with the other
When the circuit rings, we can talk about a heater failure.
If the electrical switching is in normal condition, when the boiler is turned on, the RCD will trip, causing a breakdown to the housing.
Troubleshooting instructions
Ariston boiler repair consists of a series of actions that must be performed sequentially. First of all, before carrying out manipulations, it is necessary to determine the specific problem. For example, if you need to replace a safety valve, thermostat or relay, there is no need to dismantle the device. It is necessary to disassemble the device and drain the water during maintenance or replacement of a burnt heating element. Disassembly is carried out in several stages:
- First you need to disconnect the product from the network;
- drain the water;
- dismantle the flanges to get to the inside.
These are standard manipulations that should not be neglected. There have been numerous cases when home craftsmen, having forgotten to disconnect the device from the power supply, received electric shocks of varying severity. Having de-energized the device, you can begin dismantling it:
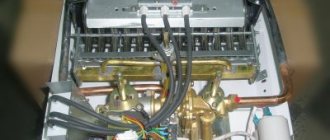
- Unscrew the cover secured with screws.
- Take photographs of the location of the wires and bolts so that nothing gets mixed up during assembly.
- Carefully disconnect the three-core cable. The first two wires - phase and zero - are connected to the thermostat. Then the latter must be carefully removed.
- Then you can start draining the liquid.
Disconnecting from the electrical network
How to disassemble a submersible pump: popular breakdowns + detailed disassembly instructions
An important and main element of disassembling a water heater is to disconnect it from the electrical network. It is simply necessary to do this, since the safety of not only the one who disassembles the boiler, but also everyone nearby, depends on it, because if the boiler explodes, the losses will be significant.
Even when the device is disconnected from the power supply, it is necessary to check the presence of current in the wires using an indicator screwdriver, since draining the water may short the wires and start a fire.
Disassembling the water heater, cleaning it inside or repairing it will not be difficult if you follow the clear instructions included in a special book. If the documents for the boiler are lost, then the parsing algorithm can be found on the Internet in various forms: written, demonstrative, etc. But do not forget that there are also models of boilers that can only be penetrated by a specialist, since the developers have made the internal system difficult for ordinary people to understand.
Draining the water and opening the device
If the initial installation of the boiler was carried out by a technician from the service center, the latter had to install a drain valve and then screw a fitting into it . This is a rather convenient and necessary device; with its help, you can attach a hose to the faucet and easily drain the water. If there is no tee, the hose should be connected to the device pipe. In order to balance the pressure during draining, you need to open the hot water tap. With a water heater capacity of up to 50 liters, the procedure will take a few minutes; if the boiler volume is 80 liters or more, the process will last at least half an hour.
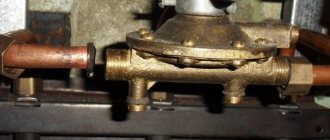
All modifications of Ariston water heaters are equipped with an oval flange on which a heating element, a magnesium anode and a tube with a thermostat are located. A rubber gasket is placed on the bottom of the flange, which ensures the product is sealed. The part is fixed on a U-shaped bar, which is secured with a nut.
After draining the water, the latter should be unscrewed, carefully push the flange inside, then turn it and remove it. After disassembling the device, you need to replace worn parts and clean the surfaces from scale . Do not use aggressive substances to clean the internal surface of the device. This is explained by the fact that the coating becomes thinner over time due to corrosion, so it is not recommended to clean off thin scale during maintenance work. To rinse the tank, just turn on the water and hold a basin or other container of suitable size underneath. When the liquid coming out of the device becomes clear, turn off its supply. Make sure there is no debris at the bottom of the tank by carefully running your hand over the surface. Carefully inspect the rubber seal - if everything is in order with it, you should not change it: a new product is not so easy to find, and its cost is high. Subsequent assembly of the product is carried out in the reverse order.
To avoid having to repair Ariston storage water heaters, it is necessary to ensure preventive inspections and cleaning of the device every 6 months. Particular attention must be paid to the magnesium anode - regular replacement of this part significantly increases the service life of the tank.
Installation
Ariston water heater for 30, 50, 80 and 100 liters: operating instructions
Installation of the “Ariston Can” water heater can be done with your own hands.
The installation of the Ariston water heater must be carried out in strict accordance with the instructions.
Installation instructions for the Ariston water heater, of course, are included when purchasing the unit.
It is necessary to check the outlet and test the voltage in the electrical network. The outlet must be grounded and have an independent wire from the panel.
Fastening
Since the weight of the device will be quite heavy, due to the large amount of water, the wall on which it will be installed must be strong. The bolts with which this structure will be secured must also be strong. It is better to use metal fasteners: hooks, bolts, screws with a diameter of 10 mm. The Ariston water heater connection should be close to the hot water supply point to avoid unnecessary heat loss. It is necessary to clearly mark the mounting location of the water heater using a level and tape measure. Make sure that the load is evenly distributed and there are no distortions. Using a drill, holes are drilled in the wall, to which brackets and holder strips are attached, on which the boiler is hung.
Some models are installed on the floor. In this case, the symmetrical installation is adjusted by the legs of the device.
Connection to the water supply system
The hoses and other connecting elements used for connection must withstand the design pressure and temperature of about 80 degrees. When connecting to a water supply system, it is best not to connect two different metals to each other, such as copper and steel (in pipes). To do this, you need to use a dielectric adapter.
Using a valve included in the device, a cold water pipe is connected. The hot water pipe is connected using a pipe. Your task is not to confuse these two inputs when connecting the Ariston boiler.
Start installation with the cold water pipe, it is marked in blue. Sealing tape or tow is wound around the pipe. If you take tow, then you need to lubricate it with a special paste. Then the tee is screwed on. There will be a relief valve at the bottom of the tee. It is installed in the upward arrow direction. This valve will control pressure and superheat. We install a tap on the side of the tee for emergency drainage. You will use it if you need to completely drain the water from the boiler.
The shut-off valve is placed at the bottom and the boiler is connected to the water supply through an adapter.
Connection to hot water is also made through a shut-off valve and adapter.
The correct diagram for connecting the Ariston water heater to the water supply is shown in the video:
Electrical connection
Only after the connection to the water has been made, we connect it to the electrical wiring. Since this unit consumes a lot of electricity, the wires must meet the requirements.
Connecting the Ariston water heater to the electrical network is as follows:
- Disconnect the water heater from the electrical network.
- The power supply wires are connected to the screw terminals of the thermostat.
- Be sure to observe the phases when connecting: - L, A or P1 - phase wire; N, B or P2 - neutral wire.
- Connect the grounding wire to the clamp on the boiler body.
- Connect the control lamp terminals to the contacts.
- Press the thermostat button.
- Close the lid
- Before turning on the power supply, you must check that the boiler is filled with water.
- Turn on the power.
Connection diagram of the Ariston boiler to electricity via a double circuit breaker:
Boiler connection
The electrical wire for the boiler must run through the wall or be hidden in a corrugated material made of non-flammable material. The connection cable must be three-core, preferably copper. Installation of the Ariston water heater must provide for grounding. Grounding is not done on metal objects and pipes, such as sewerage, water supply, and so on.
Communication with peripheral devices (errors 4**)
The screen of Ariston geysers displays error codes for standard peripheral devices. This was done in order to explain the reaction of the boiler automation to an emergency situation. In this case, the consumer will be able to try to fix the equipment breakdown or conflict on his own.
Error No. 401. Communication problem between the bus and the data transfer device. It can be caused either by a malfunction of the device itself or by damage to the bus. Repairs are only possible at a service center.
Error No. 402. GRRS/GSM modem malfunction. You need to check its connection or replace the device.
Error #403: SIM card problem. The contact has come loose or the card itself is damaged.
Error No. 404: Data transmission between modem and motherboard failed. First of all, you need to check the contacts. If they are tightly connected, then the modem is faulty.
The GSM gas boiler control module allows you to remotely control the heating modes of the building. However, in addition to the obvious advantages, there is also a disadvantage - this is another unit that can break
Error No. 405-406. Data bus (interface) problem. Usually the fault lies in loosely connected contacts. Less often the tire itself needs to be replaced.
Error No. 407. Lost signal from the room temperature sensor. You need to check the connection (wire and contacts). If they are in good condition, then you need to replace the sensor itself.
Geyser Ariston Fast EVO 11b
Vladimir Excellent speaker at an affordable price, with electronic ignition and flame modulation. But the presence of modulation does not eliminate the need to regulate the temperature - sometimes you need to adjust it yourself, without relying on the column (most often in winter and early summer). These are, of course, trifles, since otherwise it is almost flawless. It has been hanging in the house for a year and a half, does not leak, ignites softly and without popping, and ignites normally with minimal pressure. By the way, the temperature is very easy to adjust; the required value is easily selected using the built-in indicator. We can recommend it to anyone who wants to get trouble-free hot water supply at home.
Advantages:
- The performance is sufficient for the simultaneous operation of two cranes;
- Lights up even with minimal water pressure;
- There is a heating limitation, the output temperature is stable and does not fluctuate, like on cheap Chinese speakers.
Flaws:
- Some very simple appearance, like a monolithic concrete slab. It feels like something is missing;
- When the flame is small, a whistle appears, and it disappears completely if the flame is on full.
Removing the Housing Cover
Inexpensive heaters without adjustment devices usually have two screws on the bottom cover of the housing. They need to be twisted with a Phillips screwdriver and the cover removed. If the cover is too tight, you can pry it off with flat-head screwdrivers.
A special place is occupied by models with oval flanges. They are dismantled directly on the wall; it is not advisable to turn them upside down with the fittings. Near the fittings (they are marked in blue and red) there are two bolts, unscrewing which you can remove the cover.
On some models it is not immediately possible to immediately find the screws to remove the cover. They are hidden under stickers. After removing the stickers, you can unscrew the housing cover. Sometimes, before removing the cover, you need to remove the plastic shields and plugs from the screws.
Answers from experts
Fursov Yuri:
It’s quite possible that the tena’s shell is broken
Zaretskii Kostya:
A leak. Check the integrity of the heating element - drain the water, unscrew it and visually inspect it. If there are obvious cracks, replacement will solve everything. If the heating element is intact and in good working order, and the magnesium cathode is also still in good condition, then this is more complicated. If you have electrical measuring instruments, you can see the presence of leakage current if you know how to use them. No - consult with knowledgeable people.
BASIL:
How much is this a lot? the water heater has an indication when the heating element is turned on and heating, if you drain the water every half hour, it will continue to heat until the temperature you set is reached, the boiler alone cannot take more than 1.5 kW, and the meter runs well, no matter how much according to you, it’s a lot, 500-1000-2000 kW, you didn’t write, but if it works constantly, I think it alone will burn at least 150-200 kW, plus other appliances in the house at least 100-150 kW
Alexei:
So you heat 65 liters of water with a power of 2500W all day long, which you do not consume, it heats up, cools down and heats up again. And you use 15 liters from a can. 50 liters work on heat loss, the efficiency is 20-25%.
It is logical for you to buy a heater of the same volume as how much hot water you consume during periods of intensive water withdrawal.
For example, 30 liters or even 10. For example, with a programmable “memory function for daily consumption by time of day.” The heater will prepare water for you in the morning, at lunch and for dinner. the rest of the time it is disabled.
Small load with sinks. Leave the large 65 for the shower and turn it on separately.
You can buy a small one from Ariston, 20 liters with two cans of 10 and two alternately switched on tena 2500 for each can. Boiling water in half an hour.
Programmable with memory now from 8 and above.
Well, of course, the calculation is only correct if the equipment is in good working order. RCD performance.
Mr.Androws:
Water heater: .vensys /catalog/detail.php?ID=2535 off - enabled.
Nikolai Kros:
So what's the problem? Plug it in and that's it. Judging by the button and regulator, everything is turned on. on- will turn on; off-turns off. Why is the water shut off? Does it even have water at all? If you turned it on without water, the heating element could burn out.
Free wind:
What's so complicated? We supply cold water to the valve with the valve, from the other valve it goes to the apartment system of the mountains. water, while the inlet valve should naturally be closed (you’re not going to supply hot water to the whole house?)….))))))))))))))))))
Secondary heat exchanger for gas boiler
The fact is that the water that is used for hot water supply (hot water supply) is heated by the water that is used for the CO heating system. The secondary heat exchanger serves for these purposes. It is designed in such a way that inside the sealed container there are two channels isolated from each other for the flow of water. One channel with heated water, and the other with the water that needs to be heated.
At the same time, through the metal plates, a large contact area is provided between the heated water and the heated water. When the partition inside the heat exchanger is broken (a small fistula appears), an exchange of liquids begins to occur; the water from the water supply system, the one that needs to be heated, has stronger pressure and begins to be forced into the heated water channel. That is, it enters the heating system circuit, thereby causing an increase in pressure in the system.
Choice of funds
Cleaning a boiler, for example, Ariston, will be much more effective if special equipment is available. Visit a household chemicals store, you will definitely find cleaning products there. Just don’t forget to find out if this product is suitable for you, because some chemical reagents may not be suitable for, say, a rubber seal and can ruin it.
As mentioned earlier, a good cleaning result is obtained by using a saturated solution of citric acid (sold in bags). To use it, take half a kilogram of the substance and dissolve it in 2 liters of water (pre-heat it so that the acid completely dissolves).
Caring for a boiler with a dry heating element
The ceramic heating element is located in a protective tube and does not come into direct contact with water, so a layer of scale does not form on the coil. Manufacturers do not recommend using abrasive and corrosive cleaning agents to clean dry heating elements. Otherwise, flushing a modern boiler is the same as for water heaters with a conventional device.
The element is replaced without draining the water. It is removed through a hole in the housing, cleaned with a damp cloth and repaired. Water heaters with this design do not operate without water in the tank - the protective block prevents switching on and protects the heating element from burning out.
Types of heating elements
Removing air pockets in the system
It's better to start with batteries. To remove air pockets, a Mayevsky tap is usually installed on them. We open it and wait for the water to run. Did you run? Let's close. Such manipulations must be done with each heating device separately.
How to start a boiler with your own hands photo
After the air is removed from the batteries, the pressure in the system will decrease and the pressure gauge needle will drop. At this stage of work, the solution to the question of how to start the boiler involves re-filling the system with liquid.
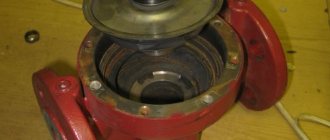
Now, the most difficult thing is that starting gas boilers requires bleeding air from the circulation pump. To do this, the boiler needs to be disassembled a little. We remove the front cover and look for a cylindrical object with a shiny lid in the middle, which has a slot for a screwdriver. After we have found it, we put the boiler into operation - we supply it with electrical power and set the water heating controls to the operating position.
Relieving air from the circulation pump when starting the boiler photo
The circulation pump will immediately turn on - you will hear a faint hum and loud gurgling and many incomprehensible sounds. This is fine. As long as the pump is aired, it will be so. Take a screwdriver and slowly unscrew the cap in the middle of the pump - as soon as water starts seeping out from under it, screw it back. After two or three such manipulations, the air will come out completely, the strange sounds will subside, the electric ignition will work and start working. Check the pressure again and add water to the system if necessary.
Basically, that's it. While the system is warming up, you can begin to study the instructions in detail (if, of course, you have not already done so) and start debugging the system that involves starting the boiler. Everything is simple here - the batteries closest to the boiler need to be screwed on, and the ones farther away need to be turned on to their full potential. This debugging is carried out using control valves installed on the supply connection pipe to the heating radiator.
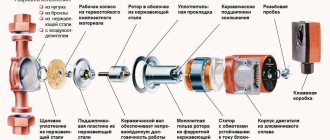
Design
Ariston water heater design. (Click to enlarge)
Fundamentally, the design of any water heater (boiler) resembles the design of an electric kettle with the function of maintaining a given temperature. But instead of a lid, this kettle has a safety valve.
Depending on the brand, its copyright holder includes a variety of marketing and technical options in the design. Such options are designed to distinguish the product of this particular brand from another.
The hallmark of Ariston storage water heaters is, among other things, the corrosion-resistant coating of the internal tank containing Ar+ silver ions.
This does not exclude the use of other protective coatings in other products of the company. The Ariston AM50 SH 2.0 Ei3 FE model (horizontal model) uses Ti-enamel as a protective coating.
Structurally, such a device consists of:
- external, heat-insulated housing (tank);
- internal tank with a volume of 15 liters to 200 liters with a corrosion-resistant coating or made of stainless steel;
- Heating element – heating element: in a tank with a wet heating element – direct contact with water;
- with a dry heating element – contact with water through a ceramic shell;
Take note: the magnesium anode should be replaced at least 1-2 times a year.
Distinctive abilities
According to reviews of Ariston gas wall-mounted double-circuit boilers, they have 4 distinctive features that are useful for their owners:
- All models of this company are equipped with automatic protection systems.
- The presence of a water pump, which is necessary for constant circulation of water through the pipes.
- Possibility to choose a model with an expansion tank. With its help, pressure will be automatically adjusted inside the heating system.
- Ariston equips its equipment with various types of ignition. It can be automatic, which will make life much easier for the owner of a particular boiler. Otherwise, every time the unit starts, the person will need to press a special button.