Sometimes a homemade water heater is a great option to save on the necessary expensive equipment. It can be used as a temporary option in case of breakdown of old equipment, or on a permanent basis, for example, in country houses where the need for hot water is seasonal. Of course, for constant water supply in a private house or apartment, it is best to use factory systems. The manufacture and installation of a homemade device for heating water does not require special experience; anyone can make it. The main thing is to have the necessary material and tools for the job. So, how to make a water heater with your own hands?
What is the basis of an electric heater?
A self-made instantaneous electric water heater operates on nichrome wire, which has a high level of resistance. It is wound on a ceramic frame.
The induction model works differently. A thick copper busbar is wound onto a metal pipe, then a voltage of 100 kilohertz is applied. The metal pipe is heated by an alternating magnetic field and heats the water.
Installation methods and types of fastenings
Currently, manufacturers produce two main types of gas boilers: instantaneous and storage. Products from Electrolux and Vector are especially popular among consumers. The device of this line can be located on the floor or on the wall. In the second case, various types of fastenings are used:
- dowels with fixation;
- metal hooks.
These elements are suitable for a reliable base of concrete or stone. For looser and thinner surfaces, other fastenings and installation methods should be used.
For example, on a wall made of plasterboard, it is better to install a reinforced boiler. For these purposes, you can use various materials:
- wood reinforcement;
- metal reinforcement;
- fastening with chemical anchors.
The choice of installation option directly depends on the experience of the technician, available tools and materials, as well as the size of the boiler.
What materials will be needed to create an electric flow heater?
How to make a instantaneous water heater with your own hands, powered by electricity? The process of assembling a tubular unit powered by a heating element will be described. In this case, a heating element with a thermostat for heating water has a power of 4 to 6 kW.
- a piece of steel pipe into which a heating element will fit with a small margin;
- two half-inch pieces of steel pipe, which have a standard thread on one end;
- pieces of steel in sheets, the thickness of which is 3 mm;
- nut and bolt for grounding;
- anti-corrosion paint.
Pros and cons of induction water heating devices
The device has a fairly simple design and does not require special documents permitting use and installation. The induction water heater has a high degree of efficiency and optimal reliability for the user. When using it as a heating boiler, you don’t even have to install a pump, since water flows through the pipes due to convection (when heated, the liquid practically turns into steam).
The device also has a number of advantages, which sets it apart from other types of water heaters. So, an induction heater:
- much cheaper than its analogues, such a device can be assembled independently without any problems;
- completely silent (although the coil vibrates during operation, this vibration is not noticeable to humans);
- during operation it vibrates, thanks to which dirt and scale do not stick to its walls, and therefore does not require cleaning;
- has a heat generator that can be easily made sealed due to the operating principle: the coolant is located inside the heating element and the energy is transferred to the heater via an electromagnetic field, no contacts are needed; therefore, there will be no need for rubber seals, seals and other elements that can quickly deteriorate or leak;
- there is simply nothing to break in the heat generator, since the water is heated by an ordinary pipe, which is unable to deteriorate or burn out, unlike a heating element;
Despite the huge number of advantages, an induction water heater also has a number of disadvantages:
- the first and most painful for owners is the electricity bill; the device cannot be called economical, so you will have to shell out a fair amount of money to use it;
- second, the device gets very hot and heats not only itself, but also the surrounding space, so it is better not to touch the body of the heat generator during its operation;
- third, the device has extremely high efficiency and heat transfer, so when using it, be sure to install a temperature sensor, otherwise the system may explode.
Stages of work
- Before you begin assembling the electrical structure, you should clean all metal parts using a grinder.
- A metal piece is taken, the size of which is larger than the diameter of the pipe. Holes for installing the heating element are marked in its center. Depending on the model, it can have a power from 1 to 6 kW.
- The fasteners are removed from the heating element and the required drill is selected, which will be 1 mm larger than the device’s leg. This drill makes holes of the required diameter. Some models of heating elements contain a threaded or smooth body designed for insertion into some kind of device. Such a hole is cut using a drill or inverter. You can turn to a professional turner for help.
- If necessary, drill holes for mounting bolts and tap threads. A piece of metal is applied to the end of the pipe so that the holes are in the middle. The shape of the pipe is outlined.
- The metal is cut according to the markings using a grinder. Then another circle is made, only without holes.
- The heating element is fixed in the circle that is intended for it. Make sure that all parts fit snugly together.
- The heating element is removed and welded to the end of the pipe. It should be cut so that there is a distance of 2 cm from the end of the heating element to the second circle.
- Next, an indent of 1 cm is made from each end of the pipe, and a pair of holes are cut in it on the same line. They correspond to the diameter of the threaded sections located inside.
- Threaded sections are welded to the holes. Water will be connected to them.
- A circle with holes is welded under the heating element, and the heater is installed. Then a second circle is welded on the other side.
- A grounding nut is welded in any suitable place.
- The resulting structure is connected to the water supply and tap. This is how the device is checked for leaks. If a leak is detected, it must be repaired.
- The water heater is removed, its surface is degreased and covered with rust-resistant paint.
- After the paint has dried, you can install and connect the device.
How to make a coil
The coil is an important part of the device.
It can be based on a metal or metal-plastic pipe with a small diameter. Typically, copper or brass is used, as they have a high level of heat transfer. The manufacturer can choose the diameter of the coil at his discretion. The main condition is that its contact with water is maximum.
The serpentine tube is wound in a spiral onto a cylinder-shaped mandrel. For this purpose, a log or pipe with a large diameter is used. When winding the coil, it is necessary to monitor the turns. They shouldn't touch each other.
Do not make the winding tight, as it will be very difficult to remove the coil from the mandrel.
The number of turns on the coil is directly dependent on the volume and height of the tank. Typically, for every 10 liters, 1.5 kW of coil heating power is used.
Manufacturing of a device operating from the heating system
How to make an instantaneous water heater with your own hands that operates from the heating system? The basis of operation of this unit is the heating of the heat exchanger by a coil, which is placed in the hot coolant of the heating system. A heat accumulator can play its role.
However, inserting such a coil into a new heat accumulator will lead to a bad result. You can cause damage to the insulation, which will dramatically reduce the level of efficiency. You should make your own heat accumulator. The device must be small in size. Then a heat exchanger is cut into it, and the entire structure is insulated.
Advantages of induction type units
The undoubted advantages of this type of home heating devices include the following characteristics:
- efficiency - the conversion of electrical energy into heat occurs almost completely without significant losses;
- ease of use - constant maintenance of units of this type is not required;
- compact dimensions - induction water heaters are small in size, they can be installed in the heating system in almost any room;
- quiet operation – this equipment operates quite quietly, no noise occurs during its operation;
- long service life - induction units are durable and can operate smoothly for 30 years or more;
- high environmental friendliness - no harmful emissions occur during operation of the device, a chimney installation and a ventilation system are not required.
Many people believe that induction boilers are much more profitable than other home heating options. And compared to equipment equipped with heating elements, the heating time of these units occurs almost twice as fast. Due to the constant circulation and vibration of the liquid, scale does not form in the pipes and inside the device, which greatly facilitates the maintenance and care of the heating system.
But this type of device also has some disadvantages. And the main disadvantage is that induction equipment is quite expensive. But you can try to make such a heater for heating your home yourself.
What will be needed for production?
To work you will need tools:
- Bulgarian;
- drill;
- inverter for welding;
- a soldering iron with a power of at least 300 watts;
- roulette;
- compass;
- core;
- metal cutting scissors or pruning shears;
- device for rivets.
The following materials should be prepared:
- a copper tube made of copper, the diameter of which is 4-8 mm;
- You will definitely need sheet steel (3 mm);
- a round mandrel made of metal or wood with a diameter of 10-12 cm;
- sheet iron 5 mm thick;
- anti-corrosion paint;
- two 90 degree squares from half-inch pipe;
- four pieces of half-inch pipe, 10-15 cm long, with a standard thread type;
- two half-inch threaded brass couplings;
- a half-inch stainless steel pipe with a diameter of more than 20 cm (part of a gas cylinder is also used);
- medium-temperature copper and brass solder and corresponding flux;
- PTFE sealing material.
For insulation you should prepare:
- mineral wool;
- steel corner with shelf measuring 50 mm;
- iron in sheets 1 mm thick;
- rivets.
Choosing the right container
The storage tank acts as a container. Its volume depends on the needs of users for hot water. The calculation is carried out according to the following principle: 50-70 liters of water per person daily. A 200-liter container is suitable for a family of four.
When choosing a material, you should pay attention to how susceptible it is to corrosion. Typically, aluminum alloy or plastic is used. You can make your own boiler from steel treated with anti-rust agents.
The basis of a storage water heater can be a pipe from a heating main. This will give you a seamless cylinder. But experts advise making a water heater from a material such as stainless steel. The price for it is reasonable. Iron is known to release substances harmful to the body. A stainless steel water heater will be absolutely safe for health.
You should also think about the weight of the pipe. A linear meter of 720X10 weighs approximately 140 kg. The price of one kg is 12 rubles. How much does stainless steel cost? The price of 1 kg of the AISI304 series is 130 rubles. The weight of a sheet measuring 2000x1000x1 is 16 kg.
Making a boiler with your own hands will cost you 2,000 rubles. If the metal is bent along its length, you will get a cylinder, the height of which will be 1 m, and the diameter will be approximately 63 cm. A thicker steel sheet will not work, as it is difficult to work with. The tank volume will be approximately 318 liters.
The result will be an excellent homemade container in which you can install a factory-made heating element for water. Its power should be 6 kW. It can heat 300 liters of water in three hours. If you use a heating element with a power of 2 kW, it will take the whole night.
The tank is supplied with two holes. One is located at the top of the body. It serves to supply hot water. The other one is below. Its function is to supply cold water. Each hole is equipped with ball valves.
An alternative to a tank is a gas cylinder.
Manufacturing process
- A copper tube should be wound around the mandrel. If its diameter is less than 8 mm, then we recommend making a double winding. The length of the spiral should be 15-20 cm. The tube should be pulled towards you to prevent its deformation. A mandrel with a diameter smaller than 5 mm should not be used. This will cause the tube to bend and flatten.
- You need to cut a couple of round plates from sheet copper. Their diameter should be the same as that of brass couplings. Holes are drilled in the center of the plates according to the diameter and number of tubes. Both surfaces of the plates and one of the ends of the coupling are cleaned. This is done using sandpaper.
- Medium-temperature solder should be used to solder the plates to the couplings.
- After the parts have cooled, tubes are inserted into them to a depth of 1 mm. They are soldered using a gas burner or the same solder with flux.
- Next, the coil is connected to the water supply and water is supplied to check for leaks. If it exists, the problem must be fixed.
- In a thick pipe it is necessary to mark a pair of holes that correspond to the coil couplings. They must be drilled so that they are 1 mm larger than the diameter of the pipe sections.
- The stainless steel pipe is cleaned from the inside and outside using a grinder. A coil is lowered into a thick pipe. It is inserted into the hole of the tube with the coil using FUM tape. Then the coupling is screwed in.
- Thin pipes are soldered using a torch or fluxed solder. The thin tube should not be overheated so as not to subject the FUM tape to melting.
- A pair of holes are drilled from the opposite edge of the body, and threaded pipes are welded to them.
- If the heating system has thick pipes, then threaded sections of identical diameter should be used and a hole made to match their size.
- A pair of circles are cut out of sheet steel, the diameter of which should be 11 cm larger than the body. If the water heater is not insulated, then the size of the disks should match the diameter of the body.
- The circles are welded to both ends of the body.
- Both heating terminals are connected to the water supply to check the device for leaks.
- The unit should be coated with paint that prevents corrosion.
Choosing a tank for the boiler
The volume of the storage tank of the water heater should be calculated based on the daily consumption of hot water in the house. If several people live in an apartment or house, a tank of 100 liters will be sufficient. And for a family of 4-5 people, you should choose a container with a volume of 200-300 liters.
The tank used should be made of an aluminum alloy, stainless steel or other metal that is resistant to corrosion. You can use a large-sized gas cylinder, the walls of which are additionally cleaned and primed. If the walls of the cylinder are not primed, the hot water may have an unpleasant gas smell.
Five holes must be drilled in the selected tank. Two at the bottom for the inlet pipe and emergency drain, two at the side for installing the coil and one hole for water extraction at the top. If you plan to use such a boiler outside the heating season, you must also make holes for installing an electric heating element. For the heating element, one or two holes are drilled from below. Ball valves or shut-off elements are installed in the holes made, after which the tightness of the storage container is checked.
Water heater insulation
- 7-10 angles are welded to the surface of the body so that the second shelf runs parallel to the surface of the pipe. Welding is not carried out with a continuous seam, but through four tacks, the length of which is 1 cm.
- A strip 2 cm wider than the distance between the end circles of the base is cut out of thin sheet material. The length of the strip should be enough to wrap the device.
- Sides are made on both sides of the strip, the width of which is 1 cm. Using pruning shears or scissors for cutting metal, the sides are given a sawtooth shape. The teeth are marked with a zigzag. They should have the shape of an equilateral triangle. The teeth on the edge of the strip, which are opposite the corner, are cut off.
- The strip is applied to the corner. It must be directed in the correct direction to wrap the unit. Once the rivets are installed, it will be impossible to correct errors in operation.
- Next you should drill the strip and corner. Seven holes should be made and the parts should be fastened using a riveting device.
- A piece of the required size is cut out of mineral wool and inserted between the corner to which the thin metal is attached and the adjacent corner.
- The insulation is covered with metal and secured with rivets.
- A similar operation is carried out with other corners.
Installation location
Put the lid back in place and place the heater where it will not be exposed to direct splashes of water.
In this case, the device must be positioned strictly horizontally.
If you place it on a shelf or hang it on a wire, it may tilt and become airy during operation. A section of the heating element that finds itself without water because of this will simply overheat and burn out.
Therefore, you will still have to drill two screws into the wall, maintaining the level of the horizon.
Error No. 4 When using it as a shower, it is not recommended to install the heater below the level of a person’s head or place it inside the bathtub.
It is allowed to place it above the sink.
We've sorted out the location and wiring, let's move on to the plumbing.
What materials will be needed?
The following materials should be prepared:
- a block of wood with a cross section of 5x5 cm;
- plywood sheet 20 mm thick;
- board 10 cm wide and 5 cm thick;
- rubber watering hose;
- foil-based insulation;
- self-tapping screws of various sizes;
- glass 3-5 mm thick;
- plywood 3-5 mm thick;
- wooden slats 5 cm wide and 1 cm thick;
- knitting wire.
The basis of such a heater is a rubber hose.
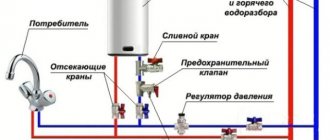
Connecting powerful water heating to the entire apartment
Those who want a complete hot water replacement will have to buy something more powerful.
We are talking here about models from 10 kW and above. For example, the popular brands Thermex and Clage. Most often they buy 12-15 kW, and for three phases.
According to factory parameters, such things can withstand a maximum pressure of up to 10 bar (1 MPa) and will easily handle the entire hot water system in the house. The pressure standard for a high-rise building is from 0.3 (minimum) to 6 atmospheres (0.6 MPa).
The flow rate of the device is from 6 to 9 l/min, with an increase in temperature from the initial (delta) by 25C.
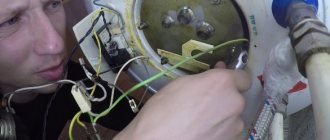
Preparatory work again begins with disassembling the water heater.
Unscrew the screws at the bottom of the case and carefully remove the protective cover.
Be careful, there is a cable of wires from the digital display to the control board, do not break it.
This cable is easily disconnected via a plug.
A wall heater often comes with a short piece of standard cable, which can rarely be adapted anywhere.
Manufacturing instructions
- A rectangular base is cut out of plywood. The bars are screwed to it around the perimeter. They connect with each other. This way the structure will be more durable.
- The resulting box is lined with foil-based insulation from the inside. The foil is laid out.
- Pieces 15 cm long are cut from the board. They will act as guides for the hose. One edge should have a semicircle shape. The diameter of the circle should be the same as the width of the board.
- The guides are screwed to the plywood from the insulation side so that the hose laid on them forms a snake. Where the hose turns, the distance between the turns should not be larger than its diameter.
- In the block located below, a pair of grooves for entry and exit are cut using a jigsaw.
- Four strips are cut from plywood, the width of which is 4 cm.
- Plywood strips are attached to the front surface of the bars so that they form the shape of a step that fixes the position of the glass.
- The water heater rises to the roof and is attached to the south side. We recommend horizontal installation. So the efficiency of the device will be higher.
- The hose should be laid along the guides and secured with loops of binding wire. They are attached to the plywood. The hinges should not be located above the guides, as the glass may crack.
Homemade induction boilers
The simplest circuit of the device, which is assembled, consists of a piece of plastic pipe, into the cavity of which various metal elements are placed in order to create a core. This can be thin stainless wire rolled into balls, wire cut into small pieces - wire rod with a diameter of 6-8 mm, or even a drill with a diameter corresponding to the internal size of the pipe. From the outside, fiberglass sticks are glued to it, and a wire 1.5-1.7 mm thick in glass insulation is wound on them. The length of the wire is about 11 m. The manufacturing technology can be studied by watching the video:
The homemade induction heater was then tested by filling it with water and connecting it to a factory-made ORION 2 kW induction cooktop instead of the stock inductor. The test results are shown in the following video:
Other craftsmen recommend using a low-power welding inverter as a source, connecting the secondary winding terminals to the coil terminals. If you carefully study the work done by the author, the following conclusions arise:
- The author did a good job and his product undoubtedly works.
- No calculations were made on the thickness of the wire, the number and diameter of the coil turns. The winding parameters were adopted by analogy with the hob; accordingly, the induction water heater will have a power of no more than 2 kW.
- In the best case, a homemade unit will be able to heat water for two heating radiators of 1 kW each, which is enough to heat one room. In the worst case, the heating will be weak or disappear altogether, because the tests were carried out without coolant flow.
It is difficult to draw more precise conclusions due to the lack of information on further testing of the device. Another way to independently organize induction heating of water for heating is shown in the following video:
The radiator, welded from several metal pipes, acts as an external core for the eddy currents created by the coil of the same induction hob. The conclusions are as follows:
- The thermal power of the resulting heater does not exceed the electrical power of the panel.
- The number and size of the pipes were chosen randomly but provided sufficient surface area to transfer the heat generated by the eddy currents.
- This induction heater circuit turned out to be successful for a specific case where the apartment is surrounded by the premises of other heated apartments. In addition, the author did not show the operation of the installation in the cold season with recording of the air temperature in the rooms.
To confirm the conclusions drawn, it is proposed to watch a video where the author tried to use a similar heater in a free-standing, insulated building:
What can be used instead of a rubber hose?
Instead of a rubber hose, a steel tube can be used, the thickness of which is 5-10 mm, or a coil from an old refrigerator. In this case, guides will not be needed, but you will have to bend the pipes in such a way as to achieve a turning radius of at least five diameters.
After the tube has been given the appropriate shape, it is covered with a tin sheet painted black and secured in the device body.
The glass is cut to size and mounted into the unit using slats that are laid on the beam. Water is connected to the water heater.
Main types of breakdowns
Modern manufacturers have learned to create excellent luxury water heating equipment. It uses gas to operate efficiently and rarely fails. However, even the best gas heaters cannot avoid breakdowns. The list of inevitable malfunctions includes:
- water leaks;
- poor heating of the liquid;
- discharge of power elements;
- weak water pressure;
- lack of gas.
Owners of gas boilers can repair some faults themselves. Anyone can change the batteries in the power supply. It is also easy to eliminate weak water pressure - perhaps excess scale has simply formed in the heat exchanger. To remove it, remove the heat exchanger and rinse thoroughly. For these purposes, you can also use special descaling liquids.
Warning
When making an instantaneous water heater with your own hands, you must clearly understand that only you are responsible for diagnosing and checking the device for malfunctions. When assembling the unit, you should be extremely careful. Incorrect assembly can lead to unpredictable consequences.
Before the first start-up and every three months, we recommend checking the condition of the wires, contacts and welding seams.
Before turning on the heating element, do not forget to supply water. Otherwise, the liquid in the device will begin to boil, and the electric tube-based heater will fail.
The law is what the drawbar is, where it is turned there and out
The design on YouTube is not illegal, but it is not very convenient. There is even less chance of setting it up correctly for use. Here are a couple of tips to help you do this somehow:
The radiator in the video resembles something from a car hood. There was no time to figure out what exactly it was, but the point is that you will need not just a coil, but just such a corrugated surface. This will significantly increase the efficiency of the device, on which both efficiency and gas fees (if there is a meter) ultimately depend.
This device is a gas instantaneous water heater, which should produce about 4 liters of warm water per minute. It’s easy to calculate how much power it should have for this:
N = A / t = (4200 x 4 (45 - 8)) / 60 = 10.36 kW, this is the power achievable for a factory gas water heater. You can only find out if you can make an appropriate heat exchanger at home by trying it.
The device itself is a coil, which is connected at one end to a cold riser, and at the other to a shower head or mixer. The flow is regulated by a valve. In this sense, you will have to use an old cast-iron tap at the inlet or a bronze tap at the outlet of the coil. The radiator is placed on the hob grate and heated by one or two burners. It is clear that the hose must be heat-resistant, otherwise various unpleasant consequences are possible.
An adult must supervise the operation of the device and, in case of danger, turn off the supply of blue fuel while someone is washing or doing the dishes. A gas water heater or an electric water heater is much safer from this point of view. I would also like to add that even purchased equipment needs to be configured, which means that the intervention of a qualified technician will be required. Sometimes a set of jets (injectors) needs to be replaced, in other cases a reducer is installed in the gas supply path. In the latter case, the system resembles traditional propane-butane power supply.