Author: Yuriy Fedorovich Kolesnikov, thermal power engineer
There is no shortage of available solid fuel in Russia and is not expected. A stove with a water circuit costs much less than a boiler: prices for domestic heating stoves with a water circuit start at 16,000 rubles; The average cost of such a stove across models is approx. 40,000 rub. A more or less decent boiler for the same thermal output costs three to five times more. Firewood in remote regions is often free - foresters will only be happy if someone removes the dead wood. Wood fuel is environmentally friendly: the growth time of a tree until it is suitable for use corresponds to the time of natural climate cycles, and when burning wood, exactly as much carbon dioxide is released as the tree removed to build itself. If you burn with fossil fuels, then nature “digests” the total emissions of greenhouse gases from many house stoves, dispersed over a large area and extended over time, much easier and faster than a salvo from a thermal power plant of the same power.
Building a brick or making a metal stove is quite a tricky business, but it does not require a machine park or production conditions. See, for example, video project of a brick stove with a water heating circuit for a private house:
Video: example of a furnace project with a water circuit for a private house
A purchased stove is relatively inexpensive, but delivery of a heavy and bulky item to distant places can cost more than its cost: half a heifer overseas, and a ruble for transportation. In this context, the question is: “Is it possible to make a stove with a water circuit with your own hands?” quite legitimate. But, unfortunately, the design of the stove took shape at a time when water heating was not yet thought about. Modern high-tech furnaces operate on the same principles, and cruise ships sail just like the triremes of Archimedes. It is possible to build or choose the right stove for purchase with a water heating circuit, but you need to take into account a number of specific points, which is what this article is about.
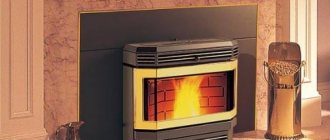
Note: The first of these points is aesthetic. Do not expect that the stove feeding the radiator will look like the one shown on the left in the figure:
Household ovens with water circuitAt best, you get what's in the center. Or maybe the one on the right. Therefore, if for you the stove is also a decoration for your home, you need to think thrice and thrice - should you still install a boiler for heating? The stove will not be a hindrance to him at all, see at the end.
About the disadvantages and advantages of brick
A brick oven is a complex, heavy structure that requires a separate foundation and major construction work in the house. It is much more difficult to install a water circuit in a brick oven than in a steel oven, see below. But at the same time:
- A brick stove maintains optimal humidity in the house: it absorbs excess water vapor from the cool air and releases it when heated during combustion.
- It also sets the optimal temperature field for health in the room: from the walls to the center it gets warmer.
- Reduces heat loss in the house: flows of air heated by the stove create a downward thermal curtain in front of the windows, which is much more effective than the upward one from the registers (heating radiators) under the windows.
- Evens out the microclimate in the house: in summer it absorbs some of the excess heat and transfers it through the foundation to the ground. In winter, it warms up the house a little in the same way.
- For the reason in the previous point stabilizes the settlement of the building, making it more reliable, stable and durable.
Note: in the history of construction, there are many cases where strong houses, converted from stove to central heating, began to collapse after dismantling the stoves.
What is the essence of the problem
The heating boiler was invented precisely to replace the stove as a heat-generating device in heating systems (CO). The boiler is a continuous operation device that ideally requires the user only to periodically reload fuel and seasonal maintenance. Its fundamental difference from a furnace is its automation, which maintains the combustion mode optimal for a given operating mode. Automation is not necessarily electronic; it can be a non-volatile combination of bimetallic plates, springs and levers.
The oven is a manually operated intermittent device, which is why it is cheaper. It's not about the automatic transmission. It's about the very fundamentals of the approach to design and production. Specifically, in the methods of organizing complete combustion of fuel. If we continue the shipbuilding analogy, then the boiler is no longer a displacement vessel, but a glider. Which can also float like a steamship, but will show its full qualities only when it reaches the redans. However, planing requires relatively calm water; a properly constructed and adjusted CO, figuratively speaking, is what it is for a boiler. The furnace (continuing the same analogy) under the control of an experienced crew can go at full speed in significant seas. Thanks to this reserve of operational endurance, it is possible to adapt the stove for water heating. Full speed (the same analogy) will be quieter than that of a glider (maximum thermal efficiency 60-65% versus 80-95%), but, “going at economic speed in calm water,” the specific fuel consumption for heating a unit of cubic capacity of a house can do not exceed that of the boiler.
Note: the thermal efficiency of heat-generating devices is a complete analogue of the efficiency for internal combustion engines.
Buy or build?
Only metal stoves with a water circuit are available for sale. A foundation and destruction of the house are not needed to install a metal stove, but it does not have the useful qualities of a brick stove. In an energy-efficient house (see below), only a metal stove can be installed. These are produced by many stove companies, incl. foreign ABX (Czech Republic), MBS (Serbia), EdilKamin (Italy). Here, firstly, there is a nuance: do not confuse it with a sauna stove equipped with a hot water heater; Sauna stoves are not suitable for heating. Differences, if the specification does not indicate that the stove is heating - a sauna stove always has a heater. Secondly, the same stove, but with a water circuit, is often sold as a boiler. How to distinguish it from a real boiler? By the presence of a cooking surface and a combustion door with a viewing glass. The boiler is not intended for gatherings by the fire. Third, EdilKamin are built using a water jacket and are not intended for use as main heating devices; this is actually a fireplace stove with a water circuit, see below. And finally, Russian stoves with a Breneran water jacket (the sign is “Aqua” in the name) should be installed in a non-residential building or in a separate boiler room, but for Breneran’s dacha it’s the best: it’s Breneran Aquaten that costs up to 20,000 rubles. (without delivery). For other domestic furnaces with a water circuit, see video reviews:
Video: reviews of furnaces with a water circuit
In addition, if you intend to buy a furnace for water heating, consider:
- For factory furnaces with a water circuit, all of the following operating limitations apply;
- If a heating boiler is often sold with a full set of standard piping, then a stove is always sold without it. Selection and installation of piping is a particularly difficult topic, and its cost can cover the difference in the price of a stove or boiler;
- Fireplace inserts with a water circuit are also available for sale. These are by no means the main heating devices, no matter what they promise in advertising! A fireplace insert with a water jacket (like the EdilKamin stove) is included in the existing local (house) heating system with a boiler to save standard fuel or in the heating system of an energy-efficient house, see below.
Note: it is necessary to include additional heat-generating devices in the existing CO with several degrees of protection from their unwanted influence on each other, see for example. video below:
Video: about the dangers of a fireplace with a water circuit
Basement as a decision criterion
In general, if your house has a basement, the first thing you need to consider is purchasing and installing a boiler. The basement will always provide an elevation of the registers above the heating device, necessary for the construction of a simple, inexpensive and non-volatile gravitational CO (see below). The heat from a stove (fireplace) without a water circuit for cooking and/or admiring the fire with cognac and caviar will not be wasted: the boiler automation “senses” it and saves standard fuel.
Drying
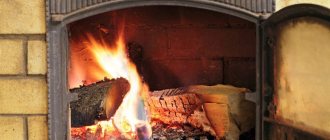
When the stove is ready, you cannot use it right away - at high temperatures, the seams will develop small cracks and the service life will be reduced by at least half. There are two ways to dry a finished oven:
- The natural way. All passages of the furnace are opened - the firebox, ash pans, flues, and then the unit receives ventilation from all sides.
- Forced. Wood chips are burned in small armfuls in the firebox with the doors and ash pans tightly closed. Only the gas ducts remain open.
Unfortunately, this method is not suitable if a Russian stove with a water heating boiler is built during the autumn-winter period - the heat from an alternative source will literally go down the chimney. And such a period takes time from six months or more.
When the first armful burns, the oven is ventilated and after a while, the second is burned. Thus, the process is reduced to three weeks. This period must be endured.
If no visible changes appear on the surface of the stove, then the unit is ready for kindling.
Related restrictions
Let us remember the saying of the “shaggy” years: free cheese can only be found in a mousetrap. A heating furnace with a water circuit is built and operated with serious restrictions compared to a simple one:
- The heat exchanger cannot be walled up in the body (structure) of a brick kiln: the difference between the TCR (thermal expansion coefficients) of it and the structure of the kiln will very soon disable both;
- If the firebox has a water jacket, then it is impossible to achieve optimal fuel consumption for the stove/fireplace. Therefore, devices of this type can only serve as additional ones in the existing local system;
- The heat exchanger of a furnace with a water circuit must be completely surrounded by flue or flue gases;
- It is unacceptable to start a stove/fireplace with a water circuit when the CO is empty. If this is a heating and cooking stove used year-round, it should have a winter-summer switch, and the heat exchanger should be installed only in the winter part of the stove structure;
- Let water into the CO from below, i.e. directly into the oven, this is possible only if it (the oven) is made of steel and the feed from below is indicated as standard in the manufacturer’s specifications. CO with a brick stove is fed with cold water only and only from above, from the expansion tank;
- Since in a CO with a periodically fired furnace, the heat exchanger experiences regular alternating thermal loads, it is unacceptable to build a closed-type CO furnace with excess pressure;
- For the reason in the previous At this point, building a heating system with a furnace constantly filled with antifreeze is pointless: the expensive coolant will age, degrade and disappear even before the end of the current heating season;
- At the end of the heating season, the coolant (water) from the CO must be drained. This is necessary to form a dense film of iron hydroxide in the pipes, preventing further corrosion;
- Before starting next. season, the system is filled with water, sealed and pressurized by pumping air from the expansion tank to 2.2 ati;
- Filling the system must be done at an outside temperature of at least 15 degrees;
- The heating device is started no earlier than one day after pressure testing the system, but not earlier than the coolant temperature is equal to room temperature;
- A wood-burning stove with a water circuit must be heated with intervals between fireboxes of no more than 12 hours, regardless of the heat capacity of the stove structure and external conditions, i.e. The oven should not be allowed to cool completely. This is explained by the low calorific value of firewood and the high probability of acid precipitation from wood flue gases.
Note: it is impossible to build with a Leningradka-type CO stove - the Leningradka requires excess pressure and forced circulation.
Oven and CO
The main thing you need to know if you decide to build a furnace with a water circuit yourself: for complete combustion of fuel in the furnace firebox and for it to achieve maximum thermal efficiency, the temperature under the furnace roof, where the pyrolysis gases burn out, must be at least 1100 degrees. At the same time, for pyrolysis, which completely “sucks” volatile components from the fuel, the optimal temperature is 400-600 degrees, and for ignition of residual amorphous carbon of the fuel - 600-800. The temperature of the outer surface of the heat exchanger, in principle, is needed higher, this allows it to be made in smaller sizes (see below), but for steel no more than 400 degrees, and for cast iron no more than 600 (at a pressure in the system equal to atmospheric) in order to prevent boiling of the coolant. The characteristic size of the heat exchanger installed in the furnace firebox is 0.3-0.5 m; installed in smoke ducts - 1-2 m. One more thing: if the temperature in the smoke ducts drops below 200 degrees, there is a high probability of acid precipitation in the furnace. If the stove is heated with waste (substandard) fuel that never burns completely, there is also increased soot deposition in the stove and chimney.
Knowing these circumstances, it is possible to successfully build a stove with a water circuit for heating a house. The task is this: to build a heat exchanger into the furnace that receives a sufficient amount of heat, but does not reduce the temperature at the installation site below the permissible one. For this purpose, the stove is designed with a deliberately overestimated power: 10-15% more than what is needed to heat the house. This 10-15% should be given to maintaining the correct operation (operating mode) of the furnace, taking into account heat transfer to the side. Thanks to a more uniform distribution of heat in the house, its heat loss, depending on the temperature difference inside and outside, falls, and fuel savings over the season will be 20-25%; up to 30% in combined CO (see below). The net gain in fuel costs for the season is 10-20%, and the loss compared to heating from a good boiler is 5-10%.
Note: a stove with a heating circuit allows you to build a relatively inexpensive and easy-to-install gravity CO in a house without a basement, see below. A boiler for gravity CO must be in the basement, and if it is not there, you need volatile CO with forced circulation, also see below.
More about the difficulties with bricks
A brick oven has one, from a CO point of view, “unfriendly” quality: their thermal time constants (this is what is colloquially called thermal inertia) are approximately equal. The thermal inertia of a metal furnace is an order of magnitude less than that of CO. If the system leaves the mode, it is possible to “drive” it back there by quickly adjusting the furnace stroke. With a brick stove, this will not always happen: all of it together can “get stuck” in an uneconomical and even emergency mode (to put it “smartly” - end up in a metastable state). Then you will either have to freeze while waiting for the next fire, or even immediately turn off the stove. A way to almost eliminate “cycling” is to heat the stove 3 times a day with an interval of 7-9 hours (early in the morning, in the middle of the day and at night), and in the coldest weather - 4 times with an interval of 6 hours.
About smoldering stoves
If you look in product catalogs for long-burning heating stoves with a water circuit, you won’t find them. About 3-4 years ago the coal stove “Besprizornitsa” flashed by, but now it’s not visible either. And this is not without reason.
A long-burning stove “pulls” heat out of the fuel slowly and gradually. On the other hand, these furnaces are critical to the temperature of the gases above the mass of fuel; for different designs it ranges from 600-1000 degrees. A little lower - the furnace goes out and the sintered mass is very difficult to pick out from it. Higher up, it switches to fiery combustion, which is an emergency for it, but threatens the owners with great disaster. In either case, a fiery stove will simply consume more fuel.
In other words, the heat balance in a long-burning furnace must be maintained much more precisely than in a fiery furnace. The “excess” heat (suitable for use) from a “smoldering” stove either does not provide enough to maintain the minimum required return temperature in the CO, or it flares up. Therefore, long-burning stoves with a water circuit and manual mode control are suitable as hot water stoves for hot water supply, which also gradually accumulates heat in an insulated supply tank. And in order to adapt a long-burning stove for heating, it must be equipped with at least the simplest automation that quickly regulates the air supply. And it turns out... a long-burning boiler. Which have been produced by industry for a long time and are successfully used. As for a homemade smoldering stove for heating, this is exactly the option for which you don’t need to break your head or your hands.
Homemade water boiler made from cast iron radiators
A boiler that is excellent in quality and efficiency can be obtained from ordinary cast iron heating radiators. You can use the M-140 radiator as a basis. It is easy to find, because large quantities of them are taken out for scrap during the dismantling and demolition of most old five-story buildings. The capacity of each section of such radiators is 1.5 liters of water, while the surface area reaches 0.254 square meters. When assembled, when 12 such sections are combined, the resulting volume of liquid is 18 liters and the total surface area is 3 square meters. m. Not every ready-made boiler assembled from sheet metal can boast of such parameters with similar dimensions. The performance of such a boiler from a radiator may be quite enough to heat a room of up to 100 square meters. m. So it will be suitable for an ordinary bath, and the supply will be quite large.
Before using the radiator, some modification is required. First you need to get rid of the cardboard spacers between the sections. It is best to replace them with asbestos cord impregnated with natural drying oil with an admixture of graphite. This way you can protect the gaskets from burning out at high temperatures.
While the sections are disassembled, they should be washed from the inside with a 6% concentration of hydrochloric acid solution, and then with a large amount of water. This way they can be cleaned of a large layer of rust and dirt accumulated over many years of use.
The procedure for assembling the radiator repeats the disassembly process, only in the opposite direction. To connect the sections, nipples are used, equipped with right and left threads on each side. Thus, sections both from below and from above are simultaneously attracted by turning the nipple. As soon as there is a gap of 2 cm between the sections, an impregnated asbestos cord is wound and the nipples are finally tightened.
Having finished assembling the entire radiator and waiting for the drying oil to dry, you should check the tightness of the joints by introducing liquid under pressure into the radiator. This is the only way to protect yourself from possible leaks during operation at high oven temperatures.
It is best to connect the supply and return pipes diagonally to the radiator. This way, the water will flow evenly throughout the new boiler. The two remaining holes should be closed with plugs. It is better to take inch pipes. On one side of the radiator there will be a right-hand thread and there will be no connection problems. On the other hand, where the thread is left-handed, it is better to use a nipple and a coupling with a drive.
Such a homemade boiler should not be placed in the firebox where wood is burned, but in the chimney chambers, which are located directly behind the firebox chamber. Since cast iron radiators are used, they should be heated not with a flame, but with hot gases that are removed from the firebox.
It is better to position the radiator so that the pipes come out of it perpendicular to the floor, and the return line is also lowered below the floor into the underground space. This way you can achieve better natural circulation of water when heating.
When assembling sections, you can experiment to improve the design of the resulting boiler. The result should be something similar to the image shown below. So it shows examples of the location of the boiler and how to connect it. Again, do not forget that in the case of cast iron, the boiler should be located in the chimney.
Installation of a boiler for a brick kiln
Building a stove
It makes sense to take on the task of building a stove with a heating circuit yourself if you have plenty of cheap or free firewood. Using a more energetic fuel (for example, coal), a stove with significant heat transfer to the side will acquire properties close to a long-burning stove, see above. For it to work correctly, the project must be carefully calculated, simulated, finalized on a prototype and subjected to comprehensive testing. In addition, a wood-burning stove with a water circuit must be built in brick. Everything is poison, and everything is medicine - its high thermal inertia will make the design not so sensitive to matching the parameters of the heat exchanger and the structure of the furnace. Next, we will look at the manufacturing features of both, taking into account which will make it possible to simplify calculations or build a furnace without them according to a known model.
Register
The heart of the furnace is the heat exchange register or simply the register. The first step in its manufacture is calculating the thermal contact area. Then the register configuration is selected (see below), its material and location in the furnace. Then either a firebox or a duct system is designed for the register, and then the entire furnace is designed according to it. In the latter case, the generally accepted scheme for designing a furnace - from the firebox to the pipe - is violated, so recalculation may be necessary at the design stage.
Thermal contact area
The register must receive as much heat from the stove as is calculated to heat the house, excluding the room with the stove. The heat flow into the register is determined at first glance without difficulty: Q = kS(ΔT), where:
Q – heat flow, W/s;
k – heat transfer coefficient for heat exchanger material of a given thickness;
S – area of thermal contact of the register with the heat-releasing zone of the furnace;
ΔT is the effective temperature difference between the heat-transfer zone and the coolant in the register.
The last parameter is the trickiest, because... ΔT is a complex function of the dependences of temperature changes both in the space occupied by the register and in time throughout the combustion chamber and the subsequent heat transfer of the furnace. With sufficient accuracy in our case, we can calculate when the register is located in the firebox ΔT = 800 degrees, when it is placed in the bell furnace hood ΔT = 550 degrees and in the smoke ducts of a channel furnace ΔT = 350 degrees. Then 1 sq. m of register made of steel 3 mm thick will transfer 12, 8.25 and 5.25 kW of coolant, respectively, and cast iron with walls 4 mm - half as much.
Material and shape
The furnace firebox is cramped, and a register made of steel that conducts heat fairly well is placed there. An ordinary structural one with a thickness of 3-4 mm will do; in an area where temperatures are above 1000 degrees, a properly designed heat exchanger will not work. An acid-resistant cast iron register must be installed in the channels. There is no need to build bell-type furnaces with a heating circuit without precise calculations: the circulation of gases under the bell is a delicate matter. If a register made at random knocks it out, the efficiency of the stove will drop significantly and it will have to be cleaned very often.
Heat exchange registers for furnaces with a water circuit
The roof-shaped “house” register (items 1 and 2 in the figure) has the largest heat-receiving surface relative to its size and material consumption, but the firebox under it needs to be high so that the “hot” supply manifold does not cool the afterburning zone of the pyrolysis gases. When designing a furnace with such a register, an imaginary plane is taken as the level of the furnace roof, cutting the places where the vertical branches of the pipes turn into converging ones. The size of the receiving surface of the register-house is considered equal to the geometric area of its outer surface.
A register welded from a steel sheet (item 3) is not an option. Its heat-receiving surface is almost half the size of the geometric one, and thermal stresses from large planes in contact with the flame will “flow” to the seams and will soon damage the register.
Drawings of a heat exchanger (heat exchange register) for a furnace with a water circuit
In a low firebox, you need to install a more metal-intensive box register (item 4), and at least 15 cm should remain from its top to the arch of the firebox. A drawing of a box register “for all occasions” is given in Fig. on right. During its technical design, the calculated size of the receiving surface is multiplied by 1.25.
An old accordion battery, pos. 5 in Fig. higher. The size of the radiating surface of one section of cast iron batteries (in this application - receiving heat) is in reference books on heating engineering and public utilities. Any search engine will give you a summary right away, you just need to measure the one you have and decide from the table what size it is. And along the surface of one section there is either the required number of them, or the total area of the available battery.
Construction of the furnace
The firebox of a furnace with a water circuit must be fireclay, easily heated and retains heat well. A stove with a brick firebox will cool the register and make it smoke, even if it is somewhere far away in the ducts. In the latter case (a cast-iron register in a channel furnace), it is advisable to line the entire thermal core of its structure with fireclay, and place the register closer to the heil (exit from the firebox to the first well), so that the temperature at its end closest to the firebox is not lower than 400 degrees.
Construction of a furnace with a water circuit
A furnace with a water circuit is built “from the register”. After laying the foundation of the furnace and laying its bed (the first 2-4 continuous rows of masonry for the furnace structure), the register is measured in place (on the left in the figure), mounted and rigidly fastened in the system, and the furnace is built around it (in the center). It is impossible to attach the registers temporarily (on the right) and finally install the system after building the furnace - it is very easy to damage both! It is also unacceptable to secure the register in the oven in any way: it must lie freely in it. The outlets of the register pipes outside the furnace structure are under no circumstances covered! After the oven has completely dried, they are tightly stuffed with asbestos cord to create a gas-tight connection. If air “siphons” into the stove, it will definitely smoke, and fumes will come out of it. For more information on building a stove with a roof-shaped register in the firebox, see the story
Video: brick oven with water circuit
The cast iron register from an old battery is low-power. A stove with it is more suitable for heating a summer house, for example, with a residential attic. An all-season house stove with a heating circuit will already be a very solid structure.
The design diagrams of such furnaces are shown in Fig.:
Schemes of stoves with a water circuit and winter-summer switching for heating a summer house and a residential building.
On the left is the country house. Since country stoves are heated mainly with waste fuel, which still cannot achieve maximum efficiency of the stove, the stove is entirely made of brick. To switch to summer operation, the upper valve is opened and the lower valve is closed. In the home oven on the right in Fig. (the winter-summer switch is not shown) large area steel registers are used in the channels. To prevent acid rain from falling out (if the furnace is fired correctly, of course), its entire thermal core is made of fireclay, i.e. increased heat capacity. In this design, the likelihood of acid condensate formation is minimal.
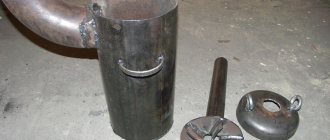
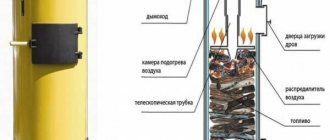
How to make “Bubafonya” from a balloon
Most often, top combustion furnaces are made from old propane vessels with a wall thickness of 3 mm. But there is a problem: the propane-butane mixture is heavier than air and does not want to leave the tank on its own. That is, the cylinder probably contains a small residue of flammable gas, which can flare up when cutting metal with a grinder.
To avoid a flash or explosion, the cylinder cap is cut off according to the following scheme:
- Lay the metal vessel on the ground, open the valve, then turn it out with a gas wrench.
- Using a hose, fill the tank with water to displace the propane. Then hammer a wooden chop into the hole.
- Carefully cut off the cover along the weld seam with a grinder. When water flows from the slot, rotate the tank and continue working.
Advice. On old cylinders you come across stuck valves that do not want to be unscrewed. In such situations, the brass tap is sawed off with a hand hacksaw (not a machine with a wheel!), then hammered with a heavy hammer.
First, mark and cut out an opening for the ash pan door at the bottom of the vessel, and a chimney hole at the top. The further procedure for making the Bubafonya stove with your own hands looks like this:
- Make grates from fittings or corners exactly to the internal size of the firebox. Install the grill inside the cylinder.
- By measuring the height from the grate to the cover, determine the piston stroke. Cut the air pipe to this size plus an extra 30 cm.
- Make a piston. Make a disk with a hole, weld the air duct and distributors from a steel strip 40 x 4 mm or an angle 45 x 45 mm. Install a damper at the end of the pipe.
- In the center of the removed cover, make a Ø60 mm hole for the air duct, which should fit in with a minimum gap. For convenience, handles can be welded to the lid, and for tightness, a steel strip around the body can be welded.
- Make the ash pan door and its frame. Install the locking handle.
- Attach the chimney pipe. You can weld a straight piece of pipe or a 90° bend to the top.
- Insert the weight into the firebox and close the lid. “Bubafonya” is ready.
The connection diagram for the stove to the chimney is standard - we connect the horizontal section and take it outside. Laying a pipeline directly through the roof, as is usually done in a bathhouse, is extremely undesirable. When burning slowly, condensation may form in the Bubafoni chimney, and it is inconvenient to clean the vertical pipe.
Furnace in the system
It is not enough to build a heating furnace with a water circuit correctly. It is also necessary to correctly develop a CO for it, and to properly include a stove in it.
Let's take a brief look at the ways of organizing CO. Whether our system will be single-pipe, 2-pipe, series, parallel or mixed is an important question, but another one from the point of view of the efficiency of using the heat of the furnace to heat the house. From the point of view of capabilities, cost, convenience, simplicity and energy independence of pairing the furnace and CO, it is more important to disassemble the systems:
- Open gravity (gravity flow).
- Open with forced circulation.
- Closed without excess pressure.
Gravity
Purely thermosiphon CO (like the internal combustion engine cooling systems of early cars) does not exist - losses in long CO pipelines will suppress thermosiphon circulation. For CO to still work, it needs to call upon a certain, quite definite share of gravity to help it (in a purely thermosiphon circulation, the share of gravitational pressure can be arbitrarily small).
The principle of operation of gravitational CO is shown on the left in the figure:
Construction of an open gravity heating system
If the system is operated from the stove in the house, it is impossible to fulfill the condition indicated in the center, even if the batteries are suspended from the ceiling. In this case, a CO with a high-mounted flow-through expansion tank (on the right in the figure) can help out; it will create the additional pressure necessary for thermosiphon circulation of the coolant. In centralized COs, a system with a flow expander is not used, because requires greater consumption of materials, labor costs for maintenance and, when used on a large scale, results in large losses of coolant. But in a private home, all this is more than compensated for by the simplicity, cheapness and stability of the operation of this CO. Its highlight is the expansion tank. The requirements for it are:
- A capacity of 200 liters is more than enough for a house up to 120-150 sq. m. m residential.
- It is convenient to make a tank from a barrel placed on the butt, i.e. vertically.
- Make-up and CO supply - only upper ones through the tank.
- The tank must be reliably thermally insulated: for circulation to occur, the water in it only needs to cool by 1-2 degrees, and heat loss from an uninsulated tank will be excessively large.
- The tank is filled halfway, like a regular expansion tank.
- To avoid evaporation of the coolant and clogging it with dust, the tank must be closed with a tight lid with thermal insulation and air drainage.
- The outlet pipe protrudes 5-7 cm above the bottom to avoid clogging the pipes with sludge.
- The mouth of the inlet pipe is located no lower than 15 cm above the outlet, but not higher than 20-25 to the water surface at its minimum level, otherwise air may be sucked into the system (water from the inlet pipe is in full swing and can be drawn into the outlet air).
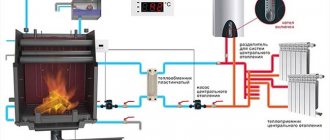
Backup (emergency) electric boiler for water heating systems with a furnace
Note: since it is impossible to constantly heat a brick stove and refill CO with antifreeze, and a winter cottage with a stove can, in addition, be left for several days, it is highly advisable to include an emergency electric boiler in the system (see figure on the right). It will maintain the temperature of the water in the system above freezing; as a rule - at the level of 5 degrees Celsius. True, the backup boiler also consumes a lot of electricity per day.
With pump
Forced circulation COs are built only with metal furnaces if required by the furnace manufacturer's specifications. The intensity of heat transfer from a brick stove is too low for this: the house will be cold, the stove will get cold, and unused heat will fly away into the chimney in the form of unburned fuel.
For CO with a furnace, firstly, from the possible schemes of systems with forced circulation of coolant (see figure), you need to choose a scheme with a high-mounted expansion tank (highlighted in red). In the event of a power failure, it will provide minimal circulation to prevent the system from defrosting. If there is no backup electric boiler, the stove must be heated all the time, but little by little, so that the water in the system does not boil. Therefore, such a CO requires a supply water temperature sensor.
Schemes of open-type heating systems with a circulation pump
Secondly, the circulation pump must be equipped with a bypass (bypass in English - bypass) with a check valve, see fig. below. Without a bypass, both the system and the pump will freeze, because... the tiny thermosyphon pressure will not push water through it.
Operation diagram and appearance of the circulation pump of the heating system with bypass (bypass shunt)
Closed
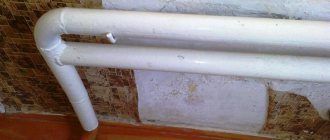
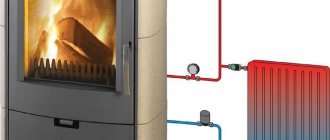
Quite expensive closed COs with a membrane expansion tank are used with furnaces quite often, because they are compact, work with both metal and brick stoves and fit relatively easily into the interior of the house: the entire CO piping can be located in a cabinet next to the stove (see the figure at the beginning). The device of a closed CO operated from the furnace has no special features; It is mandatory to have an automatic or manual valve to dewater the system, see next. rice..
Construction of closed heating systems
Possible improvement methods
To service and repair the heater, it will need to be disconnected from the piping, so it is recommended to install “American” type connections made of brass on the threaded pipes of the tank. The lower pipe is connected directly to the water supply system through a shut-off valve. Also in this place you can make a drain outlet with a tap and a fitting for connecting a flexible hose.
If the water heater is located outdoors, it will not be superfluous to provide thermal insulation to the tank. It is quite easy to do with ordinary basalt wool. You will need a wide piece of steel reinforcing mesh, rolled into a ring to form a gap from the tank walls of about 50–70 mm. The insulation is attached to the mesh with thin wire, then the resulting casing is wrapped around the water heater and tightened with wire clamps.