The gas generator furnace is a separate direction in the heating equipment industry. The principle of its operation is as follows: solid fuel burns with a small amount of oxygen; under the influence of low temperature values, pyrolysis gas is produced. This substance mainly consists of methane and carbon monoxide, has a high heat transfer coefficient, which helps to increase the operating efficiency of such equipment many times over. Fuel in this design burns almost completely. Heat is transferred through heat exchangers to the fluid in the system.
Gas-generating furnaces of various types are offered by many manufacturers of heating equipment. You can also make them yourself.
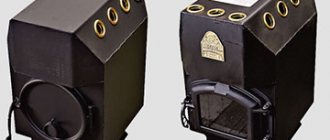
DIY oven
What else will you need besides a metal barrel?
- Sheets of iron 4-5 mm thick.
- Pipe with a diameter of 100 mm.
- A grate is better prepared, although you can make it yourself, for example, from a corner and wire.
- Asbestos cord.
Barrel construction
Now the sequence of assembly work:
The lid of the barrel is cut out with an allowance of 40-50 mm. A hole is made in the center of it, slightly larger than the diameter of the pipe 100 mm. A rectangular hole is cut out at the bottom of the barrel for the firebox. Fuel will be loaded through it. A smaller rectangular hole is made just below for the blower. From the inside of the barrel, between the firebox and the ash pit, wire guides are welded onto which the grate will be laid. A hole for the chimney is cut in the upper part on the side. A pipe with a diameter of 100 mm and a length of 20-40 cm is immediately welded to it. Now a pancake with a diameter slightly less than the diameter of the barrel is cut out of a metal sheet. A hole is made in the center of the pancake and a pipe with a diameter of 100 mm is welded to it. The length of the pipe should be 20-50 cm greater than the height of the barrel. Rectangles 50-80 mm wide are cut out of the same sheet, but their length should be equal to the distance from the edge of the pancake to the edge of the through hole in the center. These pieces are evenly welded in a circle with an edge on the back side of the welded pipe. This node is called a press. With its help, the fuel will be pressed down so as not to create a large space for the combustion zone. Now we need to carry out partial assembly. That is, a grate is installed and a press is lowered from above. A lid is placed on it so that the press pipe fits into the hole in the lid. Now the lid is welded to the stove body around the entire perimeter
Here it is important to weld the seam very tightly. An asbestos cord must be placed in the gap between the protruding pipe and the hole in the lid; it will become a barrier to smoke and carbon monoxide. The door is hung on the opening of the firebox. The gate is installed on the blower.
Everything is ready, all that remains is to install the stove at its destination and attach the chimney to it
Under such a unit, a strong and fire-resistant base must be poured, this is important
Fuel loading
Now to the question, how to add fuel? For this you will definitely need an assistant. He will lift the press by the protruding pipe. You need to lift it as high as possible to completely open the combustion chamber. The fuel is packed tightly with minimal space between its parts. The less air inside the firebox, the longer the pyrolysis process takes.
Not everyone probably understood why the pipe that was welded to the press was needed. This is a special channel through which fresh air will be supplied to the fuel combustion zone. And the ribs welded at the bottom will create the necessary space for air to penetrate inside, plus they add additional weight to the press.
This is one of the models of long-burning stoves that you can make with your own hands from a two-hundred-liter metal barrel. Let's face it, the option is not the most difficult, but not the most beautiful either. No one will install a barrel in a living space, so such stoves are most often installed in utility rooms for office purposes. For example, in garages, workshops, greenhouses, and so on. Although some summer residents install them inside the main building, enriching the structure with additional elements. For example, you can install a decorative screen in front of the stove, or line it with brick. Anyone who wants to will find options to make the stove beautiful.
Peculiarities
Indigirka is a multifunctional device, which is a symbiosis of a long-burning wood stove and a thermal electric generator capable of producing electricity.
The compact and lightweight stove can be easily transported and installed not only indoors, but also used outdoors. The device can operate at temperatures from +40 to -30 ° C.
The spacious hob can accommodate several types of cookware (cook soup, heat tea, etc.). The electricity generated by the stove is quite enough to connect a portable TV, radio, 1-2 light bulbs, and charge the power supply of a mobile phone, laptop or video camera.
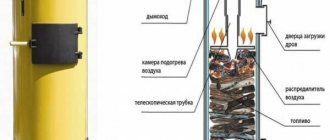
Construction of gas generator type furnaces
Gas-generating water heating furnaces do not contain a firebox, like conventional models. The design of all pyrolysis furnaces is very complicated. A wood-burning gas generator stove consists of a pre-gasification chamber - firewood is directly placed into it, and a combustion chamber - where the fuel is processed into heat. Gases from the gasification chamber enter the combustion chamber through the nozzle due to the action of the fan. (See also: Long-burning heating stove)
Please consider the following factors when assembling and using:
- The humidity of the firewood used should not exceed 20%. This is a fairly low indicator, which characterizes the firewood as very dry. During normal storage, firewood can dry to a level of at least 30-40%, and to achieve the above figure, you will need to use a heat gun or another option for drying firewood.
The connection between the chimney and the outlet damper should be very easy to disassemble. The fact is that with increased humidity of the wood, condensation will form, containing tree resin. This same condensate, passing through the chimney, will be able to clog it - in this case, resin-like clots are formed that cannot be soaked with water and are not subject to combustion. They are quite difficult to remove from the chimney.
Varieties
If you are going to purchase a wood-burning stove, then you will need information about the types of these units. Here's what we can find on sale:
- Steel and cast iron models;
- Units with and without a hob;
- Fireplace and conventional stoves;
- Conventional combustion furnaces and pyrolysis modifications.
The differences between steel and cast iron units are quite obvious - the former are lighter, less reliable and cheaper, while the latter are gigantic in weight, but are distinguished by their durability and long service life.
Such units not only look great in the interior of a country house, but will also allow you to cook directly on them.
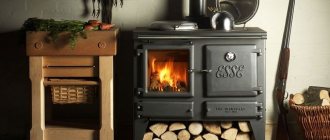
An economical wood-burning stove, which includes a hob, is an excellent find for a cozy country house, small cottage or technical room where people constantly work. Here you can cook soup, fry meat, heat a kettle to enjoy a hearty lunch or dinner. In general, a worthy addition for small-sized housing and technical premises.
Long-burning fireplace stoves combine the practicality of heating units and the beauty of classic fireplaces. Such wood-burning units will create a cozy atmosphere in your home with a beautifully burning flame. Relaxing in a house with a fireplace is a pleasure that will be available for minimal money.
Such devices can burn wood in the usual way or by pyrolysis. In the first case, combustion is carried out in a standard mode, with combustion products being removed through the chimney. Pyrolysis furnaces have a fuel afterburning chamber - the pyrolysis products formed during heating and combustion of wood in the main chamber are burned in it. Such furnaces have higher efficiency.
The principle of gas generation. Scheme of operation of a long-burning furnace
The operation of gas generator furnaces is based on the principle of wood gasification - a fuel combustion mode in which pyrolysis gas is formed.
Gas generation is achieved by burning fuel in smoldering mode under conditions of oxygen deficiency. The efficiency of such a heating unit increases several times in comparison with classic combustion furnaces.
The combustion mode is regulated by supplying air to the firebox. Heat is transferred to the heated room through heat exchange surfaces.
Let us immediately clarify the terminology of the processes underlying the operation of such heating units. All manufacturers, without exception, call the furnaces they offer that operate in smoldering mode gas generators. From the point of view of the formation of pyrolysis gas in this combustion mode, this does not raise any objections. However, this, in fact, is where the matter ends.
The operating principle of a classic gas generator furnace is as follows. The pyrolysis gas formed as a result of wood smoldering (mainly carbon monoxide and methane), passing through a special nozzle, is mixed with air. Entering the combustion chamber, the gas-air mixture ignites in the presence of a catalyst and burns with high heat output. In this case, complete burnout of all heavy fractions and soot occurs, and the remaining flue gases have almost no impurities.
Air is forced into the combustion chamber. The flame has a pronounced white color - a sign of complete combustion with excess oxygen.
Nothing like this happens in advertised “gas generator” stoves for home heating. There is only one doubt that pyrolysis gas is formed in the combustion chamber. But it is not used, but leaves the stove through the chimney circulation. those. it simply “flies down the drain.”
The color of the flame in the firebox is red. and a coating of soot and tar quickly forms on the walls of the pipe, which indicates incomplete combustion of the fuel. It would be more correct to call such furnaces smoldering or slow burning furnaces.
In this regard, many of the manufacturers' advertising statements, such as ultra-high efficiency, are at least questionable.
Despite the obvious inconsistency of such furnaces with gas-generating classics, they are still not without certain advantages.
Wind turbine characteristics
Despite the fact that a wind generator may well be installed on a site without any claims from the state, problems may arise with neighbors, for example. It may happen that he will disturb other people, which will cause complaints and possible complaints
For these reasons, it is necessary to pay great attention to certain parameters both when purchasing and when making it yourself.
- Mast height. When assembling a wind generator, you need to remember that there are height restrictions for individual buildings. If there is an airport, tunnel or bridge nearby, the height of the structure cannot exceed 15 meters.
- Noise from equipment operation. Naturally, the rotor and blades will make some noise during operation. To measure this parameter, there are special instruments. After the measurement, the results obtained must be documented. They must not exceed noise standards.
- Interference on the air. When installing a wind turbine, care must be taken to ensure that it does not create interference on the air. This is only relevant for those places where the generator is, in principle, capable of creating such troubles.
- Environmental component. Rarely, but still there may be complaints from this service. They can be presented only if the wind generator for the house is located on the migration path of birds, which will disturb them. However, this happens extremely rarely.
If the device is made by hand, then these parameters need to be given special attention. If the windmill is purchased, then it is worth checking its technical data sheet to familiarize yourself with all the characteristics
Useful tips for craftsmen needed when installing a stove
A mandatory element for the safe use of a pyrolysis furnace is the foundation on which the unit is installed.
The foundation must have a high degree of reliability. The foundation for the stove is constructed from heat-resistant building materials. The design of the stove has a small mass, so the stove does not create much pressure on the base. During operation of the installation, a high temperature is created, which can cause damage to the foundation; in order to prevent the destructive effect of high temperature on the foundation, heat-resistant materials must be used in its construction. The material used is refractory brick, which is laid on a pre-prepared concrete base.
Read also our article Installation of a heating system for a private house: basic diagrams.
The concrete base for installing a long-burning furnace should be poured into a shallow foundation. In the process of preparing the foundation, its obligatory component is the reinforcing frame.
The chimney for the stove must be installed as a separate element of the heat generating installation. A metal pipe of the appropriate diameter can be used as a chimney. When installing the chimney, it can be secured by welding to the top cover of the stove.
When making a stove with a rectangular cross-section, the chimney can be connected to the installation only from the side.
When installing the chimney, remember that immediately after the stove body the chimney must run strictly vertically. When designing a chimney, a minimum number of bends and elbows should be used.
Since when using solid fuel a large amount of soot is formed, it is best to design the chimney as a collapsible one, since it will periodically have to be disassembled and cleaned of accumulated soot.
Once the stove has been designed and installed, it is recommended to install a reflector. With the help of this structural element, heat flows are redistributed, which contributes to uniform heating of the entire volume of the room. In addition, installing a reflector allows you to increase the degree of safety during operation of the heat generating plant.
The place intended for installation of the furnace must meet all fire safety requirements, since the furnace body, heated to a high temperature, is a potential source of fire if the operating rules of such equipment are violated.
(Visited 1,614 times, 1 visits today)
Basic recommendations
This stove operates due to the optimized fuel combustion process that occurs in it. Therefore, the operating rules for the stove provide strict requirements for the materials used for the construction of the chimney and its installation.
The Buleryan stove can be heated with almost any type of fuel except gaseous and liquid.
- slabs;
- bricks;
- stone;
- other non-combustible material.
We invite you to familiarize yourself with: Fireproof facing tiles for stoves
Installation of this device involves the manufacture and installation of a 5 m chimney. For powerful models, you will need to make a 7 m chimney. This element is responsible for draft in smoldering mode. If this device smokes a little in gas generation mode, then there is not enough thrust.
The stove is installed at a distance of 60 cm from flammable materials. Before lighting the stove or putting wood in it, you should fully open the smoke damper and regulator. Next, the fuel is placed. After 20 minutes of burning, the stove switches to smoldering mode.
Vertical option
Diagram of the internal structure of a gas-generating furnace made of stone.
If you don’t have space, you can make a vertical version of the stove body. It is a little more complicated than the horizontal unit described above. The main body of this gas generator has dimensions of 700×510×1480 mm. This installation must be equipped with a grille made of steel sheet. It is installed in the gas generator housing at a distance of 30 cm from the bottom of the housing on legs made from scraps of steel pipe. The grille is connected by welding to a box installed inside the unit.
A deflector is welded to the side wall of the gas generator, holding the box with the grill and allowing air free passage to the burning fuel. All these parts are made of steel sheet (thickness 4-5 mm). As a chimney, a steel L-shaped pipe is welded into the gas generator housing (above the box at the side wall of the installation). On the same wall (in the lower part of the housing at the level of the grille) make a hole with a diameter of 10 centimeters to allow air to pass inside the installation.
At the level of the lower part of the chimney pipe (in the housing), drill a 6 cm hole. In this version of the gas generator, a fan mounted on the lower hole of the air duct is used to force air into the firebox. For normal use of the boiler and good thermoregulation of the installation, an automation system is installed on the side wall of the gas generator. Its actuator in the form of a chain is connected to the fan switch button.
If you want to use this boiler not only for heating, but also in conjunction with water heating, then you will have to make a heat exchanger yourself. It is made from sheet steel and consists of a casing larger in diameter than your furnace, placed on top of the body of your gas generator. This casing is carefully wrapped in thermal insulation using glass wool or other similar thermal insulation material.
To enter cold and output hot liquid into a water heating system, the inlet and outlet pipes are connected to the heat exchanger. Valves and other necessary equipment are installed according to a standard scheme for heating a home with water heating. The water boiler you assemble can operate not only on wood, but also on coal. If you have problems using metal, then the body of the gas generator can be assembled from bricks, but such an installation will have large dimensions.
Necessary materials
The materials we need to make a gas generator furnace can be found in any garage. Consumption
fuel will be
approximately 12 kilograms per hour
. So, we will need:
- Cord (to drown);
- Asbestos sheet;
- Steel sheet (1.5 by 6 meters) 6 millimeters thick;
- The same sheet 4 millimeters thick;
- Temperature control equipment;
- Steel pipe 13 meters long;
- Cast iron sheet, dimensions - 90 by 65 centimeters;
- One fan;
- Grate (its dimensions are the same as those of the cast iron sheet);
- Bricks, about 100 pieces;
- Two-meter iron rod;
- Electrodes (eight packs).
We will equip the external part of the unit with steel, and the internal part with cast iron (that is, the one into which water will be poured). We will need exclusively dry fuel. And finally, the last recommendation: it is extremely undesirable to work while intoxicated!
Stove prices
The market is quite competitive and you can find a unit that suits your budget and your parameters. You can buy a stove either in an online store or in specialized outlets/shops in your city or region. Let's give an example of a couple of popular models.
Fire - Battery 7B anthracite
- Room volume, m³: 150
- Firebox volume, l: 45
- Dimensions, (HxWxD) mm: 760x370x680
- Oven weight, kg: 54
- Chimney diameter, mm: 120
- Heat exchanger tank volume, l: 1.3
- Price: 16-19 thousand rubles.
Stove - fireplace Angara Aqua
- Room area up to 90m²
- Total power, kW: 18
- Water circuit power, kW: 9
- Heat exchanger volume: 4 l
- Oven dimensions: HxWxD, mm: 1020x550x490
- Oven weight kg: 150
- Chimney diameter, mm: 150
- Chimney connection top, rear
- Price: 32-37 thousand rubles.
Solid fuel boilers. which also have a water circuit. A combined or solid fuel type boiler can heat a room up to 170 sq. m. Such boilers can operate both on wood and electricity. They are made mainly of strong steel. Stove-Fireplace with a water circuit (they also come with a stove and grill). Such thermal fireplaces do not have high efficiency compared to stoves, but they can also be connected to a heating system and heat several small rooms. Read more in the article about fireplaces with a water circuit.
In order not to make a mistake in your choice and purchase a truly reliable and convenient in all respects long-burning stove with a water circuit, you should study all kinds of information provided by trading companies or reviews
buyers. It is necessary to study the characteristics of the device in its entirety, that is, not only the technical parameters of the device are important, but also its dimensions, appearance, cost, and additional functions. Compare the parameters of your home and the features of its design with the capabilities of a particular model.
But if you are not confident in your abilities or want to save your time, then contact professionals; they will draw up a project for a reasonable fee and offer various options for implementing your idea.
Sip panel finishing
Construction of houses from sip panels is pleasant not only because of the quick installation time and ease of construction - finishing such structures is a real pleasure! Since the surface of the panels is perfectly flat and smooth, you do not have to spend money on plaster or screed and spend hours leveling walls, floors and ceilings to achieve the desired result for the finishing cladding. Let's consider how you can improve the exterior of a frame house and how to carry out interior decoration.
Interior finishing
Before proceeding with the interior finishing, it is necessary to seal the joints with paint mesh, sand and polish them. Since the panels are monolithic, immediately think about where the communications will be located and make holes for them. In the bathroom, preparation follows a different scenario - the joints are closed not with a mesh, but with a sealant based on silicone or acrylic. The panels on the floor should be completely covered and overlap the walls by about 20 cm, so that if water spills, the wall materials will not get wet.
Any materials can be used for finishing a house made of sip panels. It is recommended to pre-cover the walls with plasterboard. This is necessary not so much for aesthetics (the panels are already smooth), but to enhance the fire safety of the building (we wrote about this above).
Since the floors in such houses do not need leveling and insulation, they can be covered with even the most demanding coverings - laminate, tiles, parquet. In the bathroom and kitchen it is better to make self-leveling acrylic floors to provide additional waterproofing.
Exterior finishing
Some owners prefer not to resort to exterior finishing of houses made of sandwich panels at all - they already look quite beautiful. But to protect the material from dampness, it is recommended to cover it with something.
The most popular options for exterior finishing of panel houses:
- Siding – vinyl siding panels are made of thin plastic. The coloring often imitates natural wood, the surface does not fade, protects well from moisture and is not susceptible to rotting. Basement siding is slightly thicker than classic vinyl panels (3 mm) and can even be used for interior decoration. The coloring imitates not only wood, but also natural stone, which allows you to create interesting exteriors. There is also steel and metal siding. The first is made of galvanized steel and a thin polymer coating. It can withstand strong temperature changes, mechanical stress, and direct contact with fire. Metal panels appeared on the market relatively recently. They have all the characteristics of steel, but their cost is much lower than that of galvanized products.
- Facade plaster is the most common option for exterior finishing of houses. Decorative compositions allow you to achieve an interesting effect and protect the panels well from the negative influence of the environment.
- Corrugated sheeting - a metal profile is chosen for its high strength, durability, corrosion resistance and easy installation. A wide color palette allows you to choose an option for every taste. Light weight does not create a strong load on the walls and foundation.
- Fiber cement - slabs are made from environmentally friendly materials (90% cement, 10% cellulose) by pressing. They reliably protect the house from cold, rain and wind; service life can be calculated for decades.
- Clinker facade tiles give the house a cozy and respectable look. Despite the high cost, it is chosen because of its beauty, durability (can last 100 years or longer) and environmental friendliness.
- Facade tiles are a cheaper option compared to clinker finishing. The tiles are made of concrete with modifying additives and allow you to create a convincing imitation of natural stone and brickwork.
As described in detail in the video, houses made of sip panels are becoming increasingly popular every year. This is explained not so much by fashion as by tangible savings - housing is constantly becoming more expensive, apartments in cities cost more and more, and it is becoming more and more difficult to find your own home.
Why spend crazy money on an apartment with a modest square footage, noisy neighbors and a smoky highway outside the window, when you can build your own spacious and warm house from sip panels for much less?
DIY gas generator assembly
- DIY gas generator (furnace) assembly
- Vertical option
- Materials and tools used
To heat a room in modern conditions, various types of heaters are used. These are mainly converters with various coolants (gas, water, electric current). But if you have a plot or dacha in an area where there is no possibility of gas heating, and heating your dacha with electricity is expensive, then you will have to install a conventional wood-burning stove. To reduce costs, it is desirable that it uses as little wood as possible and produces a large amount of heat.
A gas generator (also known as a pyrolysis) furnace is used in country houses, dachas, private houses, that is, where there is no central gas main and central heating.
More economical installations were used in the early and mid-20th century. They are called gas generator boilers (furnaces), have a high efficiency (up to 75%), and through a non-standard combustion method in such installations, fuel savings of up to 50% are possible.
You can make such a gas-generating furnace with your own hands from scrap materials if you have the skills to handle the tool. This device can be used in conjunction with water heating. Here is a diagram of the design of gas-generator heating installations, and recommendations for assembling them with your own hands are given.
A gas generator furnace (boiler) using wood as fuel consists of the following parts:
- fan (in vertical furnace models);
- gasification preliminary firebox (firewood is placed in it);
- the combustion chamber.
Gases from the furnace pass through the nozzle using fan pressure into the combustion chamber of the furnace, where the main heat release from the fuel occurs. Firewood must have a moisture content of at least 20%, that is, be very dry. If this condition is not met, then the tar condensate formed when burning wood will clog the chimney.
For long-term burning of fuel, such an amount of firewood is placed in the furnace (in the gasification furnace) so that it occupies 85-90% of its volume. The area heated by the installation ranges from 8 to 90 square meters. The time it takes to reach the desired room temperature directly depends on the design of your installation. You can also use the boiler both for simple heating of water (for bathing) and in conjunction with water heating.
Decoration of windows and doors
They will also require rich decoration. In addition to carving and gilding, textile inserts or colored glass, vignettes, and stained glass windows are used.
Doors, both entrance and internal, are decorated with columns, pilasters, pediments, and coats of arms. The style requires that they be double-leaf, made in dark colors, replete with lush fittings and carvings. When making doors, natural oak and beech wood is used. More budget options allow coniferous wood.
The shape of windows made in the Baroque style involves the use of curved lines, massive handles, and unusual shapes. In order not to disturb the style, the structure is equipped with stained glass windows with intricate patterns. The openings should be large so that bright daylight illuminates the entire rich interior decoration.
The operating principle of this type of heating device
For most heating devices, the heating function is realized by heating the device itself, heating the surrounding air and subsequent heat transfer by its walls. This occurs as a result of rapid and intense combustion of fuel. This method is not very convenient for several reasons: “jumps” in the temperature in the room, incomplete combustion of fuel, resulting in the formation of a lot of soot and soot, the need to constantly add coal or firewood to the firebox and adjust the draft. In long-burning furnaces, everything happens somewhat differently.
Pyrolysis boilers are particularly economical: in addition to the principle of slow combustion of fuel, they also burn gases formed as a result of combustion. Thus, the efficiency of such a heating device increases significantly, reducing costs.
"Pros and cons"
Undoubtedly, the high efficiency (up to 85%!) and the small size of such units have earned them great popularity, especially where there are no other heating resources - natural gas, electricity. It is attractive to be able to load fuel once, after which you just need to adjust the draft in the firebox when the required room temperature is reached. It remains stable for a fairly long period of time - depending on the device model - and can reach 30 hours or more.
The variety of models allows you to organize both air and water heating of the house - in this case, a water circuit is connected to the stove. You can also connect a container for heating water for domestic needs to such a stove; you can even cook and heat food on it - in a word, this device turns out to be truly multifunctional.
A relative disadvantage of this device is its utilitarian appearance: such a stove is unlikely to decorate the interior, but this is not required of it. It can rightfully be called a “workhorse” among heating stoves.
The gases leaving the firebox into the chimney have a low temperature (compared to conventional stoves) - about 2000, which leads to the formation of condensation in the chimney. Such a stove cannot be connected to a curved, multi-pass pipe, since the draft in it is very low and combustion products will not be discharged outside.
The long-burning mode does not start working immediately - first, the temperature in the room should be brought to the required level, only after that the draft is reduced and the stove is switched to an economical mode. In this case, the temperature no longer increases, but is only maintained at a given level.
Types of fuel used in this type of furnace
Another advantage that a long-burning furnace has is the ability to use various types of fuel - solid, liquid and gaseous. True, each of them has its own device model - there is no universalism here. By choosing a model that runs on the most affordable and profitable type of fuel in the area, you can fully ensure efficient and economical heating of your private home, cottage, or industrial premises.
Modernization of rocket heat generator
To expand the scope of application of reactive heating stoves, they are being modified, increasing the convenience and versatility of the design.
In mobile structures, the platform intended for cooking is often replaced with a full-fledged stove. It is convenient to use such a hob in your own backyard for household purposes - for preparing food for pets or during the period of preserving food for the winter. A special feature of this type of rocket furnace is a wide and flat horizontal channel into which hot gases from the nozzle are directed. Passing under the surface of the stove, they heat it red-hot, after which they go into the vertical chimney. Comfortable legs give the structure stability, and the original shape allows the unit to be used as a stand or table when it is not in use for its intended purpose. A jet stove with a stove is a necessary thing in a suburban area
A liquid heat exchanger cannot be installed in the flame tube of a jet furnace, but this does not mean that it cannot be used as a heat generator in a water heating system. To do this, the “rocket” is equipped with a kind of circuit of radiator plates, which create a kind of labyrinth in the afterburning zone. Thanks to their heating, heat is removed from the afterburning chamber to the water jacket. The efficiency of the unit depends on the area and heat capacity of the plates, so they are made in the form of massive metal strips with an area of up to ¾ of the cross-section of the fire channel. It must be said that such a heat exchanger is best used to produce hot water using the rocket stove itself in the traditional way.
Diagram of a rocket unit equipped with a water circuit
The rocket stove with a convector has an original design. To increase heat transfer, vertical tubes are mounted on the surface of the outer casing, performing the same role as the air channels of the buleryan. Cold air is trapped at the bottom of the tube heat exchangers and is heated as it moves upward. This ensures forced convection, which further increases the thermal efficiency of the installation.
Rocket heat generator casing equipped with a convector
4
Rocket heating from a cylinder - let's work with a welding machine
To build a rocket, we choose a heat-resistant and non-explosive cylinder. An all-metal 50-liter tank in which propane is stored is optimal for these purposes. This cylinder has standard dimensions: height – 85 cm and cross-section – 30 cm.
These parameters are ideal for making your own oven. The modest size and light weight of the cylinder do not make it difficult to work with. At the same time, it is allowed to burn any wood fuel in the finished rocket. You can also take 27 or 12 liter propane cylinders. They make compact portable stoves. But the power indicators of such devices are small. It is not practical to use them for heating rooms or country houses.
A stove made from a large gas cylinder: looks interesting, looks dangerous
To build a furnace, in addition to the cylinder, you will need:
steel pipes with a cross section of 15, 7 and 10 cm (the first two will be used to organize a vertical internal channel, the third - to the chimney); a profile pipe product of 15x15 cm (from which we will make a loading compartment and a firebox); a 3-mm thick sheet of metal; dense (100 or more kg/cubic m) basalt fiber (it will serve as a heat-insulating material).
There are various drawings on the Internet for creating a stove from a cylinder. We propose to be guided by this scheme.
The algorithm for manufacturing a rocket launcher is simple. First, we bleed all the gas from the container. Then we turn out the valve, fill the tank with water (to the top) and cut off its upper part along the seam. We cut out the windows on both sides of the gas cylinder, which are required for connecting the chimney and installing the fuel chamber.
After this, we insert the profile tubular product into the container and connect it to the channel (vertical). We remove the latter through the bottom of the tank. Next, we carry out all the necessary actions, focusing on the presented drawing, as well as on the video, which we offer home craftsmen for review.
At the end of the work, we weld the cut part of the container in its place and analyze all the resulting seams for permeability. Uncontrolled entry of air into the constructed structure must not be allowed. If the seams are reliable, we connect a chimney to the homemade system. We weld the legs to the bottom of the rocket cylinder. We install the stove on a steel sheet with parameters of 1.5x1 m. The unit is ready for use!
How to make a gas generator oven yourself
Gas generators, also called pyrolysis boilers, are increasingly used in everyday life. They are used for heating residential and commercial premises, cooking, obtaining hot water, captivating with their high efficiency, environmental friendliness and ease of maintenance. However, industrial designs are expensive, so the optimal solution for a thrifty owner would be a gas generator stove, made with your own hands from scrap materials.
Functioning and design features
The main principle underlying the work is the gasification of solid organic fuel when it is burned under conditions of oxygen deficiency. During the process of decomposition (pyrolysis), solid organic matter in a gas generator furnace does not burn, but slowly smolders, forming a large amount of flammable gas, which mainly consists of methane and carbon monoxide. The resulting gas from the combustion chamber enters the afterburning compartment, in which it mixes with heated air and burns, releasing a lot of heat. Depending on the design features, the gas generator can heat the coolant jacket, release heat to the environment, or perform both of these tasks.
Such furnaces demonstrate high operating efficiency, several times higher in efficiency than traditional ones. Unlike classic solid fuel boilers, the owner of a pyrolysis boiler is able to flexibly control operating modes and change the heating temperature of the coolant. To do this, it is enough to increase or decrease the amount of air supplied to the combustion chamber of a gas-generating furnace. Combustible gas can be extracted from almost any solid organic fuel: firewood, coal, peat and even linoleum. But in everyday life, the first one and wood processing waste are most often used. The most common type of wood-burning gas generator is a pyrolysis furnace, from which gas is not removed, but is burned to produce thermal energy.
The main design feature is the presence of two combustion chambers. In one, the process of decomposition of organic fuel occurs, and in the other, the resulting gas is burned. Moreover, the afterburning chamber in the first case can be located differently: under the gasification compartment, above it, or on the side. The internal structure and circuit of a gas-generating wood-burning stove for domestic needs is simple, and any home craftsman can make it.
Classic pyrolysis equipment should include:
- The housing inside which the working elements of the furnace are mounted.
- Filling chamber (hopper) for storing firewood or wood waste.
- Afterburning section of the gas released by the furnace.
- Grate for holding solid fuel and coals.
- Doors for loading firewood and removing ash from the gas generator.
- A system of air dampers to control the supply of oxygen to the working area of the device.
What is needed for making
Since homemade options are usually made from available scrap materials, they cost the owner much less than their industrial counterparts. To create a simple wood-burning gas generator with your own hands you will need: metal sheets with a thickness of at least 3 mm or a piece of iron pipe (barrel), steel corners measuring 5x5 or 4x4 cm, hinges and latches for doors, a chimney pipe of the required dimensions and configuration. The number of elements and dimensions of the specified materials will depend on the volume of the room that is planned to be heated and the additional tasks of the stove (heating water, cooking food).
Manufacturing process
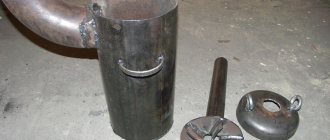
How to make a gas generator with your own hands? One of the possible options is described below. Take a 40 liter gas cylinder and cut a circle in the upper part, as shown in photo 1.
This tank will house the loading area and firebox.
A meter-long piece of pipe with an outer diameter of about 50 mm will serve to supply air (photo 2).
The bottom and cover of the housing can be made of sheet steel 5 mm thick. Fire extinguisher housings are suitable for coarse and fine filters. The grate can be welded from reinforcement (photo 3).
It is better, of course, to find cast iron rods for the grate or to find a finished product of suitable dimensions.
To make a lock for the generator column cover, an old car spring is suitable (photo 4). When the pressure inside the generator increases, such a lock will work like a valve in a pressure cooker.
A piece of rectangular pipe can serve as the basis for fastening the cover parts (photo 5)
The main parts of the body are connected by electric welding; when installing the cover parts, a bolted connection is used.
Thus, almost all the parts needed to make a gas generator with your own hands can be found in scrap metal.
Comparison of gas generator and conventional boilers.
If we compare gas generator boilers with conventional heating or heating boilers using solid fuels, we can highlight the following nuances.
The relatively low autonomy of the gas generator boiler, which is the Achilles heel of all heating installations using solid fuels, can be corrected with the introduction of an automatic loading system. In this case, a kind of conveyor begins to operate in the gas generator boiler, which, depending on the temperature in the device and the burning time, can send new portions of fuel into the furnace. In addition, the gas generator device on only one tab can operate autonomously throughout the day, which, in general, removes the question of the need for the constant presence of a stoker-operator.
operation of a gas generator boiler
In any case, the efficiency of gas generating units significantly exceeds the achievements of all their counterparts. If conventional solid fuel boilers are unlikely to be able to show an efficiency higher than 85%, then for gas generating equipment this figure can reach 95 percent.
But a wood-fired gas generator boiler is still a rather complex technical device. Unlike a conventional wood-burning boiler, it requires, albeit simple, but still regular maintenance, in addition, there are certain requirements for the qualifications of personnel who work on gas generating units.
The gas generator boiler perceives the humidity of the fuel entering it most critically. Therefore, for efficient operation of the gas generator installation, only pre-dried firewood is required.
Criteria for selecting a wood-burning gas generator installation
It is recommended to select a wood-burning gas generator boiler based on the following criteria:
- First of all, you need to take into account the degree of automation of the boiler and its energy independence. You may want to purchase a boiler that can operate for a long time without human intervention, or perhaps a gas generator boiler, which should independently, autonomously work only one fill, will be sufficient for your purposes.
- To heat rooms, heating installations must produce at least one kilowatt for every 10 square meters of heated area. Based on this, you can select the required power of the heating gas generator boiler.
- In addition, wood-fired gas generator boilers can have various additional equipment. It may be intended, for example, to ensure forced circulation of liquid through a heating circuit or to automate the regulation of combustion processes of the resulting gas.
In any case, consultants in specialized stores will help you choose a wood-burning gas generator boiler to suit your taste.
A little more about pyrolysis...
The essence of pyrolysis lies in the process of technological gas-generator combustion. When solid fuels such as coal, pellets, peat briquettes or firewood are burned, the room warms up. The operating principle is similar to that of a dry distillation boiler. The pyrolysis system is due to its exothermic properties, and can heat the incoming air due to the heat generated. The fuel is ignited and the fan turns on when the door is closed. The high temperature regime (200–800 °C) and low oxygen capacity in the pyrolysis combustion furnace lead to a chemical process - the wood decomposes into coke and pyrolysis gas. Also, when wood burns, it can form methyl alcohol, acetone, vinegar and resin.
The released gas combines with oxygen and goes into the combustion process. The smoke generated during combustion does not contain bad carcinogens and other dangerous components. Burnt fuel produces thermal energy, which heats the room. The water contained in the boiler enters the heating structure in a hot state with a simultaneous return supply. The coolant is also used as a coolant. This is how a boiler with a bottom-mounted chamber functions.
Pellet stoves
A pellet stove is a type of gas generating device. It is designed to work on pellets - wood granules. The difference between such stoves is the presence of a bunker for loading fuel
An important advantage of such models is a high degree of automation of work. The granules are supplied as they burn using a self-regulating pneumatic or screw device
You can regulate not only the fuel supply, but also the operating modes.
The water heating tank is made of steel, resistant to high temperatures and aggressive environments. There are no restrictions on tank sizes. In fact, they depend only on the dimensions of the cast iron stove. The water heating tank is connected to the general system by pipes. It can be installed in two ways - as close to the chimney as possible or at the junction of the combustion chamber with the chimney.
Technical nuances
- The oven should not be placed close to walls, objects, etc. Leave enough space around it.
- The oven gets very hot - do not keep flammable materials, fuel, or anything that can catch fire, dry out or melt near it.
- When making a chimney, think about how to clean it in the future. The best option is to make it collapsible.
- If the chimney pipe is prefabricated, install the elements so that the joints are located in the opposite direction in relation to the moving gases.
When cleaning out ash, leave some of it behind each time. If the combustion takes place on an ash bed, the bottom of the stove will not burn out longer.
Recommendations for placing heating system elements
Elements of the heating system can hardly be called decoration of a modern interior. Only pipes that look organic in some industrial interiors can fit this definition. In general, building codes and architectural principles recommend placing parts in areas that are hidden but accessible for repair and maintenance. When placing, they are guided by the following rules:
- The heat generator is placed in an isolated room with heating and good ventilation. The circulation pump must operate under the same conditions. Small boilers (with a power of up to 30 kW) can be installed in the kitchen, hallway, basement or warm heated extension. Stoves intended for residential premises are installed taking into account fire safety rules.
- The place for an open-type expansion tank is in the attic; supply and collection pipelines tend to be located along the main wall structures.
Compliance with operating rules helps the system operate smoothly Source yandex.ru
- The main riser runs openly in the corners of the living spaces; in the attic it is covered with thermal insulation.
- Radiators are installed openly under window openings. They participate in room circulation, heating the cold air coming from the windows. Attempts to decorate radiators with decorative screens are undesirable, since they reduce the thermal efficiency of the system.
Gas sauna stove from a cylinder
To independently assemble a gas stove for a bath, you will need to collect and purchase the following materials:
- You need to buy an atmospheric burner at the construction market or in a store with gas equipment.
- Find an old but not rusty gas cylinder. A new cylinder, large-diameter pipe or sheet of metal with a thickness of 8 to 16 millimeters will also be suitable.
- For the base of the heater you will need thick metal, for example, a brake disc from a car. It will last for at least several years.
- A gas pipe with a diameter of 5 centimeters and a length of approximately 3 meters.
- A pipe with a diameter of 10 centimeters, which will be used to remove gases.
- Some copper or bronze elements to connect parts.
- Additionally, you will need to acquire the following tools: grinder, welding machine, drill, measuring instruments.
After assembling the complete set of tools, you need to use a grinder to cut off the outer part of the cylinder so that the cut diameter is equal to the external size of the brake disc. Then, using welding or a drill with bolts, you need to attach the disk to the cylinder.
The next step is preparing the air supply pipe. In a pipe with a diameter of 5 centimeters you need to drill about ten 5-mm holes.
A hole with a diameter of approximately 55 millimeters is also made at the bottom of the cylinder. The whole, that is, not drilled, part of the five-centimeter pipe should extend out of the cylinder by about two meters. It must be welded to the cylinder.
First you need to cut the workpieces with a grinder according to the sketch. Then weld all the components using a welding machine. After completing these procedures, you must also grind all welds. The same grinder copes well with this task
The pipe that will supply gas is welded in the same way. An adapter is attached to the second end of this pipe, with which you can connect the device to a gas pipe or gas cylinder.
A hole is cut out on the cylinder for the chimney and the corresponding pipe is welded. Using a grinder, a rectangular hole for the door is also cut. The hinges are welded and the door is hung directly on them. You also need to attach a handle to the door.
In this way, a simple model of a gas oven will be made. Gas is supplied to the burner through the pipe. The combustion process is started, depending on the burner, by piezo ignition or electric pulse.
Methods of supplying gas to the stove
There are two ways to gasify a bathhouse:
- From the citywide system.
Individually using a balloon.
Gasification from the city system
Gas can be supplied to the bathhouse from the city pipe. If a gas pipe runs through the area, then it is more profitable to power the bathhouse from it. Let’s say right away that this is a labor-intensive task and requires knowledge and permissions. The price for the services of specialized companies is high, but once you supply gas to the bathhouse, you won’t have to worry about it for many years. And paying gas bills will be less expensive than purchasing bottled fuel each time.
For urban gasification it is necessary to carry out a number of measures:
- Receive and approve a number of documents: gas supply project, agree on technical conditions and draw up an estimate.
Purchase equipment and pipes and carry out installation.
Prepare test and technical documentation and submit the work to the local gas service.
Enter the system, install and register the meter, start it up and receive documents for maintenance and fuel supply.
It’s difficult to do all of the above points on your own; it’s easier to call a specialist. Moreover, the city gas company itself will provide and conduct pipes to the heating device.
Individual gasification
You can power the stove from a gas cylinder, which comes in different sizes. Individual gasification is suitable for areas where there is no city line. A gas cylinder can be purchased at any specialty store. But such gas supply is quite unsafe.
Safety comes first, the cylinder should not be installed in a bathhouse, its place is outside. The place chosen is easily accessible and ventilated, that is, the cylinder cannot be filled with various objects or covered with things. A fire extinguisher is hung nearby or a small box of sand is installed.