Ariston Academy names the main mistakes in connecting an electric storage water heater, which can put the tank in danger. Replacement of the original valve with an average check valve, complete exclusion of the specified element from the piping. In order not to repair the Ariston water heater with your own hands on an ongoing basis, as well as purchase an Ariston water heater on your own, again and again, know a couple of simple rules, which we will talk about casually below. The features of Ariston water heaters are limited by the lack of flow-through models. There is a magnesium anode everywhere, the tank is made of steel. It’s useful to remember when you get the hang of doing your own Ariston water heater repair.
About the brand
In the mid-40s of the last century, Aristide Merloni launched the production of electric water heaters under the Ariston (Successful) brand. The name fully justified itself, and after some time all the sons of the entrepreneur successfully entered into a similar business, and the youngest, Vittorio, inherited his father’s company.
The Ariston company today is one of the top three in terms of global sales of household appliances, and Ariston brand kitchens are sold with already built-in basic household appliances from the refrigerator to the dishwasher. In Russia, this company became famous in the late 90s of the last century, and now almost every major city has its service center.
The lineup
The Ariston brand produces many models of water heaters. Positive customer reviews clearly prove that this brand is number one in the market for the production of gas appliances. The Ariston Fast Evo model is the most popular of the entire line of heaters. The model is available in two types, differing in productivity (11 and 14 liters per minute). This is a turbocharged automatic car with electric ignition. To operate the device you only need two batteries. In addition, the model has a built-in flame modulation system. Such a system allows you to maintain temperature constancy.
The main advantages of Ariston Fast Evo include:
- ability to work at two water intake points;
- ignition occurs at minimum pressure;
- optimal outlet temperature.
Another popular model is part of the Marco Polo series - Gi7S with a closed combustion chamber. The device is equipped with a flow-through heater and does not have a chimney. An important feature of the device is that the pipe is led outside, therefore, combustion products do not remain indoors, but go outside. Gi7S is the most powerful unit, therefore it is very energy-consuming. Among the more budget models, Ariston CA 11P is in particular demand. The unit has a classic design and is easy to operate. It stably maintains the set parameters and does not upset the settings.
Quality and weaknesses
Ariston water heaters have a stylish modern design, excellent functionality, and differ from analogues from other manufacturers at a reasonable price. Developers pay careful attention to the safety of products during operation: the units are equipped with various protections for all occasions, turning off the product in the event of a power failure, overheating, or lack of water supply.
But this reliable equipment suffers from the hardness of our water and quite frequent changes and surges in voltage. The weakest points, according to experienced craftsmen, are tubular-type heating elements, a magnesium anode and a check valve. These very simple breakdowns can be fixed with your own hands if you have the necessary minimum tools. The design of the product has a standard design, so prevention and repairs are not difficult.
The user should pay special attention to the integrity of the internal coating, where modern materials are used, which include titanium, silver-strengthening enamels, glass ceramics and other high-tech additives.
The heating element is faulty
The device is connected to the network, but the heating element operating indicator light does not light up, and the liquid does not heat up. You can determine the breakdown in the following ways.
You need to take a tester, set it to 220-250 V, measure the voltage at the terminals connecting the cable to the thermostat, if there is a signal, measure the potentials at the terminals of the heating element. If the indicators there are normal, it means that the heating element itself is broken.
We turn off the storage water heater from the network, set the measuring device to the Ohm resistance measurement scale,
then we disconnect the heating element from the thermostat and release the wires from the terminal so that the contacts of the heating device are exposed. We measure the resistance value (Ohm) in the contacts of the heating device; if it is working properly, a certain value will appear on the screen, the number is not so important in this case.
If it does not show any value, you need to purchase a new one, since this one is faulty and not suitable for repair, it is recommended to simultaneously replace the flange seal and anode.
Now let’s describe in more detail how to remove the heating device from the boiler with your own hands:
- Turn off the power to the boiler and shut off the water supply from the main.
- Unscrew the bolts from the protective panel and remove it.
- Disconnect all wires.
- Unscrew the bolts that secure the heating element, there are usually 6 of them.
- Use a rotating motion to remove the heating element.
- Clean the tank and replace the necessary parts.
- Reassemble everything in the reverse order; it is recommended to tighten the bolts evenly.
- https://tehnika.expert/klimaticheskaya/vodonagrevatel/ariston-remont.html
- https://glav-dacha.ru/nakopitelnyj-vodonagrevatel-ariston/
- https://microklimat.pro/otopitelnoe-oborudovanie/vodonagrevateli/remont-ariston-svoimi-rukami.html
- https://serviceyard.net/tehnika/kak-razobrat-vodonagrevatel-ariston.html
- https://boilervdom.ru/boileri/proizvoditel/ariston/vodonagrevatel-ariston-50-litrov-sxema-bojlera-i-remont-svoimi-rukami.html
Preparation for repair work
Before disassembling the Ariston water heater for repair, it is necessary to study the design of the product, prepare the necessary tools, as well as various accessories. To repair mechanical damage, such as water leaks, you will need:
- a set of keys or one small adjustable one;
- a set of various adapters;
- new check valve.
If a malfunction occurs with the electrical part, you need to prepare a multimeter.
Preparation also includes the following work: disconnecting the device from the home electrical network, draining the water from the tank.
The tank in the Ariston water heater consists of the following main components:
- A heating element.
- Thermostat - designed to control the set temperature, as well as to adjust the heating mode.
- A relay that controls turning the heating element on or off.
- Special anode - it protects the internal coating from corrosion.
- Safety valve - regulates internal pressure when water is heated.
- Signal lights in budget models (they should turn on when current is applied) or electronics for more expensive products.
The home handyman should study the instructions in detail before starting maintenance or minor repairs in order to be able to navigate freely.
Price
The Ariston model range is very diverse. We also see a wide range in terms of the cost of devices. From economy class models to very comfortable ones. Let's look at several samples from the 80 liter line, but at different prices.
Let's start with the most modest:
Ariston SUPERLUX NTS 80V price 5,650 rubles. Tubular heating element, maximum temperature 75 degrees, power 1.5 kW number of heating elements - 1. Mechanical control, heating time 186 minutes. The inner coating is enamel. Maximum pressure up to 7 atmospheres.
Now let's look at a more expensive model:
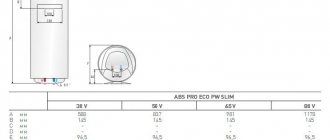
Ariston ABS PRO ECO INOX PW 80V price 11,046 rubles. Temperature up to 80 degrees. Power 4 kW. Number of heating elements – 2. Electronic control (buttons). Internal covering – stainless steel. Protection against turning on without water and protection against overheating. Accelerated water heating.
As you can see, there is a difference. Let's look at an even more expensive model:
Ariston VELIS INOX 80 l price 22,990 rubles. The internal tank is made of stainless steel with special protection. Ultra-fast water heating. Protection against: electric shock, switching on without water, power surge, bacteria. Ultra-precise temperature control. Automatic error diagnosis. Improved magnesium anode. Electronic control. Polyurethane foam thermal insulation. Power 1.5 kW.
That's the difference. If any of the listed data is important to you, you can pay extra and buy yourself a more expensive device. If not, then a budget model will suit you just fine.
Basic faults
According to statistics, during operation of the Ariston boiler the following typical malfunctions may occur:
- no water heating - the heating element has burned out;
- The thermostat needs to be replaced;
- the magnesium anode has completely used up its assigned resource;
- A large layer of limescale from heating elements formed.
If these malfunctions occur, in addition to the second option, you need to completely disassemble the product.
There is absolutely no difference what size Ariston water heater you have - 50 or 100 liters, the dismantling process will be identical.
Ariston water heater thermostat
Water heater Ariston vls pw 50 all indicators blink
Solution
Comments (2)
Your comment +5
Hello.
Need a module diagram. After the heating element burns out and replaces it with a new one, the water does not heat, the relay and the heater are replaced, but it still does not heat. Part of the board burned out, it is unclear how the tracks go. The stove does not start, but +5V and +15V power is present. The controller on the control panel is also knocked out.
Good afternoon, dear masters. I already have three display panels with broken firmware from Whirlpool ACM 838 NE induction panels. Please help me find this one.
Guys, please help. My wife’s Ariston dryer has broken down and is displaying error f8. A transistor burned out on the control board; without a datasheet I can’t find out exactly.
They brought the Samsung Diamond WF8590NMW9 CMA module, it burned on the motor (it was pouring on the block). Please share the circuit diagram for this board or photos of the tracks for restoration.
Hello everybody. The car was repaired once. Didn't turn on. They changed the shim and something else from the harness. After that I worked for about a year. Now it's broken again.
Source
We carry out dismantling
Every owner of Ariston water heaters should know that when replacing the thermostat, relay and safety valve, dismantling the tank is not required. Draining the water and completely disassembling the boiler is carried out only during maintenance work and when replacing a burnt-out heating element.
Disassembly of the product is divided into standard stages:
- Disconnect the water heater from the home electrical network.
- Drain the water from the tank.
- Remove the flanges and gain access to the inside of the water heater.
Before disassembling the product, you need to make sure that it is disconnected from the network: if the heater is powered by a separate line, then you need to turn off the circuit breaker, but if it’s just through a cord, then simply pull out the plug from the socket.
Some readers may wonder: why emphasize these points so often? But statistics say that during home repairs or when replacing burnt out parts, very often craftsmen who neglect safety precautions receive electrical injuries of varying severity.
Only after turning off the power can you begin dismantling the Ariston boiler with your own hands:
- unscrew the cover, which is secured with screws;
- before starting dismantling, take a photo of the location so as not to confuse anything during assembly;
- disconnect the three-wire cable, the first two wires - phase and neutral were connected to the thermostat, so you can carefully remove it.
All electrical work has been successfully completed, and you can begin draining the water from the tank.
Removing the thermostat
Removing water
If the initial installation of the water heater was carried out by a service technician, then he had to install a special tee with a drain tap and screw a fitting into it. Quite a convenient device - the user easily connects the hose, as shown in the photo, and drains the water into the bathroom. In the absence of a special device, water is removed by connecting a hose directly to the nozzle of the product.
Need to know! To balance the external and internal pressure, it is necessary to open the hot water tap.
Draining the water can take several minutes if the heater capacity is up to 50 liters, and when you have an 80-liter Ariston, the wait will last up to 30 minutes or more.
Hose with fitting
Opening access inside
All modifications of products under the Ariston have an oval flange on which heaters, a magnesium anode and a tube with a thermostat inside are installed . An elastic rubber gasket is placed on the flange body from below to ensure tightness. The flange is secured with a U-shaped strip, which is secured with a nut.
We unscrew the nut, carefully push the flange in, turn it and pull it out. Next, the failed parts are replaced and the surfaces are cleaned of salt and lime deposits.
Attention! Do not make any effort when cleaning the boiler tank: over time it becomes thinner due to the effects of corrosion. When performing preventive maintenance, it is advisable not to clean off thin scale.
Remove excess debris at the bottom of the tank, visually inspect the rubber seal, if everything is in order, then do not change it - it is very expensive, and it is very difficult to get a new one. Dismantling and subsequent assembly can be done independently by any user without special training. We attach this video to help:
The operation statistics of similar heaters allows us to conclude: regular inspections of the wear of the magnesium anode, cleaning of the heating elements, and preventive maintenance of the internal coating of the tank must be done regularly and by doing this you will significantly extend the service life of the product.
Do-it-yourself instantaneous water heater repair
Place a deep container under the tank; residual liquid may spill out. Using a wrench, unscrew the nut counterclockwise. For convenience, the housing can be removed from the wall and installed upside down. Now you can remove the heating element
Remove it from the housing - proceed carefully so as not to damage the element. If the part does not come out due to scale, clean the hole a little using a plastic knife. Economy class This is a more modern technology
To remove the cover, you need to unscrew two bolts. They are located near the inlet and drain hoses. You can remove the thermometer by pulling it down, but the movement must be quick and precise.
Economy class This is a more modern technology. To remove the cover, you need to unscrew two bolts. They are located near the inlet and drain hoses. You can remove the thermometer by pulling it down, but the movement must be quick and precise.
A special nut secures the flange strip. Unscrew it and remove the flange.
How the boiler works
Before removing the part, spin it. Remove the cover. Remove the temperature sensor. First disconnect the contacts from the heater. Remove the flange bolts using a socket wrench.
Unscrew the cap nut. Remove the plastic shields. Where can I find or what do the instructions for this Ariston boiler look like?
An electric instantaneous water heater can function fully in your home
Great article, but you just can’t copy it. Yes, that's understandable. The article was not prepared by people - aliens. And they are rednecks.
Tell me what the problem might be: the water heater heats up, draws water, but hot water does not flow from the tap. I took everything apart, cleaned the boiler and filters - still no leaks. Cleaning didn't help. How to find out the reason for the breakdown of the heating element or relay?
Symptoms of a problem
Many models of water heaters are equipped with an electronic display on which various error codes are displayed. You can decipher them using the instructions. Visually the user can identify the following faults:
- The product does not turn on - the circuit breaker has tripped;
- the water is very hot - the thermostat has burned out;
- drips form in the lower part of the tank;
- if when the product is turned on, the plug heats up - this is a signal that the power of the socket is low.
Some users do not suspect that the boiler may not turn on due to a burnt contact in the socket, which indicates its low power or lack of grounding.
Required Tools
Do-it-yourself repair of Samsung vacuum cleaners: common causes of malfunctions + how to eliminate them
There are several reasons why you need to disassemble the equipment:
- warm water is cloudy, there is a foreign odor;
- scale flakes are visible;
- when touching the body, a current discharge is felt;
- when the tank is turned on, the machine is activated;
- the device takes a long time to heat water or does not heat up at all;
- water is slowly rising;
- weak pressure of warm water when exiting;
- the housing is leaking.
To disassemble and subsequently assemble the Termex, Aquaverso es30v, Oasis water heater, you need to use the following tools:
- Screwdrivers - straight and Phillips.
- Wrenches. You need a universal gas wrench or a socket wrench - horn size - 22; 14; 10; 8, for some models you may need 32, 24 mm.
- Slotted screwdriver.
- Hexagon 4 mm.
- With pliers.
- Indicator screwdriver.
Causes of failure
Any failure of reliable household appliances can be caused by the following reasons:
- Formation of a large amount of scale on the heating element.
- Voltage surges in the electrical network contribute to electronic failure.
- Water flow decreases due to clogged filter and check valve.
To revive the equipment you will need spare parts, cleaning the heating element and washing the inside of the tank.
Advice! In order for equipment of any brand to serve for a long time and properly, do not set the temperature above 600C - this significantly reduces the process of scale formation.
Let's get acquainted with the boiler design
To understand how to ensure many years of uninterrupted operation of the purchased unit, you need to at least have a rough idea of its structure. It would also be a good idea to read the instructions for this model. This will allow you to avoid making mistakes when using an electric water heater.
A diagram suitable for most manufactured water heating devices is shown in the picture below:
Schematic design of a storage water heater
All water contains some amount of dissolved salts and minerals. With frequent heating and cooling, these salts crystallize and settle on the inner walls of the tank in the lower part. In 2-3 years, not only the walls are covered with a strong shell, but also the heating element and the copper tube, inside of which the temperature sensor is inserted. To reduce the hardness of the formed slags and to prevent corrosion of the tank body, a magnesium anode is attached to the same flange with the heating element. But it is not designed to last long, so it needs to be changed from time to time.
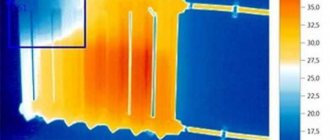
If you disassemble a boiler that has worked for several years without cleaning, you will see the following picture:
Scale formed due to long-term use of the Ariston boiler
This situation is scary not only because of its appearance. Such a frivolous attitude towards a water heater can lead to the following consequences:
- With such an amount of scale, energy consumption when heating water increases.
- Due to the higher temperature in the operating area of the heating element, the temperature sensor or heating element fails.
- The magnesium anode completely fails and, naturally, requires replacement.
- The risk of corrosion of the tank body increases many times over, causing water leakage. In this case, replacing the device with a new one is inevitable.
In order not to take matters to such an extreme, almost all companies that produce electric water heaters recommend maintenance of devices once every one to two years. What is it? It is necessary to disassemble the water heater, replace the magnesium anode with a new one, check and, if necessary, clean the heating element, clean and rinse the inner surface of the tank with water. If such an event is carried out regularly, the service life of the boiler can at least double.
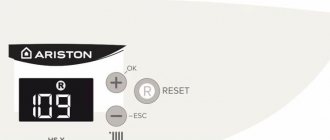
Boiler service menu
For all manipulations with switching modes, only 4 buttons are used - Plus, Minus, Ok/Menu, ESC.
It is important to understand that not all boiler menu items will be available to you; some of them will only become available when additional devices are connected to the boiler, such as external sensors or a solar collector. And most menu items are accessible only by service code, I’ll talk about this below, but for now, “let’s practice on cats.” And most menu items are accessible only by service code, I’ll talk about this below, but for now let’s “practice on cats”
And most menu items are accessible only by service code, I’ll talk about this below, but for now let’s “practice on cats”
Our cats will have meanings that are open to free access. But first, read how to work with the menu.
Comments (1)
- Oleg: 05/14/2018 at 18:24
Hello! I would like to ask you for technical advice. I have been using an Ariston brand storage water heater, model ABS PRO ECO 80V (topmost photo on the site) for 8 years now, I am satisfied with the product. But time takes its toll and a certain problem has arisen, namely, the next time the temperature sensor is triggered (if the period between switching on was 1 hour or more), the entire display on the front panel blinks and frequent clicks under the plastic casing of the indicator panel are observed for about 10 minutes, then the frequency of clicks gradually decreases and the device turns on. It should be noted that if the period between the activation of the temperature sensor is short (15-20 minutes), the heater turns on without problems. But during the period of frequent clicks, it seems as if some relay cannot be pulled in, then gradually magnetizes and closes the contact, the heater starts working.
Recommendations for home repairs
Regardless of the nature of the breakdown, before starting repair work, you first need to turn off the power supply, remove the protective cover, disconnect the wires, pipes and drain the water.
Wall-mounted models are usually removed from their brackets. The protective cover, which hides the connection point for electrical wires and the mounting of heating elements, may have a different position depending on the model.
On horizontal devices, this element is usually located on the left, on vertical heaters - at the bottom, and on small models - in front. In some devices, you first need to unscrew the main mounting bolt located in the center. Sometimes this element is hidden under a decorative sticker.
After this, you need to carefully remove the thermostat, and then remove the temperature sensor tubes. They must be handled very carefully. If the integrity of the temperature sensor tube is damaged, liquid filler will leak out of them. As a result, you will simply have to throw away the water heater and buy a new device.
The temperature sensor tubes highlighted in blue should be protected from any deforming influence; if they break, the entire device will have to be completely replaced
If the thermostat of a household water heater has become unusable, it will have to be completely replaced. The models of such devices are varied; it is best to choose an analogue with a similar device and characteristics
If there are stickers on the case that indicate the serial number, they must be preserved, even if they interfere with the maintenance and repair of the product. This may affect the manufacturer's fulfillment of warranty obligations, as well as make the work of service center employees easier.
Prevention as a way to avoid problems
Not only home owners provide themselves with autonomous hot water. More and more residents of apartment buildings prefer to install instantaneous or storage water heaters. There are 2 reasons for this unconditional popularity: interruptions in hot water supply, especially in the off-season, and the high cost of hot water supply.
Italian Ariston boilers have been popular for several years now. They are distinguished by high quality, reliability, and long service life if used correctly. Nothing lasting has been invented yet, and therefore sometimes you have to do repairs yourself.
And although a water heater is a rather complex device, its regular cleaning and maintenance can be done independently in just a couple of hours. The main thing is that before you start the actual work, understand not only how the equipment works, but also how to disassemble it correctly.
The most important thing is to completely drain the water from the boiler. There are 2 pipes installed on the lower part, through one of them water flows into the boiler, through the second it is drained.
Since high-quality drainage is the key to a successful outcome of the entire operation, we will dwell on it in more detail.
The procedure depends on the features of the particular model - with a trigger, a tee or through a check valve.
- The most demanding model is considered to be the one in which a reinforcing tee is built between the pipe and the valve. You will have to unscrew it with an adjustable wrench and drain all the water.
- on those models where there is no tee, but there is a trigger - a jumper on the reverse valve. You can bend it, fix it and wait until all the water drains. This process usually takes 1.5-2 hours.
- The simplest and therefore most effective way is to unscrew the check valve counterclockwise. Before doing this, connect the hose to the water outlet pipe and drain.
Attention! All work is carried out only after the water heater is disconnected from the power supply!
How to properly disassemble a boiler?
For those who don’t have time to read, we have prepared video instructions on how to disassemble an Ariston water heater. Here you will learn about the features of installation, connecting to pipes, cleaning, etc.
Required Tools
- screwdriver;
- pliers;
- knife;
- hose for draining water, matching in diameter with the return pipe;
- replacement anode;
- a special cleaner for cleaning heating elements; you can also use a concentrated solution of citric acid.
Let us repeat once again, all work on disassembling the water heater is carried out only when it is completely de-energized.
Procedure
- Remove the cover from the bottom of the boiler by unscrewing the bolts around the perimeter.
- Drain the water as indicated earlier (it’s easier and faster to drain through the pipe).
- There are several bolts on the inner casing; they need to be unscrewed (don’t forget to replace the bowl, there is still about 15-20 liters of water left in the system).
- Over time, the bolts become “baked” and are very difficult to unscrew. If this happens now, it is better to remove the boiler from the wall, lay it horizontally and then unscrew it. By the way, the tightness of the twist indicates a high-quality assembly.
- Very carefully pull out the electrical unit. But in such a way that the rubber gasket remains intact - it is very easy to tear or deform. At this stage it is advisable to take photographs of everything you do. Then you will have to assemble it in reverse order and then your photos will be very useful.
- If necessary, replace the anode with a new one, and soak the heating element in a solution of citric acid. The minimum time is a day. After 24 hours, take any non-sharp object with a narrow end and carefully remove the scale from the heating element. All this should be done only if the cause of the breakdown is a burnt-out heating element or the need to replace the magnesium anode. How to find out what exactly is preventing the operation of the unit is further in the text.
- The electrical unit of the boiler is treated using a cleaning composition. Plaque can be removed with a dry, hard sponge.
- The device does not heat the water - if you are sure that the socket is working and there is electricity, the fault lies in the heating element.
- The water heats up very slowly - the magnesium anode needs to be replaced.
- During operation, a distinct but dull hissing is heard - excessive scale and deposits on the heating element.
The water temperature does not correspond to the specified parameters
Significant deviation of water temperature from the specified parameters
The problem arises in two cases, when the water from the heater is either too hot (literally boiling water) at minimum heating values, or cold and heating does not occur at all. There is also an intermediate malfunction, when the maximum heater values are set, and the water is slightly warm. All problems deserve attention, the causes of which can be quite numerous.
So, let's consider a situation where the water heater, at maximum values on the relay, produces only warm water in the tap, which is preceded by the following possible problems:
- The heating element is covered with scale, it consumes more energy on heating, while the efficiency is at a minimum.
- There are problems in the central board that are blocking the relay signal to the desired temperature.
If the water heater visually turns on and supposedly works, but in fact only produces cold water, then the reasons may be similar to those stated above. When the temperature of the water is exceeded, the problem lies in a malfunction of the thermostat or thermostat, which is responsible for fixing the heating parameters set by a person and maintaining this temperature inside the water heater.
If the problem is related to temperature mismatch, you need to perform the following sequence of actions:
- Check the heating element for contamination and proper operation: disconnect the boiler from the mains, allow the water to cool and drain it as much as possible, then remove the protective cover at the bottom, open the valve and carefully remove the heating element. Using a multimeter, check the functionality of the element, which is fixed in the range of values 0.68-0.37 Ohm. If there is a break, the indicators will be unstable and will tend to infinity. If there is scale, it can be removed by soaking it in a special acid solution, which can be bought at any household store. Apple cider vinegar is an alternative.
- Take out the thermostat and evaluate its performance: disconnect the boiler from the network, drain the water, remove it from the wall. Find the thermostat (you can see in the instructions what it looks like and where it is located for a specific model) and press the safety button all the way. Next, the metal tube needs to be slightly heated with a lighter. If the thermostat is working, then when it heats up it will react and return the button to its original position. If this does not happen, then you should completely dismantle and replace the element with a new one.
Similarly, you should go through all available contacts with a multimeter, since there is a possibility of a break, which provokes a lack of proper operation.
Expert opinion Vadim Savelievich Grebnev Heating systems installer
Before draining the water, you need to let it cool. If you don’t have time to wait, then the following trick will do: open the hot water tap to maximum, unplug the boiler. After about 5-7 minutes, the water in the tank will become slightly warm, which will facilitate the process of draining it.
Geyser Ariston Fast EVO 11b
Vladimir Excellent speaker at an affordable price, with electronic ignition and flame modulation. But the presence of modulation does not eliminate the need to regulate the temperature - sometimes you need to adjust it yourself, without relying on the column (most often in winter and early summer). These are, of course, trifles, since otherwise it is almost flawless. It has been hanging in the house for a year and a half, does not leak, ignites softly and without popping, and ignites normally with minimal pressure. By the way, the temperature is very easy to adjust; the required value is easily selected using the built-in indicator. We can recommend it to anyone who wants to get trouble-free hot water supply at home.
Advantages:
- The performance is sufficient for the simultaneous operation of two cranes;
- Lights up even with minimal water pressure;
- There is a heating limitation, the output temperature is stable and does not fluctuate, like on cheap Chinese speakers.
Flaws:
- Some very simple appearance, like a monolithic concrete slab. It feels like something is missing;
- When the flame is small, a whistle appears, and it disappears completely if the flame is on full.
Video
Video about how you can independently repair the control unit in the Ariston HotPoint SM:
About the author:
Electronic engineer with many years of experience. For several years he was involved in organizing the repair of household appliances, including washing machines. Loves sport fishing, water tourism and travel.
Found a mistake? Select it and click the buttons:
Ctrl + Enter
Interesting!
History knows the fact that a kitten fell into the drum of a washing machine and, after going through a full wash cycle on the “Wool” program, got out of the unit unharmed. The only trouble for the pet was an allergy to washing powder.
Error codes for other boiler components
A list of all possible errors, their digital designation, and decoding may take a long time. In order to more fully understand the significance of the various codes, it is worth giving a description of the most important, most frequently occurring problems with gas boilers.
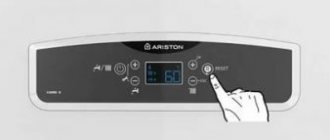
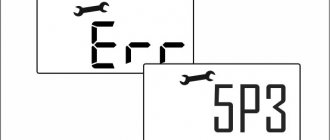
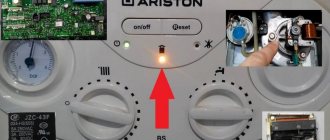
- 501 - Ariston boiler error 501 indicates problems with ignition, the boiler must be reset with the RESET button. If there is no flame, the gas supply must also be checked.
- 6p1 - if error 6p1 occurs on the Ariston boiler, you need to check the exhaust system, it means that the contacts of the relay responsible for the operation of the fan have not closed in the normal way. Sometimes resetting with the Reset button helps.
- 5p3 - with error 5p3 in the Ariston boiler, flame separation from the burner was detected.
- 117 - if error 117 occurs, the Ariston boiler must be reset using the Reset button, and it should work.
- sp3 – no burner ignition. Found in models with the EGIS Plus index and the like. Sometimes it is interpreted as flame separation, which makes it possible to classify the sp3 code as the most critical error.
Particular attention should be paid to problems such as flame separation. It occurs due to too powerful a gas flow and can lead to gas contamination inside the boiler. The same error in the Ariston 501 or 6p1 boiler does not cause any special problems, except for the inability to turn on water heating
Error - flame separation in the Ariston boiler may indicate serious problems in the supply system, they cannot be solved on your own, you just need to call a specialist, having first turned off the gas supply
The same error in the Ariston 501 or 6p1 boiler does not cause any special problems, except for the inability to turn on the water heating. Error - flame separation in the Ariston boiler may indicate serious problems in the supply system; they cannot be solved on your own, you just need to call a specialist, having first turned off the gas supply.
When a flame breaks out, a fire hazard arises, so if it occurs frequently or at least systematically, you should consider checking the gas supply line. The accumulated gas in the boiler can flare up and cause mechanical damage to it or even create a health hazard for people living in the apartment.
In addition, heating efficiency decreases significantly and gas consumption for the same volume of water increases. The flame power should be adjusted smoothly, without popping inside the boiler and other abnormal phenomena and sound effects. Only then can you expect economical operation from the heater.
Rice. 3
Ariston washing machine error codes
Error codes in the form of symbols on the screen help determine the cause of the failure.
| Error code | Malfunction |
| F01 | Motor circuit short circuit |
| F02 | Problems with the tachometer |
| F03 | Temperature sensor malfunction |
| F04 | The pressure switch responsible for the water level in the tank is faulty |
| F05 | Problems with draining (the pump does not pump or the level sensor does not signal the end of draining) |
| F06 | Problems with the control buttons (in the Dalogic series) or the sunroof locking device is faulty |
| F07 | Malfunction of the pressure switch (heating element without water) |
| F08 | The machine receives a signal that heating has begun when the tank is empty (“pressostat is stuck”) |
| F09 | Device memory problems |
| F10 | The pressure switch does not signal the water level |
| F11 | The drain pump does not respond to module commands |
| F12 | The display module does not receive a signal from the control module |
| F13 | Drying temperature sensor reports an error |
| F14 | The heating element responsible for drying clothes is faulty |
| F15 | Drying does not turn on |
| F16 | An error occurred while parking the drum (for machines with vertical loading) |
| F17 | The hatch door is open |
| F18 | Microprocessor malfunction |
| F20 | An error occurred while drawing water |
In models without a display, a certain periodicity of indicator blinking corresponds to a particular error. Thus, the owner of the washing machine will be able to find out which unit has problems.
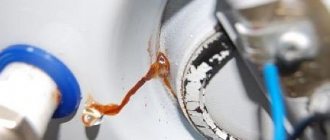
Getting rid of leaks
If you notice that water is dripping from the boiler, it is not always possible to repair it yourself. It is good if the cause of the leak is wear of the seal on the flange. In this case, the gasket must be replaced with one of the same size, which will allow the damage to be repaired. Things are much worse if the water heater is leaking due to wear and tear on the tank itself. Some people advise gluing or soldering the holes, but, as practice shows, after a short period of time you will still have to say goodbye to the boiler, because. Such leak repair methods are extremely short-lived.
Master class on fixing leaks
That's all I wanted to tell you about repairing the boiler yourself. We hope that now you know what to do if your electric water heater leaks, does not heat water well, or does not work at all. There are not many problems with these devices and you can get rid of them with timely system maintenance. At least once a year, inspect the check valve and clean the heating element so that malfunctions avoid you!
It will be interesting to read:
- How to use a multimeter
- The best water heater manufacturers
- Why is there electric shock in the bathroom?