Cast iron radiators (“accordions”) are a timeless classic, which, unfortunately, sometimes have to be hidden. As a rule, such batteries do not look very aesthetically pleasing and do not always fit into the chosen interior design style, so they are often disguised with beautiful and neat screens. However, it must be remembered that cast iron radiators have several important features that need to be taken into account when choosing decorative grilles. Among them:
insignificant heat transfer. Because of this, the design of the box or grille should be as open as possible - sparse perforations on the front panel, blank side surfaces and top shelf can make the battery useless;
the need for periodic flushing of cast iron radiators. Screens for heating devices of this type should not impede free access to the taps;
the possibility of leaks between sections and drops from under the locknuts. In order to quickly take action in the event of an emergency, it is better if the box is open at the ends and easily dismantled.
Because of these features of cast iron radiators, the optimal type of screen for them is wall-mounted models, the front panel of which is made in the form of a fine mesh. Another possible solution is a box, but not fixed to the wall, but attached.
Materials for making screens for cast iron radiators
With the correct selection of design, the box or grille can be made from almost any heat-resistant material. The only exception is plastic: due to its low strength, the thickness of all elements of the screen increases, which means it will interfere with the transfer of heat from the battery. There are no restrictions regarding other materials - in the manufacture of boxes and grilles for accordion radiators the following are used:
- a tree that has no analogues in beauty and environmental friendliness;
- MDF board, resistant to temperature deformation and humidity fluctuations;
- glass that is absolutely permeable to thermal radiation and has a stylish appearance;
- a metal that has such a high thermal conductivity that, even by limiting convection currents near the battery, the grill itself can become a source of heat. Combined with strength and durability, this makes the material the best solution for decorating cast iron radiators.
© IP Zelentsov A.E.©, 2009-2019. All rights reserved.
By mistake, many people believe that an accordion battery is a cast-iron sectional radiator. In fact, everything is not like that. This is a heat exchanger made of steel pipes bent in a zigzag, on which plates are put on, increasing the heat exchange area. The fins are covered with a casing, which is often replaced with a screen. Those who have experienced the operation of these radiators know how difficult it is to wash an accordion battery. Everything has to be done manually.
Making your own plasterboard box - step-by-step instructions
You can make a neat plasterboard box for fixing a flat decorative screen yourself .
Table 3. Step-by-step instructions for making a plasterboard box.
| Illustration | Description |
| Step 1. A guide profile for drywall (27 x 28) is used to make slats, the length of which is equal to the parameters of the structure being manufactured. | |
| Step 2. A profile is placed into the guide on one side. | |
| Step 3. Make holes. | |
| Step 4. The frame is assembled, controlling its geometric parameters using a building level. | |
| Step 5. Fix the drywall panels. | |
| Step 6. A hole is cut in the drywall and a decorative screen is installed. |
After installation, the box is painted in the desired color to match the interior of the room.
In addition, we recommend you our article on the topic - Wooden balusters, where we looked at their types, as well as step-by-step instructions for making them yourself.
What is an accordion battery
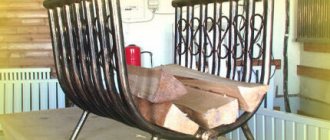
Accordion battery without casing.
An accordion battery is a heating register made of round pipes with fins. The tubes and fins are made of steel. Such radiators were installed during the union in apartments, government institutions, and public places. At that time, the task was to heat the premises cheaply and quickly, and so that the equipment would last a long time.
In principle, the design of steel accordion batteries is simple; there are no pockets for collecting air and dirt. Making them is quite simple. There are two options:
- by welding;
- using a pipe bender.
If there are welds, there is a possibility of leakage. If the pipes were bent with a pipe bender, then such a heat exchanger will withstand any pressure (within reason). In any case, they can be used in heating systems with centralized coolant supply. There are only two connection options: left and right.
By modern standards, an accordion battery is one of the worst options. There are many disadvantages to such radiators. For example, the thermal conductivity of steel is low, the batteries are very noisy, and dirt constantly accumulates between the ribs. Washing away this dirt is not an easy task. To ensure that the heat exchanger has an acceptable appearance, a façade panel is placed on it. This is a steel sheet that can be removed if necessary.
Stove heating of a garage with wood is one of the most common heating methods.
If you need a diagram of steam heating for a two-story house, click here.
Types of screens for accordion batteries
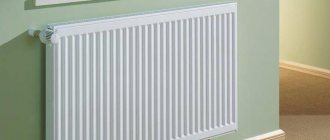
The steel screen for the radiator is simply placed on top.
The appearance of the accordion battery does not fit into the modern interior. A steel sheet as a façade does not help the situation. The only option is accordion battery screens. They should cover the radiator, but at the same time create a minimum of obstacles to air circulation. Screen configurations vary, it could be:
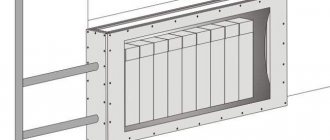
The screen-box covers the heat exchanger, but its façade will not be flush with the wall. It is sold as a finished product that can be customized to size. To install, simply place the box against the wall if it is floor-mounted. Hanging boxes must be secured to the wall with dowels.
If the batteries are covered with a screen and you want to be able to regulate the temperature in the room, then you need to use thermostatic heads with a remote sensor.
The difference between a screen and a box is that it does not have end walls. It is simply placed on the battery. The screen is made of tin, so it is quite light. There are screens made of fabric, wood, plastic and other materials. Such screens are used only when a false wall is being erected. In this case, it turns out that the battery is located in a niche that needs to be covered with a flat screen.
Screens on accordion batteries have one significant drawback - this is a violation of heat circulation. A lot of heat goes to heating the outer wall, because the heated air stagnates in the heat exchanger area. It is good if the wall is insulated from the outside with polystyrene foam and all the heat accumulated by it is transferred back into the room using the radiant method. If the walls are not insulated, then a lot of heat will be used to heat the street.
Instructions on how to make steam heating with your own hands with video will greatly facilitate installation and protect you from common mistakes.
There are boilers in which the gas burner for heating the house can be replaced with a diesel one. Read more here.
Conclusions and useful video on the topic
From the following video you can learn how to decorate a radiator yourself:
Protective and decorative screens are in great demand among consumers. They are used to hide an unaesthetic heating device and improve the interior.
When choosing a grille for a heating radiator, it is necessary to take into account environmental friendliness, safety and thermal conductivity. To improve air circulation, it is recommended to leave a gap of 2-3 cm from the floor covering when installing it.
Which decorative radiator grilles did you choose? Please share your photos and tell us if you are happy with your choice? Write your comments in the block below the article.
Restoration of an accordion battery
Floor wooden screen-box.
In one of the articles we talked about the decor of heating pipes. Today we’ll talk about how you can restore a radiator to its human form with little effort by restoring it:
- clean;
- paint;
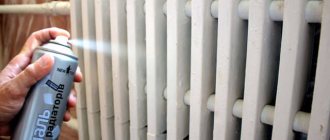
- You can also paint the radiator if you have the desire and artistic talent.
On various women's forums there are topics where housewives exchange experiences on how to wash an accordion battery. Indeed, it is difficult to wash away the dirt between the ribs. The fins are very thick, a lot of dust gets clogged there. Besides the fact that it is unsightly, it is also harmful to health.
Heating is carried out by convection method. Hot streams pick up dust and carry it throughout the room. If you constantly breathe such air, asthma, allergies, and cases of respiratory diseases may become more frequent.
You should not wash the accordion battery with caustic chemicals, since you are unlikely to be able to wash it off completely. When the heating is turned on, all the chemicals will enter the air.
Unfortunately, there is only one option - to remove the dirt mechanically. That is, you need to take a stiff brush, a bowl of water, a cloth and clean it. Don't forget to place a cloth under the radiator. Also cover the walls next to the radiator. A hard brush will cause a lot of splashes.
Painting a battery consists of the following steps:
- removing old paint with a remover - available in any hardware store, cheap, sold in glass bottles;
- primer – for the paint to lay more evenly and to adhere more firmly, the heat exchanger must be primed;
- painting - it is advisable to paint when the heating is turned off.
Naturally, only the visible parts need to be painted - these are the ends and the casing. Do not paint the fins under any circumstances. Such batteries already have poor heat transfer, and a coat of paint will make it even worse.
Should I buy a false fireplace or make it myself?
- plywood 9 mm thick;
- wooden layout;
- bars with a cross section of 50 mm;
- self-tapping screws;
- fragment of a garden fence;
- construction glue gun;
- decorative plastic panel depicting brickwork;
- furniture stapler;
- stain;
- polyurethane skirting boards;
- putty;
- fine sandpaper;
- acrylic paint;
- brush;
- long lamp;
- bath stones.
If it happens that there is no putty on the farm, you can replace it with sealant or liquid nails. After these soft materials have dried, you need to smooth the surface using sandpaper.
- drywall;
- metallic profile;
- self-tapping screws;
- drywall knife;
- putty;
- acrylic paint white and golden;
- sealant in a tube;
- construction gun;
- polyurethane skirting boards and glue for them.
- As in the first case, cut a hole in the drywall sheet. Make a base from a metal profile, attach a plasterboard blank to it using self-tapping screws. From the same material, make a rectangular shelf that will become the top of the false fireplace.
- In this part you need to connect the front and top elements by gluing here polyurethane skirting boards in front and two small ones on the sides. These same parts need to be attached between the floor and the sheet of drywall below.
- Put the sealant in the construction gun, feel like a real sculptor, as now you will make various monograms on the top of the fireplace. If something doesn’t work out, remove the excess before the composition hardens. The end of the extruded strip will be straight if you simply trim it with scissors.
- Allow the sealant to dry thoroughly. Now paint the fireplace portal with white acrylic paint in two layers. When it dries, take a thin brush and use it to paint the monograms with golden paint. If you want to decorate the top of the fireplace, you can use a laminate board for this.
- Of course, the battery must also be painted in a suitable color.
- thick sheet of foam rubber;
- thick fabric;
- drywall;
- polyurethane ceiling plinth;
- drywall saw;
- acrylic paints;
- metallic profile;
- self-tapping screws
- Assemble a rectangular base from a metal profile, use self-tapping screws to attach it to the sides of the wall, top to the window sill, and bottom to the floor.
- Now, again using self-tapping screws, you need to attach a sheet of drywall to this metal base; of course, you first need to cut out windows of this size or smaller ones in it. You need to glue the baseboard onto the top of the drywall, and then paint this decorative element with white acrylic paint.
- Cut a sheet of foam rubber to the size of the window sill and sew a cover of thick fabric on it. Insert a zipper on one side so that this part of the mattress can be removed and washed. You can also make rollers from foam rubber. To do this, you need to connect the small edges of the rectangle and roll it up. A pre-sewn cover is placed on top.
https://youtube.com/watch?v=PrYB-QK4a8I
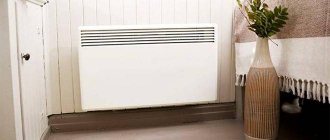
Disadvantages of plate radiators (convectors)
- The convective type of radiators does not allow heating the room evenly. Radiators are warmer than the opposite wall of the room.
- The convector plates are an excellent dust collector. They are difficult to clean. Over time, dust reduces their heat transfer.
- The appearance of plate radiators is not encouraging, although there are nice models.
Installation of factory wall panels
The soft finish is attached to a pre-prepared base. The surface must undergo plastering, sanding and primer coating. After this, the wall is marked according to level. This will help avoid distortions and shifting of decorative elements.
At the installation stage, two important factors should be taken into account:
- It is not recommended to cut panels to fit the walls. This will not affect the appearance for the better. You can sheathe the wall starting from the middle and leaving equal gaps in the corners. This will look much more aesthetically pleasing than cut material.
- It makes sense to start work from the top. If the height is trimmed, the bottom edge can be hidden with a plinth.
For gluing you will need liquid nails, acrylic glue or PVA. The latter is applied to the entire surface of the slabs; other materials are applied pointwise or in a narrow strip along the edge. Soft panels are applied according to the markings and pressed for some time to set.
The process of installing a factory product is quite simple; making soft walls and attaching them yourself will be more difficult. But the second option provides more possibilities: there are several options for creating and attaching homemade soft walls.
Thermal power of plate radiators
The heat transfer of convectors depends on their length and the number of rows with plates. The height of all convectors is 200 mm.
Thus, the heat transfer of a convector into “one thread” 600 mm long is 347 W. It is 3000 m long and gives a heat output of 1730 W. A radiator with four “threads” 3000 mm long gives a heat output of 4179 W, and one with a length of 1000 mm will give off 1393 W of heat.
The radiator is calculated according to the standard scheme for calculating radiator sections, taking into account all correction factors. Let me remind you how this is done. (read article: Simplified calculation of the heating system)
- For 1 sq. meter of area with a ceiling of 3 meters, you need 100 W of heat.
- For a room of 16 sq. meters, you need a 1600 W radiator. This is under ideal conditions: one window, 3-meter ceiling, the room is not corner. If this is not the case, we apply correction factors:
- Two windows k=1.8: 1600×1.8=2880W;
- Corner room k=1.8: 2880×1.8=5184W;
- Ceiling 2.65, k=2.65/3.0=0.88: 5148W×0.88=4547 W;
- Plastic window k=0.8: 4547W×3637W.
A standard window has a width of 1400 mm, which means that under each window you need to install 4-section plate radiators 1400 mm long, with a heat output of 1950 W. The data is taken from the passports of Purmo radiators. That's all!
Purpose
The radiator protector has three main functions:
- Protective. The panels protect against burns and other damage that can result from contact with the radiator.
- Camouflage. Screens hide unsightly elements of the heating system.
- Decorative. The devices make it possible to equip heating radiators according to the design solution.
In addition to performing all the above functions, protective panels should not reduce the efficiency of heating the room.