Sooner or later, any owner of this device will have to replace a burnt-out heating element in a storage electric boiler.
Don’t think that it will serve you for decades, no matter how high-quality and expensive the model is. Heating elements fail for two reasons:
- scale formation and burnout of the working element (heating coil)
- corrosion and mechanical failure
Scale and cleaning of heating elements
Scale forms primarily in the presence of hard water. Just 1mm of scale gives 75% additional thermal insulation. Thus, the heating element under such a large layer of salts simply begins to overheat.
The first sign of scale formation is a distinct hissing or whistling noise.
When the noises become louder, but the boiler continues to work properly, do not delay cleaning, otherwise it may be too late.
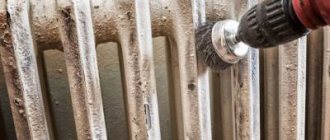
Disassemble the boiler, as shown below, and begin cleaning. This can be done in two ways:
- a regular knife or wire brush
- if the scale is very hard, then use citric acid or special products
Cut off the neck of a 1.5 liter plastic bottle and dilute the solution in it:
- warm water 60 degrees
- 7 teaspoons citric acid
Soak the heating element in it overnight. After which, in the morning you clean off all excess. The result is sometimes simply amazing.
Prevention measures
To prevent damage to the heating element, you need to:
- disassemble the boiler and inspect the anode and heating element at least once every 6-9 months;
- At each maintenance, rinse the tank from dirt and scale;
- when replacing the heating element, also change the “sacrificial” element;
- avoid mechanical methods of cleaning the tube, especially with a knife and other sharp objects;
- tighten the nuts and bolts firmly, but without jerking, so as not to damage the threaded connections.
To slow down the formation of scale, you need to heat the water no higher than +60...+65°C. Once every 2-3 weeks, you can set the regulator to maximum mode to disinfect the tank.
For high water hardness, it is recommended to install a filtration (softening) system. Depending on the configuration and resource, it is mounted in front of the boiler or on the common apartment wiring. You can buy a water purification system in the KVANTA + online store.
Corrosion of the water heating element
Why does the heating element body corrode and collapse? The fact is that the heating element in the boiler is equipped with a magnesium anode.
Without it, a galvanic couple is formed inside the titanium:
- tank - heating element
And with a magnesium anode:
- heating element - anode
Through this anode, all stray currents flow to the ground, gradually taking with them some part of the anode body. When it is completely destroyed, these currents begin to flow down the body of the heating element.
The growths on the heating element do not form evenly. Because of this, different parts of its copper shell acquire different expansion coefficients. As a result, surface tension is created, which breaks the shell of the heating element.
In many service centers, if the boiler breaks down completely, you may even be denied a warranty if you do not have a receipt for timely replacement of the anode.
Ultimately, corrosion becomes through and the working element burns out.
By the way, with the anode intact, the water from the tank may have a slight odor. When the smell disappears, this may be some kind of sign of corrosion of the electrode.
Modern models have special sensors that monitor the condition of the anode.
With timely replacement of the anode and mandatory cleaning, your heating element will actually last several times longer. Grounding the housing also increases the service life of the heating element by at least two times.
However, for some reason many people lose sight of this point. Meanwhile, during intensive work, it is recommended to clean the boiler at least once a year.
It cannot be said with certainty that some models, for example Electrolux, Ariston or Gorenje, have a longer service life than Thermex or Indesit. It all depends on many factors:
- amount of water consumed
- the average heating temperature of this water, its chemical composition
- how the plug is inserted into the socket (where the phase comes and where the zero)
- is there grounding or not?
Comparative characteristics
The peculiarity of the operation of heating elements with different methods of interaction with liquid is reflected in the difference in the operation of two types of water heaters, the difference in their productivity and, as a consequence, the difference in electricity costs.
The choice of an electrical appliance for heating water with different types of heating elements remains up to the consumer. These tables will help you focus on some facts about the technical characteristics of heating devices.
| Heating element type | Positive sides | Negative sides |
| Wet type heating element | Does not match the model of the electric heating device (universality); The water heats up in a short time; Affordability; A large assortment. | There is a possibility of receiving an electrical discharge if the device is broken; The heating part is periodically cleaned and changed; Increased energy consumption. |
| Dry type heating element | Water does not affect performance; The water temperature is kept at 40°C; Corrosive phenomena are minimized; Long service life. | High cost of models; Finding a replacement boiler is difficult. |
There are pros and cons to the operation of dry and wet type boilers. The choice between them is made based on financial capabilities and operating preferences.
Checking the serviceability of the heating element
How can you understand that the heating element has burned out and it’s time to change it? If the indicator lights light up and show that the boiler is on, but it does not heat, this is only an indirect reason.
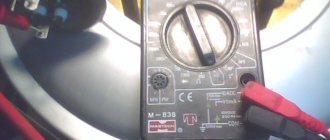
The issue may be wiring, poor contact, or a thick layer of scale. The main check should be carried out with a multimeter by measuring the resistance. How to do this is described in detail in the article “Connecting the boiler to the electrical network - errors and rules.”
You can also check the presence of potential between zero and the body of the device. When the heating element is destroyed, its current-carrying spiral comes into contact with water, and through it the voltage reaches the boiler body.
It is better to take measurements with a multimeter in AC voltage measurement mode. The dial can show either a couple of tens of volts or all 220V. This already indicates a 100% malfunction and the need to change the heating element.
If you have an RCD, as it should be in a normal circuit, then it starts to knock out when you try to turn on and supply power.
A correct RCD (not 30mA, but max 10mA) is a mandatory element of the circuit when connecting any boiler, otherwise the voltage can easily appear on the faucet, tap water in the kitchen and in other unexpected places.
Flaws
There are many references online that dry heating elements are less economical, because... first heats the surface of the metal tube and only it warms up the water, however, such a statement does not stand up to criticism, because the main heating occurs deep inside the heated medium and heat loss from such an “indirect” effect on water is minimal, especially since the diameter of a dry heating element (usually 12mm) is only a couple of millimeters smaller than the inner diameter of the tube, so the air gap is minimal.
You can also find references to the fact that the power of such heating elements is lower than the power of “classic” ones. Indeed, a powerful 2000 W spiral is much more impressive than dry ones, which are never stronger than 1200 W, but usually two “crackers” are installed in a water heater, and this is 2.4 kW, so the minus here is not at all clear
The only undeniable disadvantage of a dry heating element in a water heater is the price of the device as a whole. Thus, the minimum price for a 50-liter Gorenje boiler with a conventional heating element starts at $90, and for a similar device with a “dry” heating element it starts at $120. We will describe below what you get by overpaying this $30.
Draining water and disassembling the water heater
And so, when you decide that you still need to open it, the first thing you do is turn off the power by unplugging the plug from the socket. Then drain the water from the titanium. To do this, turn off the hot and cold water supply taps.
Unscrew the cold water hose, placing a suitable container for drainage.
If water does not flow from the removed hose, this indicates an air lock. We need to remove it. To do this, just slightly loosen the nut at the point where the hot water pipe connects to the pipe.
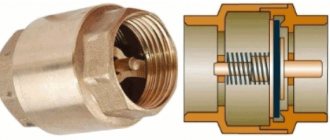
Next, open the safety valve and release water through it. If the valve suddenly becomes clogged, you will have to twist the entire valve. Water will flow out of the boiler in a continuous stream.
After draining, completely unscrew both valves from the titanium (hot + cold) to open the bottom cover and gain access to the heating elements.
There are modern models where the bottom cover is collapsible and to remove it, it is not necessary to touch the valve. It comes in the form of a plastic insert secured with several screws.
Disconnect the power wires, first remembering or marking with a marker which one is connected where. Better yet, draw a diagram. As a rule, all wires are colored and this will be easy to do. Otherwise, you can get confused in such a pile of wiring.
If you don’t want to draw anything, then just take a couple of photos on your cell phone. You will know exactly the location of all elements and wires.
After this, unscrew the nuts or screws securing the heating element itself around the perimeter.
You can unscrew them in any order, but you need to screw them in the same way as the engine head or the wheels on a car, that is, crosswise.
If you immediately tighten a nut all the way, this will cause the flange to bend and there will not be the required tightness. Consequently, the gasket will not hold and will leak.
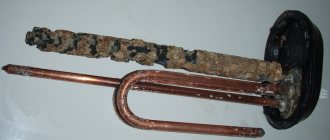
Carefully pull the heating element out. It will be all covered in rust, and from the magnesium anode, except for a thin burnt piece of iron, there may be nothing left at all.
Make an electrolyzer with your own hands
Surely, you are familiar with the process of electrolysis from the elementary school curriculum. This is when 2 polar electrodes under current are placed in water in order to obtain metals or non-metals in their pure form. An electrolyzer is needed to break down water molecules into oxygen and hydrogen. The electrolyzer, being part of scientific mechanisms, divides molecules into ions.
There are two types of this device:
- Dry electrolyzer (this is a completely closed cell);
- Wet electrolyzer (these are two metal plates placed in a container of water).
This device is simple in terms of design, which makes it possible to use it even at home. Electrolyzers divide the electrolysis charges of atoms of molecules into charged atoms.
In our case, it divides water into positive hydrogen and negative oxygen. To do this, a large amount of energy is required, and to reduce the amount of energy required, a catalyst is used.
Flushing
After the heating elements are removed, the boiler itself must be rinsed with clean water to remove all the rust and dirt that has accumulated inside. Therefore, for a quality replacement, the water heater still has to be removed from the wall.
Rinse the insides with an ordinary tap hose. Pour only a little water, since the boiler with a volume of 50-80 liters will still have to be lifted manually to drain all the scraps. Some people add citric acid when washing, others don’t.
Washing tip: It is best to rinse the tank in the bathroom, placing it vertically on a linen board. Twist the watering can from the mixer shower and insert the hose into the hole where the heating element was.
Application of plastic gaskets
The option of manufacturing an electrolyzer with polymer gaskets allows you to use an aluminum container instead of a plastic one.
Thanks to the gaskets, it will be reliably insulated. When cutting out plastic gaskets (4 pieces are needed), you need to give them the shape of rectangles. They are laid in the corners of the base, providing a gap of 2 mm.
Now you can start installing the container. To do this, you will need another sheet in which 4 holes are drilled. Their diameter must correspond to the outer diameter of the M6 thread - these are the screws that will be used to secure the container.
The walls of an aluminum container are stiffer than those of a plastic container, so for more reliable fastening, rubber washers should be placed under the heads of the screws.
The final stage remains - installing the gate and terminals.
Replacing heating element and anode
After all cleaning procedures, proceed to reassembly. Keep in mind that the anode may not be included with the new heating element. Be sure to buy it separately and screw it into your seat.
It is especially worth noting that if two heating elements are installed in the boiler, then it is not always necessary to install two anodes.
One is enough for one electric titanium, even if you have at least five heating elements inside. An anode is not an accessory or component of a heating element. This is an element of protection for the boiler.
Please note that in the factory version, during the first disassembly, there is no place at all on the second heating element for attaching this same anode.
Some claim that on tanks with stainless steel you can do without an anode, the main thing is to have them in specimens with walls made of glass porcelain.
However, the pattern of failure of boilers is usually the same: first the anode, then the heating element and then the housing.
You can install heating elements not only from the direct manufacturer of the boiler. For example, there is a company called Thermowatt, which produces some of the best heating elements on the market. The main thing is that the power, overall dimensions and seating fit.
It is also recommended to install stainless steel heating elements on stainless steel tanks. If you cannot find any, then use copper ones.
Practice has shown that there is not much difference. The main thing here is the quality of the product (China or Italy).
When repairing, be sure to change the flange gasket. Here are some of their varieties for boilers Thermex, Ariston, Indesit, Gorenje, Electrolux:
ThermexAristonIndesitGorenjeElectrolux
Some people are trying to save money here. Remove the old one and replace it with the new element.
However, a leak that will inevitably form in a month or two will make you regret such savings.
The flange nuts, as mentioned above, are tightened in a cross pattern. In this case, there is no need to use excessive force; you can inadvertently break the thread or tear the pin out of the body.
According to the marks sketched in the diagram, connect the power wires and replace the protective casing-cover. Before closing the cover, be sure to check all terminal blocks again, they should fit tightly and not loosen.
Useful tips
To protect the heating element from high voltage in the network, you can connect the boiler via a control relay. If the set maximum is exceeded (for example, 220-230 V), it turns off the device, preventing the tube from burning out. If there are frequent surges or the voltage in the network is too low, it is recommended to install a stabilizer.
In addition to the heating element and anode, when disassembling it is advisable to pay attention to the rubber gaskets of the boiler. Timely replacement of sealing elements will prevent leaks.
Before starting the boiler, you need to check it for leaks: assemble it, wipe it dry, fill it with water and let it stand for 3-4 hours. If there are no traces of water on the body and connections, the device can be connected to the network.
Filling with water and checking functionality
Hang the electric titanium in place. Connect the hoses and open the cold water and begin to fill the tank. The hot water tap must also be open to allow air to escape.
At the same time, make sure that there are no leaks anywhere. As soon as water comes out of the “hot” tap, the boiler is full. There is no need to close the tap immediately; let all the “slurry” spill out and finally flush the tank and pipes.
Only when clean water comes out do you turn off the mixer.
After this, the water heater must stand for at least half an hour or an hour so that condensation leaves all surfaces and there is confidence that there are no leaks.
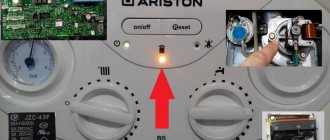
You can then apply voltage by plugging the titanium into an outlet. To check the operation of the thermostat, use the control knob to force the adjustment to maximum and minimum.
In this case, the boiler on/off light should light up.
If the boiler operates quietly, without making any sounds, and it is not clear to you whether it is heating or not, you can check the energy consumption using the meter.
At maximum heating power of the heater, the counter will spin or blink much faster. This means that the heating elements work as they should.
The entire repair with the purchase of spare parts will cost you around 1500-2000 rubles. In any workshop that calls a plumber to your home, they will ask for at least 3,000-5,000 rubles for such work, and this does not include materials.
So self-repair can save you a significant amount of money, the main thing is not to make some mistakes.
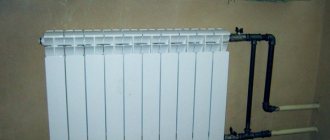
Principle of operation
The operating principle of a storage water heater.
(Click to enlarge) Structurally, the boiler is two barrels isolated from each other.
One of them (internal) is made of either stainless steel or high-quality steel with an anti-corrosion coating.
Modern heat-insulating materials are used as insulators.
This can be basalt fiber, polyurethane foam and similar insulators. Such a “thermos” can retain the heat of heated water for up to 3 days.
Expert Recommendation: Schedule your water heater for later hours using a nightly rate.
When it cools below the programmed value, the thermostat supplies voltage to the heating elements (heating elements) and water heating resumes.
To avoid mixing cold and already heated water, the latter is taken from the very top of the device. Cold water, displacing hot water, is always at the bottom.
When using equipment wisely, you should not force it to constantly work at maximum load. Every technology has its own resource.
Expert advice: by adjusting the thermostat to t=600, you can avoid scale deposits, thereby extending the life of the heating elements and the inner barrel. But periodically, once a month, it is useful to turn on the boiler at the highest possible temperature for disinfection purposes.
Diagnostic options
There are several ways to check a part. The simplest is a visual inspection. The part is removed and checked for scale or mechanical damage. Plaque is dissolved with vinegar or citric acid. The tube is kept in the composition for 5-6 hours.
Megaohmmeter
The method is used to detect minor insulation damage. The tester flag is set to 50 V. One probe is connected to the spiral contact, the second to the boiler body.
If a figure greater than 0.5 MOhm appears on the device screen, the heating element does not need to be replaced.
Checking with a tester
The device is equipped with a 360° rotating regulator. It is set at 200 ohms. After this, the probes of the device are connected to the contacts of the heating element. If 0, 1 or an infinity sign appears on the screen, the coil is faulty. After this, they check for breakdown of the housing. The tester is switched to buzzer viewing mode. One probe is connected to the tubular heater, the second to the housing or ground terminal. If the multimeter starts beeping, do not touch the boiler until it is unplugged.
Indicator light
Electricians use this device in the absence of a tester. The neutral from the network is connected to one of the contacts, and the phase passed through the lamp is connected to the second. If the indicator lights up, the heating tube is working properly and does not need to be replaced.
Avometer
Checking with this device helps ensure that the heating element is working properly. To do this, perform the following steps:
- Disconnect the boiler from the power supply. Remove the protective cover.
- Disconnect the wires going to the heating element. Connect the heater terminals to the avometer, take readings, compare them with the parameters in the technical data sheet.
Using LED, battery or power source
If you don’t have a tester, you can use a dead Krona battery and an indicator found in any household appliance. The LED is connected in series to the battery and heating element. The heater has resistance, so it is not necessary to include a resistor in the circuit. If the LED lights up, the coil is working properly. To check the insulation resistance, disconnect the assembled circuit from the contacts of the heating element and apply it to the element tube. The LED should not light up. The battery in the circuit can be replaced with a charger from a laptop or cell phone.
Phase indicator
If you have such a tool, you can check the performance of the heating element. The resistance of the insulating filler will be measured with greater accuracy. To check, perform the following steps:
- Find a phase in the socket. Most often it is located on the right.
- Connect one of the heater contacts to the phase output using a piece of cable. The indicator tip touches the opposite rod of the heating element. The lamp should light up. If it does not glow, the spiral is broken.
- They touch the bulb of the element with the sting. The lamp should not be lit. The glow of the indicator indicates contact of the spiral with the tube.
Using electrician supervision
Anyone can check the heating element this way. To do this, any lamp is connected in series with a heater and a household electrical network. The check is done like this:
- Connect the cable with the plug to one of the contacts of the lamp socket. Another piece of wire is connected to the second terminal.
- Screw a lamp operating from a 220 V network into the socket. The free cable of the socket is connected to the remaining contact of the heating element. The plug is inserted into the socket. If the spiral is working properly, the lamp lights up. When this does not happen, the heater is faulty.
- Remove the plug and connect the right terminal of the cartridge to the bulb of the heating element. Insert the plug into the socket. If the lamp does not light, there is resistance between the insulation and the bulb, the part is working properly.
Malleable cast iron and connecting parts made from it
The most common ductile iron parts for connecting steel pipes and other pipeline parts are: A) straight couplings B) reducing couplings C) coupling nuts D) fittings E) locknuts E) plugs.
To completely seal the system with a threaded connection, it is necessary to use sealants, for example, gaskets. In addition to them, for other types of fastening additional parts are used. If it is necessary to connect the elements of the pipeline using flanges, that is, without a coupling, then in addition to gaskets, bolts are also needed.
When connecting risers at an angle, they use connecting parts made of ductile cast iron: straight and transition angles, tees, crosses.
A cast iron coupling has a low collar around the entire perimeter of the end circumference, which serves to increase the strength of the part, unlike its steel counterpart, which does not have such an element.
The quality of connections depends not so much on the sealing methods and materials, but on the craftsman and the quality of his work. If he is responsible, neat, has basic plumbing knowledge and skills in working with a wrench or pipe wrench, then you won’t find a better specialist. If you follow the basic rules for installing pipeline systems, the pipeline will function for many years. This can be confirmed by anyone who has at least once installed a pipeline system, even the shortest and simplest one.
Try it yourself, experiment and see that you are the best specialist in installing pipeline systems using the threaded method of connecting pipeline elements.
Detailed description of each method
Threaded
They can be done in several ways, the most common being squeezing.
The following tools will help you do this job:
- Pipe wrench.
- Coupling with internal thread.
- Seals for sealing. Maybe: hemp rope, FUM tape or sealant.
- Lock-nut.
Two pipes have external threads. We apply sealant to them. One has a longer thread length than the other. Where there are more turns the nut is screwed on until the end. Then the clutch. Then we screw it onto the second part, twisting it with the first one. When the coupling stops screwing, support it with a lock nut
Tighten with keys, carefully, so that the coupling does not burst
Flanges
For a flange joint you will need:
- two flanges;
- paronite gasket;
- bolts, washers, nuts;
- keys;
- manual arc welding;
- level.
The flanges need to be welded. Avoid displacement; they must be in the same plane.
We catch using a horizontal level. We screw two bolts into the upper holes. We put the part on the edge of the tube so that the bolts are at the top. We put a level on them and catch the position of the bubble between the strips in the middle. When caught, we make a tack by welding at the top point. The horizontal plane is ready.
We rearrange the level to a vertical position, leaning it against the flange mirror. We catch the level by slightly adjusting the lower end of the flange that is not yet stuck. Having established the vertical, we installed the second tack. And then two more, resulting in four even sections.
Then the welder welds the flange on both sides. Manipulations are carried out similarly with the second pipe.
Bonding
This method is used very rarely in metal parts. The process itself does not require any special skill from a person, but it takes a lot of time.
This job requires:
- glue. BF-2 or 88N or EDP;
- brush.
Before gluing the parts, first apply the first layer on their surface and allow to dry. This layer will be the bonding layer. Each glue has a drying time written in its instructions. Then a second layer is applied and the parts are placed under the press for a day or even more. It all depends on the glue.
Then clean the seam from any glue leaks.
Crimp connectors for steel pipes
Welding
The welding process is used in almost all metal pipe joints.
In order to obtain a seam, the following welding methods are used:
Gas welding is used to obtain permanent connections in small diameter pipes with minimal thickness.
The gas welding station consists of:
- oxygen cylinder;
- acetylene;
- rubber hoses;
- burners.
Resistance welding is rarely used. This method has proven itself more effective in working with plastic pipes.
The most popular method of producing permanent joints is electric arc welding, divided into:
- manual
- semi-automatic in protective gas environment
When constructing pipelines, connections are made only by welding
An important part is preparing the joint for welding
The pipe must be connected to another:
- no fractures or displacements;
- the joint must be cleaned;
- make a chamfer;
- set the gap to 1-3 mm.
Required welding equipment:
- electrodes;
- power source (transformer or rectifier);
- cable;
- Personal protective equipment for welders: overalls, mittens, brushes.
Soldering of polyethylene pipes end-to-end and using an electrofusion coupling
Trumpet
This type of connection is widely used in cast iron pipes for the oil and gas industry, housing and communal services. One of the simplest options for permanent joints.
The main process of obtaining a joint is to seal the gap between the socket and the surface of the conical pipe. Cement material is used for this.
To seal the socket, grade 300-400 cement is used, which is thoroughly mixed with water in a ratio of nine parts cement to one part water. The socket is filled with cement mortar using a scoop and embossed until the latter begins to bounce off the cement.
Pressing
This method of obtaining a permanent weld has become necessary for small-diameter connections made of non-ferrous metals. Conventional electric arc welding is not capable of welding such metals due to its technical parameters, so in this case they found a different approach.
To join such thin-walled non-ferrous metal pipes, press fittings with crimp sleeves are used. They perform crimping on the inside of the pipe, and external seals ensure the joint is sealed.