Read more about the benefits
Metal is much softer than ceramics, but is comparable in strength. It can be melted, cut and bent, forged and drilled, after which it does not require additional energy expenditure for firing. There are many ways to process metal with a broad scientific basis, and this is another plus in favor of the material.
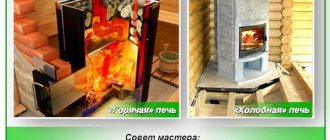
When creating a metal furnace, you can use various design innovations that improve technical characteristics. As a result, the efficiency of a brick kiln is on average 70%, and metal kilns have an indicator of 85-90%.
Comparison
Again, if we compare metal and ceramics, the strength of brick decreases with decreasing thickness, while that of metal, on the contrary, increases. As a result, the weight and cost of heat of metal furnaces is 10-20 times less than that of equipment made of bricks. On the modern market, good heating equipment made of metal for a house of 100 m2 can be purchased for $300, and second-hand equipment can be purchased for $50-100.
In addition, it is a one-piece design - it is easy to transport, resistant to shocks, impacts, and falls. Its mobility is combined with the absence of the need to build a foundation. The entire installation boils down to installing the chimney into the smoke channel. If the stove is no longer needed, it can be easily dismantled and stored.
Another plus is the high thermal conductivity of the metal. Because of this, the heat capacity of the stove is small, and the house heats up quickly. This factor gives high efficiency.
For example, in a brick structure, almost 20% of the heat goes into the chimney during the combustion process until the heat exchange in the furnace is leveled out and it does not release energy.
Household use and certification
Also, the metal product is more homogeneous than brickwork and does not have a porous structure. It is not afraid of dampness and heating breaks, it does not need accelerating heating. It is easier to integrate a hob and water heating equipment into this design due to the high thermal conductivity of the metal and the rapid combustion of flue gases.
If a metal stove is produced at a factory, then it can be certified in terms of fire safety as a completely ready-to-use product. Permission from the fire inspection is much easier to obtain than for another furnace building. Some models of factory-made metal stoves do not require paperwork at all - you only need a chimney separate from the ventilation.
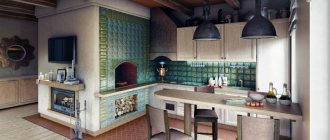
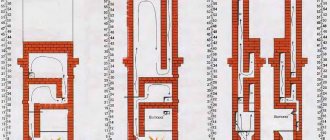
Schemes of brick mini-ovens
Small ovens occupy a small area, the dimensions of their bases range from 50 to 70 centimeters in width and up to 65–100 cm in length . The height of the heating structure is from 1.5 to 2.3 meters . A cooking floor, an oven, and a water heating tank are built into the oven. Stove makers have also developed devices intended only for heating a home.
Small heating structure
This is the simplest heating structure. We will analyze the model in the following sizes:
- width - 51 cm;
- length (depth) - 89 cm;
- height - 238 cm.
The mini-stove is installed in the middle of the kitchen or against the wall. The optimal heating area is 20-35 meters . Interior partitions are erected around the stove, which allows heating both the kitchen and the adjacent room.
Inside the device are:
- combustion chamber;
- blower;
- smoke channels leading into the chimney.
The combustion door of the mini-stove ( cast iron or glass ) is selected depending on the aesthetic preferences of the home owners. A door made of heat-resistant glass, through which you can see how the wood is burning, gives the structure a resemblance to a fireplace. Two smoke valves are installed in the middle and upper parts . There is one door for cleaning the channels. To build this model of the device you will need:
- 260 pieces ceramic bricks ;
- 130 pieces of fireclay bricks;
- grate (40x23 cm);
- combustion (30x20 cm) and blower (20x14 cm) doors;
- 2 doors for cleaning holes ( 20x40 cm );
- metal pre-furnace sheet (50x70 cm) ;
- two sheets of roofing material measuring 60x100 mm ;
- sand and clay (or ready-made clay-sand mixture for masonry), clay-fireclay mixture .
Reference. Masonry mortar increases the volume of the device by the thickness of the joints.
The base and top of the mini-oven are laid with ceramic bricks on a clay-sand mortar. The firebox is made of fireclay bricks on a clay-fireclay mixture.
Three and a half bricks fit on the long side , and 2 standard bricks 25 cm long on the short side . The masonry consists of 35 rows .
Small heating and cooking stove
This is a mini-oven model for heating and cooking - a convenient and very compact structure. The optimal area for a heated room at sub-zero temperatures is 20-25 square meters .
The device has the following dimensions:
- length (depth) - 64 cm;
- width - 51 cm;
- height - 215 cm.
The structure is being erected in the kitchen. The device includes :
- blower;
- combustion chamber;
- smoke channels leading into the chimney;
- cooking floor;
- niche for the oven.
cooking floor has a hole that is closed with a disk and a circle. Solid flooring is also available for sale. In the niche for the oven chamber there is a metal oven or a hot water tank with a tap. If the niche is left free, it is used for drying things. To build a stove you will need :
- 222 pieces of ceramic bricks;
- grate (40x25 cm);
- firebox door 20x20 cm );
- door for the blower ( 14x14 cm );
- cooking floor (35x38 cm) ;
- metal oven or hot water tank ;
- iron pre-furnace sheet (50x70 cm) ;
- two doors for cleaning holes ( 20x14 cm );
- two valves;
- piece of flat slate;
- steel corner;
- clay, sand or ready-made clay-sand mixture for masonry.
Choice: nuances
To choose a metal boiler, you need to understand the difference between the materials used.
Made from ordinary steel
One popular option is regular steel. Thus, the tensile strength of this substance during prolonged exposure is about 400°C (at 2 hours it increases to 600°C). The thickness of the steel starts from 4 mm, but the stove quickly burns out due to intense heating, so it is not suitable for climates with severe frosts.
However, there are long-burning furnaces that do not maintain long-term heating of the body above 600°C, and those parts that become as hot as possible are made massive and replaceable. They are suitable for large houses and frosts.
Made from heat-resistant steel
The second material is heat-resistant steel, which is often used in industrial production. Such special steels are taken with a thickness of 3 mm and provide a service life of more than 20 years, efficiency is above 80%, and are also lightweight. Such branded units are mounted on the floor and only need to be connected to the chimney. They are certified and completely safe under intense heating, which means they are well suited for harsh winters.
Equipped with a hob and a “water heater” allows you to use them both at the dacha, in a country house, and in a permanent home. It is very difficult to produce them yourself; you need to master intricate welding technology (TIG/MIG) and the corresponding expensive equipment. It is easier to purchase a ready-made device.
Made of cast iron
Cast iron is known and highly respected as a base - it is a kind of metal, but not quite a metal. It is as strong as steel, but also as brittle and heat-intensive as ceramics. Cast iron stoves heat up after heating for up to 3 hours, and warm up for about 40 minutes.
The thickness of cast iron is taken in the range of 6-25 mm: not thicker, so that the expansion coefficient from heating does not work to the detriment, but not thinner - the unit will be fragile.
The high efficiency of cast iron stoves is only possible when heating houses with an area of no more than 60 m3 - i.e. For large rooms such a heating device is not suitable. However, he is not afraid of interruptions in the firebox or dampness.
Therefore, a cast iron stove is an ideal option for small outbuildings (sheds for keeping livestock, greenhouses, cottages, etc.). It is impossible to make such a unit with your own hands - after casting at the factory, the material cannot be machined by home craftsmen. The maximum is painting.
Types of furnaces
The history of the evolution of stove designs goes back many centuries. It’s no wonder that building a heat-efficient and reliable stove is a real art. But with proper preparation and diligence, you can do it yourself, here is a good video instruction:
You can fold a stove using many methods. At the same time, there are a number of parameters that determine the specifics of the future stove:
- Purpose.
- The temperature to which the walls should be heated.
- The time required to heat the walls and the amount of fuel required for this.
- Chimney design.
- Heat transfer level.
- Scheme of gas movement in the channels.
- Form.
- External wall finishing material.
- Main material.
Based on all these parameters, you will build the stove of your dreams. The main thing is to draw up a drawing at the initial stage, with detailed diagrams. The project must describe in detail all the features of the future design. But before that, you need to decide what type of stove you need.
Construction options
Heating and cooking stoves for domestic use can be of several types according to their design.
Chamber
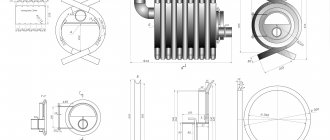
A metal chamber stove is a classic “potbelly stove”, which has been greatly improved in modern production. This unit has the following technical characteristics:
Channel
The principle of operation of this design: the gases burn out, and then cool and pass through the channels between the partitions, and give off heat to the furnace body. The unit must warm up to 400°C inside - then afterburning will occur in it. Modern potbelly stoves can easily be reclassified as a duct circuit. In this case, only a horizontal “elbow” is left from the flue and it separates the combustion chamber from the firebox.
Combustion air enters through the cracks of the hob or through a special air throttle. A duct stove has an efficiency of up to 80%, and the specific thermal power is several times greater than that of a chamber stove. Such a stove works both with long burning and with flame, on almost any fuel.
At the same time, the power is regulated by the air supply - this possibility here is 2 times higher than in a chamber potbelly stove. An advantage for household use is the temperature in the afterburner is within 250-300°C, and this is convenient for cooking.
Almost all metal household stoves with a power of up to 15 kW are created according to the scheme described above. The body is usually made of ordinary steel with a thickness of 4 mm or more, and the hob is made of cast iron or steel with a thickness of 8 mm or more.
Kolpakovaya
Finally, a bell furnace is a scheme in which gases are retained by the roof of the bell until complete combustion, and then they fall down and give off the remaining heat. Such designs provide more than 70% efficiency. This technology is also applicable to metal boilers, but here we had to abandon the flame - a metal cap simply will not absorb as much heat as it releases without overheating. Therefore, such stoves were switched to smoldering mode - this made it possible to increase the heat transfer time to 60 hours (with wood) or up to 30 days (with coal).
Long-burning metal stoves can be made with your own hands and operate on wood, coal, but not on wet fuel, since wet fuel does not smolder, no matter how much air you give it. If this is a special coal boiler, then it will not be able to work on wood - it simply will not “give out” the required efficiency. The body of such a boiler is made of simple steel, surrounded by a sealed gas jacket.
For example, you can trim the body at a distance of 70 mm with a hot water register in the form of a ring tank or coil. This will enhance convection and produce hot water. Such boilers are suitable for heating large houses (optionally, dachas, country cottages) with a bathroom, even in harsh climatic zones. User reviews of such stoves are positive.
How to make a small oven: recommendations and step-by-step instructions
Before starting masonry, preparatory work is carried out. They include the following steps:
- project selection ;
- selection and purchase of materials ;
- purchase of metal parts for the stove ;
- preparation of tools , containers for solution;
- preparing a site for building a stove;
- construction of a mini-oven.
Project selection
On the Internet and in furnace textbooks there are serial diagrams of a dozen mini-ovens.
The choice is great , but if the home craftsman has no experience at all, it is worth consulting with local professionals or with people who have successfully built similar stoves. When choosing a device that you plan to build yourself, several factors are taken into account :
- area of the heated room;
- number of heated rooms;
- temperature in winter;
- frequency of use of the heating structure;
- purpose of the mini-oven;
- experience in furnace construction and repair;
- material costs .
Photo 1. Before starting construction, it is very useful to model the appearance, dimensions and order of the future stove.
If you plan to cook food , the option with a hob and oven would be preferable. The need for hot water in winter and in the off-season will close the hot water tank in the niche. In it, by removing the removable tank, you can dry shoes and other things . If the house always has electricity or a gas stove, choose a stove option without a hob and a niche for the oven.
For regions where winter temperatures drop below 20 degrees and remain at this level for weeks, a large oven with heat shields . It is not recommended a mini-stove continuously for more than two hours in a row .
the design matters . It can be tiled or laid with bricks with a relief surface.
Materials
For the chosen mini-oven project you will need high-quality bricks. You should choose a smooth, grade 1 brick , uniform in color, without chips or cracks.
For laying bricks, it is better for a home craftsman without experience to choose a ready-made mixture at a hardware store. It is diluted according to the manufacturer's instructions.
If the master creates a solution from individual ingredients, you should purchase sand and clay . The ratio of materials is determined experimentally. The solution is scooped with a spatula and its working surface is tilted 45-50 degrees . The masonry mass of normal composition does not fall in clumps from the spatula and does not flow from it.
Tools
To work, you will need all the stove maker’s tools and a table on which you can stand when laying the top rows. The list of tools includes:
- spatulas : wide and narrow:
- Master OK;
- jointing to form beautiful seams;
- trowel;
- hammer with a flat back and a pick;
- mallet;
- long construction level
- plumb line ;
- wooden beam for the frame;
- threads, fishing line, chalk for marking the base;
- grinder with a set of discs for cutting and grinding;
- rule .
Important! The temperature in the room when laying the stove and drying it should be positive (from plus 5 degrees ).
Main manufacturers
Let's look at the most popular manufacturers on the modern metal furnace market.
Teplodar
Teplodar - model “Vertical” (increased long-burning mode gives 8 hours of heating without adding fuel), “Stove” is equipped with a hob with removable rings, “Top Model” and “Matrix” can act as a fireplace due to fireproof glass in the doors , from where the flame is visible. The T-80 model can be equipped with a smoke exhaust.
The stoves of this manufacturer are designed to heat houses with an area of 80-300 m3, and the cost is scattered within 10-25 thousand rubles.
Ephel and Bayard
Efel is a Belgian manufacturer that leads the European home heating technology market. Thus, the “Harmony” model has a power of 12.5 kW and runs on wood and coal with a burning duration of 10 hours. That is, the oven can work all night.
The cost of such a stove is high - from 130 thousand rubles. Bayard 12 is a classic model with a hob and minimal gas emissions (0.28%). Its price is approximately 110 thousand rubles.
Eco fireplace
Another reliable company is Ecofireplace. It produces stoves that combine quality, safety and beauty. High-quality steel is used, and the facade is finished with tiles - this is aesthetically pleasing.
Thus, the Bavaria Arch model with a cast iron grate and heat-resistant glass on the doors opens up a view of the flame. This wall-mounted stove has economical fuel consumption (usually wood) and a glass self-cleaning mechanism. Such models cost about 40 thousand rubles.
The Bavaria Baroque model with a cast iron hob and a 6 mm thick fireproof steel body provides an efficiency of 78%.
Meta
produces wood-burning stoves that are maximally adapted to the Russian climate. All models have a hob with durable cast iron burners, are compact and safe.
Thus, the “Narva” series with ceramic lining and fire-resistant paint on top of a metal body is equipped with ash pans, firewood, and a glass combustion door. Its power is 6 kW and is capable of heating a house or cottage of 60 m2. Its price in the budget segment is 20 thousand rubles. "Meta Gnome-2" is the most compact model from the Meta manufacturer. Its dimensions are 363*502*640 mm and weighs 38 kg, and its power is 5 kW, which is suitable for heating a room of 50 m2.
Termofor
Finally, the Termofor company. Small-sized models for dachas and outbuildings “Selenga”, “Pichuga”, “Student”, “Avoska”, “Cinderella” are known here, which are easily portable, as well as models for heating the house - “Turbo”, “Normal”, air-heating models – “Associate Professor”, “Professor”, “Butakov”.
The latest options are very large and are permanently mounted. Prices range from 10-50 thousand rubles. Reviews about Selenga are very good: it is a beautiful oriental-style model that saves fuel well and can heat a house of 85 m2.
Which brick is better to build a stove from?
It is necessary to distinguish between ordinary heat-resistant bricks and stove bricks. Firstly, the latter can withstand temperatures above 1000 degrees. Secondly, if it is cooled sharply, cracks do not form in the structure.
Four types of stove bricks are used to build stoves:
- Quartz. This brick is the result of firing sand and clay.
- Carbon - consists of graphite.
- Fireclay. Best suited for a fireplace. But its unique thermal insulation qualities cannot be discounted. It can withstand temperatures up to 1600 degrees. At the same time, it does not crack and does not lose its qualities. The only negative is the yellowish tint.
- Basic - used when you need to fold a metallurgical furnace.
In reality, there are no strict rules regarding the choice of materials for masonry during construction. Nevertheless, there are some recommendations that are best followed, the main one concerns fireclay bricks. It must be placed in the hottest places, namely in the area of the firebox and chimney. For all other zones, the grade must be no lower than M-200.
Construction materials for mini ovens
First you need to prepare the clay. To do this, fill it with water and leave it like that for about a day. You can speed up the process by thoroughly kneading it every five to seven minutes, preferably using a drill mixer, for an hour. Strain through a sieve. The sand also needs to be sifted first.
To fold a mini heating stove, which will take up an area of 0.4 square meters. meters, you will need:
- 20 liters of solution;
- 60 pieces of red stove bricks;
- 38-40 pieces of fireclay bricks;
- firebox door;
- ash door;
- grate;
- hob;
- chimney damper.
Doors, grill and hob must be cast iron.
If you do without fireclay bricks, then it will be a mini-stove model that burns wood rather than coal. Red brick, even of the highest quality, will collapse over time due to the high temperatures created by coal fuel. In general, to make a mini Russian oven with your own hands, you just need to follow the recommendations.
List of stove accessories
The mass of the furnace without foundation is 2600 kg.
- grate, 25 x 25.2 cm - 1 piece;
- combustion door, 25 x 20.5 cm - 1 piece;
- blower and cleaning doors, 13 x 14 cm - 6 pcs;
- door for ventilation, 13 x 13 cm - 1 piece;
- stove (cast iron or steel floor with one burner), 53 x 36 cm - 1 piece;
- gate valve, 13 x 24 cm; - 3 pcs;
- winter shutter, 24 x 13 cm - 1 piece;
- pre-furnace steel sheet (on the floor), 50 x 70cm - 1 piece;
- oven with baking trays, 30 x 28 x 57 - 1 piece;
- water heating box, 15 x 38 x 38 cm - 1 piece;
- double door of the cooking chamber, 68 x 44 cm - 1 piece;
- drying mesh in the cooking chamber, 35 x 50 cm - 1 pc.
Closing events
Three more rows of brickwork are made to connect to the pipe. Having removed the “knockout” bricks, the furnace channels are immediately cleared of construction debris. The perimeter of the structure is carefully covered with a plinth.
Whitewashing or lining of the stove is done after test firing.
Only after the whitewashed or tiled mini-oven is completely dry can it be used. In order for a mini stove for a summer house to please you for a long time, you should not rush to light it. Let it sit for a week or two with the doors open.
It is not recommended to use coal right away; you need to give the stove time for initial heating with the help of wood chips.
Laying the foundation
Before installing a wood-burning stove-fireplace, you need to take care of laying out the foundation. There are cases when there is no need to install a foundation and install the stove directly on the ceiling, but in this case, it is necessary to take into account the load on the ceiling.
For the foundation can be used:
- Solid brick.
- Reinforced concrete slab.
- Solid concrete.
It is extremely undesirable to lay on sand-lime brick, as it is destroyed in a damp environment.
How deep the foundation will be laid depends on the natural qualities of the soil. It is advisable to lay it below freezing point. A cushion of sand and gravel is laid under the foundation.
Location and foundation preparation
The best location for such a stove, if the dacha room consists of one room, is in the center. In other cases, you need to focus on the partitions or the intersection of interior partitions. It is imperative to take into account fire safety rules.
A foundation is not needed for a structure of this size. However, it is necessary to put a thick, durable board secured with joists at the base, and a fireproof layer on top. This can be an ordinary asbestos cement sheet.
Then a waterproofing layer of polyethylene and roofing material measuring approximately 80 by 55 cm is installed. A thin layer of sand is poured.
Required Tools
You need few tools; they can be easily purchased at any hardware store:
- trowel, or as it is also called, trowel;
- convenient hammer-pick;
- building level;
- roulette;
- plumb line
In addition, during the work you will need:
2 buckets (for water and solution), a construction sieve, a trough where to sift the sand.
Making a stove with your own hands
Selecting a location
To build a good heating structure, you need to choose the right place. The following standards must be taken into account:
- There should be more than 37 cm from the smoke duct to the wooden structures.
- The minimum distance of the pipe from the ridge is one and a half meters. The height above the ridge is half a meter.
- If there is 1.5-3 meters from the pipe to the ridge, it can be placed flush with it.
It is best to put the stove in the middle of the house. This will ensure uniform heat distribution and ease of use.
Materials and tools
In addition to bricks, you will also need a number of other materials to build the stove. These include:
These are the basic materials without taking into account the components, but you also need to take care of the vent doors, the vent, the firebox, and so on.
To build a good stove you need to mix the right solution. It is best to use special refractory clay; in extreme cases, red clay can also be used. Sand grains should be no more than 1 mm. The optimal ratio is achieved experimentally. Usually it is 1 to 1 or 1 to 2. Plus 25 percent of water from the total volume of clay.
Metal objects play a fundamental role in the construction of the furnace. To put together a decent structure, you need doors and half-doors, grates, cast iron dampers, latches and views. If necessary, all these elements can be made with your own hands, but you will need to purchase iron sheets.
Of course, you won’t be able to build a stove without good tools; you will need:
- hammer-pick specially for the furnace,
- Master OK,
- ruler-rule,
- wash brush,
- roulette,
- plumb line,
- level.
With this simple toolkit you can build any stove.
The process of building a stove
For the foundation, a pit is dug, backfill and a reinforced frame are made. The resulting structure is filled with concrete. Before you put the stove together, make sure you have diagrams of the bricks in front of your eyes.
It is very important to maintain order when working. Otherwise, you won’t be able to build a high-quality stove. The slightest deviation in the design will lead to one of the channels being blocked. The result is more than disastrous. Instead of coming out through the chimney, the smoke will go indoors.
Using drawings
In order to avoid significant mistakes when installing a long-burning wood stove, it is necessary to use drawings.
It is not advisable for beginners to draw up drawings on their own, as this can lead to irreversible consequences.
- There are several types of masonry, but the main stages are repeated almost everywhere.
- It is recommended for both beginners and experienced layers to first lay out the layout without mortar in order to accurately follow the diagram and take into account all the nuances.
- This is necessary for proper installation of the chimney, and, therefore, for proper draft.
The procedure for laying a brick stove with your own hands
The next stage is the construction of the stove itself:
- In the first row the solution is not used. 12 pieces are laid strictly horizontally on the sand. A blower is placed on the clay-sand mortar. The door is wrapped with asbestos cardboard and wrapped with cord. Fastening is done with wire.
- Then lay the second row.
- In the third row, lined with refractory bricks, strictly above the ash pit, a grate is placed.
- The bricks in the fourth row are placed on edge.
- A stand for the partition is provided in the chimney. The back wall is laid out without using mortar. These bricks will then need to be removed. Then they install the furnace door, wrapping it with asbestos cord. A couple of bricks are temporarily used for fastening. Secure with wire.
- The fifth row is laid out flat, like the fourth.
- The bricks of the sixth row go on edge.
- The bricks in the seventh row are laid flat again. For inter-row bonding, you need to start with a brick, chopped off three-quarters the size. Having placed two bricks edgewise, they begin to build the back wall.
- The eighth row will close the firebox door. To direct the fire to the center of the hob, the brick is placed at an angle. Tightness is ensured using a wetted asbestos cord.
- The ninth row is also laid using asbestos cord. The peculiarity of this row is that it is shifted back a little so that the door remains open.
The beginning of the chimney is formed in the tenth row. There will be a place to attach the iron pipe. In the eleventh row, a chimney damper is installed. At this stage, step-by-step instructions will be useful - how to fold the stove with your own hands, which will help you not get confused in the details.