Buying expensive equipment for organizing heating in a rarely visited country house, bathhouse or small house is not always advisable. It is especially unreasonable if the country property is not constantly supervised and a security alarm is not installed. What to do if heating is still required from time to time?
A homemade gas boiler, assembled from scrap materials or used household units, can handle heating quite successfully. A device made with your own hands can become the pride of the owner. Building a gas-powered structure will show off your craftsmanship.
The article we have proposed describes in detail the steps for assembling and modernizing gas units that can adequately heat private buildings. We have given as examples the most popular, practice-tested homemade options. Our advice will ensure home craftsmen success in a difficult task.
What do you need?
There are a lot of instructions on how to make a boiler for heating using different types of fuel: solid, liquid, electricity and others.
But not many people decide to build such a structure using gas. The main problem is that the installation will need to be connected only after approval from the relevant authorities. But first things first. So, first you need to understand that you can use such a heating unit only at your own peril and risk; responsibility for the consequences, which can be disastrous, falls entirely on the shoulders of the home owner.
After realizing this, you need to find suitable drawings. It is advisable that they contain detailed information about heating boilers, connections, cooling, chimney, deflector and other important points. The master must understand such documentation in full, because even one change will adversely affect operation in the future. It is advisable to see several photos of finished systems. This will help “assemble the unit in your head.”
After this, you need to calculate the amount of all materials for the heating boiler. It is necessary to understand that in no case should you replace the specified metal with another to reduce the cost of the structure, because it may turn out to be soft, which will quickly render the installation unusable. Then purchase blanks, as well as already assembled individual components (buttons, deflector, taps, etc.).
It is also important to have your own tool, which is needed for joining metal sheets, cutting them and grinding them. You also need to have a soldering iron, a set of screwdrivers and wrenches, hammers and all sorts of other tools that allow you to work with metal and electrical circuits.
Advantages and disadvantages
Gas heating has its pros and cons.
Gas is one of the cheapest types of energy carriers. That is why the use of heaters using this fuel has become popular. The advantages of using gas-powered equipment include:
- High efficiency of boilers.
- Easy to use.
- Environmental safety.
- Low cost of fuel.
- The heater can be used for more than 40 years.
Such equipment also has disadvantages:
- The equipment must have a license issued by the gas service. If it is missing, it is prohibited to connect the unit to a centralized gas supply system.
- The boiler is installed in a separate room, which can be difficult in small houses.
- Installation of a chimney is required.
- An electrical connection is required for ignition.
- If you do not follow the operating instructions, a household gas explosion may occur.
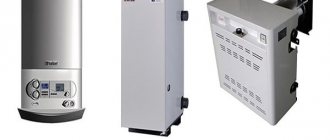
Types of water gas boiler for heating a private house
You can find several types on the market. They have a common operating principle, but there are differences in characteristics. The main thing is the method of fastening:
- wall;
- floor
Wall-mounted gas boiler
Wall
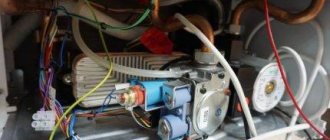
Main parts:
- The burner is rectangular or square in shape with several holes through which fuel is supplied from nozzles located below.
- The combustion chamber.
- Section for heat exchange. The system may have one or more heat exchangers. If two are used, then one looks like a network of pipes located above the burner, which are located in a place with a large number of plate fins. This allows you to maintain the coolant temperature longer.
- The secondary heat exchanger consists of lamellas through which liquid moves through pipes. Heating occurs due to the escaping hot coolant.
- Valve that controls the amount of fuel supplied.
- A pipeline through which fluid circulates.
- Expansion tank.
- Electric motor.
- Air supply system.
- A pump for circulating fluid through the system.
- A set of sensors and a microcircuit for monitoring the operation of equipment.
Floor
The main difference is the installation method. Such units are larger in size and weight. Instead of a copper heat exchanger, a cast iron one is used, which is more reliable. May have one or more contours. The amount of automation is less than that of the wall-mounted analogue.
The main modules include:
- Burner.
- Gas chamber.
- Heat exchanger.
- Tank for normalizing pressure during heating.
- Set of valves.
- Electric power unit.
- Air supply system (fan).
- Secondary heat exchanger.
- Circulation pump.
- A set of sensors for monitoring equipment.
Floor
From a cylinder
The tanks are made from used gas cylinders. Essential elements:
- The role of the body and base is performed by a gas boiler up to 50 liters. A piston with a lower nozzle is attached to the bottom of the cylinder. The equipment can heat a room up to 70 sq.m.
- The nozzle is an empty pipe inside that provides the heating element with the air necessary for gas combustion.
- A metal disk is attached to the bottom of the piston, the diameter of which is slightly smaller than that of the cylinder. Arc-shaped blades are welded to it, necessary to create vortex-like flows.
- Chimney.
- The upper part, after attaching the handles, can be used as a cover.
- Pump for forced circulation of coolant.
Boiler from a cylinder
Other options
A homemade boiler can come in two more variants, when the unit is obtained by remaking a gas water heater or stove. This can significantly save on installation costs.
Based on a gas water heater
The alteration involves replacing the nozzle or block responsible for gas combustion if a liquefied mixture is used. You will need to purchase an atmospheric burner that fits the combustion chamber. The ignition is mounted inside it.
To connect a fan burner, you will need to purchase an additional heating circuit. It consists of a security system unit, an expansion tank and pump, an air vent and a Mayevsky valve. This type of burner is more expensive, since it will also require a pressure gauge, an automatic air bleeder and a coaxial chimney.
Conversion from a gas stove
It is almost impossible to make such a boiler. There is only one available way: install a metal container with coolant on the burner, which will heat up and then move through the pipes to the batteries. The volume of the tank depends entirely on the power of the stove. It does not exceed 100-150 liters.
The return pipe is welded from below, and the direct supply is connected from above. Hot water rises and moves to the radiators. The cold liquid returns through the lower pipe.
Such a homemade device does not require a safety valve and an air vent, since excess water in the form of steam bubbles will escape through a loosely closed tank lid.
You can install a gas boiler yourself. You just need to follow the exact instructions and remember safety precautions. Before connecting, you must remember to obtain permission from Gorgaz.
The principle of operation of a gas boiler
Structurally, a gas boiler consists of the following elements:
- gas burner;
- heat exchanger;
- pump;
- expansion tank;
- automation;
- fan;
- security systems;
- thermometer;
- pressure gauge;
- gas valve;
- air vent.
A gas boiler consists of many elements. Each of them is very important for the smooth operation of the unit.
When the device is plugged in, the gas burner lights up. It heats the heat exchanger, which contains water, oil or antifreeze (depending on how the house is heated). The pump creates operating pressure, under the influence of which the coolant constantly circulates through the pipes and transfers heat into the room through the surface of the radiator. Next, the cooled coolant is drained back into the boiler. This is how a gas heating system works in general terms.
Heat exchanger for wood boiler
If a solid fuel heating device is equipped with a heat exchanger in the form of a water jacket, horizontal or vertical pipeline, the efficiency of the system increases by 10-15%. Not only water, but also other liquids with sufficient heat capacity can act as a coolant.
Separate, plate heat exchanger boiler
A boiler with a water jacket is a firebox that is placed in a barrel. If a horizontal pipeline is used, the hot fluid pipe or supply must be raised above the cold pipe or return.
When placed vertically, the heat exchanger can be either strictly vertical or at a slight slope. It is best to place pipelines in a checkerboard pattern to increase the productivity of the home heating system.
For the manufacture of modern heat exchanger registers, heat-resistant steel is used, which has high thermal conductivity.
What's next?
It must be said right away that there are a number of requirements for a gas boiler. For example, it is necessary to have a special exhaust gas outlet with a deflector on top. In addition, everything must be perfectly connected. In other words, it is prohibited at the legislative level to use heating systems operating on this type of fuel without the necessary checks and obtaining the appropriate documentation. Therefore, before installing a self-made gas boiler, you must definitely call a specialist who deals with the above.
The fact is that such equipment belongs to devices that have an increased danger. And for a self-made boiler, you must obtain permission for installation from a gas service. And she, in turn, needs to provide a certificate for the product, moreover, the original, not a copy or photo.
You need to understand that getting such paper is not easy, and most often it costs a large sum of money. In addition, a minimal deviation from all prescribed standards leads to a complete ban on the use of homemade installations. This is a strong argument in favor of the fact that making a gas boiler with your own hands can only be done by a person who has extensive experience in installing and servicing such units. This refers to the complete set and assembly of the system from individual components, each of which is manufactured in compliance with GOST, and the use of hand-made parts is reduced to a minimum and is permissible only in non-critical areas.
We recommend: Water pump for heating - selection, installation and nuances of application for a finished system (125 photos)
When all issues with the relevant services have been settled, the boiler can be installed. Unfortunately, there are rare cases when homeowners manage to do this without the approval of technical supervision authorities, which is a gross violation of the law and is fraught with unpredictable consequences.
The nuances of placing the finished structure
You can place a gas boiler:
- inside the house;
- outside the house;
- in the garage.
Each accommodation option has its own characteristics and nuances.
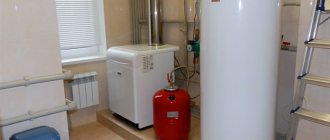
Accommodation inside the house
To place the unit inside the house, you need to allocate a separate room for it. The boiler room has the following requirements:
- area - at least 5 square meters;
- dry warm place;
- low humidity levels;
- free human access to the boiler;
- natural or forced ventilation system;
- Electricity must be supplied to the room, and an outlet must be located next to the boiler. Modern sockets provide grounding. There is no need to create additional grounding.
Inside the house, the gas boiler is installed in a separate room
Placing the boiler outside the house
Of course, it is impossible to install a gas boiler directly on the street. A special room is being built for it:
- area - at least 5 m2;
- the temperature inside is not lower than +5 0C all year round;
- Availability of electricity, grounded socket.
The pipes from the boiler to the house must be insulated so that during its “journey” the coolant from the boiler to the house does not lose its temperature.
If it is not possible to place the boiler in the house, a separate closed room is built for it
Placing the boiler in the garage
If it is not possible to arrange a separate room inside the garage to house the boiler, then consider another place to install the equipment. The fact is that the garage is a place of increased concentration of automobile gases. If a gas unit is also running inside, the concentration of carbon dioxide in the room will exceed all permissible standards. It will be dangerous for a person to be inside.
If there is a gas leak in the garage, spontaneous combustion is possible, since there is gasoline and oil in the immediate vicinity. It's better not to take risks.
If you cannot equip a special room inside the garage, follow the rules for placing the unit inside the house.
Getting ready to create a boiler: useful little things
Creating a gas boiler is a slow and very responsible process. If you do not have at least basic skills in working with welding equipment, then it is not advisable to start the process. The parts of the unit are connected to each other by welding. If you don’t have a welding machine or don’t know how to interact with it, then it’s better to buy a gas boiler in a specialized store. But if you have set yourself the goal of creating your own gas heater, then you need to know:
- without the permission of the gas service, connecting a homemade boiler to the main line supplying natural gas to your home is prohibited;
- to obtain permission, you will have to call specialist analysts to your home or take the boiler to the service in person;
- if you install a boiler without permission, this may lead to a gas leak, fire or explosion;
- When performing welding work, do not forget about your own safety: put on protective gloves on your hands, a special mask on your eyes, and work clothes on your body;
- Buy elements for the boiler in a specialized store, and not from hand. All units must have certificates and passports;
- do everything strictly according to the drawings;
- Before starting work, prepare the necessary equipment, materials, and tools.
Materials and tools
To build a gas boiler, prepare the following materials and tools:
- electric drill;
- pliers;
- level;
- corner;
- roulette;
- metal pipe;
- steel sheet;
- gas pipe;
- doors for creating a firebox;
- red brick;
- fittings;
- clay;
- galvanized sheet;
- welding tool;
- thermostat;
- automation;
- deflector.
If everything is clear with most of the above, then choosing the right automation, deflector and thermostat is not the easiest task. What to look for when choosing them:
- Thermostats can be wired or wireless. The former are slightly cheaper than the latter. Choose programmable models; they make it easier to control and regulate the boiler temperature. Structurally, the thermostat consists of two devices. One is placed in the room, the other on the facade of the boiler. When the room temperature drops, the thermostat starts the heater. Pay attention to domestic device models. They are in no way inferior to expensive foreign analogues;
Thermostats for gas boilers are wired and wireless
- The concept of “automation for gas boilers” includes: flame control module, overheating protection, draft controller, blast valve. These devices are sold separately. For normal operation of the heater, all of the listed devices are needed. Do not choose the cheapest or too expensive models. Stop at the average price;
A blast valve is needed to compensate for the increase in coolant pressure during heating
- The deflector provides good exhaust. It is installed on top of the chimney pipe. For a homemade gas boiler, a model in the form of a cone-shaped stainless steel umbrella is suitable.
Chimney deflector ensures good exhaust
Project selection, drawings
Having decided to make a gas boiler yourself, find a suitable project with drawings . They should contain details about heating boilers, connections, cooling, chimney, deflector and other nuances.
Attention! Before you start manufacturing, have a good understanding of the drawings and find photos of finished circuits. Any inaccuracy or modification will adversely affect future operation.
During manufacturing, heat loss in each room where heating is planned is taken into account. Even in rooms with equal areas, heat transfer will be different.
Photo 2. Drawing of a wall-mounted gas boiler. The arrows indicate the components of the heating device.
Calculations are carried out with a margin of 10% , focusing on the actual sizes of objects.
Reference. The simplest way to calculate: for every 10 sq. meters of area requires 1 kW of energy. The calorific value of gas is 6.55 kW.
The amount of energy consumed by the boiler per day is divided by its calorific value and this is how the required volume of the boiler is obtained.
Thus, you need:
- calculate the entire hydraulic system;
- take into account the costs of the chimney, including the deflector;
- decide in advance on the diameter of the pipes;
- set the required pump power;
- calculate the system resistance.
Photo 3. Drawing of a gas heating boiler. The dimensions of the device and its components are indicated.
How to weld a heating register yourself
A register is a heat exchanger with parallel mounted pipes with a diameter of over 32 mm, connected by jumpers from pipes of a smaller diameter. They can also be made in the form of a coil. The devices perform the same functions as radiators, but differ in the ability to manufacture them independently.
Heat exchanger installation diagram.
As a rule, registers provide heating in warehouses, utility rooms, garages, and some low-rise residential buildings, but can be equipped as part of the interior of ordinary rooms. Heat exchangers are used as elements of one- and two-pipe heating systems with increased fire and sanitary standards.
Drawings and calculations
For assembly, it is advisable to use ready-made drawings. On specialized sites, ready-made schemes are posted that have already been verified by other owners.
It is necessary to correctly calculate the power. There are several ways. The simplest of them is power calculation. According to it, it is believed that approximately 1 kW is required per 10 sq.m. To create a reserve, it is necessary to provide up to 10% additional power so that the boiler is not used at maximum power settings.
A house with an area of 100 square meters requires at least 11 kW of energy per hour. So 264 kW is consumed per day. To calculate the volume, you need to divide the amount of energy released by the ability to release heat.
Drawing with a chimney
Step-by-step instructions for making a gas boiler with your own hands
The easiest way to create a floor-standing gas boiler with your own hands. It heats water, is economical, and is suitable for installation outdoors, in the house or in the garage.
So, let's begin:
- The boiler is installed on the foundation. Dig a hole about 80 centimeters deep. The width of the pit is equal to the size of the boiler foundation. Place sand at the bottom of the hole, fill it with water and let it soak. Place stones, broken bricks and gravel on the sand slightly below ground level.
A separate foundation is made for the floor boiler with a backfill of sand and gravel
- Assemble the formwork with the frame. Here you will need fittings. Fill the formwork with concrete mortar. After a day, remove the formwork. Fill the area under the formwork with gravel and sand. Cover it all with moisture-proofing material, such as tar.
- Make a brick wall that will protect the main wall from the heated gas boiler. Laying is done using a cement composition. The height and width of the brick wall are 10 cm larger than the dimensions of the boiler.
A protective brick wall is erected on the foundation
- Now you need to weld the boiler itself according to the drawing. Carry out work strictly according to size.
The boiler is welded from steel sheet strictly according to the dimensions indicated in the drawing
- We make a heat exchanger - it is thanks to it that the water in the boiler is heated. It requires a steel tank and a copper tube (40–50 cm). There should be two holes at the top and bottom of the tank corresponding to the diameter of the tube. Bend the tube into a spiral and insert it into the tank (this is easy to do with your bare hands; the copper is easily exposed). Install fittings or solder them on the ends of the tube coming out of the tank. During operation of the boiler, the burner will heat the copper spiral, and it, in turn, will transfer heat to the tank, which will heat the water inside the boiler.
The heat exchanger heats the water in the boiler
- It is impossible to make a thermostat, automation, or deflector with your own hands. All of these devices can be bought in a store or ordered online.
- When the boiler is installed, the chimney is welded to it. This is a straight metal pipe that will remove carbon dioxide from the unit. Choose a pipe with a diameter of at least 20 centimeters. The length should be such that part of the pipe (30–40 centimeters) rises above the roof of the building. The pipe is welded to the side of the boiler. A hole is made there through which combustion products will come out. The chimney is taken out to the street, for which a hole is cut or sawn out in the roof. When the pipe is inserted into this hole, the resulting gaps between it and the roof are sealed with polyurethane foam and mineral wool.
The chimney is an integral part of a gas boiler. The unit cannot be operated without it.
- The hood is mounted in the chimney pipe to remove carbon dioxide more easily and quickly. To make a hood you need a small fan and a grille. The fan is installed inside the pipe, closer to the outer end and connected to the electrical network using a wire. And the grate is fixed at the outer end of the pipe so that dirt and debris do not get inside the chimney.
Video: making a gas boiler yourself
Assembling a heater with a heating element
To make a homemade electric heating boiler with a tubular electric heater, you will need the following set of materials:
- steel sheet more than 2 mm thick;
- a piece of steel pipe (length and diameter depend on the performance of the unit);
- three-phase heating elements (it is not recommended to use heaters with a built-in relay, as they wear out quickly).
First, you need to cut out the future bottom of the boiler from a steel sheet. The dimensions of the bottom must correspond to the diameter of the pipe. Then, from the same metal, you need to make a flange - a ring, whose internal diameter is equal to the outer or inner diameter of the pipe, depending on how the part is planned to be fixed to the body. The ring width is usually 30 mm.
Next, a cover with a diameter corresponding to the outer diameter of the flange is made from a steel sheet. The cover and flange are connected using 6 bolts; holes are made in advance in the places where the fasteners are installed. Several more holes are drilled in the lid - their size must correspond to the size of the heating elements planned for installation.
Welding elements
The bottom needs to be welded to the boiler body first, the flange next. The cover is mounted only after the tubular heaters are firmly fixed to it. A sealing gasket made of water-resistant material is inserted between the heating elements and the lid.
Between the cover and the flange there is another gasket made from a car inner tube. This gasket must be an exact copy of the flange, including holes for the bolts.
Installation of pipes
Before closing the boiler with a lid, pipes for connecting the heating system pipes are installed in its body, having previously cut out suitable holes
It is important that there are threads at the ends of the pipes: this is required for installing inlet valves, which will allow you to shut off the coolant circulation in the circuit if repairs are required. The pipe for discharging hot liquid is located at the top of the unit; it is advisable to build it directly into the lid
The cooled coolant is supplied through a pipe from below.
When the pipes are installed, the boiler is completely assembled and connected to the network. Sometimes its design may change: for example, not only the lid, but also the bottom is mounted on the flange. The device is universal and can be easily adapted to the technical parameters of the home heating system.
Electric installation work
During electrical installation work, the contacts of all boiler heating elements are connected to the block, and the neutral wire is connected to it. Sometimes heating elements immediately short to this wire without using a block.
A phase wire passed through a circuit breaker is connected to the contact of each heater. The cable cross-section is selected based on the load created by all the heating elements turned on simultaneously.
All wires must be insulated, special attention must be paid to ensure that their exposed parts do not come into contact with the metal lid of the boiler
Installing a gas burner in a solid fuel boiler
After sound reflection and a real assessment of their capabilities, most home craftsmen still give preference to the modernization of solid fuel boilers that previously processed firewood or coal. A factory-made gas burner is simply placed in their firebox.
To equip your country property, you can purchase a solid fuel unit, which can be converted into a gas one. For example, a Teplodar stove in which a gas burner is mounted
Let's consider the stages of installing a Teplodar AGG burner device:
- Dismantling the firebox door, the ashpan damper (or the ashpan itself, if it is made in the form of a drawer with a solid door), the bumper and the grate. In short, you need to remove all structural parts located within the firebox and ash pan.
- Fixing the burner device. A burner block is mounted in the firebox channel freed from the above elements. If the Teplodar stove is designed for changing fuel, then the burner module is fixed in the channel through standard ears with screws and nuts threaded into them.
- Connecting automation to the remote control. The devices included in the design of the burner block that ensure automatic operation of the boiler are connected to the control panel.
- Thermostat sensor mount. It is installed on the supply pipe, wrapped in insulation to protect against external mechanical and temperature influences, and on top with ties.
- Putting it into operation. It is carried out after checking the draft and burst ventilation of the room with a modernized boiler. Using a simple handle, you select the most suitable mode.
We remind you that in accordance with the requirements outlined in the “Safety Rules for Gas Distribution and Gas Consumption Systems”, all work on installing equipment, replacing burners, servicing equipment and connecting to the network supplying blue fuel must be carried out by gas workers.
The technical documentation attached to the Teplodar stove contains a detailed description of the process of installing a gas burner for converting a solid fuel unit into a gas one
In accordance with federal regulations and standards, it is necessary to conclude an agreement with representatives of gas services for the supply of gas and related services. It is clear that not all remote settlements will be able to be served by employees of gas organizations. However, it is advisable to adhere to the requirements in order to avoid catastrophic consequences.
When it decreases and suddenly goes out, the current coming from the electrical element is weakened, as a result of which the gas supply channel is blocked. Overheating of water in the boiler is detected by a temperature sensor, which transmits a signal to open the contact pair blocking the burner
Should you take risks or value and protect your health with the well-being of your loved ones? It's up to you to decide. It is wiser to refuse threatening measures, but knowing about the process of their implementation is very useful in order to monitor how efficiently and honestly the gas workers work.
Pellet boiler type
Operating principle of a pellet boiler
This type of boiler installation is more automated and less demanding to maintain during operation. Pellets are granulated wood made from sawdust and shavings. Since this material is free-flowing, they are fed into the combustion chamber automatically using a screw or hopper.
We make a UPS and connect the voltage stabilizer of the gas boiler
UPS is an uninterruptible power supply. It is needed to ensure that the equipment continues to work when the power is turned off. And the stabilizer will protect the boiler from overloads during frequent power surges in the network.
An uninterruptible power supply can be purchased at the store. But if you do it yourself, it will be cheaper
Stores sell a variety of uninterruptible power supplies and stabilizers. They are not cheap. You can try to make an uninterrupted unit yourself. It is impossible to make a stabilizer yourself. The rules for choosing it are:
- For a 220-volt network, choose a single-phase stabilizer; for a 380-volt network, choose a two-phase one.
- Power - from 20 to 40 kW depending on the volume of the boiler.
- The stabilizer can be installed on the floor or mounted on a wall - this does not affect its operation.
Focus on the following technical characteristics of the stabilizer:
- type - electronic or relay;
- response time - a few milliseconds;
- input voltage range - from 140 to 260 volts;
- operating temperature range - from +5 to +40 0C.
The stabilizer is mounted next to the boiler in a dry place where access to water is excluded. It should not be overheated or frozen.
A stabilizer for a gas boiler will help maintain the voltage in the network at the level required for the heater to operate
Video: why do you need a voltage stabilizer for a gas boiler
How to assemble an uninterruptible power supply with your own hands
To produce a UPS you need:
- current converter (220 volts). It is needed so that a voltage of 220 volts is supplied to the boiler from the battery;
- battery (helium batteries have proven themselves well);
- charger (minimum 15 amps).
The instructions for assembling the UPS look like this:
- The converter is connected to the battery using wires with a cross-section of 4 millimeters, observing polarity.
Usually there are “+” and “-” indicators at the connection points (sometimes the polarity is indicated by different colors of the wires). The positive from the converter must go to the positive from the battery. The same goes for the negative wire. The converter is connected to the battery using two wires. Their cross-section must be at least 4 millimeters - The boiler is connected to the converter via a socket. It is already included in the kit; there is no need to install anything additional. Thus, three parts of one system - the boiler, the converter and the battery - are connected to each other.
- When the battery is discharged, a charger is connected to it.
The converter is connected to the battery using wires, connecting plus to plus, and minus to minus.
Such a unit will not operate automatically. You will have to turn it on yourself when the electricity suddenly goes out.
Video: making a UPS with your own hands
Electrodes for manual arc welding
4.1.1. For manual arc welding of joints of pipelines and boilers made of carbon, low-alloy and high-alloy steels, it is necessary to use electrodes that meet the requirements of GOST 9466, 9467 and 10052. The brand of electrodes should be selected depending on the grade of steel being welded. For welding products covered by this RD, domestic electrodes listed in Table 4.1 can be used; the chemical composition and mechanical properties of the deposited metal of these electrodes are given in Appendix 7.
Brands of electrodes from foreign companies that can be used are listed in Appendix 8; The type of electrodes according to the domestic classification is also given there to determine the scope of application of a specific brand of electrodes.
The possibility of using electrodes not listed in Table 4.1 and in Appendices 7 and 8 for facilities of the Ministry of Energy of Russia must be agreed with CJSC "Prochnost MK", for other facilities - with any specialized research organization in the field of welding, given in the appendices to rules of the Gosgortekhnadzor of Russia.
4.1.2. Electrodes for welding fastening parts made of high-alloy steels to superheater pipes and other boiler elements or to a pipeline made of low-alloy pearlitic steels, as well as for welding fastening parts, must be selected according to Table 4.2.
To weld fasteners made of steel of any grade to pipes made of austenitic steel, electrodes EA-395/9, ZIO-8, OZL-6, TsL-25, TsT-10, NIAT-5 should be used; for steel 12X11V2MF - electrodes EA-400 /10U and EA-400/10.
4.1.3. Before welding production joints and testing, the electrodes must be calcined according to the regime given in the relevant document (OST, TU) or label. In the absence of such data, the calcination mode is selected according to Table 4.3.
Imported electrodes are calcined according to the same regime as domestic ones with a similar type of coating.
4.1.4. Electrodes with a basic coating intended for welding pearlitic steels should be used within 5 days after calcination, TsT-45 electrodes - within 10 days, other electrodes - within 15 days, if they are stored in a warehouse in compliance with the requirements of clause 3.10. After the specified period, the electrodes must be calcined again before use. If electrodes are stored in a drying cabinet at a temperature of 80-115°C, their shelf life is not limited.
Table 4.1
Cutting out parts and installing the boiler
To increase heat transfer, it is recommended to cover the homemade boiler with refractory bricks.
Before you begin assembling homemade wood boilers, you will need to make a drawing taking into account the features of the heating system for a private home. The products look like 2 compartments arranged in a “matryoshka” pattern. The outer box is a combustion chamber, the inner one is a reservoir for heating water. The elements do not communicate with each other.
The parts are prepared as follows:
- The walls of the unit are cut from a sheet of metal.
- Partitions for the stove are made from metal 10-12 mm thick.
- A hole for the chimney with a diameter of 10 cm is made on the top part.
- The sides are welded to the bottom, and then metal strips 3 cm wide for the grate are placed on the vertical parts.
- Support strips for partitions are attached to the side parts.
- The doors are manufactured and installed on the hinges, and the flaps for the firebox and ash pan are cut out.
- Partitions are attached in the form of a labyrinth - they will increase the heating efficiency by creating a barrier to air.
- A sleeve 20 cm high under the chimney is welded onto the lid with a hole.
- The cover is welded to the body, and the chimney is mounted.
Making a boiler from a pipe
Heat exchanger made of a metal pipe connected by welded seams.
A boiler for wood or coal is made of a pipe and has a U-shape. There is a fitting on the upper part, and a return line on the lower part. The unit is easy to make if you follow the step-by-step recommendations:
- Selection of tools and materials. You will need several metal pipes with a diameter of 1.5-2 inches, as well as a welding inverter, an angle grinder with an attachment for cutting metal, a tape measure, and a hammer.
- Cutting a metal pipe to size.
- Welding the edges of the lower part in the shape of the letter P.
- Burning holes for vertical posts.
- Arrangement of vertical elements from angles or pipes of smaller diameter.
- Making the upper part from a pipe of the same diameter and holes for vertical parts.
- Welding the fitting onto the supply pipe and the air vent.
- Making a firebox and blower. Rectangular holes of 20x10 cm for the firebox and 20x3 cm for the blower are cut in the pipe.
Execution of the electrical model
DIY heating element assembly diagram
A do-it-yourself electric boiler for heating a house is made using the following materials and tools:
- angle grinder or grinder;
- inverter welding machine;
- multimeter;
- sheet steel with a thickness of 2 mm;
- adapters for connecting to the system;
- Heating elements - heaters can be purchased or assembled yourself;
- steel pipe 159 mm in diameter and 50-60 cm long.
The algorithm for creating an electric type unit consists of the following steps:
- Making connections to the pipe system. You will need 3 elements 3, 2 and 1.5 inches in diameter.
- Making a container for a tank from a pipe. Markings are made, a hole is cut along it and the seams are processed.
- Welding pipes to holes.
- Cutting two circles from a larger diameter pipe for the heating compartment.
- Welding to the top of a 1.25 inch diameter pipe.
- Making space for the heater. Two holes are made in the bottom.
- Connecting the boiler using pipes to the system.
- Installation of a low-power heating element with a thermostat on the upper pipe.
Long burning boiler
This boiler for heating a private house has at least two modifications. Of course, each of them can be made by hand.
According to many drawings, the design of the first modification of a long-burning boiler consists of the following elements:
- An ash chamber with a door on which the ash pan is located.
- Combustion chamber with door.
- Heat exchanger.
- Connections for supply and return of coolant.
- Openings for the release of carbon monoxide. Placed at the top of the combustion chamber.
- Draft regulator (includes a temperature sensor in the form of a bimetallic plate or container filled with wax, as well as a chain mechanism that controls the blower).
- Cases.
- Thermal insulation.
- Sheathing.
- Nozhek.
In this long-burning boiler, the ash chamber has the same depth and width as the combustion chamber. It is located under the combustion chamber.
You can make two types of heat exchanger with your own hands:
The first consists of vertical pipes that are connected by horizontal pipes. or horizontal tubes, the ends of which are welded to two flat vertical sealed metal boxes. In this case, one end of each pipe is higher than the second. That is, there is a slight slope. In both options, the pipes are placed in a checkerboard pattern. Thanks to this, the smoke seems to get entangled between the heat exchanger tubes and gives off more heat.
Of course, such a unit is placed in the firebox. They place it with their own hands at the top of the chamber. In this case, the movement of the coolant should be opposite to the movement of smoke. In a boiler with such a heat exchanger, they always make an additional casing with their own hands. There should be a space of several centimeters between it and the combustion chamber. Thanks to this, the thermal insulation material will not overheat. which is located around the body.
As for the water jacket, such a heat exchanger consists of two containers placed one inside the other. The inner one is the combustion chamber. Space is created between the containers. During operation of a boiler made according to the selected drawing, it is filled with water, which absorbs heat from the hot walls of the combustion chamber.
The second modification of the boiler for heating a house has a similar structure:
- Frame. It is a structure of two pipes that are inserted into each other. The space between them is filled with water.
- Ash and loading doors.
- Air distributor. It is a round plate with vertical plates welded at the bottom and a hole made in the center. This distributor supplies air to the firewood through a pipe that is welded to a hole made in it. There is a valve at the top of the tube.
- Top with a hole in the center. An oxygen supply pipe passes through this hole (it is also welded to the air distributor).
- Chimney.
Difficulties in manufacturing, how to make the boiler more economical
The rules prohibit the supply of gas to the basements and ground floors of the building, so the owner must allocate a separate room in the house that complies with the standards, otherwise the installation of the unit will not be approved by the services.
An attempt to save money on automatic heating equipment leads to overheating of the heating system and even rupture of pipelines.
Overheating also occurs due to lack of circulation. In this case, check the pump, filter and overheating thermostat.
Incorrect calculations of the required power will lead to the fact that the heat received from the boiler will not be enough to heat the premises.
If the pressure does not rise when the boiler warms up, then the tightness of the system may be compromised and you need to tighten the connections , and then add a little pressure.
Problems may arise if, when drawing up a project the features of a particular facility were not taken into account: power surges in the network, low quality fuel, insufficient gas pressure, proper ventilation is not organized, or recommendations on permissible distances from the boiler to other equipment and walls are not followed. During repairs, it will be necessary to modernize the engineering work.
How to increase efficiency
Under no circumstances should safety precautions be neglected. If you decide to save on something, you can lose much more. For example, you should not connect a gas pipe to the basement or ground floor.
You shouldn’t skimp on automation either. Otherwise, the system may overheat, causing a rupture in the pipeline. Lack of water circulation can lead to an accident. Therefore, automation must provide control over the operation of the pump, filter, and thermostat.
You can save on the coolant supplied to the batteries without losing temperature. To do this, you need to insulate the walls and windows by sealing the cracks. Savings are calculated at the assembly stage, and not when the device is ready for use, because after the last soldering nothing can be changed.
Recommendations and safety precautions
Before you start creating a homemade unit, you need to make sure you have the necessary tools and evaluate your skills in using them. For example, if a person has never done welding, it will be difficult for him to assemble a structure with his own hands. In this case, it is better to purchase the device in a store. After all, its individual parts can be joined together only thanks to a welding machine.
Below are a few important things to know:
- It is prohibited to connect the device to the main line yourself without the knowledge of the gas service.
- Permission can be obtained by calling specialists to your home or delivering the assembled unit to their office.
- If installed without permission, gas may leak, which will lead to fire and even explosion.
- Welding work is performed only in special clothing, gloves and a mask.
- Each item must be purchased only in a special store and have a passport.
- The creation of the device must be carried out in accordance with the drawing.
Connection and placement
Before connecting the finished device to the gas pipeline, you need to obtain permission from the relevant organization. After this, 2 “American” taps are purchased, which are installed on the forward and reverse pipelines. Such shut-off valves will help dismantle the unit if an emergency occurs.
A filter must be installed on the pipe through which the coolant will move back to the boiler. It will protect the device from mechanical debris. It is necessary to install shut-off valves on the gas pipeline. It looks like a faucet and acts as a filter.
Now all that remains is to connect the gas pipe through which the fuel will move. Each joint and connection point of elements must be sealed. The boiler must be connected to a water supply with cold water, as well as hot water if it is a double-circuit one.
Place the device in a specially prepared place, on a pillow. The installation location can be a garage, boiler room or street.
Calculations for a homemade gas heating boiler
You need to make gas boilers yourself, only after accurately calculating everything. If this is done correctly, the equipment will save the owner not only one-time costs, but also operating costs.
It is necessary to manufacture the unit, taking into account heat loss in each room where heating will be carried out. You need to understand that even if the rooms are the same, the heat transfer in each will be different. It is best to carry out calculations with a small margin. In this case, the layout of the room will not work; it is better to start from the actual dimensions. It is important to check everything several times in order to definitely exclude the possibility of an error, because it can lead to excessive fuel consumption and increased costs in the future.
For self-made gas boilers to work as expected, you need to:
- calculate the entire hydraulic system;
- take into account the costs of the chimney, including the deflector;
- decide in advance on the diameter of the pipes;
- set the required pump power;
- and calculate the system resistance.
If everything is calculated correctly, there should not be any failures.
What parts does a solid fuel boiler consist of?
Before you start working on the boiler, you need to understand its operating principle. Main elements of the boiler design:
- The combustion chamber is a chamber into which fuel is placed and where the combustion process occurs.
- The heat exchanger is the main structure of the boiler through which the coolant passes and, after heating, enters the heating system.
- The body is a structure that contains all the components of the boiler.
Independent creation of heating boilers for the home is usually limited to a simple design, but nevertheless has two design options: brick and metal.
Let's consider each option in detail.
What determines the efficiency of a boiler?
The main indicator of the efficiency of a boiler is its efficiency - efficiency factor. The average efficiency of various models is in the range of 90-94%. Much greater efficiency, more than 100%, is achieved by condensation heat generators, which use condensate that is formed during gas combustion to heat the coolant.
The type of combustion chamber - open or closed - also affects efficiency. In a closed combustion chamber, the gas burns completely, and a minimal amount of carbon monoxide enters the air. The correct choice of power is also an important factor in the efficiency of the boiler. If you install a boiler that is too powerful, it will turn on and off at very short intervals, and as a result, it will consume more gas.
If the power is insufficient, the heat generator will wear out, which will significantly reduce its service life. Economical operation of the boiler will be ensured by automation, which will respond to changes in room temperature. And, most importantly, insulating the house, because no matter how economical your boiler is, heating the street will bring everything to naught.
Video about a homemade gas boiler:
Design features of boilers
Turbocharged
A turbocharged gas boiler is distinguished by the presence of a coaxial chimney. This chimney is a pipe-in-pipe design. Through a pipe of a larger diameter, gas combustion products are discharged to the street; through a pipe of a smaller diameter, combustion air enters, which is heated by the exhaust gases, which contributes to efficiency.
Turbocharged boilers are equipped with a forced draft fan, which supplies air to the combustion unit. Such boilers have a closed combustion chamber, which is usually made of copper or copper alloys, sometimes it is cast iron.
Bottled gas, propane, liquefied gas
When converting a boiler to a gas boiler, you can use not only main gas. Your homemade unit can run on liquefied gas or propane. To connect bottled gas, it is necessary to install a reducer, since the gas in the bottle is under high pressure.
In some cases, it is necessary to change the injectors to smaller ones. For convenience, so as not to constantly change cylinders, you can connect several cylinders. Taking into account the fact that on average 2 cylinders are consumed per week to heat a house of about 100 sq.m. and obtain hot water, you can calculate the number of connected gas containers.
For convenience and more efficient use of gas, the cylinders are connected into a so-called ramp; up to 10 cylinders can be connected. The ramp consists of a two-arm collector, which divides the entire group of tanks into 2 parts. After the main group runs out of gas, it switches to the additional group.
Insulation of the house
The degree of insulation of a house or apartment is of significant importance in saving gas. If the building is not insulated, and the doors and windows are ventilated, a significant part of the heat will go outside. The material of the walls of the house also matters. For example, wood and block transmit heat faster than double brickwork.
Good insulation of the ceiling, floor and walls will save a lot of fuel. It is advisable to replace old frames with energy-efficient double-glazed windows, and wooden doors with a more airtight modern analogue. A well-insulated building will save up to 30% on gas.
Particular attention should be paid to insulating the attic and basement, since a lot of heat also escapes through them.
Note! To increase the energy efficiency of your home, you can install reflective screens made of aluminum foil between the radiator and the wall; they will allow you to return some of the heat to the room.
Skirting radiators
This is a newfangled option when small radiators are installed around the perimeter of the apartment, at the level of the baseboard and disguised as worthless.
The main disadvantage will be this very plinth, it is wider and higher than ordinary plinths, and therefore there will be a small side around the perimeter of the room, which will not allow the bedside table or bed to be pushed completely against the wall. Agree, it’s very inconvenient when all the objects in the room stand 3-5 centimeters from the walls.
The advantage will be a more uniform heat distribution compared to radiator batteries. There will be no warm or cold corners in the rooms and it will be more pleasant to be in such a house.