Electrolyzer
Electrolysis is a chemical and physical phenomenon of the decomposition of substances into elements using electric current, which is used everywhere for industrial purposes. Based on this reaction, units are made to produce, for example, chlorine or non-ferrous metals.
Electrolysis plant, which consists of plates
The constant increase in prices for energy resources has made ion installations for home use in demand. What are such structures, and how to make them at home?
Types of installations
Today, a hydrogen generator for a car can be equipped with three electrolyzers that differ in type, nature of operation and performance:
The first type of design is quite sufficient for many carburetor engines. There is no need to install a complex electronic circuit for a gas performance regulator, and the assembly of such an electrolyzer itself is not difficult.
For more powerful cars, it is preferable to assemble the second type of reactor. And for engines running on diesel fuel and heavy-duty vehicles, a third type of reactor is used.
General information about the electrolyzer
An electrolysis installation is a device for electrolysis that requires an external energy source, which consists of several electrodes placed in a container filled with electrolyte. This installation can also be called a water splitting device.
In similar units, the key technical parameter is productivity, which means the volume of hydrogen produced per hour and is measured in m?/h. Fixed units carry this parameter in the model name, for example, the SEU-40 membrane unit generates 40 cubic meters per hour. m hydrogen.
appearance of the stationary industrial unit SEU-40
Other characteristics of such devices completely depend on the intended purpose and type of installation. For example, when performing water electrolysis, the efficiency of the unit depends on the following indicators:
- The level of the lowest electrode potential (voltage). For good operation of the unit, this characteristic should be in the range of 1.8-2 V per plate. If the electrical power source has a voltage of 14 V, then it makes sense to divide the capacity of the electrolyzer with the electrolyte solution into sheets into 7 cells. A similar installation is called a dry electrolyzer. A lower value will not start electrolysis, and a higher value will greatly increase energy consumption;
Arrangement of plates in the bath of an electrolysis plant
- The smaller the distance between the plate elements, the lower the resistance will be, which, when a large current passes, leads to an increase in the production of gaseous substance;
- The surface area of the plates directly affects productivity;
- Heat balance and degree of electrolyte concentration;
- Material of electrode components. Gold is considered an expensive but excellent material for use in electrolyzers. Due to its high cost, stainless steel is sometimes used.
Main! In constructions of a different type, the values will have different parameters.
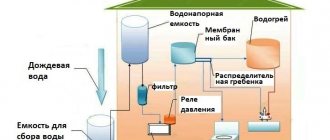
Water electrolysis plants can also be used for purposes such as disinfection, purification and water quality assessment.
PREPARATION OF IONIZED WATER
The positive result of electrolysis depends primarily on the quality of the liquid. It should have a minimum amount of impurities. For this purpose, ordinary tap water is allowed to settle for at least two to three hours and passed through a filter.
At the beginning of the process, a current consumption of 1 A or more indicates an increased content of metal salts in the solution. The optimal current consumption value is 0.2 A, which at the final stage does not exceed 1 A. Temperature is also a determining indicator of electrolysis. It should not exceed 35 degrees.
The procedure for preparing activated water does not significantly depend on the version of the device, but has some features.
Sequence of actions in the first option:
- Place the tarpaulin bag in an empty container.
- Pour liquid 1 cm below the top edge.
- Place the electrodes in a jar and the anode in a bag.
- Connect the device to the mains.
- After 5-12 minutes, turn off the mains voltage and remove the electrodes.
- Immediately remove the canvas bag with the acidic liquid and pour it into a separate container.
Sequence of actions in the second option:
- Pour the liquid into a jar and into a clay glass.
- Place the glass in a glass jar.
- In both containers, the water levels should be the same, but so that the liquid does not overflow into the glass from the jar.
- Place the plate with the positive electrode in the clay glass.
- Place a negative electrode in a glass jar so that its plates are parallel to the anode plates.
- Check that there is no contact between the cathode and the anode.
- Connect the device to the network for 5-12 minutes.
- Turn off the device and remove the ionized water.
Working principle and types of electrolyzer
Electrolyzers have a very simple device that splits water into oxygen and hydrogen. They consist of a container with electrolyte into which electrodes are placed connected to an energy source.
Design of the simplest electrolysis plant
The working principle of an electrolysis plant is that the electric current passing through the electrolyte has a voltage sufficient to decompose water into molecules. The result of the process is that the anode releases one part of oxygen, and the cathode creates two parts of hydrogen.
Other
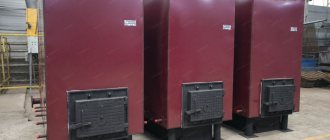
Electricity costs for hydrogen production are no more than 5.0 kW*h/Nm3.
Structure of maintenance and repair cycles for the FS-T.25 installation:
TO-1 - with the unit turned off, once a month.
TO-2 - with the unit turned off, once every 6 months.
TO-3 - with the unit turned off, once a year.
TO-4 (current repairs) - with the unit turned off, once every 3 years.
TO-5 (overhaul) - with the unit switched off, once every 10 (6) years*.
* In accordance with clause 6.22.1.3 STO 70238424.27.100.050-2009 “Electrolysis installations of power plants. Organization of operation and maintenance. Standards and requirements" major repairs must be carried out once every 6 years.
Installations of the FS-T.25 series are subject to major repairs once every 10 years, subject to technical maintenance by the service department of IFTI LLC.
The electrolysis plant is powered from the existing 0.4 kV switchgear in accordance with the requirements of the PUE.
Types of electrolyzers
Devices for splitting water are of the following types:
Such electrolyzers have the most primitive design (picture above). They are characterized by the characteristic that manipulating the number of cells will give you the opportunity to power the device from a source with any voltage.
Flow view
These units have in their design a completely filled electrolyte bath with electrode elements and a tank.
The device of a conventional flow-type electrolyzer, where A is a bath with electrodes, D is a tank, B, E are tubes, C is an outlet valve
The working principle of the flow electrolysis plant is as follows (from the picture above):
- when electrolysis leaks, the electrolyte and gas are squeezed out through pipe “B” into tank “D”;
- in container “D” the process of separating gas from the electrolyte takes place;
- gas exits through valve “C”;
- the electrolyte solution flows back through tube “E” to tub “A”.
Interesting to know. This working principle is configured in certain inverter devices - the combustion of the released gas allows parts to be welded.
Membrane view
The membrane type electrolysis plant has the same design as other electrolyzers, but the electrolyte is a polymer-based solid called membrane fabric.
Membrane electrolyzer design
The membrane fabric in such units has a dual purpose - transfer of ions and protons, zoning of electrodes and electrolysis products.
Aperture view
When one substance cannot penetrate and influence another, a porous diaphragm is used, which can be made of glass, polymer fibers, ceramics or asbestos material.
The device of a diaphragm electrolyzer, where 1 is an outlet for oxygen, 2 is a flask, 3 is an outlet for hydrogen, 4 is an anode, 5 is a cathode, 6 is a diaphragm
Alkaline view
Electrolysis cannot occur in distilled water. In such cases, it is necessary to use catalysts, which are alkaline solutions of high concentration. Based on this, a significant part of ionic devices can be called alkaline.
Main! It should be noted that the use of salt as a catalyst is harmful, since chlorine gas is released when the reaction occurs. An excellent catalyst is usually sodium hydroxide, which does not corrode metal electrodes and does not contribute to the release of harmful substances.
Video on the topic
I've been wanting to do something like this for a long time. But it didn’t go further than experiments with a battery and a pair of electrodes. I wanted to make a full-fledged apparatus for producing hydrogen, in quantities to inflate a balloon. Before making a full-fledged device for electrolysis of water at home, I decided to test everything on the model.
The general diagram of the electrolyzer looks like this.
This model is not suitable for full daily use. But we managed to test the idea.
So for the electrodes I decided to use graphite. An excellent source of graphite for electrodes is trolleybus current collector. There are plenty of them lying around at the final stops. It must be remembered that one of the electrodes will be destroyed.
We saw and finalize it with a file. The intensity of electrolysis depends on the current strength and the area of the electrodes.
Wires are attached to the electrodes. The wires must be carefully insulated.
Plastic bottles are quite suitable for the body of the electrolyser model. Holes are made in the lid for tubes and wires.
Everything is carefully coated with sealant.
To connect two containers, cut off bottle necks are suitable.
They need to be joined together and the seam melted.
Nuts are made from bottle caps.
Holes are made in the bottom of two bottles. Everything is connected and carefully filled with sealant.
We will use a 220V household network as a voltage source. I want to warn you that this is a rather dangerous toy. So, if you do not have sufficient skills or have doubts, then it is better not to repeat it. In the household network we have alternating current; for electrolysis it must be rectified. A diode bridge is perfect for this. The one in the photo turned out to be not powerful enough and quickly burned out. The best option was the Chinese MB156 diode bridge in an aluminum housing.
The diode bridge gets very hot. Active cooling will be required. A cooler for a computer processor is perfect. You can use a suitable size junction box for the housing. Sold in electrical goods.
Several layers of cardboard must be placed under the diode bridge.
The necessary holes are made in the cover of the junction box.
This is what the assembled installation looks like. The electrolyzer is powered from the mains, the fan from a universal power source. A baking soda solution is used as an electrolyte. Here you need to remember that the higher the concentration of the solution, the higher the reaction rate. But at the same time the heating is higher. Moreover, the decomposition reaction of sodium at the cathode will contribute to heating. This reaction is exothermic. As a result, hydrogen and sodium hydroxide will be formed.
The device in the photo above got very hot. I had to turn it off periodically and wait until it cooled down. The heating problem was partially solved by cooling the electrolyte. For this I used a tabletop fountain pump. A long tube runs from one bottle to another through a pump and a bucket of cold water.
Electrolysis is widely used in the industrial sector, for example, to produce aluminum (apparatuses with baked anodes PA-300, PA-400, PA-550, etc.) or chlorine (Industrial units Asahi Kasei). In everyday life, this electrochemical process was used much less frequently; examples include the Intellichlor pool electrolyzer or the Star 7000 plasma welding machine. The increase in the cost of fuel, gas and heating tariffs radically changed the situation, making the idea of water electrolysis at home popular. Let's consider what devices for splitting water (electrolyzers) are, and what their design is, as well as how to make a simple device with your own hands.
Self-production of an electrolyzer
Anyone can make an electrolyzer with their own hands. For the assembly process of the most common design, the following materials will be needed:
- stainless steel sheet (the best options are foreign AISI 316L or our 03Х16Н15М3);
- bolts M6x150;
- washers and nuts;
- transparent tube - you can use a spirit level that is used for construction purposes;
- several herringbone fittings with an outer diameter of 8 mm;
- plastic container with a volume of 1.5 l;
- a small filter that filters tap water, for example, a filter for washing machines;
- water check valve.
Assembly process
Assemble the electrolyzer with your own hands according to the following instructions:
- First of all, you need to mark and then cut the stainless steel sheet into equal squares. Sawing can be done with an angle grinder (angle grinder). One of the corners in such squares must be cut at an angle to properly secure the plates;
- Next you will need to make a hole for the bolt on the side of the plate opposite to the corner cut;
- The connection of the plates should be done in turn: one plate on “+”, the next on “-” and so on;
- Between the differently charged plates there must be an insulator, which is the tube from the spirit level. It should be cut into rings, which should be cut lengthwise to obtain strips 1 mm thick. This distance between the plates is sufficient for good gas release during electrolysis;
- The plates are fastened together using washers like this: a washer sits on the bolt, then a plate, then three washers, then a plate, and so on. The plates, favorably charged, are placed as mirror images of the negatively charged sheets. This makes it possible to prevent the sawed edges from touching the electrodes;
Electrolysis plant plates assembled together
- When assembling the plates, you should simultaneously insulate them and tighten the nuts;
- Also, each plate must be ringed in order to be sure that there is no short circuit;
- Next, the entire assembly needs to be placed in a plastic box;
- After that, it is worth highlighting the places where the bolts touch the walls of the container, where you can drill two holes. If the bolts do not fit into the container, then they need to be trimmed with a hacksaw;
- Then the bolts are tightened with nuts and washers to seal the structure;
Plates placed in a plastic container
- After these steps, you will need to make holes in the container lid and insert fittings into them. In this case, impermeability can be ensured by sealing the seams with silicone-based sealants;
- The safety valve and filter in the design are placed at the gas outlet and serve as a means of controlling excessive gas accumulation, which can lead to poor results;
- The electrolysis plant has been assembled.
The last stage is a test that is performed like this:
- filling the container with water up to the mark of the bolts for fastening;
- connecting power to the device;
- connecting a tube to the fitting, the opposite end of which is lowered into the water.
If a weak current is applied to the installation, the release of gas through the tube will be almost imperceptible, but it can be seen from inside the electrolyzer. By increasing the alternating current, adding an alkaline catalyst to water, you can significantly expand the yield of the gaseous substance.
The completed electrolyzer usually acts as an important part of many devices, for example, a hydrogen burner.
appearance of a hydrogen burner, the basis of which is considered to be a self-made electrolyzer
Knowing the types, key characteristics, structure and operating principle of ion installations, you can correctly assemble a homemade structure, which is an excellent assistant in a variety of everyday situations: from welding and saving fuel consumption of vehicles to the functioning of heating systems.
DEVICE WITH SEPARATE CONTAINERS
The electrical circuit of the device does not differ from that discussed earlier, but for the catholyte it is envisaged to use a glass jar for bulk materials with a diameter of 90 mm and a height of 160 mm.
The container for the analyte goes inside the jar and for it you need to try to find a clay cylinder with dimensions 60x60x130 mm, which is available in hardware stores. The baked clay acts as a diaphragm. It is advisable to monitor the current consumption using an additional ammeter with a scale of up to 1 A.
It is convenient to use 3-4 medical spatulas as electrodes. They can be purchased at Medtekhnika retail outlets. To increase efficiency, the cathode is made of two spatulas, which are placed in a plastic cover. The spatulas are fastened through holes made in their narrow parts and U-shaped galvanized tin jumpers with holes.
The anode spatula should be cut at the narrow part to a length of 125 mm and secured in the same way as the cathode parts. For efficiency, the anode can also contain two spatulas, spaced more than 20 mm from each other. They are placed in a plastic cover of smaller diameter, for which a hole is cut in the cathode cover.
In the simplest case, a cap with a positive electrode can be placed on a clay cylinder. It is important to ensure that the positive and negative electrodes do not touch when the device is assembled.
No less interesting is the version of the device for living and dead water with two separate containers.
The figure shows that two separate containers are connected by a conductive jumper. It is usually made in the form of a tourniquet of medical cotton wool, wrapped in a bandage and its length is within 10-15 cm. Before the electrolysis process begins, the jumper is generously moistened with liquid.
Connecting a 15-25 W light bulb in series to the device allows you to control the electrolysis process. At the end of the process, it begins to barely glow, and if its glow does not change over time, then electrolysis does not occur, most likely due to a short circuit between the electrodes.
Make an electrolyzer with your own hands
Surely, you are familiar with the process of electrolysis from the elementary school curriculum. This is when 2 polar electrodes under current are placed in water in order to obtain metals or non-metals in their pure form. An electrolyzer is needed to break down water molecules into oxygen and hydrogen. The electrolyzer, being part of scientific mechanisms, divides molecules into ions.
There are two types of this device:
- Dry electrolyzer (this is a completely closed cell);
- Wet electrolyzer (these are two metal plates placed in a container of water).
This device is simple in terms of design, which makes it possible to use it even at home . Electrolyzers divide the electrolysis charges of atoms of molecules into charged atoms.
In our case, it divides water into positive hydrogen and negative oxygen. To do this, a large amount of energy is required, and to reduce the amount of energy required, a catalyst is used.
ICE on hydrogen fuel
For several decades, there has been a search for the possibility of adapting internal combustion engines for full or hybrid operation on hydrogen fuel. In Great Britain, back in 1841, an engine running on an air-hydrogen mixture was patented. At the beginning of the 20th century, the Zeppelin concern used internal combustion engines running on hydrogen as the propulsion system for its famous airships.
The development of hydrogen energy was also facilitated by the global energy crisis that erupted in the 70s of the last century. However, with its end, hydrogen generators were quickly forgotten. And this despite a lot of advantages compared to conventional fuel:
- ideal flammability of the fuel mixture based on air and hydrogen, which makes it possible to easily start the engine at any ambient temperature;
- large heat release during gas combustion;
- absolute environmental safety - exhaust gases turn into water;
- the combustion rate is 4 times higher compared to a gasoline mixture;
- the ability of the mixture to operate without detonation at a high compression ratio.
The main technical reason, which is an insurmountable obstacle to the use of hydrogen as a vehicle fuel, was the inability to fit a sufficient amount of gas on a vehicle. The size of the hydrogen fuel tank will be comparable to the parameters of the car itself. The high explosiveness of the gas should exclude the possibility of the slightest leak. In liquid form, a cryogenic installation is required. This method is also not very feasible in a car.
We create the device with our own hands
The device for this process can be made by hand.
For this you will need:
- Stainless steel sheet;
- Bolts M6 x 150;
- Washers;
- Nuts;
- Transparent tube;
- Connecting elements with threads on both sides;
- One and a half liter plastic container;
- Water filter;
- Check valve for water.
An excellent option for stainless steel is AISI 316L from a foreign manufacturer or 03Х16Н15М3 from a manufacturer from our country. There is absolutely no need to purchase stainless steel, you can use old one. 50 by 50 centimeters will be enough for you.
“Why use stainless steel itself?” - you ask. Since corrosion will occur on even ordinary metal. Stainless steel withstands alkalis better. You should mark the sheet in such a way as to divide it into 16 similar squares . You can cut it with an angle grinder. Cut off one of the corners of each square.
On the other side and opposite corner from the cut corner, drill a hole for a bolt that will help hold the plates together. The electrolyzer does not stop working like this: electricity flows from plate to plate - and water breaks down into oxygen and hydrogen. Thanks to this, we will need a good and negative plate.
The plates must be connected alternately: plus-minus-plus-minus , with this method there will be a strong current. To isolate the plates one from another, a tube is used. The ring is cut from the level. By cutting it, we get a strip a millimeter thick. This distance is more correct for gas production.
The plates are connected to each other using washers: we put a washer on the bolt, then a plate and three washers, then another plate and so on. Eight plates must be placed on the plus and minus. If everything is done correctly, the cuts of the plates will not touch the electrodes.
Afterwards you will need to tighten the nuts and insulate the plates. Then we place the structure in a plastic container.
Required performance
In order to truly save fuel, a hydrogen generator for a car must produce gas every minute at the rate of 1 liter per 1000 engine displacement. Based on these requirements, the number of plates for the reactor is selected.
To increase the surface of the electrodes, it is necessary to treat the surface with sandpaper in a perpendicular direction. This treatment is extremely important - it will increase the working area and avoid “sticking” of gas bubbles to the surface.
The latter leads to isolation of the electrode from the liquid and prevents normal electrolysis. Do not also forget that for normal operation of the electrolyzer, the water must be alkaline. Regular soda can serve as a catalyst.
Finishing and testing of the device
Then you need to determine where the bolts touch the walls of the box and, in those places, drill two holes. If for no apparent reason it turns out that the bolts do not fit into the container, then they should be cut off and tightened with nuts to make it tight . Now you need to drill out the cover and insert threaded connecting elements on both sides. To ensure a tight seal, seal the seam with silicone-based sealant.
After assembling your own electrolyzer with your own hands, you should test it. To do this, connect the device to the power source, fill it with water up to the bolts , put on the lid by connecting a tube to the fitting and lowering the opposite end of the tube into water. If the current is weak, then the current will be visible from inside the electrolyzer.
Gradually increase the current power in the device you made yourself. Distilled water is a poor conductor of electricity because it contains no salts or impurities. To prepare the electrolyte, you need to add alkali to the water. To do this, you need to take sodium hydroxide (found in “Mole” type pipe cleaners). A safety valve is needed to prevent a decent amount of gas from accumulating.
- It is better to use distilled water and soda as a catalyst.
- You should mix part of the soda to forty parts of water. The walls on the sides are best made of acrylic glass.
- Electrodes are best made of stainless steel. It makes sense to use gold for plates.
- Use light-transmitting polyvinyl chloride as lining. They can be 200 by 160 millimeters in size.
- Your own electrolyzer, made with your own hands, can be used to cook food, for complete combustion of gasoline in cars and in most cases.
Dry electrolysers are mainly used for machines. The generator increases the power of the internal combustion engine. Hydrogen ignites much faster than liquid fuel, increasing the force of the piston. In addition to "Mole", you can take "Mr. Muscle", caustic soda, baking soda.
The generator does not work on drinking water. It is better to connect electricity this way: the first and last plates are negative, and the plate in the middle is positive. The larger the plate area and the stronger the current, the more gas is released.
Origin
This rubbish was given to me by friends following the post about the Fuel Shark. Since I got it for free, I put 18 points. My friends themselves seem to (but I’m not sure) politely asked the distributor for clean water as a gift (and where the handsome man emerged from, they won back this crap a long time ago... Well, after all, the new is the well-forgotten old The seller with such a product I googled it. Although it’s unlikely that the scammer took it from him, but IMHO any seller of such a product deserves to be rewarded with a boot in the face. Repeatedly.
There are, of course, similarities with the fuel shark - both products are intended to deceive and scam money. But there is also a significant difference: During the analysis, we will see that the electrolyzer under review poses a mortal danger when used, both for the fraudster using this equipment and for his victim.
Do-it-yourself home electrolysis
When I was little, I always wanted to do something myself, with my own hands. But parents (and other close people) in most cases did not allow this. But I didn’t see then (and still don’t see) anything bad when little children want to study??
Of course, I did not write this article in order to recall my childhood experiences in the desire to begin self-education. Just completely by accident, when I was wandering around otvet.mail.ru, I came across a question of this kind. Some little demolition boy asked questions about how to do electrolysis at home. True, I didn’t answer him, because this boy wanted to electrolyze very suspicious mixtures?? I decided that it would be a shame that I wouldn’t say any more and let him look for it in books. But not so long ago, again wandering through the forums, I saw a similar question from a teacher at a chemistry school. Judging by the description, his school is so poor that it cannot (does not want) to purchase an electrolyzer for 300 rubles. The teacher (what a disaster!) could not find a way out of the resulting situation. So I helped him. For those who are curious about this kind of homemade product, I am posting this article on the site.
Actually, the production process and use of our samopal is very primitive. But I will tell you about safety precautions first, and about manufacturing second. The point is that we are talking about a demonstration electrolyzer, and not about an industrial installation. Thanks to this, for safety, it would be good to power it not from the mains, but from AA batteries or from a battery. Naturally, the higher the voltage, the faster the electrolysis process itself will go. However, for visual observation of gas bubbles, 6 V is quite enough , but 220 is already excessive. with such voltage, water, for example, will boil faster, and this is not very safe... Well, I think we’ve sorted out the voltage?
Now let’s talk about where and under what conditions we will experiment. First of all, it should be either free space or a well-ventilated room. Although I did everything in the apartment with the windows closed and nothing seemed to happen?? Second, it is better to conduct the experiment on a good table. The word “good” means that the table must be stable, or better yet, heavy, rigid and attached to the floor surface. In this case, the table covering must be resistant to aggressive substances. By the way, tiles are perfect for this (although not every one, unfortunately). A table like this will come in handy for more than just this experience. However, I did everything on a regular stool?? Third, during the experiment you will not need to move the power source (in my case, batteries). Therefore, for reliability, it is best to immediately place them on the table and fix them so that they do not move from their place. Believe me, this is more convenient than holding them regularly with your hands. I simply tied my own batteries with insulating tape to the first hard object I came across. Fourthly, the dishes in which we will experiment should be small. A simple glass or shot glass is suitable. By the way, this is the most optimal way to use glasses at home, as opposed to pouring alcohol into them and then consuming them...
Well, now let’s move on specifically to the device. It is shown in the figure, but for now I will briefly explain what and with what.
We need to take a simple pencil and remove the wood from it using an ordinary knife and remove the entire lead from the pencil. You can, however, take the lead from a mechanical pencil. But there are two difficulties here. The first one is ordinary. The lead of a mechanical pencil is too thin; it’s simply not suitable for a visual experiment. The second difficulty is some incomprehensible composition of the current leads. It feels like they are made not from graphite, but from something else. In general, my experience with such a “lead” was not successful at all, even at a voltage of 24 V. Because of this, I needed to pick out a good wooden pencil. The resulting graphite rod will serve as an electrode. As you understand, we need two electrodes. Thanks to this, we go pick a second pencil, or simply break the existing rod in two. That's exactly what I did.
We wrap the first lead electrode (with one end of the wire) with any wire that comes to hand, and connect this same wire to the minus of the power source (with the other end). After which we take the second stylus and do the same thing with it. For this, based on this, we need a second wire. But in this case, we connect this wire to the plus of the power source. If you have problems attaching the fragile graphite rod to the wire, you can use the tools you have on hand: insulating tape or tape. If it was not possible to wrap the tip of the graphite with the wire itself, and the adhesive tape or insulating tape did not provide a tight contact, then try gluing the lead with conductive glue. If you don’t have something like this, then at least tie the stylus to the wire with a thread. There is no need to be afraid, the thread will not burn from such tension??
For those who know nothing about batteries and the simple rules for connecting them, I will explain a little. A AA battery produces a voltage of 1.5 V. In the picture I have two similar batteries. Moreover, they are connected gradually - one after another, and not in parallel. With such a (serial) connection, the final voltage will be summed from the voltage of each battery, i.e. for me it is 1.5 + 1.5 = 3.0 V. This is less than the previously stated 6 volts. But I was too lazy to go buy a few more batteries. The principle should already be clear to you??
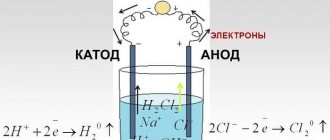
Let's start the experiment. For example, let's limit ourselves to the electrolysis of water. First of all, it is very accessible (I hope that the person reading this article does not live in the Sahara), and secondly, it is harmless. different with the same device (electrolyzer) with the same substance (water) . I think that you have enough imagination to come up with a bunch of similar experiments with other substances?? In general, tap water is fine for us. But I recommend that you add a little more salt to it. A little means a small pinch, not a whole dessert spoon. This is no small matter! Stir the salt well until it dissolves. So water, being a dielectric in its pure state, will conduct electricity perfectly. At the beginning of the experiment, wipe the table from potential moisture, and then place a power source and a glass of water on it.
We lower both electrodes, present under voltage, into water. At the same time, make sure that only graphite is lowered into the water, and the wire itself should not touch the water. The start of the experiment may be delayed. The time depends on many indicators: the composition of the water, the quality of the wires, the quality of the graphite and, of course, the voltage of the power source. The onset of my reaction took a couple of seconds. Oxygen begins to be released at the electrode that was connected to the battery positive. Hydrogen will be released at the electrode connected to the minus. It should be noted that there are more hydrogen bubbles. Very small bubbles adhere to the part of the graphite that is immersed in water. Afterwards, some of the bubbles begin to float.
Electrode at the beginning of the experiment. There are no gas bubbles yet. Hydrogen bubbles formed on the electrode connected to the negative terminal of the batteries
What other experiments can there be? If you’ve already played enough with hydrogen and oxygen, let’s move on to another experiment. It is more interesting, especially for home researchers. It is interesting because it can not only be seen, but also smelled. In the last experiment we received oxygen and hydrogen, which, in my opinion, are not very spectacular. And in another experiment we get two substances (useful in everyday life, by the way). At the beginning of the experiment, you should stop the previous experiment and dry the electrodes. Now take table salt (which you usually use in the kitchen) and dissolve it in the water mass. In this case, not in small quantities. Actually, a decent amount of salt is the only way the second experience differs from the first. After dissolving the salt, you can immediately repeat the experiment. Now there is a different reaction. A good electrode now releases not oxygen, but chlorine. And on the negative side, hydrogen is also released. As for the glass in which the salt solution is located, sodium hydroxide remains in it after prolonged electrolysis. This is the familiar caustic soda, alkali.
You can smell chlorine by its aroma. But for the best effect, I recommend using a voltage of at least 12 V. Otherwise, the aroma may not be felt. The presence of alkali (after a very long electrolysis) in the glass can be checked in several ways. The simplest and most brutal one is to put your hand in the glass. An ethnic sign says that if a burning sensation begins, there is alkali in the glass. A smarter and clearer way is a litmus test. If your school is so poor that it is not even able to purchase litmus, the indicators at hand will help you out. One of these, as they say, can be a drop of beet juice?? But it’s quite possible to just drop a little fat into the solution. As far as I know, saponification must happen.
For those who are very curious, I will describe what actually happened during the experiments. In the first experiment, under the influence of electric current, a similar reaction occurred: 2 H2O >>> 2 H2 + O2 Both gases naturally float from the water to the surface. By the way, floating gases can be caught by traps. Can you do it yourself?
In another experiment the reaction was completely different. It was also initiated by electric current, but now not only water, but also salt acted as reagents: 4H2O + 4NaCl >>> 4NaOH + 2H2 + 2Cl2 Keep in mind that the reaction must occur in excess water. To find out what amount of salt is considered the largest, you can count it from the above reaction. You can also think about how to improve the device or what other experiments can be carried out. It is indeed possible that sodium hypochlorite can be produced by electrolysis. In laboratory conditions, it is most often prepared by passing chlorine gas through a solution of sodium hydroxide.
Brown's Gas
Today, hydrogen generators are gaining popularity among car enthusiasts. However, this is not exactly what was discussed above. By electrolysis, water is converted into the so-called Brown's gas, which is added to the fuel mixture. The main task that this gas solves is complete combustion of the fuel. This serves to increase power and reduce fuel consumption by a decent percentage. Some mechanics have achieved savings of 40%.
The surface area of the electrodes is of decisive importance in the quantitative gas yield. Under the influence of an electric current, a water molecule begins to decompose into two hydrogen atoms and one oxygen. When burned, such a gas mixture releases almost 4 times more energy than the combustion of molecular hydrogen. Therefore, the use of this gas in internal combustion engines leads to more efficient combustion of the fuel mixture, reduces the amount of harmful emissions into the atmosphere, increases power and reduces the amount of fuel consumed.