Termex electric water heaters are manufactured using high technology and quality materials. Such water heaters are equipped from the factory with a safe shutdown function (RCD), which increases the level of safety of the device.
Such devices are manufactured according to international standards and meet all safety and environmental requirements. These devices must undergo state certification and meet GOST standards.
Electric water heaters of the Termex model range differ in their characteristics and the volume of internal space, which can be 15, 30, 50, 80 or more liters, and in this article we will talk about a Termex water heater with a volume of 30 liters, and we will also consider detailed instructions for using this models.
In fact, the Italian electric water heater is a design with a tank, in the inner part of which there are heating elements, in other words, heating elements. The larger the volume of such a tank, the greater the amount of water it will be able to heat to the required temperature. 30-liter water heaters are perfect for a small apartment, small house or construction trailer. This volume will be quite sufficient for domestic use. This model is very economical and practical to use, and its cost is not at all high compared to similar versions of other models. Such devices do not require special installation, as they operate from a regular outlet.
The Italian company Termex produces water heating devices of excellent quality and various internal tank volumes: 15, 30, 50 and 80 liters, respectively. According to customer reviews, 30-liter water heaters can last more than ten years without problems, of course, if you follow certain rules for servicing the device.
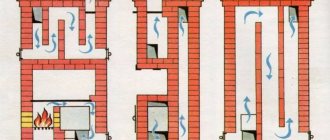
You can learn about the pros and cons of a homemade long-burning wood-burning stove here. In this article you can learn how to build a wood-burning stove with your own hands. What advantages, thanks to the design features, do brick stoves with a water circuit have:
Instructions for starting a Thermex boiler
If installation of equipment is usually carried out by specialists, then the owners themselves have to deal with its startup at least once a year. Let's take a closer look at how to turn on a Termex water heater so as not to negatively affect its performance properties. After all, the duration of operation and frequency of maintenance largely depend on the correct execution of the process.
Work order
Turning on the boiler: The steps for starting the water heater and the settings may vary slightly. It all depends on whether a flow or storage device is used. However, despite the design differences, the order of their inclusion has the same principle. The universal instructions for starting a Termex boiler are as follows:
- Before turning on the water heater, the shut-off valve for supplying hot liquid from the common riser is closed. This occurs even if a check valve is installed on the pipe. After all, if there is a slight malfunction, the device will heat the central water supply without blocking the channel.
- Before connecting the Termex storage water heater to the network, it is filled with water. The outlet of the hot liquid device and the mixer open in turn, and after them the inlet of the cold flow. These manipulations are necessary to displace air from the system.
- After the water has flowed in an even stream, you can turn it off, turn on the unit to the power grid and, after setting the settings and waiting an hour or two, start using it.
The connection diagram for a Thermex water heater when using flow-type devices will be similar, except that the result will be felt immediately.
The next stage after switching on is checking the functionality. Before using the Thermex water heater you need to:
- Make sure that the power indicators light up when plugged in.
- Measure the temperature of the liquid supplied to the mixer.
- After 20 minutes, look at the equipment sensors; if the connection of the boiler with the touch panel is done correctly, the temperature indicator on the device should already increase. If there is no electronic panel, you must once again measure the degree of heating of the water at the outlet of the mixer.
What to do if Thermex does not turn on
The installation process of a Thermex instantaneous water heater or any other model requires the presence of serviceable network elements: sockets, circuit breakers, cables of sufficient thickness. The devices have very high power, so if they do not work, first of all, armed with a tester, you need to check the presence of electricity in the outlet, then the power terminals. Video instructions for installing a Termex water heater will help you find their location, and the tester will help you take readings. If the voltage is zero, then the cable of the electrical appliance is broken.
What to do if the Thermex water heater does not turn on, or rather, power is supplied, but it gives an error - the most popular question. In this case, you need to open the device instructions and look at the explanation corresponding to the code indicated on the display. If this option is not available, the causes of the problem may be the following:
- The heating element has a damaged or burnt-out coil. A sign is often a breakdown of electricity on the housing, then the RCD automatically trips and cuts off the power supply. The only way to combat this is by replacing the heating element.
- The protection is triggered if the heating of the coolant rises above the set limit (usually more than 90 degrees), which occurs both when the control thermostat breaks down and when scale accumulates on the heating element, after which it overheats.
- The tank is not filled with water. How to turn on a Thermex ID 50V boiler or another model for the first time was discussed above, and if the requirements for removing air from the pipes are not met, a protective mechanism is triggered. Please note that this must be done even if the system is full but has not been used for a long time.
Source
How to choose?
Any electrical appliance is selected according to certain criteria, and the boiler is no exception in this matter.
When choosing a water heater from the well-known manufacturer Thermex, you should pay attention to some factors.
- A heating element. It is preferable to choose models with built-in heating elements rather than coils, since the latter quickly burn out.
- The material used to make the tank and body, since the service life of the device depends on this. It is also desirable to have an antibacterial coating and protection against corrosion and mechanical stress.
- The presence of a safety valve, which is necessary to drain water in the event of a long break in the operation of the device.
- Anti-corrosion anode that performs a cleaning and protective function.
- Protection class. The high quality of the device is ensured by protection levels IP 24 and IP 25.
- The power of the water heating device and the presence of different modes, with the help of which you can significantly save electricity, and therefore money.
- Installation method: vertical or horizontal. When the device is positioned horizontally, water of the same temperature is evenly distributed.
- Type of device - storage, instantaneous or combined boiler.
After purchasing a water heating device, you must carefully study the instructions for use and only then use it.
Instructions for use contain the following information:
- purpose of the device;
- main technical characteristics;
- equipment;
- detailed description and principle of operation of the water heater.
The last point is a paragraph that includes precautionary measures, which spells out everything that should not be done:
- turn on the boiler when there is no water in the tank;
- remove the cover while the device is operating;
- use a boiler without a filter, etc.
How to properly turn on a Termex water heater after installation?
After you have purchased a water heating tank, as a rule, its installation is carried out by specialists, but the owners themselves have to deal with the startup regularly throughout its entire service life.
Today there is a huge selection of boilers. They differ in their characteristics: volume, power, energy consumption, etc. They produce water heaters with a touch screen, so adjusting the temperature and turning the device on or off is quite simple. However, the price of such devices will be significantly higher than conventional ones, which must be started up a little differently. In this article, we will try to find out how to properly turn on the Termex tank so as not to disrupt the functions of the water heating device. After all, it is precisely because of proper operation that the duration of operation and the frequency of repair and maintenance work depend.
Features of gas connections
When connecting gas stoves, water heaters and other types of equipment, flexible hoses are also used. Unlike water models, they are yellow and are not tested for environmental safety. For fixation, end steel or aluminum reinforcement is used. There are the following types of devices for connecting gas appliances:
- PVC hoses reinforced with polyester thread;
- made of synthetic rubber with stainless steel braid;
- bellows, made in the form of a corrugated stainless steel tube.
The Santekhkomplekt holding offers engineering equipment, fittings, plumbing fixtures and devices for connecting them to communications. The assortment is represented by products and materials from well-known foreign and domestic manufacturers. Discounts apply for bulk purchases, and product quality is confirmed by standard certificates. For information support and assistance, each client is assigned a personal manager. The ability to arrange delivery within Moscow and to other regions of the Russian Federation allows you to quickly receive the purchased goods without unnecessary hassle.
Turning on the tank
First of all, it is worth understanding that turning on the device can mean both the initial startup and its configuration. Also, a lot depends on the type of device, because it can be:
Despite slight differences in the design of the equipment, the launch is almost identical. The instructions for the Termex tank provide the following steps to start:
- Before turning on the device, you must turn off the hot water supply. This must be done even if there is a check valve on the riser.
- Before plugging in the tank, it must be filled with water. To do this, you need to open the hot water outlet from the tank, the mixer, and then the cold water inlet in turn. This is necessary to ensure that all existing air escapes.
- After this, the water should flow out in a uniform stream - now you can plug it into the outlet. After a couple of hours, when the water warms up, you can start using the equipment.
The procedure for connecting an instantaneous water heater will be similar to the previous one, but you will not have to wait until the water warms up.
After the tank is turned on, it must be checked for correct operation. To do this you will need to do the following:
- check whether the indicator lights up after turning on the device;
- check whether the water leaving the device is hot;
- If the tank has a touch panel, the temperature readings on it will increase after 20-30 minutes.
If the tank does not turn on, what to do?
To successfully install a water heating tank, not only the equipment itself must be in order, but also various elements: sockets, cable, plug, machine. Due to the fact that this equipment has high power consumption, first of all you need to check the terminals, as well as the voltage in the network. Accordingly, the larger the volume of the tank, the greater the power it will have (Termex has tanks of various sizes - 50 liters, 30 liters, 80 liters). A device such as a tester will help measure the voltage in the network; if the indicator is “zero,” it will mean that the electrical cable is damaged somewhere.
Adviсe
After installing the water heater, proceed to its startup. To carry out this process correctly, it is recommended to follow the instructions for use of the heating apparatus. Proper start-up determines the lifespan of the boiler and the frequency of maintenance. Starting and setting boiler modes will differ depending on the type of water heater. However, in general, the order of inclusion is based on the same principles. It looks like this:
- Before turning on the device, it is necessary to close the shut-off valve for hot water supply from the common riser. This must be done even if there is a check valve;
- then they proceed to filling the reservoir with liquid and displacing the air;
- after which you should plug the plug into the socket and adjust the settings. You can start using the equipment in a few hours.
To check the functionality of the Thermex water heater, you need to perform the following steps:
- notice the power indicators turn on (they start to light);
- determine the temperature of the liquid leaving the mixer;
- After 20–25 minutes, you can see increased temperature readings on the touch panel.
In most cases, all consumers are satisfied with the Thermex 50-liter water heater. When choosing the optimal heating equipment option, reviews from real customers will help solve this problem and answer the most pressing questions. Many consumers unanimously concluded that a heater with a capacity of 50 liters is much more economical than larger units. The manufacturer offers a fairly wide selection of models - from the cheapest to designer boilers with electronics and a touch screen.
Sources
- https://kvanta.ru/vodonagrevateli/kak-pravilno-vklyuchit-bojler-thermex
- https://stroy-podskazka.ru/vodosnabzhenie/vodonagrevatel/thermex-obyomom-80-litrov/
- https://remont-system.ru/vodonagrevateli/remont-vodonagrevateley-termeks-samostoyatelno
- https://boilervdom.ru/boileri/proizvoditel/termeks/kak-pravilno-polzovatsya-bojlerom-termes-instrukciya-po-ekspluatacii-vodonagrevatelej-thermex.html
- https://kvanta.ru/vodonagrevateli/tehnicheskie-harakteristiki-vodonagrevatelya-termeks-na-50-litrov
- https://mtop.info/elektronika/tekhnika/vodonagrevatel-termeks-80-litrov/
- https://stroy-podskazka.ru/vodosnabzhenie/vodonagrevatel/thermex-50-litrov/
[collapse]
To carry out repair work, the water from the tank will need to be drained.
In order to drain all the water from the container, you must perform the following steps:
- the equipment should be disconnected from electricity;
- The cold water supply tap must be turned off;
- flush hot water or let it cool directly in the boiler;
- the valve located on the hot water supply pipe must be opened, this will ensure the flow of oxygen into the container;
- a special hose through which water will be drained is connected to the pipe, through which cold water is supplied to the device;
- direct it into the sink or toilet and secure it so that it does not jump out from the pressure;
- then open the drain valve and drain the water.
Source
Situations that require draining water
Long-term and trouble-free operation of the device greatly depends on its correct operation. Note that the boiler must be filled with water at any time, since the material from which the tank is made is metal. It rusts when exposed to air. Water interferes with this process. But there are situations when you simply need to drain the water. In accordance with the instructions for use, in order to operate the device, it is necessary to periodically perform a medical examination and clean it from accumulated dirt. Water heaters are often installed at the dacha or in other rooms that can freeze. In these circumstances, the owner has to drain the water from the device. Due to savings, more and more people prefer to perform this procedure themselves.
How to turn on a Thermex boiler correctly
Installation and connection of water heating devices to the network is most often performed by specially trained workers, since this process is difficult and requires the proper skills. But during operation of the unit, owners often need to restart the boiler themselves or change its settings. The period of use of the device depends on the accuracy of these procedures, so its owners are advised to read the instructions and find out how to turn on the Thermex water heater, check its correct operation, select the temperature mode, etc.
The installation of a water heater is most often performed by specially trained workers.
The boiler does not heat the water well. Causes and methods of eliminating them.
Have you started to notice that you are getting less hot water? Do you feel like your boiler is not heating the water well? Let's figure out what could be the matter:
1 The valve on the common riser is not completely closed.
The valve is either not closed or is not in working condition, thereby hot water goes to the neighbors below, and you get noticeably less water from the water heater. To reliably determine whether hot water is flowing to your neighbors, you need to check that the pipe below the valve is hot/warm. If the pipe is warm, then it is necessary to replace/close the valve.
2 The temperature setting on the thermostat was changed.
It often happens that children/wife/mother-in-law changed the temperature setting of the boiler without your consent. Thus, you begin to receive significantly less hot water. Check whether the temperature has remained at the same level or has changed downward?
3 The first heating element is switched off.
In boilers where two heating elements are installed, someone may have turned off one heating element without your consent. Check this, because one heating element heats the water twice as slowly.
Main characteristics of Thermex
Devices of the Thermex line have the following characteristics:
- Tank volume - 15, 30, 80 or 50 liters. As it increases, the water heating time will increase.
- The required voltage is 220 V (permissible error is 10%), frequency is 50 Hz.
- Maximum operating temperature is +95 °C. When it is reached, the emergency shutdown system is activated.
- The internal part of the body is made of stainless steel and titanium, due to which the boiler has good thermal insulation and protection against rust.
- The space between the body and the tank is filled with high-quality modern sealant - polyurethane foam. It provides additional thermal insulation and protects the device from leaks.
- The liquid is heated by tubular electric heaters (TEHs) located inside the tank. The temperature is regulated using a thermostat.
The service life of the device is 10 years or more, subject to compliance with all safety regulations, regular maintenance and elimination of minor breakdowns.
Rating of the best models of Termex boilers for 80 liters
We bring to your attention the TOP of the best water heaters from the Thermex brand for 80 liters. This rating is based on the technical characteristics of electrical equipment, reviews of people who bought and tested the operation of the device from this company.
Thermex Praktik 80 V Slim
- Price – from 9600 rubles;
- Dimensions – 44.5x75.1x45.9 cm;
- Power – 2.5 kW;
- Country of origin : Russia.
Thermex Praktik 80 V Slim water heater
| pros | Minuses |
| Two heating elements | Thermal sensor is not working well |
| Compactness | Poor pressure relief valve |
| The tank is made of stainless steel |
Thermex RZB 80 L
- Price – from 15930 rubles;
- Dimensions – 49.5x100.5x27 cm;
- Power – 2 kW;
- Country of origin : Russia.
Thermex RZB 80 L water heater
| pros | Minuses |
| Design | The case gets very hot |
| Compactness | The tank begins to leak quickly |
| Flat shape |
Termex rzb 80 f
- Price – from 14282 rubles;
- Dimensions – 49.3x102.5x28.5 centimeters;
- Power – 2 kW;
- Country of origin : Russia.
Termex rzb 80 f water heater
| pros | Minuses |
| The bank is made of stainless steel | Poor quality assembly |
| Maintains the set temperature for a long time | There is a possibility of damage to the housing |
| Heats water quickly |
Thermex IR 80-V
- Price – from 8390 rub.;
- Dimensions – 44.7x82.3x46 cm;
- Power – 2 kW;
- Country of origin : Russia.
Thermex IR 80-V water heater
| pros | Minuses |
| Comfortable operation | Maximum temperature 65 degrees |
| Beautiful design | Thermal sensor is not working correctly |
| The tank is made of stainless metal |
Termex ER 80 S
- Price – from 7818 rubles;
- Dimensions – 72.5x45x44 centimeters;
- Power – 1.2 kW;
- Country of origin : Russia.
Termex ER 80 S water heater
| pros | Minuses |
| Classic design | Mechanical control |
| Heats water quickly | |
| Consumes little electricity |
FSD 80 V (Diamond)
- Price – from 15947 rubles;
- Dimensions – 55.5x103.5x33.5 centimeters;
- Power – 2 kW;
- Country of origin : Russia.
FSD 80 V (Diamond) water heater
| pros | Minuses |
| Beautiful design | Oversized |
| Flat | |
| Several mounting methods |
Thermex ERD 80 V
- Price – from 9000 rubles;
- Dimensions – 43.8x81x46 cm;
- Power – 1.5 kW;
- Country of origin : Russia.
Thermex ERD 80 V water heater
| pros | Minuses |
| "Dry" heating element | Heavy |
| Classic design | Mechanical control |
| Small sizes |
Thermex Bravo 80
- Price – from 13965 rubles;
- Dimensions – 57x90x30 cm;
- Power – 2 kW;
- Country of origin : Russia.
Thermex Bravo 80 water heater
| pros | Minuses |
| Two installation methods | No hose included for draining water |
| Trendy design | |
| Electronic control |
Instructions for installing and connecting the water heater
Boiler installation consists of 3 main stages:
- Installing the unit on the wall.
- Connecting the device to the water supply system.
- Wiring assemblies and connections of the water heater to the network.
The installation of the boiler must be carried out by qualified personnel with appropriate skills. Improper installation of the device can lead not only to improper operation of the unit, but also to damage to property or human health. You can buy a Thermex water heater and order an installation service in Tyumen.
Water heater connection diagram.
Placement and installation of the device
The installation location of the water heater must comply with safety standards. You need access to sewerage, distance from electrical appliances (and other equipment for which contact with water is undesirable), the possibility of emergency drainage and autonomous connection to the switchboard. The installation process takes place in several stages:
- Taking measurements, marking anchor attachment points.
- Drilling holes, screwing in anchors.
- Mounting the boiler to the wall.
- Connecting taps to water supply circuits.
- Installation of filters and pressure reducer on the cold circuit.
- Installation of a safety valve, tee, drain hose and other auxiliary and protective elements.
To seal the seams between elements when installing a water heater, flax is used. It protects against the effects of hot water.
Electrical connection
The last stage of installing the boiler is connecting it to the electrical network. The procedure consists of the following steps:
- Laying wires in grooves or in an overhead box.
- Connecting the RCD to the panel board.
- Route the cable from the electrical panel to the fuse.
- Connecting the boiler to the machine with a separate cable.
- Connecting the “phase”, “zero” and “ground” wires to the bottom of the water heater.
The wiring connection to the boiler is carried out exclusively by professionals.
The devices are not equipped with cords and a standard plug-socket system. Instead, they are connected to the network using a 3-core cable d 2.5-3 mm with the mandatory installation of a 16-amp fuse.
Advantages and disadvantages
Having decided on the brand and model of the water heater, you should study in detail all the advantages and disadvantages of the product, and only then purchase it.
Thermex electric boilers are produced using the latest technologies and developments, so they are endowed with many advantages.
- Economical energy consumption. Regardless of the volume, the device consumes 1.5-2 kW. Thanks to additional thermal insulation, the desired water temperature is maintained for up to nine hours.
- The ability to properly distribute energy. Regardless of how far the boiler is from the point of water consumption, the temperature remains unchanged; both pipes and walls do not heat up.
- Availability of an automatic shutdown system in emergency situations.
- High degree of strength and reliability of structures. It is due to the use of high-quality materials in production - plastic and stainless steel.
- Easy to install and connect to the electrical network. To connect the device, a three-phase power supply is not required.
- Environmental friendliness. Each device has an antibacterial system that prevents the development of microbes.
- A variety of shapes (flat, cylindrical) and sizes, thanks to which the model can be installed in a small room or in a closet.
- Long operational period. Reviews from boiler owners indicate that the devices can operate without breakdowns or failures for 7-8 years.
- High performance: 80 liters of water can be heated in 1.5-3 hours.
- Water supply to several points.
- High safety indicators.
- Some models have a silver heating element.
- Resistance to corrosion processes and deformation.
- High class of housing protection against moisture.
- Most models have a self-diagnosis system.
Despite the huge number of advantages, Thermex water heaters have disadvantages:
- high price segment;
- the need for an additional filtration system that protects against water with increased hardness.
In addition, boilers from this manufacturer require special maintenance: regular cleaning of the tank, heating element and replacement of the magnesium anode.
First start-up and checking the correct operation of the boiler
After connecting the unit, you need to prepare it for connection and check its functionality. Algorithm of actions:
- Shutting off the supply of hot water from the common riser. This is done so that the broiler does not heat the central water supply of the house.
- Filling the tank. First, water is poured into the boiler, then the mixer and outlet for hot liquid are opened, then the inlet for cold liquid is opened. These manipulations are necessary to release air from the tank.
- Opening the supply valves located on the boiler inlet.
- Opening the hot water tap. After a while, when a stable and even stream comes out of it, it is closed.
- Connecting the water heater to the electrical network.
From connection to the first start of the unit, you must wait 1-2 hours.
With mechanical control
The first start-up of a mechanically controlled boiler is carried out according to the standard scheme. Step-by-step instruction:
- Indicate the power using the buttons on the control panel. There are 2 modes in total: 1.3 kW and 2 kW. The selected value is displayed on the indicator lamps: if 1 of them is on, power is selected, when 2 - Double power.
- Adjust temperature. This is done using the regulator knob. When turned clockwise, the value increases, and when turned counterclockwise, it decreases. The step is 1°C.
- Measure the temperature of the water in the mixer using a thermometer. Turn on the boiler, wait about 30 minutes and take another measurement to make sure that heating has started.
You can turn off a mechanically controlled device by turning the temperature regulator all the way.
On touch screen
The first start of a unit with a touch control panel is easier. Step-by-step instruction:
- Exit the DEMO mode in which the device is initially located. To do this, you need to simultaneously hold the upper and lower brackets for 5 minutes.
- Select power. This is done using the upper and lower selection keys. The display will show the selected indicator: power (1.3 kW) or Double power (2 kW).
- Set the temperature. Switching to the selection mode is carried out by 2 clicks of the upper bracket. The value is displayed on the screen.
- Set a timer. This is done by clicking the left selection bracket.
- Turn on the unit using the round key in the center of the screen. Note the water temperature (it is displayed on the panel) and recheck it after 20-30 minutes to make sure it is rising.
You can stop the operation of the device by pressing the key in the center of the display again. A boiler with a diagnostic system will switch itself off if operating conditions are violated and display an error message on the touch screen.
Do-it-yourself Termex boiler repair
Before you begin the repair, first gather the necessary tools: a set of wrenches, an adjustable wrench, electrical tape, various screwdrivers, pliers. After this, turn off the water by closing the inlet and outlet valves to the water heater. Then drain the water from the boiler tank and disconnect it from the power supply .
The next step is to remove the protective cover. If you have a vertically located boiler, then the lid is located at the bottom, and in the case of a horizontally located one, it is on the left or in front.
When removing the cover, pay attention to the stickers. Often the screws for securing it are located under these stickers. If you have unscrewed all the screws and the cover still does not come off easily, check the stickers again.
Replacing the heating element
First, perform all of the above steps and remove the tank cap.
To make it more convenient to work, you can even remove the tank from the wall.
It is worth noting that most Thermex models have not one, but two heating elements. Therefore, it is imperative to remember how and in what sequence the parts need to be connected . It’s better to photograph the whole process.
To remove the heating elements from the Thermex water heater, remove the top cover by unscrewing the bolt; disconnect all plugs and unscrew the bolts securing the heating elements.
The heating element itself is turned off as follows:
- After removing the cover, find the protective thermostat, remove the tips from it;
- also remove the tips (3 pieces) from the heating element;
- cut the plastic clamp;
- Unscrew the screws, removing the sensor;
- now disconnect the cable and unscrew the four screws;
- then you need to dismantle the nut on the clamping bar and pull out the heating element.
After dismantling the heating element, it is necessary to clean the surface of the tank from dirt and scale. Only after this can you install a new heating element and put everything back together.
Do not forget that the heating element does not always need to be changed. If the water in the tank still heats up, but it happens slowly, then, most likely, scale has formed on the heating element. Then dismantle it and descale it. Then install. The problem should go away. Also, do not forget that it is advisable to clean the heating element with chemicals rather than scrape off the dirt. In the latter case, there is a possibility of damage to the part.
To clean the heating element, you can use a solution of citric acid or vinegar (its percentage in the solution should be about 5%). The part must be immersed in liquid and wait until the scale falls off. Then you need to wash the heating element.
Faulty thermostat
The thermostat in Termex water heaters is located under the cover, next to one of the heating elements, and its sensor is located inside the tank.
Sometimes the thermostat fails. This element cannot be repaired; it must be replaced . To perform the replacement, you need to do all the preparatory steps, remove the cover, then remove the thermostat. But before dismantling, we recommend checking this part. To do this, use a lighter to heat the tip of the sensor (copper). If the thermostat is working properly, you will hear a characteristic click, which means that the protection mechanism has activated and the circuit has opened. Otherwise, you will have to replace the part.
Tank leak
No matter how trivial it may sound, but first you need to find where the water is coming from. A lot depends on this, since if the tank is rotten, you will have to buy a new water heater. So:
- if water oozes from the side seam, then the container is rusty and repairs will not be possible;
- If water comes out from under the lid at the bottom, then you need to disassemble the tank.
If traces of leakage are found in the places where the heating elements are attached, then your water heater is not hopeless and can be saved by replacing the gasket.
In the case of the second option, complete all preparatory steps, then remove the plastic cover. Next, take a close look at where the water is leaking. If it comes out near the flange, then the rubber gasket has deteriorated (less often this is a problem with the heating element). Otherwise, the tank is rusty and the boiler can be thrown away. To replace the gaskets, you need to remove the heating element. But it is necessary to carefully examine the heating element itself. If it is cracked, it is also better to replace it.
Other faults
If you have checked and replaced all the parts, but the boiler still does not work, then it is quite possible that the electronics have failed. The control board cannot be repaired, and it will be extremely difficult to find a similar one in a store. Therefore, in this case, we recommend contacting specialists.
Recommendations for choosing the Thermex water heater mode
The temperature regime is selected individually, depending on the needs of the owners of the device and its operational characteristics. General recommendations for selection:
- At the beginning of operation, it is best to keep the boiler at the minimum temperature until the water warms up. After 4-6 hours, the indicator is gradually adjusted to the desired value.
- If the broiler operates irregularly, the energy consumption is much higher, since the unit requires more energy to heat the water than to maintain its temperature. Therefore, during short breaks in use (1-3 days), it is better to leave the device turned on at a low temperature.
- The most economical energy consumption is observed at an average water temperature of +45...+55 °C.
Purpose of the heater
The Thermex heater is made using modern assembly technology using high-quality materials. It has a residual current device (RCD), which ensures safety during operation. Termex complies with international standards and the requirements of GOST R IEC 60335-2-21-99. Some heater models have a silver anode. This is indicated in the instructions for the water heater.
The device is used to heat running water in domestic and industrial premises. It is very reliable and economical.
Otherwise, the water will not have time to heat up to the desired temperature. In winter, Thermex should be used in well-heated rooms. All models of household appliances are connected to a 220 V power source. The Termex heater is supplied with:
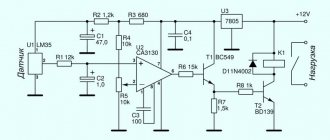
Figure 1. Schematic diagram of a water heater.
- Automatic RCD.
- Safety valve.
- User manual.
- Anchors for fastening.
- Package.
The schematic diagram of the water heater is shown in Fig. 1. It shows how the liquid is heated in a technical structure. The Thermex heater body is made of durable plastic. The inner tank is made of low carbon stainless steel. Thanks to this, Thermex has excellent corrosion resistance and a long service life. The space between the plastic body and the steel tank is filled with heat-insulating material.
To repair a malfunction of the heating element, the flange on which it is held is removed. A thermostat sensor with a thermostat is installed on the front panel of the product. With this device, Termex maintains the set temperature. The work occurs automatically. The required value is set by the regulator.
How to use the device is indicated in the instructions. The residual current device is mounted on the power cable. It is triggered by a current leak of 0.2 mA. A simplified electrical circuit of the heater is shown in Fig. 2, where the safety element is thermal protection. The drawing can be used to troubleshoot equipment operation.
How to turn off the device and turn on hot water
Disabling the device is carried out in the same way as turning it on, but in reverse order. Algorithm of actions:
- Disconnect the water heater from the power supply.
- After the water stops heating, wait until it cools to room temperature.
- Turn off the cold and hot water taps.
- Open the hot water supply tap to the apartment or house.
Before restarting a switched off boiler, drain the water (if there was any) and thoroughly wash the inside of the casing.
After this, you need to fill the tank with clean water, pump out the air and start operating the unit again.
Owner reviews
We purchased the Thermex Champion ER 100V model. Its advantages: reasonable price, reliability. We have been using the heater for almost 2 years now. The duration of continuous operation reached 2 months, it heats just as quickly, and there were no incidents with electrical leaks or repairs. The device is easy to use and resembles a regular thermopot in functionality. Disadvantages: short cord (only 1 meter), decent power consumption. With constant use, it generates approximately 180–200 kW of excess per month, which is more expensive than hot water.
Lita88
https://irecommend.ru/content/vodonagrevatel-thermex-osnovnye-kharakteristiki-dostoinstva-i-nedostatki-kakoi-bak-dlya-boil
We have been using the Thermex IF 50 V water heater for 2 years. Advantages: good volume, 50 l, safe, compact and nice design. The apartment has a lot of space, so there were no special problems with accommodation. The parents have a small toilet, placed neatly above the toilet. I like the digital display, it’s convenient to control the temperature level, easy to operate.
zhahanutik
https://irecommend.ru/content/elektricheskii-vodonagrevatel-thermex-if-50v
I bought a Thermex Flat Plus IF 50H heater. I didn’t see a big difference between the consumption of hot water and electricity in the housing and communal services bill, so I boldly used it. The display function is convenient - you know what’s going on. I liked the possibility of accelerated heating.
Prahlada
https://irecommend.ru/content/pochemu-ya-snova-vyberu-ego-etot-thermex-udoben-kompakten-nadezhen-osobenno-v-sravnenii-s-dr
It was no coincidence that we chose Thermex IF 80 V 80 L. The ratio of price, volume of 80 liters and unusual flat shape is the best option for our bathroom. Heats up quickly, there are different heating modes - slow and fast. Convenient backlit menu - always shows the temperature.
Sofi_ya
https://irecommend.ru/content/krasivyi-i-kachestvennyi-4
About a year ago I bought a Thermex IF-30V electric water heater. The control panel is modest but neat. There is an RCD that disconnects the device from electricity in the event of a leak or short circuit. There is also a safety valve. But a significant drawback of this model is that the water takes quite a long time to heat up and runs out quickly. If you don't hurry, you won't really have time to wash yourself.
Papa11
https://irecommend.ru/content/zrya-kupil-0
We bought the Thermex Silverheat ER 80 V tank 3.5 years ago. The device heats up completely (up to 70 degrees) in three to four hours. We used it daily. There is a temperature sensor on top. I was impressed that the tank uses bioglass porcelain, as well as the Silverheat system, which prevents the formation of bacteria and scale inside the tank. But recently the heater began to leak, the technician said that the device was rusted from the inside and these models do not last more than 3-4 years.
anitaBlack
https://irecommend.ru/content/skolko-obychno-sluzhat-termeksy-i-skolko-otsluzhil-nash-mnenie-mastera-vodonagrevatelei-koto
Frequent errors and malfunctions
When you turn on the water heater, various problems and malfunctions periodically occur. List of common problems and their solutions:
- Problems with the electrical network. The broiler has a lot of power, so due to its operation, the socket often burns out or the wiring becomes unusable. To correct the situation, it is worth ringing the electrical network with a special tester, and if faults are detected, replace damaged elements.
- Burnt out or broken heating element coil. With this breakdown, the device not only does not work, but also produces an electric shock when you touch the body. The problem is solved by replacing the faulty part.
- Overheating protection triggered. This happens when the temperature inside the device exceeds the maximum allowable value. The reason for this may be the accumulation of scale on the heating element - then it needs to be cleaned. In addition, such a malfunction occurs due to a broken thermostat - it will have to be replaced with a new one.
- Incomplete water tank. The problem is solved by pumping out and refilling the tank with liquid, as well as removing excess air to the outside.
Water heaters with touch control display an error code on the display. A complete list of them with a description of common breakdowns is contained in the operating instructions that come with the device.
When is a water heater repair required?
- no signal about power supply, no current in the electrical circuit;
- there is power, the indicator lights up, but the water does not heat up - the heating element has failed;
- The thermostat failed;
- leaks or fistulas appeared;
- the anode needs to be replaced.
For self-repair, you will need a minimum set of tools and spare parts for the device - a spare heating element assembled with gaskets, a magnesium electrode and seals. You will need keys to unscrew the fasteners, a brush to remove scale, and a flashlight to examine the internal condition of the enamel coating. A Termex 80 liter or other water heater can be repaired with your own hands in a certain sequence:
- If there is no power, the socket may be faulty, there may be no contact in any of the network wires, or the power supply has simply been cut off in the line. Care and a current indicator will help you find the problem. But power may not be supplied due to interlocks provided in the dry start protection system, low insulation, or tripping of an RCD.
- The heating element does not heat. After removing the cover from the housing, free access to the terminals of the heating element and use a tester to check it for serviceability. If there is voltage at the terminals, but the element does not heat, it requires replacement. In accordance with the instructions, drain the system and save information on the location of the wires on any medium so that they can be connected correctly in the future. Disconnect the wires, remove the temperature sensors and unscrew the flange connection of the platform with the heating element and anode. Replace the faulty heating element, and at the same time clean or replace the magnesium electrode. It is attached to the same flange, but it can be removed separately without disassembling the circuit.
- A leak in the seals that appears during operation indicates wear of the sealing gaskets, which need to be replaced or rewinded at the flange connections. If a leak appeared after replacing the heating element, when they were repairing the Termex water heater with their own hands, the flange was skewed due to uneven tightening. You need to re-install and replace the gasket.
- If the heating element is working properly, power is supplied, but there is no heating, you need to check the serviceability of the thermostat. To do this, the unit is dismantled and tested for its reaction under operating conditions, that is, in an environment of 60 0 and at room temperature. Deviations in the response to power supply are considered a malfunction.
Lack of grounding accelerates corrosion of all elements under water. To prevent the tank from rusting and the flanges from wearing out, a grounding circuit is necessary.
It should be noted that a leak in the storage tank cannot be eliminated for many reasons. The inner tank is covered with enamel; welding will destroy it. But another insurmountable difficulty is the three-layer structure, when it is impossible to dismantle the internal tank without damaging the thermal insulation and the upper casing. Therefore, you need to treat the tank with care, knowing that it cannot be repaired.
Rules for using a water heater
Compliance with the operating instructions for the water heater is necessary not only to extend its service life, but also to ensure the safety of the owners. Basic rules and recommendations:
- Maintenance is required once every 1 year. The device is disassembled, the water is drained into the sewer, and the inner surface of the housing and heating elements are cleaned of scale and deposits. You can carry out the procedure either independently or with the help of professional workers.
- If the device is not used in the warm season, it is better not to drain the water from it: this will increase its resistance to corrosion and damage. The liquid is drained and the tank is refilled with clean water only when the boiler is turned on again.
- When the device is not used in the cold season, it is better to drain the water from it. Freezing may damage the casing and break internal parts.
- If the emergency shutdown system is triggered, the water heater may be restarted only after the time specified in the operating instructions has expired.
- It is forbidden to connect a water heater to the network without first filling the container with water.
- The maximum permissible pressure in the water supply system for operating the device is 0.6 MPa.
- For installation and connection of equipment, it is allowed to use only those parts that are included in the kit. If they are worn out, they must be replaced with similar ones.
- The water heater cannot be used without grounding.
- Under standard conditions, you need to clean the device from scale and replace the anode once a year, and if the water is highly hard - once every 6 months.
- The broiler can only be connected to water pipes using safety elements.
- The water in the water supply system to which the broiler is connected must be clean, free of heavy metals and other harmful substances. Their impact can lead to premature wear of parts and damage to the housing.
- Water heated by the unit must not be drunk or added to food for people or animals.
- Draining water from the water heater is allowed only after it has been disconnected from the network.
If breakdowns or malfunctions in the operation of the device or its complete failure are detected, it is prohibited to disassemble the unit yourself and carry out repairs. This should only be done by workers with appropriate qualifications who know the principles of operation of the device and methods for diagnosing common breakdowns.
Maintenance
Maintenance involves the identification and subsequent removal of scale that forms on heating elements.
Also, sediment may form in the lower part of the internal tank of the device, which must also be removed. Descaling is carried out using special cleaning agents. The intensity of maintenance is determined by special workers after analyzing the accumulated scale. It is recommended to carry out the first maintenance of the device after a year of use. Failure to carry out cleaning work will lead to a decrease in operating efficiency and a decrease in the level of efficiency. In most cases, the cause of failure of water heaters is precisely the scale formed on the heating element. If the heating element or heating device fails and the cause is scale formation, then repairs are not covered under warranty. Periodic maintenance must be carried out by the user himself. To carry out proper maintenance of the device, you must: 1. Turn off the device 2. Wait until the hot water cools down, or drain it through the tap 3. Shut off the cold water supply 4. Unscrew the drain valve 5. You must put a regular hose on the valve and direct it to the sewer 6. It is also necessary to drain the hot water through the mixer 7. Now you can remove the device body, disconnect the wires, unscrew and remove the support flange 8 from the water heater. Check for scale on the heating element and at the bottom of the tank, if any, carry out appropriate cleaning. 9. Reassemble the device in reverse order.
This article discussed the technical characteristics and instructions for using a Termex electric water heater with a capacity of 30 liters. Note that the manufacturer has established a minimum service life of a Termex water heater of seven years. But this is only provided that the water in the system meets the necessary standards and does not contain a large amount of impurities and heavy elements, and that the installation, operation and timely maintenance rules are followed when using the device.
Termex electric heater delivery set
- Electric water heater with RCD - 1 pc.
- Safety valve type RSD - 1 pc.
- Instruction manual - 1 pc.
- Anchor for fastening - 2 pieces for each fastening strip.
- Packaging - 1 pc.
Description and principle of operation of EWH
The external housing of the EWH, depending on the model, is made of various high-quality materials - impact-resistant plastic, low-carbon or special polished stainless steel. The internal tank is made of high-quality stainless steel containing titanium, which ensures high corrosion resistance and, as a result, long service life. The space between the outer casing and the inner tank is filled with polyurethane foam - modern, environmentally friendly thermal insulation with the best heat-saving characteristics. Models RZL-VP, RZL-VS, RSD have two threaded pipes: for cold water inlet (with a blue ring) and hot water outlet (with a red ring), and models RZL-HP, RZL-HS, RZB, RZB-D, RZB-F, RZB-L are equipped with an additional drainage pipe (with a red ring, closed with a metal plug) for draining water and washing the internal tank.
There is a thermometer on the front side of the EWH (model RZL-HS, RZL-VS, 30l -150l). The location of the control panel depends on the model and type of EWH: RZL-VS, RSD - bottom, RZL-HS - right, RZB, RZB-D, RZB-F, RZB-L, RZL-HP, RZL-VP and ROUND PLUS series models - on the front side.
A tubular electric heater (TEH) and thermostat and thermal switch sensors are mounted on a removable flange. The heating element serves to heat water and is controlled by a thermostat, which has smooth temperature control up to +75°C. The thermostat automatically maintains the water temperature at the level set by the user. The temperature control knob is located on the mechanical control panel. Electronically controlled models have a touch control (Fig. 4). The thermal switch serves to protect the EWH from overheating and disconnects the heating element from the network when the water temperature exceeds +95°C (Fig. 2).
The RZB10 model is equipped with an autonomous unregulated thermostat located under the top cover of the device. Models RZB10 and RSD are equipped with a pilot lamp that induces the heating mode of the heater. The thermal switch in models RZB10 and RSD is located under the top cover. The operating mode indicator of the EWH models 30L - 150L is the backlight lamps of the power selection keys: they light up when the water is heated and go out when the water heating temperature set on the thermostat is reached. In models with electronic control, the indication is carried out by the control lamp L1 (Fig. 4) - it lights up when the set temperature is reached.
An RCD is mounted on the electrical cord of the device, which ensures that the EWH is disconnected from the power supply network in the event of a leak or breakdown of the supply voltage to the grounded elements of the device. Silver models in their design contain an electronic device with a silver anode, which ensures disinfection of heated water. This series of water heaters is a “new generation” product that takes care of your health. The safety valve functions as a check valve, preventing water from the water heater from entering the water supply network in cases of pressure drop in the latter and in cases of increasing pressure in the tank when the water is very hot, and also functions as a safety valve, relieving excess pressure in the tank when the water is very hot. When the water heater is operating, water may leak from the safety valve outlet pipe to relieve excess pressure for the safety of the water heater. This outlet pipe must remain open to the atmosphere and be installed permanently downward and in a frost-free environment.
It is necessary to ensure that water is drained from the outlet pipe of the safety valve into the sewer system by providing appropriate drainage when installing the EWH.
It is necessary to regularly (at least once a month) drain a small amount of water through the outlet pipe of the safety valve into the sewer system to remove limescale deposits and to check the functionality of the valve. To open the valve, it is equipped with a handle. It is necessary to ensure that during operation of the water heater this handle is in the position that closes the drain of water from the tank.
Safety instructions for working with the Termex water heater
The electrical safety of the EWH is guaranteed only if there is effective grounding, carried out in accordance with the current rules for installing electrical installations. Plumbing connections and shut-off valves must comply with the parameters of the water supply network and have the necessary quality certificates.
During installation and operation of EWH it is not allowed:
- connect the power supply if the EWH is not filled with water;
- remove the protective cover while the power is on;
- use EWH without grounding;
- include EWH in the water supply network with a pressure greater than 0.6 MPa;
- connect the EWH to the water supply without a safety valve;
- drain water from the EWH when the power supply is on;
- use spare parts not recommended by the Manufacturer;
- use water from the EWH for cooking;
- use water containing mechanical impurities (sand, small stones), which can lead to disruption of the operation of the EWH and the safety valve;
- change the design and installation dimensions of the EWH brackets.
Installation and connection
ATTENTION! All plumbing and electrical installation work must be carried out by qualified personnel with a mandatory entry in the “Connection Mark” section (see the “Manufacturer’s Warranties” section).
Placement and installation of the device
The installation of the EWH is carried out in accordance with the markings indicated on the housing and the following table:
| MARKING | VOLUME | ACCOMMODATION |
| RZL-VS, RZL-VP, RZB-F, RZB-L, RSD | 5 -150 liters | Vertical Pipes down |
| RZL-HS, RZL-HP, RZB, RZB-D | 5 -150 liters | Horizontal Pipes down |
It is recommended to install the EWH as close as possible to the place where hot water is used to reduce heat loss in the pipes. The EWH is suspended from the housing brackets on anchor hooks fixed in the wall. Installation of hooks in the wall must prevent spontaneous movement of the EWH brackets along them.
To service the EWH, the distance from the protective cover to the nearest surface in the direction of the axis of the removable flange must be at least: 30 centimeters - for models 5-80 liters; 50 centimeters - for models 100-150 liters. ATTENTION! In order to avoid causing harm to the property of the consumer and (or) third parties in the event of malfunctions of the hot water supply system, it is necessary to install the EWH in rooms with waterproofing of floors and drainage into the sewer, and in no case place objects exposed to water under the EWH. When placing the EWH in unprotected premises, it is necessary to install a protective tray under the EWH with drainage into the sewer. If the EWH is located in places that are difficult to access for technical and warranty service (mezzanines, niches, ceiling spaces, etc.), the dismantling and installation of the EWH is carried out by the consumer independently or at his expense. Note : the protective tray is not included in the EWH package.
Connecting a Termex electric water heater to the water supply
Install the safety valve at the cold water inlet, marked with a blue ring, tightening it 3.5 - 4 turns, ensuring the tightness of the connection with any waterproofing material (linen, FUM tape, etc.). It is prohibited to operate the EWH without a safety valve or use valves from other manufacturers.
Rice. 1. Connection diagram of the EWH to the water supply system
During operation of the EWH, you can observe the appearance of drops from the drainage beak of the safety valve (relieving excess pressure when heating the water). It is recommended to attach a rubber or silicone tube of the appropriate diameter to the drainage beak to remove moisture. Connection to the water supply system is made in accordance with Fig. 1 only using copper, metal-plastic or plastic pipes, as well as a special flexible plumbing connection. It is recommended to supply water to the EWH through a mud filter installed on the cold water main (not included in the delivery package). After connecting, open the cold water supply valve to the EWH and the hot water tap on the mixer to ensure the outflow of air from the water heater. When the EWH is finally filled, cold water will flow from the mixer tap in a continuous stream.
When connecting the EWH in places not supplied with running water, it is allowed to supply water to the EWH from an auxiliary tank located at a height of at least 5 meters from the top point of the EWH, or using a pumping station.
Note : to facilitate maintenance of the EWH during operation, it is recommended to install a drain valve in accordance with Fig. 1 (for models not equipped with a drain pipe (not included in delivery)). If the pressure in the water supply system exceeds 0.6 MPa, then a reducer (not included in the delivery package) must be installed at the inlet in front of the EWH to reduce the water pressure to normal.
Connecting the device to the mains
ATTENTION! Before turning on the power, make sure that the EWH is filled with water.
The EWH is equipped with a standard power cord with a plug and an RCD. The socket must have a grounding terminal and be located in a place protected from moisture. The socket and the electrical wiring connected to it must be designed for a rated power of at least 2000 W. Insert the plug into the socket and press the button located on the RCD.
Trial run
Boiler installations are often carried out by professionals. They are the ones who should carry out a test run immediately after installation. But if you installed everything yourself, then be sure to do the following.
- Make sure that the water heater is installed efficiently, according to its instructions.
- Inspect it for leaks. Fill with water after disconnecting from the power supply.
- To see when the tank is full, open the hot water valve. If water flows, the tank is already full.
- Close the valve and examine the outside of the device.
Second boiler connection diagram
Only after this can you safely connect the boiler to the power supply and set it to the desired temperature.
Checking the water heating unit
A boiler, like any other device, requires periodic maintenance. So, before turning it on for the first time, it will be necessary to check the serviceability and functionality of all its systems. It is worth doing this even after the water heater has been turned off for a long time, or after severe frosts.
In summer, in most apartments with centralized water supply, hot water is turned off. During this period, utility services carry out repair and maintenance work. As an alternative, the vast majority of people choose to buy tankless or storage water heaters, depending on their needs and budget.
It’s not enough to just buy a device; you need to figure out how to turn on the water heater. Although the process is quite simple, some still have doubts.
The range of equipment includes storage and instantaneous water heaters, and connecting each of them requires a certain sequence of actions, most of them approximately the same.
Possible problems and their solutions
Changes in water temperature may be caused by a broken thermostat
During the operation of boilers, certain problems may arise. Usually this is an unpleasant odor and mold. They may appear when the heating temperature is set to 40°C. Setting such values is beneficial from the point of view of energy savings, but it is precisely in such conditions that bacteria and fungi actively multiply. To eliminate the problem, it is necessary to set the temperature at 50-55°C. Each model has its own meaning called eco mode.
When operating the device, do not connect to a hot water pipeline. The device may malfunction. Average temperature values depend on the type of model.
When warm water stops flowing out of the instantaneous heater, pressure problems can be judged. Some devices have a low pressure mixer installed. If it is selected incorrectly, the water is turned off. To resume fluid supply, the pressure should be normalized. The reason may be that the water supply is cut off. It needs to be renewed.
The water coming from the tap may be too hot. This is due to incorrect temperature control settings. If the device has a manual adjustment mechanism, you need to set the optimal values yourself. To set up electronic models, you need to call a technician.
How to use a water heater without overpaying for electricity?
To save on your boiler you need to do the following:
- Choose the optimal location to install the water heater. After all, a pipeline that is too long “cools” the hot water, forcing you to spend extra kilowatts.
- Optimize the operating mode of the device. By adjusting the periods of operation and inactivity of the heating element, we will receive significant savings in kilowatts.
- Carry out maintenance on the heating element. By cleaning the heating element from scale, we will increase the thermal power of the heating element, optimizing the efficiency of the boiler (the ratio of absorbed electricity and heat released for boiling water).
By doing these manipulations, you will receive a noticeable increase in your budget. Now for the details!
How to choose a place to install a water heater?
You open a “hot” tap, and lukewarm water flows out. After all, the “boiling water” stored in the tank must reach the point of consumption, pushing the cooled water in front of it. And you will have to wait, paying for the loss of 0.2 liters of boiling water for every meter of pipe with a diameter of ½ inch.
After closing the tap, you will lose the same amount of hot liquid. After all, “unused” hot water will remain in the pipe. That is, every time you open and close the tap, your boiler loses at least 0.4 liters of boiling water per linear meter of pipeline.
Typical storage water heater installation diagram
You can reduce these losses by optimizing the length of the pipeline due to a better location of the boiler.
Simply put: your water heater should be located somewhere between the bathroom and the kitchen. Moreover, the second (kitchen) branch should be shorter than the first. After all, in the kitchen we open and close the tap much more often than in the bathroom.
However, very often such an “ideal place” that promises energy savings is not such from the point of view of the designer and common sense. Agree: not every person will agree to tolerate a boiler in the hallway. And not every homeowner will decide to change the position of the water heater for the sake of expected savings.
Therefore, if you don’t want to look for the ideal place for the boiler, insulate both branches of the hot water supply system and calm down.
Types of water heaters
Flow-through
Flow-through boilers are small in size. If you take the smallest storage device of 30 liters, then any flow-through device will still be smaller
This indicator largely determines the consumer’s choice, since the lack of space for installation is important. In addition, installing a flow device is an order of magnitude simpler than a storage device
Instantaneous water heaters cope with heating water much faster, because the entire process takes place immediately as it passes through the device. The undoubted disadvantage of the boiler is the inability to use it at two or more points of water consumption. As a rule, the flow-through type is used when hot water consumption is low, and operation is reduced to simply washing dishes or washing at the dacha.
Cumulative
The Termex company is a leader in this area of production, largely due to glass porcelain, which is used to make the internal surfaces of tanks. It is this high-tech material that can most effectively protect the surface from corrosion and scale, which undoubtedly determines the strength, durability and ease of use of the device.
To ensure that the temperature of the heated water is maintained, high-strength polyurethane foam is used; it does not allow the temperature to drop by more than two degrees per hour. The device is equipped with magnetic anodes that protect against aggressive scale that forms on the heating element of the water heater. They ensure long service life of the device. The heating element should be changed once every six months or a year. This period is directly dependent on the quality of the water.
Advice! Thermex heating element is sold in any company store. To replace the magnesium anode, you do not need to go to a workshop or call a specialist, since you can change it at home yourself.
If you have made a final decision and the device is already in your home, then you should check the package once again. It includes a power cord with a European plug and mounting hardware. After the work on installing the boiler has been completed, you next need to understand the correct connection of the water heater, which is based on knowledge of the attached instructions and the diagram for connecting the device to the water supply system.
Error codes
Many Thermex water heaters are equipped with an electronic display that shows the main equipment error codes. Knowing how to read these emergency symbols can help you save big on professional repairs. The following errors occur most often.
- E1 or Vacuum - the storage tank cannot be completely filled with water when the heating element is turned on. Solution: turn off the heating element and wait until the container is full, and then turn on the heating element again.
- E2 or Sensor – the temperature sensor does not work. Solution: Disconnect the boiler from the power supply for 30 seconds and then restart the equipment.
E3 or Over Heat - the water heating temperature has risen to a critical level (95 degrees or more). Solution: Press the safety thermostat button.
Thus, if you notice problems in the operation of the Thermex water heater, this is not a reason to immediately contact the service center - armed with the above recommendations, a number of malfunctions can be eliminated yourself. But when starting repairs, remember that the main thing is to soberly assess the scale of the breakdown and not exaggerate your strength, so as not to provoke even bigger problems.