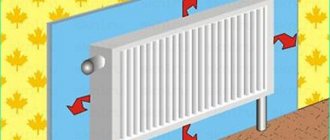
Every owner of a country house, garage or utility room knows what a potbelly stove is. This stove appeared a long time ago, but is still in demand to this day. Decades ago it was even used to heat food; now it is a source of heat for different rooms. You can assemble such a stove yourself using improvised materials that are not a problem to find in the garage or even on the street.
Owners of garages or small houses choose this type of heating because they have significant advantages over other types of stoves. For example, if you have a small area, it will either not be possible to install a stove, or it will simply not be rational, but you want the room to be warm all year round. Therefore, installing some kind of heating device is simply necessary.
In the case of using a potbelly stove, a problem may arise that an increase in efficiency will be required. And for this you do not need to resort to the help of specialists; such work can be done with your own hands. Let's look at what you need for this.
Furnace characteristics
Each device has its pros and cons during use. In the case of a potbelly stove, we highlight the following positive aspects:
- The design of the furnace is simple and does not require large financial expenditures. Everything you need to make a stove with your own hands can be easily found in the utility room.
- If necessary, the potbelly stove can be easily transported to another house or garage. Its weight usually does not exceed 30 kilograms and its small dimensions will only be a plus.
- The stove can be quickly heated regardless of weather conditions.
- In fact, almost anyone can heat a potbelly stove. That is, it can be coals, sawdust, firewood branches, or even household garbage.
As for the negative characteristics, we highlight the main ones:
- The heated surface area is quite small, and therefore a small amount of heat enters the room.
- The room, even after using the stove for a long time, cools down quickly.
Taking into account such shortcomings, we are talking about a low efficiency, that is, the level of efficiency of the stove.
We recommend: DIY bubbler
Eight ways to increase efficiency
The efficiency of a wood-burning stove varies between 60-80%. It all depends on its design, the length of the chimney, the materials used for its construction and the firewood used. The efficiency increases significantly when using birch and oak logs with a humidity level of 13-15%. The higher the humidity, the less heat transfer and the more resin will remain on the internal surfaces.
You can increase the heat transfer of a potbelly stove and increase the efficiency indicator in the following ways - here is a list of them:
- Providing pyrolysis combustion of wood - it increases efficiency by 5-10%.
- Creating smoke circulation – the main task here is to maximize heat extraction from combustion products.
- Creating a natural convection system will improve the airflow of the potbelly stove, increasing heat transfer and accelerating the heating of the room.
- Fan blowing - as in the case of natural convection.
- Lining the potbelly stove with bricks retains heat and stabilizes the temperature.
- Increasing heat transfer through an air heat exchanger is a complex but very effective method.
- Increasing the length of the chimney is important if there is free space in the room.
Let's look at each method in more detail. All the modifications presented in the review can be done using the example of a simple rectangular potbelly stove.
Organization of smoke circulation
It is quite easy to increase the efficiency of a potbelly stove - you just need to improve the heat extraction. In traditional stoves, it instantly evaporates into the chimney. As a result, the efficiency remains low, and the stove heats the street. In other words, you literally throw away about 30-40% of the wood, it goes to waste. The problem is solved in a simple way - you need to retain the heat inside the potbelly stove for as long as possible. For this purpose, two smoke circulations are organized in it. They allow you to increase resistance, causing heat to escape into the walls.
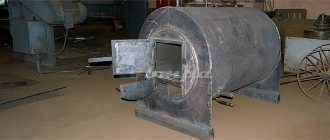
This problem is best solved at the initial stage of assembling the potbelly stove. Weld two pieces of sheet iron into it, as indicated in the drawing. They form two smoke circuits. Passing through them, combustion products will give off heat to the maximum. And only after that they will go up the chimney.
Scheme of a stove-stove.
Pyrolysis combustion
Combustion products are full of heat and contain flammable elements. Afterburning them with secondary air allows you to extract additional kilocalories. To achieve this, wood is burned with limited supply of primary air. The next task is to burn out what is contained in the combustion products. Pyrolysis gases burn releasing a large amount of thermal energy. It is absorbed and emitted by the metal walls of the potbelly stove. Due to this, we will be able to increase its efficiency.
To organize pyrolysis combustion, you will need smoke circulation from the previous section. At the level of the first turn, the supply tube is welded. Secondary air is supplied through it. In its presence, the pyrolysis products are burned out - the efficiency increases by 5-10% of the initial value. On a monthly basis, this will result in savings of several tens of kilograms of firewood. Be sure to provide for a secondary supply if you have already installed smoke circulation.
Creation of a convection system (+fins)
Increasing the efficiency of a potbelly stove with your own hands involves creating a convector. Natural convection improves heat removal and ensures quick heating of the room. By installing a stove with a convector in the garage, we will get an excellent heating device. Literally 15-20 minutes after ignition, a comfortable temperature will be established in the garage. Our task is the following - we need to create a convector that sucks in air from below and exhausts it from above.
The easiest way to increase efficiency is to equip your potbelly stove with a metal screen. It is a sheet of iron that wraps the stove on the sides and back like a shirt. The distance between the body and the sheet is from 3 to 5 cm. The sheet is welded onto metal spacers - make them from thin reinforcement. The result is a fairly simple convector. The only problem is that the area of thermal energy dissipation will remain the same.
Fins will help increase the efficiency of a potbelly stove. It can be done:
- From a profile rectangular pipe 20x40 mm.
- Made from a U-shaped metal profile.
- From a traditional round inch pipe.
We scald the back and side walls with the selected material. This will help increase the dispersion area. At the same time, we will get an effective convector.
Forced airflow
Forced convection is more effective than natural convection. And it’s not so much a matter of efficiency, but rather the speed of heating the room. For these purposes, you need to use any fan – even a household one. We place it 50-60 cm from the stove, connect it to the power supply, turn it on and enjoy the result. A powerful air flow will effectively remove heat from the surface of the stove and distribute it throughout the room. The costs are minimal - you only need an old fan with a low noise level so that it does not put pressure on your ears.
Chimney modification
Quite an interesting way to significantly increase the efficiency of a traditional potbelly stove. To do this, we take the following steps:
- Take a small old gas cylinder or other metal container.
- We weld metal tubes between the bottom and the lid.
- We make cutouts in the side walls to suit the diameter of the chimney.
- We cut the chimney and weld the resulting module into it.
Such a non-trivial solution will significantly increase the efficiency of your potbelly stove.
The result should be a design like the one in the picture below. Next, all that remains is to install a fan opposite the module, blowing air through the tubes. This step will help increase efficiency by removing the heat remaining in the combustion products.
In other words, our task is to cool the combustion products as much as possible, removing all remaining thermal energy from them.
Brickwork construction
It cannot be said that this method allows you to radically increase the efficiency of a metal potbelly stove. It provides:
- Maintaining temperature when the flame goes out.
- Safety of using the stove.
- Creation of natural convection.
- More uniform heat transfer.
Increased efficiency can be achieved in other ways. As for the brickwork, which follows the contours of the rear and side walls, it only complements other technical solutions.
Increasing the length of the chimney
Increased efficiency is achieved by increasing the total length of the chimney. Moreover, it is not the vertical part that increases, but the horizontal one. The bottom line is that combustion products will heat the metal of the chimney, which is why most of the heat will be retained indoors. The gases at the outlet of the chimney will become much colder.
When increasing the length of the chimney pipe, it is necessary to place the potbelly stove at one end of the room, and place the chimney itself at the other end. The horizontal section of the pipe will connect the chimney to the stove and ensure efficient heat removal.
An additional way to increase efficiency is to retrofit the chimney with convection pipes. This step will increase the heat transfer area and create additional convection.
Installation of reflective screen
This step will increase efficiency by 1-2%. We will not touch the stove itself, but will cover the corner in which the potbelly stove is installed with galvanized iron. Thus, we will prevent some of the heat from escaping into the walls, directing it into the heated room. Fireproof thermal insulation can be laid between the iron sheet and the wall.
Design
In some cases, traction force can be directly related to operating conditions, for example:
- The potbelly stove needs to be inspected from time to time for cracks, especially pay attention to the slabs and the perimeter of the firebox door. If cracks have formed in these places, then these places need to be covered up or completely replaced.
- The decrease in draft may also be due to the fact that during use, soot has accumulated inside the pipe on the walls and the clearance has become smaller.
You can even tell how well a stove works by the color of the flame. For example, if the flame is red with dark stripes, then there is not enough air. If you often hear a hum from the chimney and the flame is bright white, then there is too much air. And if the flame has a golden-orange color, then the draft in the stove is normal.
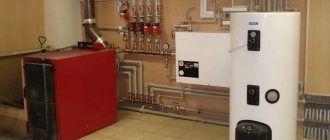
Pyrolysis boiler
Connoisseurs of high technology may be interested in pyrolysis boilers, the cost of which, although higher than usual, is not comparable in productivity to traditional systems. The owner of such a boiler saves significant amounts on firewood, since the process includes the stage of burning gas released from solid fuel. With one stack of firewood, such a boiler can operate for more than a day.
To properly heat a pyrolysis boiler, you should put a portion of wood chips and a large piece of dry paper into the scorching door, and firewood and a small amount of coal on top into the loading door. You should light a piece of paper, from which the combustion process will spread further. The door can be closed as soon as the wood chips ignite.
Increased utility
Potbelly stoves can come in a variety of sizes and shapes. They are invariably connected by one fact - low efficiency. Thermal energy does not enter the desired room, but flies away into the chimney. Therefore, the owners of such stoves decided to experiment with the design to increase utility.
In this case, they often resort to partial modernization of the furnace. There was no single solution for everyone in this matter, so each owner, using his own trial and error, looked for a solution to the problem.
To increase the amount of heat released without increasing the volume of fuel required, you can do the following:
- Improve heat transfer surface
- Increase heat removal
- Change the type of fuel to a higher calorie one
- Increase the heat capacity of a potbelly stove
Option 1
The heat in a house or garage from a potbelly stove comes not only from the outgoing heat of the structure, but also from the metal chimney. Therefore, the heat transfer surface can be increased. This is quite possible when making a stove with your own hands.
We recommend: How to make a grill-smokehouse?
If you already have a ready-made device, then here’s how to implement the idea. Weld a corner to a metal chimney pipe. You need to position it with its apex facing the entire length of the element, and set the angle along the circumference of the pipe. Using this method, it is possible to increase the heat transfer surface by about 4 times (depending on the size of the selected corner).
You can also resort to the option of making a metal pipe that will pass over a larger area. It is necessary to make a chimney with turns. Turns should be smooth, without right angles, so that the device does not start smoking. The final section of the chimney is made vertical; a compartment is located in the last section to subsequently clean out soot.
When it is impossible to lengthen the pipe, then change its composition. To do this, cylinders with a circumference of about 40 cm are welded onto the pipe, which protrudes from the body of the structure. They are connected to each other by pieces of pipe, the diameter of which is no less than the diameter of the pipe.
Option 2
To modify the stove, you can install side screens. Everything is quite simple, but effective in the end.
Sheets of metal are attached to the side parts of the potbelly stove using self-tapping screws. The metal must be unpainted and of any thickness. The screens are mounted at a distance of 6 cm from the body.
In this simple way, the principle of heat transfer changes. That is, thermal energy enters the room through convection, and not through radiation. The air begins to circulate in the prepared space, which will save on fuel purchases and increase the rate of heating of the garage or house.
Folk way
A curious way to ensure that the heat continues to spread even after the stove is no longer working.
After all the fuel in the stove has already burned out, an iron box is placed on it and two buckets filled with sand are placed on top of it.
This design will allow heat to accumulate, and the garage will heat up for some time without additional fuel.
Ensuring heat removal
It is possible to increase heat removal by creating devices that promote natural and forced convection. To ensure natural air circulation, screens are made with a guide device that allows you to create a powerful convection flow and distribute it throughout the room. The guide apparatus is made in the form of curved strips of metal, welded to the screen and directing warm air not only upwards, but also to the sides. The prepared device is attached to the oven.
The heat removal device can also be made from scraps of water supply and profile pipes. The distance from the floor to the bottom edge of the elements must be at least 15-20 cm. The pipes are welded to the stove body and covered with a screen on the sides to protect against accidental contact. A traditional potbelly stove heats the air around it by 0.5-1.0 m, and the use of such a design allows you to increase not only the radius, but also the rate of temperature rise in the room. When the body of the heating device is heated above 60 °C, a stable convection draft appears in the device, the power of which increases as the temperature of the furnace increases.
Heat removal can be increased by using fans to blow over the heat transfer surface. Both household and old car fans are used. Devices with variable rotation speeds have proven themselves especially well. They allow you to regulate the temperature and heating time of the room in various oven operating modes.
For more efficient blowing of the furnace elements, special casings are installed that allow cold air to be directed to the hottest areas of the heating device, while it can be taken from various places in the room. A potbelly stove with pipes welded into the firebox for heating air has proven itself well. A multi-speed car fan installed on a common discharge manifold allows you to effectively heat the room.
The combined use of devices for artificial airflow and natural convection can significantly increase the efficiency of a potbelly stove, which means heating the room more efficiently.
The principle of a long-burning potbelly stove
There is nothing special or too abstruse about the design of such a heating device.
The design diagram is as follows:
- The lid is opened at the top of the potbelly stove and the cone is installed vertically.
- Sawdust is poured into the combustion chamber (to the limit). Then they need to be compacted tightly.
- The installed cone can be removed, the lid can be closed and ignition can begin.
- In order to light a potbelly stove, you need to pour small wood into the ash box. After this, do not close it completely so that there is a small gap for air circulation.
- A draft is formed through the chimney, the sawdust begins to smolder, and the potbelly stove works.
- Substances that are formed during the combustion process after leaving the firebox begin to heat the walls of the furnace and flow out through the pipe.
We recommend: Chiller – what it is and how it works
Thus, the room in which the potbelly stove is located receives up to 50% of the heat from the flue gas. The duration of such combustion reaches 11 hours - the result is a device with a high efficiency coefficient.
How to install and connect a fuel pump
Let's move on to connecting the fuel pump. Spray its fastening rubber with WD40 liquid (otherwise the barrel will not fit), and pull it onto the pump.
Where the fuel pump has a terminal block for the wires, this is the outlet to the heater.
On the other side, a tube from the diesel fuel tank is connected. Attach the fuel pump to the wall at an angle of 45 degrees or strictly vertically.
In this case, air will not accumulate in it and the liquid will completely fill the entire space.
In this case, it is advisable to place the pump itself below the diesel fuel tank, and the fuel hose should not have sharp turns.
This is done so that in the event of airing (for example, opening the lid to add diesel fuel or checking the level), air can easily escape from the tube upward into the tank. Otherwise, the pump will take a very long time to pump.
They say that this pump is one of the weakest elements of the system and is the first to “fly”. Fortunately, the Chinese sell them in unlimited quantities. You can select the right model for your Webasta here.
Why do you need furnace modifications?
Every model, and not just stoves, is imperfect, and you always want more and better. So it is in this case with heating partings. Any modifications are carried out in order to obtain maximum effect without reducing the service life of the heating device.
For example, with the help of improvements, you can achieve maximum proper combustion, with a good level of heat transfer, without heating the potbelly stove to the limit so that the metal turns red.
Watch the air damper. It must be at a level so that the flame does not enter the chimney. The fire should not exceed the level of the top of the stove. The heat must be distributed evenly throughout the device in order to properly warm the room.
There are many options for modification; you should choose the optimal one for yourself in order to ensure a comfortable temperature for being in the room.
Rules for safe operation
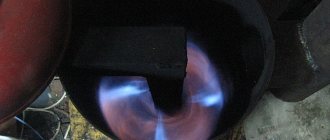
Before you start lighting the stove, you should check if there is water in the oil tank. It may appear due to condensation flowing down the inner walls of the chimney. If the liquid is not removed, when it boils it will cause oil droplets to splash through the diffusion holes.
The used oil is poured through the filling opening, and then ignited using a rag soaked in kerosene, barbecue liquid, etc. The oil film ignites within 3–5 minutes, after which it is necessary to close the air damper. Usually, for normal operation of a potbelly stove, a gap of 1–2 cm wide is sufficient. The exact amount of air can be adjusted by observing how the liquid fuel behaves. As soon as it starts to boil, close the damper a little. There should be just enough air to ensure active evaporation of the oil, but not the boiling of its top layer.
It is convenient to ignite the stove using a long wick
Since a potbelly stove during mining is a fire hazardous unit, several rules should be followed during operation:
- Do not shake the container with used motor oil before refilling. Remember that moisture, antifreeze and other pollutants settle in the lower part.
- The oil level should not exceed ¾ of the height of the fuel chamber.
- It is best to refuel the stove a few hours before ignition - this will allow the fuel to settle.
- It is prohibited to add oil to the tank while the unit is operating.
- To stop a fire, do not use water or powder fire extinguishers. It is best to completely close the air supply and wait a few minutes.
- You should not light the oil by pouring a portion of gasoline or solvent on top, since an instantaneous flash can cause burning fuel to splash over a large area.
- Before using the stove, be sure to check the draft. To do this, bring a lit match to one of the diffusion holes. The deflection of the flame into the vertical pipe indicates that ignition can begin.
Basic safety standards should not be ignored. No flammable materials or liquids are allowed near the stove. Spilled waste is immediately removed with a rag, and the oil stain is covered with sand. By the way, the box with it, as well as the carbon dioxide fire extinguisher, must be located next to the heating device.
When burned, used engine oil leaves a lot of sludge, so the potbelly stove needs to be cleaned periodically. To do this, disconnect the stove pipe and remove the upper part of the unit from the fuel tank. Carbon deposits are removed from the surfaces of parts using a scraper and a stiff brush. The non-removable upper module can be tapped with a mallet. As for the chimney, it is cleaned with the same tools that are attached to a long pole.
What to drown with
In general, a potbelly stove can be heated with anything, wood, oil, coal, etc. When considering tree species, many prefer oak. Dry wood from this tree can add about two more degrees of heat when burning.
If you're worried about cleaning up the ash, you're in vain. The resulting bedding at the bottom of the stove from coals and ash will not only protect the bottom from burnout, but also what remains as coals during the first fire will burn out the next time. Accordingly, the combustion percentage increases.
Using simple ways to modernize a potbelly stove that you made with your own hands or bought in a store, you can achieve its maximum, but at the same time correct operation. To improve the device and increase efficiency, you do not need special skills or large financial costs.
Procedure for kindling
Experienced stokers don’t have a question: how to quickly light a stove with raw wood? They elevated their work to the level of art. Because they know that wood gives off heat at a temperature of 300 to 400 degrees. And to heat rooms it is not enough to maintain a fire at 50 °C. This will only lead to smoke.
For an optimal kindling process, experts give several recommendations on how to reduce fuel consumption and increase heat:
- It is preferable to prepare raw materials that are five centimeters smaller than the combustion chamber.
- The size of the chopped log should be approximately the same.
- It is necessary to remove all burnt ash and coals from the furnace, and clean the grates from tar and soot.
- Then check for the presence of traction, first light the paper. And look at the direction of the smoke. If everything is in order, then it will go inside the firebox, and not out.
- We begin to make a seed: we place two logs parallel to each other, and between them is a crumpled piece of paper. Sawdust and shavings are poured on top. Two more beams are placed on top of this structure. Next, we set it on fire with the blower open so that there is additional air supply.
- When the heater begins to hum, then close the lid, but not completely.
This method is suitable for dry logs, but how to light a stove with wet wood? Stokers give their recommendations:
- Chop the block lengthwise into several pieces.
- If it is a birch tree, then remove the bark, as it will interfere with the kindling.
- From the inside, pinch the splinters, which are not so wet.
- There should be a large number of such chips. Because they will have to maintain the fire for 15-20 minutes until the firebox warms up.
- Place the prepared splinters in a “hut” on the crumpled paper.
- When the fire is burning properly, you can then add thin dies.
- Wait another twenty minutes, then add the raw logs to the hot coals.
- Cover the vent and monitor the combustion process.
- Don't let the fire go out, otherwise you'll have to do it all over again. Periodically add wood to the flame.
- Watch the draft so that smoke does not enter the room.
Why a cast iron stove?
To answer this question, it is worth understanding what tasks a country heat source should solve, in addition to its direct purpose - heating the room. Without going into discussions about which energy carrier is best used to heat a country house, but taking wood as the default, we list these tasks:
- Since heating the house is required periodically, the heat generator will have to endure long breaks in operation.
- For the same reason, a stove for heating a private house or cottage must quickly heat up after lighting and release heat into the room.
- It is very desirable that the stove retains heat for a long time or can work for a long time with one load.
- There is not always dry, high-quality fuel at the dacha, so the stove must be “omnivorous.”
- In order not to buy a separate stove for cooking, you need a combined heating and cooking stove.
- It is very convenient if the heater design includes a built-in water circuit. This will make it possible to take a shower, wash dishes and even organize heating for the next room.
- The heat source must be compact and easy to maintain.
Modern cast iron stoves for the home meet most of these requirements. As a material, gray cast iron is resistant to corrosion from dampness and condensation, which determines its durability. High humidity and dampness inevitably appear in an unheated building in winter and negatively affect any objects made of ordinary metal.
Condensation occurs on the walls of the combustion chamber and in the chimney pipe during the kindling and rapid heating of the stove in the cold season. It mixes with volatile fractions of smoke and settles on the walls, leading to their gradual destruction. Unlike steel, a cast-iron firebox can easily withstand this impact, the only difficulty is to clean such deposits.
When it comes to quickly warming up the heater and the air in the house, cast iron stoves are somewhat inferior to steel ones, but this disadvantage also contains an advantage. Yes, the thick walls of the product require a long time to warm up, but they also take a long time to cool down after the wood burns out and heat the room, while steel walls cool very quickly.
In essence, any heating stove can burn wood of various qualities, and cast iron heaters are no exception. Another thing is what effect it will have. Frankly damp firewood with a humidity of more than 50% will produce a lot of soot and soot, but little heat, since all the useful heat of combustion released by the wood will go to evaporate the moisture it contains. In other cases, anything will go into the firebox: firewood, wood waste, shavings and even dried trunks of large weeds.
Factory-made household heaters made of cast iron are quite compact and have a wonderful appearance. Many models are equipped with additional elements that increase their functionality: hobs and water heat exchangers. At the same time, the compactness of the product does not suffer, and the installation of cast iron stoves is extremely simple and involves installing a chimney.
Start of installation: screen, wall protection
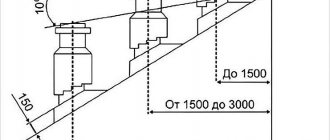
The wall near which the stove will be placed is made of wood, with foam inside and plasterboard outside. Therefore, in order to protect the wall from the high temperatures of the heated device and single-layer pipe, it was decided to construct additional insulation for the wall. As a result, profiles for plasterboard 75 mm wide were installed, fire protection was laid inside - “Paroc” with a 40 mm foil gasket and an air gap between the insulation and the wall. Each seam was taped with aluminum tape and a glass-magnesium sheet 8 mm thick was sewn on top.
In one of the photographs you can see that only the lower part is sealed; if it gets cool in the room, then the part on top will also need to be sealed. Clinker tiles under the brick will be laid on a glass-magnesium sheet using a special heat-resistant tile adhesive. The resulting distance from the tile to the stove will be 25 cm. A sheet of drywall will be laid under the stove, and the tile will be placed on top of it using the same heat-resistant adhesive. There will be a varnished wooden plinth around the entire structure.
Grid with stones
Modernizing a potbelly stove with a mesh with stones is quite one of the most common improvements. Almost everyone had a bath and steamed in the steam room. There you saw a set of stones that warm the air in the steam room.
The principle of this modernization method is similar. It is necessary to line the potbelly stove with stones, which continue to retain heat for a long time. It is worth remembering that you should not use galvanized material for manufacturing, since when heated, toxic fumes are released into the air.
Materials and tools
For this event we will need:
- a set of good stones (you can use high-quality clay bricks), preferably of medium size, similar to those you came across in the steam room.
- dense metal net, you can use a chain-link net.
- if you plan to do it like an adult, then you will need fittings and a welding machine.
Instructions
Making this improvement is simple:
- It is necessary to make a frame of metal mesh (or reinforcement) near the stove, which will not block access to the technological openings of the potbelly stove.
Design example - After creating this frame, it is necessary to fill the cavities between the stove and the frame as tightly as possible with prepared stones.
You can also fill the cavities between the stones with clean clay, which will also help retain heat.
Precautionary measures
It is strictly forbidden to use flammable materials and metals with low melting points to create this improvement. Also, this structure should ensure free maintenance of the potbelly stove, not block access to the firebox, to the ash pan, and not interfere with the removal and replacement of outlet pipes.