Let's look at the types of faults and how to fix them
Leak in area without thread
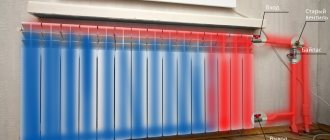
The main reason for its appearance is a poor-quality weld - under the influence of temperature it is destroyed first.
Diagram for eliminating a leak with a rubber band
In this case, you won't have to dump risers and deal with disgruntled neighbors. You will need a clamp to eliminate leaks: put it on the pipe so that the gasket is adjacent to the leak, and carefully tighten it with bolts
If there are streaks of paint at the leak site, carefully clean them off with a knife (this may cause the leak to become slightly worse)
An aluminum clamp is also suitable for this case: you need to place a thick rubber gasket under it and tighten it with a screwdriver.
Thread leakage from under the locknut
Occurs due to a violation of the tightness due to mechanical impact (someone sat or stood on the pipe).
The first step is to turn off the heating and reset the risers. Next, you need to unscrew the locknut, clean the threads and inspect it. If there are no fistulas, rewind the nut with flax, paint or any other sealant (clockwise) and safely tighten it back.
If, when you turn on the heating, your pipe flows again, you will have to remove the lock nut again, and with it the radiator cap. When dismantling the upper liner, the radiator should not be completely removed.
Remove all the paint, use a special die to thread the pipe and cut an additional 5-6 threads. Then tighten the plug and locknut and connect the line to the radiator. The leak will be fixed.
Radiator fin leaking
You can fix the leak using cold welding
The main reason is the thin walls of the radiators. Due to corrosive processes, fistulas appear in them sooner or later. Of course, it is best to completely replace the plate, but if this is not possible, cold welding will come to the rescue.
To repair, you will have to drop the risers. Clean the area of the fistula from paint and rust, degrease (you will need gasoline or acetone for this) and then apply cold welding. The instructions for it are on the package, read carefully. Apply the weld so that it covers the area 3-4 cm around the fistula.
Leak between sections
In this case, you will have to completely remove the radiator (after draining all the water from the heating system). You need to measure the distance between the nearest end of the radiator and the leak, and then run a radiator wrench into it to engage the problem nipple and tighten it. Don't be afraid to use force - you won't break it. After tightening, reinstall the radiator and start the heating system.
Radiator sections that are not pressed tightly
As you can see, there is nothing complicated in eliminating a leak in the radiator, but you must follow a clear procedure and be extremely careful. Do not delay radiator repair under any circumstances! And, of course, it is best to call the appropriate service: it will help not only fix the problem, but also prevent it in the future.
Just about twenty minutes ago the following story happened to me: I was sitting in the kitchen, drinking tea. On the radiator battery.
I noticed that the faucet was leaking. I tried to open and close it (probably it was a mistake), but the water began to flow faster. The apartment is rented, there was a plug on the tap made of electrical tape and fum tape.
It flows quite strongly, I absolutely don’t know what to do. I would be glad for some practical advice.
I just called the emergency services - they turned me away, saying that they do not service the house.
No duplicates found
Let the emergency crew not be clever - the current battery faucet is their area of responsibility (if the battery and faucet were not changed by the owners of the apartment, then eliminating the accident is free, or rather, already included in the fee for maintaining the property. If the batteries and faucet were changed independently, then they still have to turn off the water and fix the tap, but for money. And if you rent officially, then the owner is usually responsible for such emergency situations and the fee for such force majeure is already included in the rent for the apartment.
At least give me a photo, especially Tampax made from duct tape and fum.
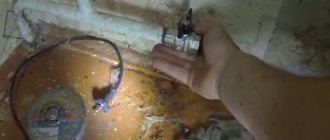
If the Mayevsky tap is leaking
This part is used in heating radiators as air valves. Over time, the rubber gasket becomes unusable and the faucet begins to leak water. Ideally, it is better to replace the damaged gasket with a new mechanism. If there is no spare part, a special product called “Santech Master Gel” will come to the rescue. It has detailed instructions for use. Based on the recommendation, you should do the following:
- Unscrew the tap and remove the rubber gasket.
- Liberally lubricate the threads on the tap with gel.
- Apply the product to the rubber seat.
- Lubricate the initial threads on the battery.
- Install the tap, unscrew halfway and tighten completely.
- Wipe off any remaining gel from the surface.
- Wait 15 minutes and check the operation of the tap.
Instructions for Santech Master Gel sealant (click to enlarge).
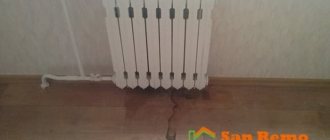
The heating battery is leaking, what should I do?
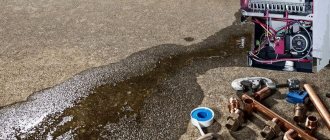
The first thing to do if the radiator is leaking, as in the photo, is to turn off the water. But if the leak is serious, then it is urgent to call an emergency team - plumbers have all the necessary tools and materials to eliminate the problem if the battery leaks.
Next, if possible, you need to turn off the water. It’s good if there is a tap or valve in the apartment itself - this will allow you to quickly turn off the water supply and save your property. But what if there is no such valve and the radiator is leaking - what to do? Then you need to turn on the coolant supply valve to the heating system, which is located on the main pipe near its entrance to the basement. If the leak is minor, then you can try to fix it yourself (for more details: “How to fix a leaking heating pipe if it is leaking”).
Using a clamp and rubber as a means to eliminate radiator leaks
If the damage is located at the junction of the main pipe and the radiator, then the leak can be removed for a while using wire and a rubber band (car clamp). A piece of rubber is wrapped around the damaged area and secured with wire.
If you cannot find a special remedy for eliminating radiator leaks, then you can simply cut pieces of rubber from a bicycle inner tube - the strips should be 30-35 centimeters long and 4-5 centimeters wide. Using a clamp, you can stop the leak for a while. For this reason, it doesn’t hurt to have a few clamps in stock at home - their price is low.
Air conditioner thermostatic valve
Downcast
. Why are you afraid of them (utility workers)? You pay them money every month, right? So don’t ask for your money, but DEMAND! Don’t humiliate yourself and don’t beg - take the paper and write an Application addressed to the head of the housing office (or whatever it’s called in your area). Complain - that you called his employee, he came, did nothing, i.e. refused to perform his DUTIES. And that if “tomorrow” you flood your neighbors, then during the debriefing you will at all levels blame him - the boss - for the inaction that led to it. ".
Message from Novosel
as an option, they will first require you to pay a receipt, they have a price list
You are contradicting yourself.
If they are “obliged”, what is the payment?
A leak in a heating radiator is, although unpleasant, a fairly common failure that residents of houses or apartments encounter sooner or later. The main reason for leaks is, of course, aging of pipes and metal corrosion. Sometimes a leak appears due to improper installation of connections or due to excessive mechanical stress on the heating system.
Radiator
Sometimes the reason may be the choice of the wrong materials (for example, if a silicone gasket is placed in a pipe connection, it will deform over time, which is why a leak will appear).
Unfortunately, many ordinary people believe that to eliminate the problem it is enough to simply place a basin under the dripping pipe. The result is always the same - a burst pipe, water on the floor, angry neighbors downstairs.
If your radiator leaks, call a specialist immediately!
However, there are times when you have to fix the breakdown yourself. What to do in this case?
First, you will have to turn off the heating and release all the water from the pipes. If you live in a multi-story building, the valves will be located in the basement. Be sure to put a sign on them indicating that repairs are underway, otherwise anyone can go down to the basement and fill the system. In this case, streams of dirty hot water will flow into your apartment.
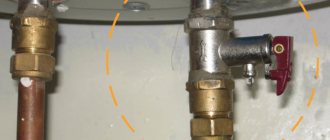
Hermetic seal to eliminate leaks
As for how to fix a heating radiator leak, if there is minor damage, you can use a powder or polymer-based sealant. They can be found in hardware stores.
Such a composition polymerizes upon contact with air, and as a result of hardening, a strong filling is formed, which gives time for significant repairs. Some sealants are two-component polymer compounds, and harden as a result of mixing their two components. Other products harden as a result of a chemical reaction with air. Using sealants designed specifically to fix leaks, you can solve the problem in a matter of minutes.
Preparation and necessary tools
The first rule of any plumbing repair is to turn off the water supply. Valves can usually be found in the toilet; the levers simply need to be turned 90 degrees. If the equipment has not been used for a long time, the valves may become blocked. It doesn't take any heroic effort to turn them. This way, you can simply rip off the tap and then instead of one problem you will have to solve two
Valves should be developed carefully, gradually increasing the effort and adding lubricant drop by drop.
Only after the water supply is securely shut off can repair work begin. First you need to prepare the necessary tools so that they are at hand:
- adjustable wrench;
- flat screwdriver;
- crosshead screwdriver
- wrench, etc.
Usually this simple set is quite enough. Auxiliary elements will not interfere, for example, pieces of rubber or leather for making new gaskets, fluoroplastic sealing tape, which replaces liners, rags, sponges, detergent to remove dirt accumulated inside the mixer, etc.
Advice. To prevent an accidentally dropped tool from damaging the sink or bathtub, it doesn’t hurt to put something soft underneath: a rag, a piece of foam rubber or other material suitable as a shock absorber.
The reasons why a faucet is leaking can be very different. For a traditional two-valve faucet, the most pressing problem is the wear of the gasket or liner, which needs to be replaced. If a ball (or hinge) valve, which is designed fundamentally differently, is leaking, completely different actions will be needed.
Mixer device
Ball valves, regardless of their location and manufacturer, always have the same design, which greatly simplifies repairs. It is enough to figure it out once and then solve all the issues without any problems. Mixers of this type consist of the following parts:
- The handle is a rotary type, fixed with a screw that can be unscrewed with a small hexagon.
- The faucet cover covering the work area is usually spherical in shape.
- A rod, the fastening of which is sealed with a washer and nut.
- A spout through which water is supplied.
- The body, inside of which the rod moves and the cartridge is located.
- A ball-type cartridge that is held inside by rubber seats.
- Seals that prevent water leaks.
By the way!
The system works very simply: when you lift the lever, the cutouts in the cartridge and the holes in the seats are aligned and water flows into the spout. Due to rotation, the cavities shift, changing the proportions of hot and cold water. This allows you to set the optimal temperature in just a few seconds.
What to do if the heating battery is leaking
If you notice a leak from your battery, call the company that services your home right away. This should be done immediately, even if the leak is small, as the leak can quickly get worse. After this, you need to shut off the battery, if possible. Next, before the emergency team arrives, you should do the following.
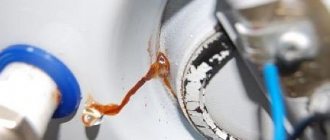
The photo shows an example of a leak between battery sections
If the leak is severe
Place a container under the leak. If the leak area is large, you can wrap the leak area with cloth or film and direct the free end into a container.
If the leak is small (the heating battery is dripping, leaking)
The location of the leak is a pipe or its connection to the battery
It is necessary to clamp the pipe with a clamp or wrap the pipe or joint with rubber, tighten it with wire and clamp it with pliers. If a plastic or metal-plastic pipe is leaking, flexible plastic or fiberglass is used as a bandage. The bandage is fixed with clamps or ties.
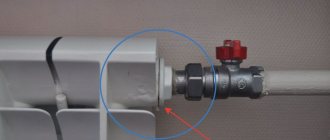
The tap on the radiator is leaking
If the ball valve leaks in one of the extreme positions - open and closed - it must be replaced. In some cases, tightening or replacing the oil seal (gasket) solves the problem.
Leakage between battery sections
To fix a battery leak, you will need a bandage and epoxy glue or a waterproof equivalent. Soak a bandage in glue and wrap it around the area where the leak occurred. It takes from 24 hours to 3 days for the glue to dry completely.
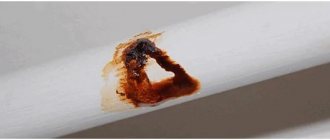
Fistula directly on the radiator
Cold welding will help here. You need to take a little bit of welding in your hands (after putting on rubber gloves), stretch it and cover up the leak. Cold welding hardens in about an hour. Polymer or powder based sealants can be used. The damaged area must first be cleaned and, if possible, treated with sandpaper.
The connection of metal-plastic pipes is leaking
You need to disassemble the leaking end of the connection, remove the nut and pull the pipe out of the fitting. Depending on the situation, you will need to change the O-ring, fitting gasket, or align the pipe cut.
What to do if the heating pipe is leaking?
If the leak is located on a flat area, you can use a plumber's pipe clamp to stop the leak. If there is no ready-made clamp, you need to wrap a piece of rubber around the leak source and secure it with wire.
Why do radiators leak?
The causes of leaks may be the following:
- Corrosive damage to metal.
- Incorrect battery installation.
- Wear of the seal between the battery sections.
- The radiator does not match the pressure in the system (incorrect choice of radiator).
- Violation of the bending radius when installing metal-plastic pipes.
- Wrong choice of consumables. For example, the use of silicone gaskets that deform over time.
- Use of unsuitable pipes (for example, a cold water pipe is installed instead of a hot water pipe).
When is the best time to change the battery?
It is better to replace the battery immediately after detecting a leak, without waiting for the end of the heating season. The leak can get worse quickly and unexpectedly.
Reasons for leaking taps on the battery
What causes leaks:
- natural wear and tear of axle boxes, gaskets, seals, fluoroplastic seats;
- manufacturing defects;
- incorrect installation;
- mechanical damage;
- excess pressure in the circuit, causing damage to radiators. If it is not corrected, you may soon experience battery leakage.
Ball valve repair
New-fashioned ball valves are somewhat more complex than traditional valve models. So, what should you do if the ball valve is leaking? Most often, the problem is that dirt has gotten inside the housing and interferes with the operation of the mixer.
When repairing a ball valve, you must carefully remove the valve. To do this, first remove the decorative plug, under which there is a fixing screw. In short, the faucet needs to be disassembled, cleaned and reassembled
They do it like this:
In short, the faucet needs to be disassembled, cleaned and reassembled. They do it like this:
Use a screwdriver to unscrew the screw that secures the lever. Carefully remove the lever from the tap. Use a screwdriver to unscrew the threaded screw. Remove the mixer dome and plastic seal. Inspect the seal gasket and remove accumulated deposits. If the seal is worn out, you need to purchase and install a new part. Remove and inspect the ball. If it is damaged, it will also have to be replaced with a new one. Using a thin screwdriver, carefully pry off the seals that secure the ball.
If they are even slightly worn, they will also need to be replaced. After replacement, lubricate the seals with the composition recommended by the manufacturer. Carefully reassemble the mixer in reverse order.
All procedures when cleaning a ball mixer must be carried out carefully, since its parts are easily damaged. If all steps are completed correctly, leaks will stop.
In the same way, problems with temperature control in mixers of this type are eliminated.
Sometimes you just need to change the faucet cartridge. This procedure is described in detail in the video:
How to fix a faucet with a cartridge
Most often, faucets with one lever are installed in the bathroom or kitchen. They are also called flag or single-lever. A special device, a cartridge, is responsible for opening/closing the water in it, which is why they are also called cartridge ones.
Cartridge tap
There are two plates with holes inside the cartridge. The lower one is fixed rigidly, and the upper one is movable. A rod is attached to it, and it, in turn, is attached to the handle. By turning the handle, we move the rod, and it moves the movable plate, which opens/closes the water and changes its pressure.
If there are problems with such a faucet, it can only be repaired by replacing the cartridge. The main problem with them is that they start to leak - water oozes or drips from under the handle. To repair a leaking or dripping cartridge faucet, you need to replace the cartridge. The only way.
Replacing the cartridge
The first step is to turn off the water, then remove the handle. To do this, first remove the colored plug - it covers the screw. After unscrewing the screw, pull the handle up, separating it from the stem. After the handle is removed, unscrew the pressure ring - it holds the cartridge. Now all that remains is to take it out.
Then, along with the cartridge, you need to go to the store or market and buy exactly the same one. The new one must match in size, the holes in its lower part must have the same shape and location. Basically, you need to find an exact copy.
How to disassemble a faucet with a cartridge
Assembly occurs in reverse order:
- place the cartridge (strictly vertically, twisting it a little around its axis so that the protrusions in the body fit into the recesses on the cartridge),
- tighten the clamping nut;
- install the handle;
- screw in the fixing screw;
- insert the plug.
An initial check can be done after the pressure ring has been installed. You can turn on the water and check if the tap is now flowing.
If the water flow becomes too weak
Most modern faucets are equipped with a mesh on the spout that traps solid particles that may be contained in the water supply. If the stream of water gradually becomes less elastic, and the pressure on other taps does not change, the reason is that this very mesh is clogged. In this case, you can fix the faucet in a couple of minutes.
Need to clean the mesh
Unscrew the nut with the mesh, which is located at the end of the spout. Rinse it, clean out clogged holes (you can use a needle or an old toothbrush). Place the cleaned mesh in place.
Cement-plaster dressing to eliminate leakage of the heating radiator
Before fixing a leak in the heating battery, you need to prepare the required materials and tools:
- cement;
- alabaster (plaster);
- container with water;
- salt;
- medical bandage
To eliminate the leak, a bandage is applied to the damaged area.
The procedure after turning off the water is as follows:
- dilute cement in a container with water to the consistency of thick sour cream;
- cut the bandage into strips 25-30 centimeters long;
- thoroughly soak the bandage with the cement mixture;
- wrap strips around the damaged area.
The process is repeated until a durable bandage is obtained.
If it was not possible to turn off the water, then instead of cement you need to use alabaster, which dries much faster. Then a cement bandage is applied to the plaster cast.
If the heating battery leaks at the threaded connection, you can use salt:
- wet strips of cloth or bandage in water;
- roll the material thoroughly in salt;
- wrap the leak area.
The gap will close as a result of the salt dissolving in the water. A cement bandage is applied on top.
How to fix a leak
There are several options for solving the problem, using:
- self-tapping bolt;
- rubber pad with wire or clamp;
- cement-plaster bandage;
- fabric impregnated with heat- and water-resistant glue;
- special sealant;
- welding
The easiest way to fix a small leak in a cast iron radiator is to fix a self-tapping bolt in the hole. It must be remembered that all these methods of eliminating leaks are only a temporary measure - it is advisable to replace old radiators with new products as soon as possible.
To come in
Already registered? Sign in here.
There are no users viewing this page.
Find out the cost of repairs
Why do clients choose us?
Heating and Repair
We have the best prices!
The heating system has a connection system: a boiler, an expansion tank, batteries, air vents, pipes, fasteners, manifolds, pressure-increasing pumps, and thermostats. On the open tab we can find and select the necessary parts of the system for the garage. Garage Heating Assembly Includes Important Components
Any node is important. Therefore, the correspondence of parts of the structure must be planned technically carefully.
Thanks to the wonderful film “Afonya,” replacing a gasket in a faucet has become an almost anecdotal situation. Despite all the achievements of civilization, if a faucet leaks in the kitchen or bathroom, it is sometimes simply unrealistic to wait for qualified help from a plumber from the management company. But if the faucet is leaking in the house: how to fix the plumbing equipment yourself? This is not the most difficult task. You need to find out the cause of the problem and fix it using a simple set of tools.
Kinds
Let's start with definitions. There are taps and mixers in the bathroom and not in the kitchen. Taps only supply water; mixers also allow you to regulate its temperature by mixing two streams - cold and hot water. In this article we will talk specifically about taps and how to repair them. Faucet repair is very similar, but has its own characteristics. By the way, you can read about the repair of single-lever faucets.
There are several types of taps for the bathroom or kitchen:
- valve;
- single-lever (also called cartridge or flag).
Cranes - flag and valve
Their devices are different, so the repair, even with the same damage, is significantly different. Therefore, we will consider each type separately.
Replacing a faucet without shutting off the riser
Is it possible to replace the shut-off valve without shutting off the water?
Do not practice on upper floors! Don't do this with hot water and heating!
One of the site’s readers under the nickname stefano asked a similar question:
Tell me what to do. The house has a riser and water drains from polypropylene pipes. The crane on one of the branches fell down. Is there any way to replace it without shutting off the water in the entire house? And what is better to put? We turn off the water every day before leaving for work.
The first thing to do is to secure the pipes on which the meters hang. Meters should not hang on pipes. To replace the faucets you will have to turn off the riser. You can, of course, install a backup one if this one also overlaps, but this is only as a last resort.
In your case, it is better to turn off the riser. If this is possible, then after disconnecting you will have to re-solder something here, namely: if you look at the photo, then after the meters you have two 90-degree bends installed, which take the pipe closer to the wall. With the same two outlets, take the faucet and meters to the wall immediately after the riser. Next, the meters need to be mounted on clamps so that they do not hang on the pipes.
For example, use these clamps:
They fit very well into the girth of the counters. After installation they are almost invisible.
As for shut-off valves, install reinforced valves from Valtek, or for example Bugatti.
There is material about shut-off valves here and here.
Depressurization of the radiator wall or fin
This kind of damage brings big trouble. It is extremely difficult to fix a problem when the battery is leaking, but for a short time you can find a way out of the situation. The method is quite simple.
The small hole on the battery needs to be enlarged. Before doing this, you need to turn off the water and reduce the pressure. Using a drill, make a hole larger than it was. A wooden peg is inserted into the drilled hole. When exposed to water, it swells and stops water leakage.
You can also use a self-tapping screw with a rubber washer instead of a peg.
Of course, leaving the battery in this state for a long time is dangerous; the section must be urgently replaced with a new one.
Repair of two-valve tap
Replacing the gasket
The answer to the question: why does the faucet leak, no matter how tightly it is screwed on, most likely sounds like this: the problem is a worn-out gasket. Replacing it is not difficult, to do this you need:
- Unscrew the valve body (simply rotate it counterclockwise).
- Remove damaged or worn gasket.
- Make a new gasket from a piece of thick leather or rubber. Of course, they take the old gasket as a sample.
- Install a new gasket.
- Wrap the seal around the stop edge.
- Reinstall the valve body by turning it clockwise.
- Using a wrench, tighten the installed valve tightly.
In order not to bother with making a gasket, you can buy a new one at a plumbing store. However, if for some reason this is not possible, a homemade part is quite suitable for urgent repair of the crane.
The diagram shows in detail how to properly replace the ceramic gasket in a traditional two-handle faucet. You will need a Phillips screwdriver and a wrench
Replacing the sealing insert of the oil seal
Wear of the oil seal insert can also cause a leak. In this case, a leak is observed when the tap is open: water enters between the gland nut and the valve stem. To correct the situation, you need to:
- Using a screwdriver, unscrew the oil seal nut.
- Make a sealing liner from recycled plastic sealing tape.
- Remove the worn liner.
- Wind the new insert tightly onto the valve stem.
- Tighten the nut.
If everything is done correctly, the valve will turn smoothly and the leak will stop.
Replacing the O-ring of a shower hose
When a leak occurs where the faucet and shower hose connect, the problem is usually caused by a worn O-ring. To replace it, you must:
- Using an adjustable wrench, unscrew the shower hose. This must be done carefully, otherwise you can easily damage the hose threads.
- Remove the worn seal.
- Install a new O-ring.
- Reinstall the shower hose.
If possible, it is best to use an O-ring made of silicone. Rubber parts are less resistant to wear and therefore are not as durable.
Most often, to eliminate a faucet leak, you have to replace the rubber gasket or part of the locking mechanism - the faucet. These parts can be purchased at a plumbing store.
When, when switching the water supply to the shower hose, a small amount of water continues to flow out of the tap, you should change the shut-off elements located in the mixer handles, they are called faucets. They can be ceramic or equipped with a rubber gasket; the appropriate model must be selected at a plumbing store.
Leaking from the connection between the radiator and pipes
Most often in this case, problems arise with the seal on the thread. Troubleshooting will require shutting off the water and reducing the pressure.
For such cases, it is advisable to keep spare nuts and couplings at home. The old ones could become unusable. Rusted parts do not always withstand the stress of working with them. In cases of thread damage, a die will be needed. When everything is ready, tow is wound onto the threads and a layer of Unipak paste is applied on top. The parts are tightly screwed. Gradually opening the water supply tap, the reliability of the work done is checked.
Instructions for sealing a threaded connection with tow and sealing paste (click to enlarge).
Required Tools
Before work, it is important to collect the necessary set of tools. They should be at hand at any time needed
So, for the job you will need an adjustable wrench, a flathead and Phillips screwdriver, and wrenches. Often, this modest set should be enough. It happens that a kitchen faucet leaks suddenly and heavily. How to fix it, what keys are needed - it’s impossible to say specifically here. The fact is that each manufacturer has its own standards. A set of keys that every motorist has will be sufficient.
It would also be a good idea to prepare various additional elements. These can be pieces of rubber, leather, from which gaskets can be made. A fluoroplastic sealant in the form of a tape, rags, and detergents may also be useful.
Sometimes during the repair process, keys or any other tool may fall - in order not to damage an expensive sink or sink in this way, place a sponge, rag, or something else under the bottom that can absorb the shock.
How to deflate
During operation, the device does not require any maintenance work.
Using the tap is very simple: before opening the valve and releasing air, you need to place a bucket under the tap and cover the tap with a rag (or polyethylene). Sprays of dirty or rusty water can fly along with the air and splash the wall, curtains or furniture. Then unscrew the screw with one hand (using a screwdriver, wrench or pen), and hold the rag with the other hand. The air will come out with a hiss when water starts to drip - tighten the screw tightly.
You can clearly see the progress of work on using the air valve in our video:
Ball valve leaking
Good day. The ball valve located on the outlet from the heating riser to the battery leaked. The battery is an aluminum radiator. An American faucet, of an unknown manufacturer, was complete with a battery. All this equipment was installed by Santa from the housing office two years ago
But all this is not very important. In short, today I decided to turn off the water supply to the battery and when I turned it off, water started flowing from under the butterfly
I removed the butterfly - it was leaking from the gap between the stem and the valve body. The faucet is cheap, there are no oil seals (like Bugatti's). There is no leakage in the fully closed and fully open states. I think it is necessary to change this tap and the second one, which cuts off this battery, too. I'm right?
Vl-80 wrote: There are no leaks in the fully closed and fully open state
And it should be either completely open or completely closed. This is not your regulator.
This is understandable, but in this case what to do?
Hubert wrote: And it should be either completely open or completely closed.
It shouldn't leak in any position.
in my humble opinion
Are there any identification marks on the crane? And so, of course, change it.
There are the letters MPL and a number.
What does it mean that the faucet is leaking? The body is not damaged, it flows precisely from the gap between the rod and the body. There was a similar case when the rod fell out of the ball and flew out, naturally there was flooding.
This means that the seal between the rod and the body has leaked. Or it (capable of holding water for a long time) is not provided at all - by the way, this is quite possible. In the fully closed and fully open positions, with proper fluoroplastic gaskets between the ball and the body (i.e., the main gaskets of the ball valve), the internal cavities of the body are not under pressure. So you can leave it like that for now.
psnsergey wrote: Or it (capable of holding water for a long time) is not provided at all - by the way, this is quite possible
psnsergey wrote: Or it (capable of holding water for a long time) is not provided at all
psnsergey wrote: the internal cavities of the case are not under pressure.
in my humble opinion
In 2.5 years, I have already replaced 6 PROAQUA polypropylene taps out of about 40. They are installed at the inlet and outlet of radiators - I sawed them and looked for leaks through the seal (the seal has 2 rubber rings). It only flows in the open position. In short, I got it.
So, what's the final verdict? Should I change it now (during the heating season) or wait until it ends, and then quietly drain the water and change it myself?
don’t rely on luck, if there is at least one percent out of a hundred that an accident can happen, then you need to take measures, especially now you have less warm weather there, I think the riser will be turned off without problems
They will turn it off, but they will also take money for it, but in the summer I can do it myself.
By the way, it’s up to you to decide, there’s also a problem with aluminum batteries, it’s not recommended to put bimetal on them .. what kind of radiator company is this, if the faucets are included and the radiators are like that
And if you change the taps, do you also need to unscrew the old American ones from the battery and screw in new ones, or can you leave the old ones?
Hey.. tell me the experts on this issue.
possible but not advisable, even if the taps are the same
Good afternoon everyone. The situation is like that of a topicstarter. I close the batteries, because It’s too hot, the taps are Bugatti, installed only in the fall, before heating. season. I close only the top tap of the two. When leaving, I decided to open the taps, one leaked, flowing from under the lamb, only when opening and closing. In extreme positions it does not flow. Is there anything I can do besides replacing the faucet? (It’s new, bastard, 750 rubles per piece, and even then repairs are underway.)
Alexander_B wrote: Is there anything I can do besides replacing the faucet? (It’s new, bastard, 750 rubles per piece, and even then repairs are underway.)
If there is a nut on the rod, you can tighten it a little until the leak is eliminated. This is a normal situation. Even if you can’t fix the leak, leave it like that for the heating season, then change it in the summer when the water is turned off.
Alexander_B wrote: Should I change the faucet anyway or not? Those. Is it already discarded or will it work?
It is necessary to replace it only in one case: if it turns out that the valves are fake, or the leak cannot be eliminated by tightening the nut (which is the same thing: what kind of design is this for the stem seal that does not allow itself to be tightened?). But then everyone is a replacement.
Correct check of radiators before the heating season
Battery checks should be carried out in the summer. Immediately after the heating season, it is recommended to perform pressure testing. To do this, increase the hydraulic pressure in order to identify weak points. If leaks are detected, they are repaired.
Checking radiators should consist of several stages:
- Thorough external cleaning of radiators . Dirty batteries weaken the system and cause unpleasant odors. In addition, uncleaned batteries can become sources of harmful microorganisms that can bring illness into the home. When servicing equipment, detergents should be used.
- Cleaning the batteries inside . To do this, you can use dust brushes with a long handle. You can buy periscopic devices on the market to get to the most inconvenient corners. It is advisable to carry out internal cleaning at least every 5-7 years.
- Adding water . When the radiators are already clean, you can begin ventilating the heating equipment. During downtime, a large number of air pockets could appear that block water circulation. The air should be completely expelled from the system.
Poll: Do you carry out annual inspection and pressure testing of your heating system?
Battery leaks in heating systems occur quite often. You always need to be prepared for this. Scheduled maintenance of the heating system guarantees uninterrupted operation for a long time. But it’s still better to always play it safe and keep the necessary tools and supplies at home in case of breakthroughs. The equipment must be monitored at all times to avoid unpleasant consequences.
General information
There are two types of shut-off valves with a ball mechanism:
Product repairability
The all-welded body, as you might guess, cannot be repaired and, in the event of a malfunction, is completely replaced.
But a faucet consisting of several parts with a ball mechanism is not difficult to repair.
Enough to know:
- housing design
- design features
- crane disassembly sequence
Before you begin troubleshooting and disassembling the structure, the first thing you need to do is turn off the water. Drain off the remaining liquid.
Expert advice
Here are some recommendations that will allow you not only to carry out the work quickly and efficiently, but also to choose a reliable mixer that will work for a long time. You need to remember the following:
- Before buying a mixer, you should read reviews from people on thematic resources. There you can find out which companies' products are reliable and which models are better not to purchase.
- You should not buy models from the most budget segment; most often they do not last long. You can also compare products by weight: the heavier it is, the better the quality of the metal used.
- It is best to purchase a set of seals along with the mixer, if ready-made sets are available. This will allow for quick repairs in most cases.
- Be sure to install a filter at the water supply inlet to the house. Even the simplest option of rough cleaning significantly extends the service life of the ball valve, since contaminants do not enter the system.
- It is best to conduct a preventive inspection and replace some components at the first sign of malfunction. For example, the faucet may begin to move much more tightly or, conversely, the lever will turn too freely. Also a sign of a problem are extraneous noises or difficulty setting the appropriate temperature if everything was fine before.
- To avoid scratching the nut when unscrewing with a spanner, it is worth placing a rag, this will protect the chrome coating.
- After turning off the inlet tap, drain the remaining water from the system. When disassembling, use a rag, as some liquid always spills.